background image

The Control Panel      

1-17

5. If you want to print all the adjustment patterns, press the 

Enter

 button. If you want to print a single adjustment pattern, 

press the 

+

 or 

-

 button until the pattern number (

#1

#2

#3

...) 

that you want to adjust appears. Then press the 

Enter

 button. 

The printer starts printing all the adjustment patterns or the 
selected pattern.

Note:

It takes 7 minutes or less to print all the adjustment patterns. Use 
of 0.5 m roll paper is necessary.

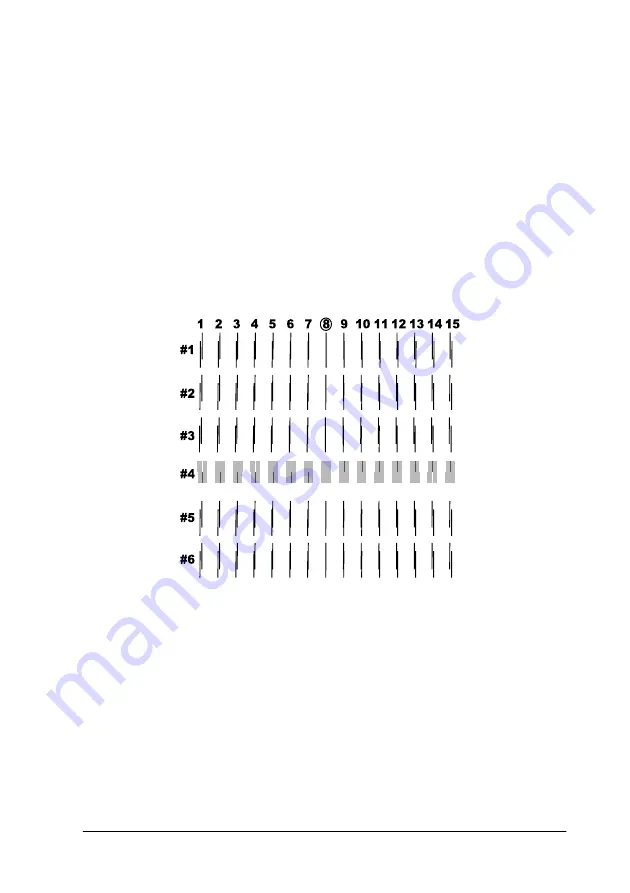
Head alignment pattern example:

6. After printing, the pattern number and current set number 

are displayed (for example, 

#1 = 4*

). Select the set that has 

the smallest gaps, then press the 

+

 or 

-

 button to display the 

number for that set.

Note:

If set 8 shows the smallest gaps out of all the printed patterns, the 
print heads are aligned. Press the 

Pause

 button to exit SelecType 

mode.

Summary of Contents for Stylus Pro 7500

Page 1: ...ting brackets roll paper cover paper insertion slot paper set lever control panel ink cartridge compartment lower cover paper guides guide track optional interface card slot cover parallel interface connector USB interface connector AC inlet ...

Page 2: ... 2 ...

Page 3: ...ION s operating and maintenance instructions SEIKO EPSON CORPORATION shall not be liable against any damages or problems arising from the use of any options or any consumable products other than those designated as Original Epson Products or Epson Approved Products by SEIKO EPSON CORPORATION EPSON and EPSON ESC P are registered trademarks and EPSON ESC P 2 is a trademark of SEIKO EPSON CORPORATION...

Page 4: ... 2 ...

Page 5: ... maintenance mode 1 23 Items 1 23 Hex dump 1 23 Language 1 24 MW7 1 24 Chapter 2 Printer Software Printer Software Introduction 2 2 Accessing the Printer Software 2 2 Accessing the printer software for Windows 2 2 Accessing the printer software for Macintosh 2 3 Using the Printer Driver 2 4 Making the Media Type setting 2 4 Using the Automatic PhotoEnhance Custom and Advanced settings 2 5 Adjustin...

Page 6: ...Print Job Management Checking Printer and Print Job Status for Windows 3 1 Using the Progress Meter 3 1 Using the EPSON Spool Manager 3 2 Using EPSON Status Monitor 3 3 3 Checking Printer and Print Job Status for Macintosh 3 7 Using the EPSON StatusMonitor 3 7 Making Configuration Settings 3 8 Using EPSON Monitor3 3 9 Increasing the Print Speed Windows only 3 14 General tips 3 14 Using Speed Progr...

Page 7: ... 4 22 Chapter 5 Maintenance and Transportation Replacing Ink Cartridges 5 1 Replacing the Paper Cutter 5 5 Cleaning the Printer 5 8 If you have not used your printer for a long time 5 10 Transporting the Printer 5 10 A long distance 5 10 A short distance 5 10 Setting up the printer after transporting it 5 15 Chapter 6 Troubleshooting Printer Stops Printing Unexpectedly 6 2 Head cleaning ink chargi...

Page 8: ... colors 6 13 Faint printout or gaps 6 13 Blurry or smeared printout 6 14 Color Documents Print in Black Only 6 15 Printing Could be Faster 6 15 Roll Paper Cannot be Cut 6 16 Paper Feed or Paper Jam Problems Occur Frequently 6 16 Roll Paper does not Eject Properly 6 17 When feeding paper forward with the optional Stand 6 18 Clearing Paper Jams 6 18 Correcting USB Problems 6 20 Make sure your comput...

Page 9: ...e Specifications A 13 Parallel interface A 14 USB interface A 16 Options and Consumable Products A 17 Options A 17 Consumable products A 18 EPSON special media A 19 Appendix B Contacting Customer Support Contacting Customer Support B 2 For Users in the United Kingdom and the Republic of IrelandB 2 For Users in Australia B 4 For Users in Singapore B 5 For Users in Hong Kong B 6 Glossary SelecType M...

Page 10: ... 8 ...

Page 11: ...hen to use SelecType 1 7 Basic SelecType setting procedure 1 7 SelecType menus 1 9 Printing a nozzle check pattern 1 15 Performing the head alignment 1 16 Aligning the print heads 1 16 Setting the paper thickness 1 18 Printing a status sheet 1 21 Maintenance Mode 1 23 How to enter maintenance mode 1 23 Items 1 23 Hex dump 1 23 Language 1 24 MW7 1 24 ...

Page 12: ...utton while pressing and holding the Pause button to enter the maintenance mode See Maintenance Mode on page 23 Cleaning 3 Sec Print head cleaning is performed when pressed for 3 seconds Before cleaning make sure that thick paper is not loaded in the printer Pause Reset 3 Sec Stops printing temporarily Press a second time to resume printing Clears print data in the printer memory if pressed and he...

Page 13: ...Type mode a desired parameter can be selected from the selected item Parameters change in reverse order Cut Eject Enter When the Sheet light is on Ejects the cut sheet When the Roll Auto Cut light is on Feeds the roll paper before cutting it When the Roll Cutter Off light is on Feeds the roll paper to the guide on the platen When the Roll Cutter Off light is on and the Print Page Line is on Feeds ...

Page 14: ... occurred See Printer Stops Printing Unexpectedly on page 6 2 o Ink Out K The black ink is out or the black ink cartridge is not installed correctly f Ink Out K The black ink is low The black ink cartridge is nearly empty Obtain a replacement ink cartridge o Ink Out C The cyan ink is out or the cyan ink cartridge is not installed correctly f Ink Out C The cyan ink is low The cyan ink cartridge is ...

Page 15: ...Roll Auto Cut Auto Cut is selected The roll paper will be automatically cut after printing f Roll Auto Cut Roll paper is selected in the printer driver but Sheet is selected at the control panel o Roll Cutter Off Printing occurs continuously without cutting f Roll Cutter Off Roll paper is selected in the printer driver but Sheet is selected at the control panel o Sheet Sheet is selected Printing i...

Page 16: ...DGE You are replacing the ink cartridge s INK LOW Ink cartridge s is are nearly empty Replace the ink cartridge s indicated by the Ink Out light s When the ink cartridge s is are out printing stops Printing can be resumed after empty cartridge s have been replaced LOAD PAPER The paper set lever is down while loading paper When you load paper and pull the set lever up PRESS PAUSE BUTTON appears TUR...

Page 17: ...dcommandstotheprinterthat override SelecType settings If you are not getting the results you expect check your application software settings To see the current SelecType settings print a status sheet Basic SelecType setting procedure The following is the basic SelecType setting procedure 1 Enter SelecType mode Make sure that READY is displayed on the LCD panel then press the SelecType button The f...

Page 18: ...rinter exits SelecType mode and returns to READY status For example INIT PANEL EXEC Initializes the current panel settings to the factory set values 4 Select a parameter Press the or button to select a parameter for the item For example PAGE LINE OFF Note that the asterisk disappears This means that the selected parameter OFF is not yet stored as the current setting value To display the next item ...

Page 19: ...R STATUS MENU on page 1 13 You can see the firmware version total prints since delivery and ink cartridge parts life on the LCD Paper Configuration menu PAPER CONFIG MENU onpage 1 14 You can register the paper thickness and ink drying time and select the specified value Cutter Replacement menu CUTTER REPLACE MENU on page 1 14 Follow this menu when you replace the cutter For details see Replacing t...

Page 20: ...per The Print Page Line operation changes according to the Auto Cut settings as shown Note When the Sheet light is on the Print Page Line setting is not available Roll Auto Cut light Print Page Line Printer s Operation On On Prints page line on the right side only and cuts paper automatically after the print job On Off Cuts paper automatically after the print job Roll Cutter Off light Print Page L...

Page 21: ... PARA USB or optional OPTION PARA I F Parallel interface mode selection Select the parallel interface mode from compatible COMPAT and ECP If you are using a USB connection select COMPAT CODE PAGE Code page selection Select the code page from PC437 and PC850 ROLL MARG Roll paper margin selection Select margins for roll paper from 3 MM 15 MM and T B 15 MM Note The combination of Top Bottom 3 mm Left...

Page 22: ...print even if the paper width does not match the images and the printer may print off of paper PAPER ALIGN CHK Paper alignment check When you select ON the printer stops printing and PAPER NOT STRAIGHT appears on the printer s control panel if slippage has occurred and the paper was fed at an angle If OFF is selected the printer continues to print even if the paper was fed at an angle INIT PANEL P...

Page 23: ...check pattern printing using the utility included in the Software CD ROM shipped with the printer STATUS CHECK Status printing Prints the current SelecType status For details see Printing a status sheet on page 1 21 Printer Status menu PRINTER STATUS MENU This menu allows you to see the printer status from the LCD VERSION Firmware version Shows the firmware version INK LEFT K C M LC LM Y Remaining...

Page 24: ...etting The procedure for registering and recalling the paper thickness setting is described in Setting the paper thickness on page 1 18 Note When you are loading very thin paper set the Suction setting to LOW Otherwise the paper may not be ejected properly and paper error may occur Cutter Replacement menu CUTTER REPLACE MENU This menu enables you to replace the paper cutter For a detailed descript...

Page 25: ... is printed as shown below After printing the printer exits SelecType mode and returns to READY status Nozzle check pattern examples If you find that any segments are missing from the test lines in the pattern you need to clean the print heads Press the Cleaning button on the control panel for more than 3 seconds or access the Head Cleaning utility from the EPSON printer utilities in your software...

Page 26: ...t be possible 2 In SelecType mode press the SelecType button until HEAD ALIGNMENT MENU is displayed on the LCD panel 3 Press the Item button PAPER THICK STD appears When you want to print on EPSON media leave this setting as STD When you want to print on non EPSON media enter the thickness value of the paper in 0 1 mm increments by pressing the or button 4 Press the Enter button to register your v...

Page 27: ... patterns or the selected pattern Note It takes 7 minutes or less to print all the adjustment patterns Use of 0 5 m roll paper is necessary Head alignment pattern example 6 After printing the pattern number and current set number are displayed for example 1 4 Select the set that has the smallest gaps then press the or button to display the number for that set Note If set 8 shows the smallest gaps ...

Page 28: ...er and recall the settings you made see the following sections You can also register the ink drying time and suction setting for respective paper settings including STD To select the registered setting see Selecting the registered settings on page 1 21 Registering the settings To register the paper thickness and ink drying time settings follow the steps below 1 Load the paper you want to check and...

Page 29: ...es are aligned show the smallest gap and note the corresponding number 7 You may see Press the or button to select the number noted in step 6 Note The default value depends on the PAPER THICK value in the Head Alignment menu and is displayed as a PAPER THICK NO in the Paper Configuration menu as shown below 8 Press the Enter button to save the selected value 9 Press the Item button appears Press t...

Page 30: ...1 20 The Control Panel 11 Press the Item button appears Press the or button to select NORM or LOW Note When you are loading very thin paper set the Suction setting to LOW ...

Page 31: ...egistered number that you want to use Then press the Enter button 4 Press the Pause button to exit SelecType mode Printing a status sheet In SelecType mode a status sheet can be printed to see the current SelecType default values 1 Load paper as described in Using Roll Paper on page 4 3 or Using Cut Sheet Media on page 4 15 2 In SelecType mode press the SelecType button until is displayed 3 Press ...

Page 32: ...1 22 The Control Panel ...

Page 33: ...s Default value Hex dump Data received from the host can be printed out in hexadecimal numbers 1 Load paper into the printer 2 In maintenance mode press the Item button to display UMP 3 Press the Enter button The print data in the print buffer is printed with 16 byte hex data in the left column and corresponding ASCII characters in the right column Item Parameters HEX DUMP PRINT LANGUAGE ENGLISH F...

Page 34: ...press the Item button until LANGUAGE ENGLISH is displayed 2 If you want to change the language press the or button until a suitable language is displayed Example LANGUAGE FRENCH 3 Press the Enter button to set the language The printer exits the maintenance mode and messages on the control panel appear in the selected language MW7 MW7 is for test and a qualified service representative ...

Page 35: ...page 2 15 Using the Roll Paper Option 2 17 Previewing your printout 2 19 Using the Printer Utilities 2 21 Accessing the printer utilities 2 22 EPSON Status Monitor 3 EPSON StatusMonitor 2 23 Nozzle Check 2 23 Head Cleaning 2 24 Print Head Alignment 2 24 Printer and Option Information Windows only 2 24 Speed Progress Windows only 2 26 Configuration Macintosh only 2 27 Getting Information through On...

Page 36: ...nter Driver on page 2 4 For information on the printer utilities and how to access them see Using the Printer Utilities on page 2 21 Online help provides more information about the printer software See Getting Information through Online Help on page 2 28 Note The specific features available in the printer software vary depending on the version of Windows you are using Accessing the Printer Softwar...

Page 37: ...ows 98 right click your printer icon then click Properties For Windows NT 4 0 right click your printer icon then click Document Defaults For windows 2000 right click your printer icon then click Printing Preference The printer software window appears Note The specific features available in the printer software vary depending on the version of Windows you are using Accessing the printer software fo...

Page 38: ... printer Find your paper in the list below then select a corresponding Media Type setting For some kinds of paper you have several Media Type settings to choose from Media Type setting EPSON special media name Plain Paper Double Weight Matte Paper EPSON Doubleweight Matte Paper Glossy Paper Photo Weight EPSON Glossy Paper Photo Weight Premium Glossy Photo Paper EPSON Premium Glossy Photo Paper Pre...

Page 39: ...control over the printer driver as explained below Automatic mode The quickest and easiest way to start printing See Automatic mode on page 2 6 PhotoEnhance settings Lets you choose from a variety of image correction settings specially designed for photos See PhotoEnhance mode on page 2 7 Custom mode Choose from a list of ready made settings suited to the kind of document you want to print You can...

Page 40: ...tion and printable area onpage2 13and Fittingdocumentsontothepage onpage 2 15 Automatic mode When Automatic is selected on the Main menu for Windows or in the Print dialog box for Macintosh the printer driver takes care of all detailed settings based on the current Media Type and Ink settings To make the Ink setting click Color to print in color or Black to print in black and white or gray scale T...

Page 41: ...fy the settings on the printer driver s Paper menu or Layout menu PhotoEnhance mode The PhotoEnhance mode provide a variety of image correction settings that you can apply to your photo images before printing PhotoEnhance does not affect your original data Click PhotoEnhance on the Main menu for Windows or in the Print dialog box for Macintosh Selecting PhotoEnhance also enables the Digital Camera...

Page 42: ...n or images taken by a digital camera You can also create your own settings and add them to this list See Advanced settings on page 2 9 The Custom Settings list includes the following ready made settings Click the arrow on the right of the Custom Settings list Standard This setting provides standard image correction for most photos Try this first People This setting is best for photos of people Na...

Page 43: ...Type and Ink settings as they may be affected by the Custom setting you select See Making the Media Type setting on page 2 4 Advanced settings The Advanced settings give you complete control over your printing environment Use these settings to experiment with new printing ideas or to fine tune a range of print settings to meet your individual needs Once you are satisfied with your new settings you...

Page 44: ...Windows 95 and 98 The appearance of the Windows NT 4 0 and Windows 2000 printer driver screens differ only slightly 1 Click the Custom button on the Main menu for Windows or in the Print dialog box for Macintosh and then click Advanced The following dialog box appears Advanced menu for Windows ...

Page 45: ...ded For details see online help Note Some settings are enabled or disabled depending on the Media Type Ink and Print Quality settings you make 6 Click OK to apply your settings and return to the Main menu for Windows or Print dialog box for Macintosh If you want to return to the previous screen without applying your settings click Cancel To save your Advanced settings click Save Settings in the Ad...

Page 46: ... up to 16 characters for your settings in the Name box and click the Save button Your settings will be added to the Custom Settings list You can save up to 10 groups of settings You can select your saved group of settings from the Custom Settings list on the Main menu for Windows or in the Print dialog box for Macintosh ...

Page 47: ...gs list When you select your saved settings in the Custom Settings list be aware that making new settings for example Media Type and Ink settings may change your custom settings This may cause unexpected results in your printout If this happens reselect your saved settings and try printing again Adjusting page orientation and printable area You can adjust the page orientation and printable area on...

Page 48: ...2 14 Printer Software Paper menu for Windows Page Setup dialog box for Macintosh ...

Page 49: ...entation Use this setting to specify the direction of printing on the page Portrait vertical or Landscape horizontal If you need to print close to the bottom of the page select Rotate by 180 Printable area available only for Sheet Select Centered to position your printout at equal distances from the edges of the paper Reduce or Enlarge for Macintosh Lets you define the percentage you want to enlar...

Page 50: ...ze you select on the Paper menu Fit to Page Proportionally enlarges or reduces the size of your document to make it fit the paper size you select in the Output Paper Size list in the Reduce Enlarge box Custom Lets you define the percentage you want to enlarge or reduce an image Click the arrows next to the Scale to box to select a proportion from 10 to 650 ...

Page 51: ...e this function select the Fit to Page check box and select the paper size you loaded in the printer from the Output Paper Size list Using the Roll Paper Option When printing on roll paper you can choose from the following roll paper settings Auto Rotate Auto Cut Print Page Line and Save Roll Paper To access these settings open the Paper menu for Windows or the Page Setup dialog box for Macintosh ...

Page 52: ...r the Auto Rotate check box in the Page Setup dialog box for Macintosh This function is not available when Roll Paper Banner is selected from the Paper Source list Auto Cut When Auto Cut is selected the roll paper will automatically be cut after each print job Note If you use Cloth as an EPSON special media select Roll Cutter Off mode rather than Auto Cut mode To enable Auto Cut select the Auto Cu...

Page 53: ...save roll paper When this check box is selected the blank portion of the last page of your document is not fed through the printer This function is available only when Roll Paper Banner is selected from the Paper Source list Previewing your printout The Preview feature allows you to see how your document will appear before actually printing it Auto Cut Print Page Line Printer s Operation Selected ...

Page 54: ...ck Print to print the document or click Cancel to cancel printing For Macintosh Click the Preview icon button in the Print dialog box for Macintosh until the Print button changes into a Preview button Then click the Preview button The Preview dialog box appears and displays a preview of your document On the Preview dialog box click Print to print the document or click Cancel to cancel printing ...

Page 55: ...ween Print Preview and Save File by pressing the Preview icon button See online help for more information Using the Printer Utilities EPSON printer utilities allow you to check the current printer status and perform some printer maintenance from your screen ...

Page 56: ...ities click the Utility tab in the printer software window then click the button of the utility you want to use Note The letter in parentheses after the utility name indicates the shortcut key for that utility Press Alt and the letter on the keyboard to open that utility While printing is in progress pressing any of the utility buttons except the EPSON Status Monitor 3 button may mar your printout...

Page 57: ... mar your printouts EPSON Status Monitor 3 EPSON StatusMonitor You can check the occurrence of errors and the level of ink remaining for each ink cartridge using the EPSON Status Monitor 3 or EPSON StatusMonitor utilities depending on your system software Nozzle Check To find out if nozzles are delivering ink properly you can print a nozzle check pattern If the nozzles are not delivering ink prope...

Page 58: ...of vertical lines appears in the head alignment test pattern or when banding is evident in your printouts Note Make sure that the printer is finished printing before performing the Nozzle Check Head Cleaning or Print Head Alignment utilities Otherwise your printout may be marred Printer and Option Information Windows only This utility allows the printer driver to confirm printer configuration info...

Page 59: ...lly 1 Loadpaperintheprinter thenclicktheSettings Sheetbutton inthe PrinterandOptionInformationdialogbox Information on your printer and options is printed out similar to that below Printer ID 48 48 50 52 50 52 2 Make sure the information in the utility matches the printed information If not adjust the information on the screen to match the printed information 3 Click OK to save your settings and e...

Page 60: ...ing the printer software for Windows on page 2 2 then click the Utility tab The available settings are as follows High Speed Copies To print multiple copies of your document faster select High Speed Copies Show Progress Meter To monitor the progress of your print job select Show Progress Meter EPSON Printer Port For Windows 95 and 98 only To speed up the data transfer rate to EPSON printers select...

Page 61: ...pe requires fewer resources than EMF so some problems Insufficient Memory Disk Space to Print Slow print speed etc can be solved by selecting the Always spool RAW datatype check box When spooling RAW datatype print progress as displayed by the Progress Meter may differ from actual printing progress Monitoring Preferences Click this button to open the Monitoring Preferences dialog box where you can...

Page 62: ...ing help from your Windows application By accessing the printer software the printer driver and utility menus appear in the printer software window Click the Help button at the bottom of the Main Paper Layout and Utility menus for help related to the items on those menus Also you can get specific help related to any item on a menu by right clicking the item then clicking the What s This prompt Acc...

Page 63: ...s 2000 When you update the printer driver in Windows NT 4 0 and Windows 2000 please be sure to uninstall the previous printer driver before you install the new driver Installing over the existing printer driver results in a failure to update To uninstall theprinterdriver double clicktheAdd Remove Programs icon in the Windows Control Panel The Add Remove Programs properties dialog box appears Selec...

Page 64: ...nd EPSON Status Monitor 3 from the software list Click Add Remove If you are uninstalling printer software a dialog box appears and you need to select the printer icon for the driver you want to uninstall 4 Follow the instructions on the screen to uninstall the software ...

Page 65: ...r and Print Job Status for Windows 3 1 Using the Progress Meter 3 1 Using the EPSON Spool Manager 3 2 Using EPSON Status Monitor 3 3 3 Checking Printer and Print Job Status for Windows Using the Progress Meter When you send a print job to the printer the Progress Meter opens as shown in the illustration below ...

Page 66: ...ress on page 15 for more information EPSON Printing Tips Tips for getting the most out of your EPSON printer driver appear at the bottom of the Progress Meter window A new tip appears every 30 seconds For more details on a displayed tip click the Details button Using the EPSON Spool Manager The EPSON Spool Manager is similar to Windows Print Manager If it receives two or more print jobs at one tim...

Page 67: ...ON Status Monitor 3 displays detailed information on the printer status Note Before using EPSON Status Monitor 3 be sure to read its READ ME file To open this file click Start point to Programs and then EPSON or EPSON Printers then click EPSON Stylus Pro 7500 Read me Accessing EPSON Status Monitor 3 There are two ways to access EPSON Status Monitor 3 Double click the printer shaped shortcut icon o...

Page 68: ... following information Current Status EPSON Status Monitor 3 provides you with detailed printer status information a graphic display and status messages If the ink runs low or out the How to button appears in the EPSON Status Monitor 3 window Clicking How to displays cartridge replacement instructions Ink Levels EPSON Status Monitor 3 provides a graphic display of the amount of ink remaining ...

Page 69: ...ture of the EPSON Status Monitor 3 Follow the steps below 1 Open the printer software for your printer as described in Accessing the printer software for Windows on page 2 2 2 Click the Utility tab then click the Speed Progress button The Speed Progress dialog box appears 3 Click the Monitoring Preferences button The Monitoring Preferences dialog box appears ...

Page 70: ...otification Select Shortcut Icon Select the Shortcut Icon check box to have a shortcut icon placed in your Windows taskbar Clicking the shortcut icon in the taskbar will open EPSON Status Monitor 3 To select which icon will be displayed click the icon you prefer from the choices given your selection will be shown at the right Allow monitoring of shared printers When this check box is selected a sh...

Page 71: ...message You can also use this utility to check ink levels before printing To use the StatusMonitor click the EPSON StatusMonitor button in the Utility dialog box The following dialog box appears To access the Utility dialog box see For Macintosh on page 2 23 The StatusMonitor informs you of the amount of ink remaining at the time the StatusMonitor was opened To update ink level information click t...

Page 72: ...2 23 The Configuration Settings dialog box appears as below The options in this dialog box allow you to make the following settings Error notification Choose how the StatusMonitor notifies you in case of an error Warning Choose how the StatusMonitor notifies you if a warning message becomes necessary Temporary Spool folder Choose the folder for temporary spooling of print data Temporary High Speed...

Page 73: ...cs data is sent by the computer to the printer in rectangular bands which prevents the printer from having to reconstruct an entire image in memory before printing it Selecting this check box will make the computer temporarily store the image data on its hard drive and then send it to the printer as a whole to prevent banding in the printed image Check for errors before starting to print Select th...

Page 74: ...ialog box the same as or similar to the one below Note You can also open EPSON Monitor3 by double clicking the EPSON Monitor3 icon in the Extensions folder Managing print jobs with EPSON Monitor3 With EPSON Monitor3 you can manage print jobs as follows Use the buttons below to hold resume and delete print jobs for documents selected in the dialog box First select the appropriate print job then cli...

Page 75: ...ng Double click a file in the list to preview it This function is disabled when you are printing the ESC P command file Double click Copies to change the number of copies to print out Resume Resumes printing Delete Stops printing and deletes print job from the print queue Print Head Cleaning Starts the Print Head Cleaning utility Status Monitor Starts the EPSON StatusMonitor which displays the amo...

Page 76: ...log box displays detailed information on a selected document s printer driver settings Changing the priority of print jobs To change the priority of print jobs in a print queue follow the steps below Note You can also change the priority of print jobs whose print times were previously set in the printer driver s Background Printing dialog box ...

Page 77: ... the name of the document whose priority you wish to change in the Document Name column 3 From the Priority list select Urgent Normal Hold or Print Time Note If you select Print Time a dialog box appears where you can specify the date and time that the document will print Make sure that your printer and computer are turned on at the time you specify ...

Page 78: ...faster print speed Even if your document requires the highest print quality and extensive use of color it may still be possible to optimize the print speed by adjusting other printing conditions Keep in mind that changing some conditions to increase the print speed may also lower print quality The following table shows the factors that inversely affect print speed and print quality Increasing one ...

Page 79: ...he printer software for Windows on page 2 2 then click the Utility tab Print speed Faster Slower Printer driver menu Printer driver settings Ink Black Color Advanced dialog box Main menu Flip Horizontal Off On Advanced dialog box Data characteristics Variety of colors Grayscale Full color Hardware resources System speed Fast Slow HDD free space Large Small Memory free space Large Small Software st...

Page 80: ...s check box to turn on high speed printing for multiple copies This speeds up printing by using your hard disk space as a cache when printing multiple copies of your document EPSON Printer Port For Windows 95 and 98 only Select this check box to enable the EPSON printer port which is optimized for EPSON printers instead of the Windows default printer port This speeds up the data transfer rate to E...

Page 81: ...Message Action High Speed DMA Transfer enabled DMA transfer is already enabled Click OK to close the dialog box For higher data transfer rates use DMA Transfer Follow the steps below this table toenable DMA transfer No message Your system s parallel port setting does not allow DMA transfer However if you change the parallel port setting to ECP or enhance using your computer s BIOS Setup program yo...

Page 82: ...e Automatic Setting Write down the Input Output Range settings shown in the Resource settings box 5 Select a basic configuration setting from the Setting based on list that uses the same Input Output Range settings as those you wrote down in step 4 and make sure the Direct Memory Access channel and Interrupt Request numbers are allocated and displayed Confirm also that the Conflicting device list ...

Page 83: ...uld only be made by experienced personnel with administrative privileges If your computer has a parallel port which supports ECP mode you can make certain print speed settings in the Port Configuration dialog box Before making settings make sure that the ECP mode has been selected in your computer settings For details about ECP mode see your computer manual To access the Port Configuration dialog ...

Page 84: ...ng IRQ and DMA settings here may help you speed up printing Input the same configuration numbers for IRQ and DMA which you have made with your expansion board See your computer manual to determine the settings for IRQ and DMA Use DMA transfer Using DMA transfer to send print data to the computer may help you speed up printing If the Use DMA Transfer check box appears dimmed you first need to enabl...

Page 85: ...r or printing page lines 4 13 Using Cut Sheet Media 4 17 Loading cut sheet media longer than 483 mm long edge of Super A3 B size 4 17 Loading cut sheets with a length of 483 mm long edge of Super A3 B or shorter 4 19 Printing on thick paper 0 5 to 1 6 mm 4 21 Setting the Paper Basket 4 23 When feeding paper forward 4 23 When feeding paper backward 4 24 Notes for Special Media and Other Media Altho...

Page 86: ...SON special media see EPSON special media on page 19 Note Use EPSON special media at normal room temperature and humidity for best results Read the enclosed instruction sheets before loading EPSON special media Storing EPSON special media Store unused media in its original plastic bag and outer package to avoid moisture problems Avoid storing the media in places exposed to high temperature humidit...

Page 87: ...w To remove roll paper or empty roll paper cores see Removing the roll paper from the spindle on page 4 4 1 Slide the movable flange off the end of the spindle 2 Place the roll paper on a flat surface so that the paper unwinds in the direction shown below 3 Slide the roll paper onto the spindle until it fixes into place on the fixed flange ...

Page 88: ...e the paper loaded spindle down on a flat surface 2 Slide the movable flange off the end of the spindle c Caution When removing the movable flange from the spindle do not hold the spindle vertically and tap the end on the floor Doing so could damage the spindle 3 Remove the roll paper from the spindle 4 Attach a new roll paper to the spindle see Attaching the roll paper to the spindle on page 4 3 ...

Page 89: ...ndle to the printer follow the steps below When you remove the spindle from the printer clear the roll paper from the paper insertion slot and perform the following steps in reverse order Note When not printing on the roll paper keep it wound up with the paper belt to avoid paper jams See Using the roll paper belt on page 4 12 1 Open the roll paper cover 2 Make sure that the movable flange is fixe...

Page 90: ...e is on the right side Then place the spindle on the groove on top of the printer once Note To mount the spindle correctly match the color on the end of the spindle with the mounting bracket 4 Lift the spindle again then place it on the mounting brackets inside the printer ...

Page 91: ... 4 7 to load the paper Loading the roll paper To load roll paper follow the steps below 1 Make sure that the printer is on 2 Press the Paper Source button repeatedly until the Roll Auto Cut light or Roll Cutter Off light comes on c Caution Depending on the kind of paper used automatic cutting may not be possible ...

Page 92: ... Pause light are not flashing then push the paper set lever all the way down appears on the LCD panel c Caution Do not move the paper set lever while the Operate light or Pause light is flashing Doing so may damage the printer 4 Open the roll paper cover ...

Page 93: ... paper insertion slot 6 Pull the paper down a small way through the paper insertion slot Note If the bottom edge of the paper does not come out below the lower cover open the lower cover by pulling down on the handles then pull the paper through ...

Page 94: ... line with the rows of punch holes 8 Pull the paperset leverall the wayup then close the roll paper cover appears on the LCD panel Note If the Roll Auto Cut light is on and the bottom edge of the roll paper was not cut properly after the previous print job press the Paper Feed button to position the paper in place for cutting marked with scissors Then press the Cut Eject button to recut the edge ...

Page 95: ...osition READY appears on the LCD panel 10 Extend the two paper guides out from the lower printer 11 Make the printer driver settings see Accessing the Printer Software on page 2 2 then send a print job from the computer The printer starts printing Note Make sure that the Paper Source setting in the printer driver matches the paper loaded in the printer 12 After you finish printing you may need to ...

Page 96: ... automatically or prints page lines around the document according to your settings You can make these settings using the control panel or printer software Note Software usually overrides control panel settings Use your software to make settings whenever possible Using the Auto Cut setting When you want the roll paper to be cut automatically after your print job use the Auto Cut setting To make the...

Page 97: ...eatedly until the Roll Auto Cut light comes on 2 Press the Cut Eject button The roll paper is cut Cutting the roll paper at other times 1 Press the Paper Feed button to position the paper in place for cutting marked with scissors 2 Press the Paper Source button repeatedly until the Roll Auto Cut light comes on 3 Press the Cut Eject button The roll paper is cut Cutting cloth manually To cut cloth m...

Page 98: ...r while using the utility cutter Keep the cutter out of the reach of children 4 After cutting press the Pause button to go back to online mode Note When the printer is in online mode after the cutting the media is not sent to the print position automatically Printing page lines If you want to print continuously on roll paper first then cut the page yourself after you finish printing use the Print ...

Page 99: ...per 0 5 mm to 1 5 mm on page 4 19 c Caution As much as possible keep your fingers off the printable surface of the media as fingerprints may reduce printout quality 1 Make sure that the printer is on and the roll paper cover is closed 2 Press the Paper Source button repeatedly until the Sheet light comes on 3 Make sure the Operate light and Pause light are not flashing then push the paper set leve...

Page 100: ... into the paper insertion slot until it comes out below Make sure that the right and bottom edges of the sheet are straight and in line with the rows of punch holes 5 Pull the paper set lever all the way up appears on the LCD panel 6 Press the Pause button The print heads move and the sheet automatically feeds into the printing position appears on the LCD panel ...

Page 101: ...printing is complete the printer supports the printed media and is displayed on the LCD panel To remove the paper hold it while pressing the Paper Feed button The paper can be removed from the printer Loading cut sheets with a length of 483 mm long edge of Super A3 B or shorter To load cut sheet media with a length of 483 mm or shorter follow the steps below c Caution As much as possible keep your...

Page 102: ...nd the sheet automatically feeds into the printing position appears on the LCD panel 5 Make the printer driver settings see Accessing the Printer Software on page 2 2 then send a print job from the computer The printer starts printing Note Make sure that the Paper Source setting in the printer driver matches the paper loaded in the printer 6 When printing is complete the printer supports the print...

Page 103: ...contact your supplier for more information 1 Set the paper basket forward if you have installed the optional Stand See When feeding paper forward on page 4 21 2 Make sure that the printer is on 3 Press the Paper Source button repeatedly until the Sheet light comes on 4 Make sure that the Operate light and Pause light are not flashing then push the paper set lever all the way down appears on the LC...

Page 104: ...behind the open lower cover Make sure that the right edge is straight and in line with the right edge of the scale on the roll paper cover 6 Pull the paper set lever all the way up then close the lower cover appears on the LCD panel 7 Press the Pause button Then follow the same procedure as for other cut sheets ...

Page 105: ...n use the paper basket for both roll paper and cut sheet media To install the Stand see the Assembly and Setup Instructions Note When you print on thick paper set the paper basket forward to prevent your printouts from becoming damaged See the next section When feeding paper forward on page 4 21 When feeding paper forward Pull down the paper basket unit rod so that it rests on the floor ...

Page 106: ...4 22 Paper Handling When feeding paper backward Lift the paper basket rod unit all the way up Note If the parts shown below loosen tighten them ...

Page 107: ...es They flash when a cartridge is low and remain steady when a cartridge is empty The LCD panel also displays or Note Even if only one ink cartridge is empty the printer cannot print If you remove an ink cartridge and then reinstall it the printer cannot determine the correct level of ink remaining The corresponding Ink Out light may not flash to warn you even when the cartridge is almost out of i...

Page 108: ...tridge installed in the printer until you are ready to replace it with a new one 1 Make sure the printer is on Determine which cartridge needs to be replaced as indicated by the Ink Out light 2 Open the ink compartment cover 3 Carefully pull the empty cartridge straight out of the printer appears on the LCD panel ...

Page 109: ...into your eyes flush them immediately with water 4 Make sure the replacement ink cartridge is the correct color and remove it from the package w Warning Do not shake cartridges that have been installed previously Doing so may cause ink to leak out c Caution For best results shake the ink cartridge gently before installing it ...

Page 110: ...nk cartridge into the slot until the corresponding Ink Out light turns off Note There is a protection system against improper cartridge insertion If you cannot insert the ink cartridge smoothly the type of cartridge may be incorrect Check the package and production code 6 Close the ink compartment cover The printer returns to the previous status ...

Page 111: ...to move the paper cutter holder using the control panel settings w Warning Be careful not to cut yourself while replacing the paper cutter To replace the paper cutter follow the steps below 1 Make sure that the printer is on 2 Press and hold the SelecType button for about five seconds until appears on the LCD panel Then press the Enter button appears and the paper cutter holder moves to the replac...

Page 112: ...e lower cover by pulling down on the handles 4 When appears on the LCD panel push in the side pin while turning the paper cutter cover to the right to open the casing 5 Slowly take your finger off the side pin The paper cutter raises so it can be removed Note Be careful not to let the cutter or the spring coil pop out of the casing ...

Page 113: ... the old cutter from the printer 7 Remove the new paper cutter from its package 8 Make sure the spring coil is inside the cutter holder If necessary reinstall the coil 9 Fully insert the new cutter into the paper cutter holder in the direction shown below ...

Page 114: ...ADY appears on the LCD panel Paper cutter replacement is complete After replacing the paper cutter the print head nozzles may be clogged Perform a nozzle check and clean the print heads See your Startup Guide Cleaning the Printer To keep your printer operating at its best you should clean it thoroughly several times a year 1 Make sure the printer is turned off and all the lights are off Then unplu...

Page 115: ... the ink cartridge compartment closed to prevent water from getting inside 7 If the inside of the printer accidentally gets soiled with ink wipe it off with a damp cloth 8 To wash the paper basket remove the shafts from the basket and wash them with mild detergent w Warning Be careful not to touch the gears inside the printer c Caution Never use alcohol or thinners to clean the printer these chemi...

Page 116: ...ransporttheprinter followtheinstructions described in this section A long distance When you need to transport your printer a long distance the printer should be repacked using the original box and packing materials Contact your dealer for assistance A short distance When you need to move the printer a short distance follow the steps below If you move the printer using the casters on the optional S...

Page 117: ...tall the ink cartridges as soon as possible then check the printing performance If you reinstall the ink cartridges you have removed above the printer cannot determine the correct level of ink remaining The corresponding Ink Out light may not flash to warn you even when the cartridge is almost out of ink After transporting the printer install new ink cartridges 4 Make sure that the paper set lever...

Page 118: ...sassemble your printer and optional Stand and transfer them separately continue with the step 6 6 Have two or more people lift the printer using the hand grips and keep the printer level while moving it The printer unit weighs approximately 43 5 kg 95 8 lb and should be lifted carefully ...

Page 119: ... and washers from the left and right sides and keep them in a safe place 8 Have two or more people lift the printer unit off of the optional Stand using the hand grips The printer unit weighs approximately 43 5 kg 95 8 lb and should be lifted carefully 9 Keep the printer level while moving it ...

Page 120: ...youwanttotransportthe printeraveryshortdistance such as within the same room you can slide the printer on its casters c Caution Do not slide the printer on angled or uneven surfaces 1 Make sure that the power cord interface cable roll paper spindle and sheet media are removed and the roll paper cover and lower cover are closed Note Ifyou onlyneedto transport your printer a very short distance usin...

Page 121: ...hen you set up the printer again see the Assembly and Setup Instructions and note the following points After transporting the printer EPSON recommends you perform a nozzle check clean the print heads and realign the print heads to ensure print quality See your Startup Guide EPSON recommends installing new ink cartridges after transporting the printer If you reinstall the cartridges you removed bef...

Page 122: ...5 16 Maintenance and Transportation ...

Page 123: ...n t have enough available memory Macintosh 6 8 The printer sounds like it is printing but nothing prints 6 8 Printouts are Not What You Expected 6 9 Incorrect or garbled characters 6 9 Incorrect margins 6 9 Inverted image 6 10 Blank pages are printed 6 10 Printed color differs from the color on the screen 6 10 Ruled lines shift 6 11 Printouts have smears on bottom edges 6 11 Print Quality Could be...

Page 124: ... 23 Printer Stops Printing Unexpectedly If the printer stops printing unexpectedly try the solutions listed for the corresponding problem Head cleaning ink charging or ink drying is in progress Check to see if the Pause light is flashing If so the printer is in the process of head cleaning ink charging or ink drying During head cleaning and ink charging WAIT is displayed on the LCD panel During in...

Page 125: ...pressing the Pause button for 3 seconds then load paper and send the job again LOAD ROLL PAPER o Paper Out f Roll Auto Cut f Roll Cutter Off o Sheet Roll paper is selected in the printer driver but Sheet is selected at the control panel Make sure the paper source setting in the printer driver is the same as the control panel LOAD SHEET PAPER o Paper Out f Sheet o Roll Auto Cut o Roll Cutter Off Sh...

Page 126: ...le Reload paper See Paper Feed or Paper Jam Problems Occur Frequently on page 6 16 RELOAD PAPER f Paper Out Paper couldnot be reversed into the printing position Remove then reload the paper so that the right and bottom edges are straight and in line with the rows of punch holes on the printer See Paper Handling Paper is set out of the printable area Paper is set out of the horizontal cutting area...

Page 127: ...lecType mode When an error or status message appears again clear and print a test pattern again INK OUT o Y LM M LC C K Ink cartridge s is are empty Replace the ink cartridge s as indicated by the lights See Replacing Ink Cartridges on page 5 1 NO INK CARTRIDGE o Y LM M LC C K Ink cartridge s is are not installed Install ink cartridge s as indicated by the lights See Replacing Ink Cartridges on pa...

Page 128: ...matches the rated voltage label on the printer If not turn off the power and unplug the power cord immediately Contact EPSON for assistance See Contacting Customer Support on page B 2 c Caution If the supplied voltage and rated voltage do not match do not plug the printer back inagain Doing so could damage the printer The Printer Prints Nothing The printer is not connected to the computer correctl...

Page 129: ...iver if it is not installed already and follow the steps below to select your EPSON printer as the default printer For Windows 1 Click Start point to Settings and select Printers 2 Right click EPSON Stylus Pro 7500 in the Printers window 3 Select Set As Default then close the Printers window For Macintosh 1 Click Apple menu and select Chooser If the EPSON STYLUS PRO 7500 printer icon can be seen t...

Page 130: ...sn t have enough available memory Macintosh To increase the available memory in your Macintosh select Control Panel from the Apple menu and double click the Memory icon You can increase the size of RAM cache or virtual memory to increase total available memory Also quit all unnecessary applications The printer sounds like it is printing but nothing prints Try one or more of these solutions Run the...

Page 131: ...printer and computer Make sure the printer s interface cable is plugged in securely Make sure the running application is for Windows 95 98 NT 4 0 Windows 2000 or Macintosh Make sure the EPSON STYLUS PRO 7500 printer driver is selected If you are using Windows NT 4 0 try to install the EPSON Printer Port Click Start point to Programs then point to EPSON Printers and point to EPSON Printer Port Unin...

Page 132: ...nstructions see the printer driver s online help Blank pages are printed Try one or more of these solutions Select your printer as the default printer in Windows See Your EPSON printer is not selected as the default printer on page 6 7 For Windows check the settings in the Paper menu Make sure they are correct for the paper size you are using For Macintosh check the settings in the Page Setup dial...

Page 133: ...e Advanced dialog box Do not use plain paper The color of printout images can differ with media Use the appropriate paper for your color printing requirements Ruled lines shift Make sure the print heads are not misaligned When bi directional printing is made ruled lines will shift if the print heads are misaligned Run the Print Head Alignment utility See Using the Printer Utilities on page 2 21 Pr...

Page 134: ...ect for the paper you re using For Macintosh check the Media Type setting in the Print dialog box Make sure it is correct for the paper you re using Make sure the printable side of the paper is face up Run the Head Cleaning utility to clear any clogged ink nozzles See Using the Printer Utilities on page 2 21 Check the Ink Out lights If necessary replace ink cartridges See Replacing Ink Cartridges ...

Page 135: ...ee Replacing Ink Cartridges on page 5 1 Adjust the color settings in your application software or your printer driver See your application s documentation Faint printout or gaps Try one or more of these solutions Make sure that the ink cartridges do not exceed the expiration date For Windows check the Media Type setting in the Main menu Make sure it is correct for the paper you re using For Macint...

Page 136: ...sh check the Media Type setting in the Print dialog box Make sure it is correct for the paper you re using If the paper you re using is not supported by the printer driver setthepaperthickness usingtheSelecType setting See SelecType Settings on page 1 7 Make sure your paper is dry and the printable side is face up Also make sure you are using the correct type of paper See Paper on page A 8 for spe...

Page 137: ...is set in the Main menu for Windows or Print dialog box for Macintosh Printing Could be Faster Try one or more of these solutions To increase print speed select the Automatic mode in the Main menu for Windows or in the Print dialog box for Macintosh and then move the slider towards Speed Do not run too many applications at the same time Close any applications you are not using Delete unnecessary f...

Page 138: ...g the Paper Cutter on page 5 5 Note If you use roll paper other than EPSON special media see the user documentation included with the paper or contact your supplier Paper Feed or Paper Jam Problems Occur Frequently Try one or more of these solutions Before loading paper and feeding it through the paper insertion slot make sure the roll paper is wound up firmly Position the bottom edge of the paper...

Page 139: ...Make sure that the platen gap setting matches your paper You can change the platen gap setting in the Printer Setting menu of SelecType mode See SelecType Settings on page 1 7 For paper other than EPSON s check the paper type selected in the Paper Configuration menu of SelecType mode See Setting the paper thickness on page 1 18 Roll Paper does not Eject Properly Ifyouareusingthe printeronthedesk r...

Page 140: ...feeding paper forward with the optional Stand Extend the two paper guides out from the lower printer Clearing Paper Jams To remove jammed paper follow these steps 1 If the roll paper is jammed cut it at the paper insertion slot ...

Page 141: ...wind the roll paper using the flange on the right If the sheet is jammed carefully pull down the jammed paper 4 When is displayed on the LCD panel press the Power button to turn the printer off and back on 5 Make sure that the Paper Out light is on and is displayed on the LCD panel To load paper see Using Roll Paper on page 4 3 or Using Cut Sheet Media on page 4 15 ...

Page 142: ...t heads move to the home position then turn off the printer c Caution If the print heads are not all the way to the right in the home position print quality may decline Correcting USB Problems Make sure your computer is a Windows 98 or 2000 pre installed model Your computer must be a Windows 98 or 2000 pre installed model You may not be able to install or run the USB Printer Driver on a computer w...

Page 143: ... device driver or the printer driver may be installed incorrectly Follow the steps below to check the installation and reinstall the drivers 1 Turn the printer on Plug the USB cable into the printer and the computer 2 Right click the My Computer icon on your desktop then click Properties 3 Click the Device Manager tab If your drivers are correctly installed EPSON USB Printer Devices should appear ...

Page 144: ...ces the USB printer device driver is not installed correctly If EPSON Stylus Pro 7500 appears the printer driver is not installed correctly If neither USB Printer nor EPSON Stylus Pro 7500 appears under Other devices click Refresh or unplug the USB cable from the printer then plug it into the printer again 4 Under Other devices click USB Printer or EPSON Stylus Pro 7500 then click Remove Then clic...

Page 145: ...able as described in System Requirements on page A 12 If you use a USB hub connect the printer to the first tier of the hub or connect the printer to the computer s USB port directly For PCs try reinstalling the USB printer device driver and the printer software First uninstall EPSON Printer Software usingthe Add RemovePrograms utilityin theControlPanel then uninstall EPSON USB Printer Devices Nex...

Page 146: ...ng Make sure that the PARA I F setting is COMPAT You can change this setting in the Printer Setting menu of SelecType mode See SelecType Settings on page 1 7 If this problem still occurs turn the printer off and back on ...

Page 147: ...al A 6 Initialization A 7 Safety approvals A 7 Paper A 8 Ink cartridges A 11 System Requirements A 12 For using your printer with a PC A 12 For using your printer with a Macintosh A 13 Interface Specifications A 13 Parallel interface A 14 USB interface A 16 Options and Consumable Products A 17 Options A 17 Consumable products A 18 EPSON special media A 19 ...

Page 148: ...inting method On demand ink jet Nozzle configuration Black 64 nozzles Color 64 nozzles 5 cyan magenta yellow lightcyan light magenta Character Pitch Printing Column 10 cpi 237 Horizontal resolution Printable width Available dots 360 dpi 604 mm 23 78 inches 8561 720 dpi 604 mm 23 78 inches 17123 1440 dpi 604 mm 23 78 inches 34246 ...

Page 149: ...paper and cut sheets Resolution Maximum 1440 720 dpi Print direction Bidirectional Control code ESC P Raster Line spacing 1 6 inch or programmable in 1 360 inch increments Paper feed speed 200 10 m seconds per 1 6 inch line RAM 10 MB A B L B R C ...

Page 150: ...e printed A For roll paper the minimum top margin is 3 0 mm 0 12 For cut sheets the minimum top margin is 3 0 mm 0 12 B L For roll paper the minimum left margin is 3 0 mm 0 12 For cut sheets the minimum left margin is 3 0 mm 0 12 B R For roll paper the minimum right margin is 3 0 mm 0 12 For cut sheets the minimum right margin is 3 0 mm 0 12 C For roll paper the minimum bottom margin is 3 0 mm 0 1...

Page 151: ...n Dimensions printing Width 1 100 mm 43 31 inches Depth 572 mm 22 52 inches Height 560 mm 22 05 inches Weight 43 5 kg 95 8 lb without the ink cartridges 120 V Model 220 240 V Model Input voltage range 90 to 132 V 198 to 264 V Rated frequency range 50 to 60 Hz Input frequency range 49 to 61 Hz Rated current 1 0 A 0 5 A Power consumption Approx 100 W ISO10561 Letter Pattern 15 W or less in standby m...

Page 152: ...Operational conditions temperature and humidity Temperature Operation Storage Transit 10 to 35 C 50 to 95 F 20 to 40 C 4 to 104 F 20 to 60 C 4 to 140 F 1 month at 40 C 104 F 120 hours at 60 C 140 F Humidity Operation Storage Transit 20 to 80 RH 20 to 85 RH 5 to 85 RH temperature C Humidity ...

Page 153: ...ization when the ESC initialize the printer command is received The print buffer is cleared The printer returns to the default condition last set Panel button initialization by pressing the Pause button on the control panel for 3 seconds or more Print head capping occurs Any paper loaded in the printer is ejected The input data buffer and print buffer are cleared The printer returns to the default...

Page 154: ...the quality of any non EPSON brand or type of paper Always test paper samples before purchasing large quantities or printing large jobs U S model FCC part 15 subpart B class B CSA C108 8 class B European model Directive 89 336 EEC EN 55022 CISPR Pub 22 class B EN 61000 3 2 EN 61000 3 3 EN 50082 1 IEC 60801 2 IEC 60801 3 IEC 60801 4 Australian model AS NZS 3548 class B ...

Page 155: ... 0 inches 11 0 to 1771 65 inches Internal diameter 2 inches Outer diameter 103 mm 4 06 inches maximum for standard optional 2 inch roll paper spindle 150 mm 5 90 inches maximum for optional 3 inch roll paper spindle Paper types Plain paper special papers distributed by EPSON Thickness for plain paper 0 08 to 0 5 mm 0 003 to 0 020 inches Weight for plain paper 64 g m 17 lb to 90 g m 24 lb ...

Page 156: ...3 B 329 483 mm A4 210 297 mm US D 22 34 inches US C 17 22 inches US B 11 17 inches Letter 8 5 11 inches Paper types Plain paper special papers distributed by EPSON Thickness for plain paper 0 08 to 0 11 mm 0 003 to 0 004 inches Weight for plain paper 64 g m 17 lb to 90 g m 24 lb Use paper under the following conditions Temperature 15 to 25 C 59 to 77 F Humidity 40 to 60 RH EPSON Photo Quality Glos...

Page 157: ...31 T483031 T482031 T481031 T485031 T484031 Print capacity Approx 28 pages A1 720 dpi 40 duty Approx 3 400 pages A4 360 dpi 5 duty Cartridge life Within 6 months after opening package at 25 C 77 F Temperature Storage uninstalled 30 to 40 C 22 to 104 F 1 month at 40 C 104 F Storage installed 20 to 40 C 4 to 104 F 1 month at 40 C 104 F Transit 30 to 60 C 22 to 140 F 1 month at 40 C 104 F 120 hours at...

Page 158: ...00 and a shielded twisted pair parallel cable If you want to connect your printer to a USB port you need a Windows 98 pre installed PC equipped with a USB port and a shielded USB cable Your computer dealer can help you update your system if it does not meet these requirements Minimum system Recommended system i486 25 MHz for Windows 95 and NT 4 0 i486 66 MHz for Windows 98 Pentium 133 MHz for Wind...

Page 159: ...e requirements may vary depending on the size of the paper the type of application you are using and the complexity of the document you want to print In addition to these system and memory requirements you also need12 MBoffree hard diskspace toinstallyourprinter software To print you need extra hard disk space amounting to about double the size of the files you want to print Interface Specificatio...

Page 160: ...ivalent Transmission mode IEEE 1284 Nibble mode Adaptable connector 57 30360 Amphenol connector or equivalent Synchronization Refer to the IEEE 1284 specification Handshaking Refer to the IEEE 1284 specification Signal level IEEE 1284 Level 1 device Data transmission timing Refer to the IEEE 1284 specification Transmission mode IEEE 1284 ECP mode Adaptable connector 57 30360 Amphenol connector or ...

Page 161: ...Product Information A 15 Data transmission timing Refer to the IEEE 1284 specification ...

Page 162: ...al Serial Bus Device Class Definition for Printing Devices Version 1 0 This interface has the following characteristics Standard Based on Universal Serial Bus Specifications Revision 1 0 Universal Serial Bus Device Class Definition for Printing Devices Version 1 0 Bit rate 12 Mbps full speed device Data encoding NRZI Adaptable connector USB Series B Recommended cable length 2 meters ...

Page 163: ...s so they are always ready to be loaded in the printer To use optional spindles see Using Roll Paper on page 4 3 Stand You can place your printeron the optional Stand insteadofa desk When you assemble the optional Stand you can also install the included paper basket To assemble the Stand see Assembly and Setup Instructions Interface cards A number of optional interface cards are available to suppl...

Page 164: ...r cutter If the edge of the paper is not cut finely you can replace the cutter blade See Replacing the Paper Cutter on page 5 5 Ink cartridges To replace ink cartridges see Replacing Ink Cartridges on page 5 1 Type B Ethernet I F card 10BASE T C82362 Type B Ethernet I F card 100BASE TX C82363 IEEE 1394 I F card C82372 Paper Cutter Blade C815131 Ink cartridge Black T480031 Ink cartridge Cyan T48303...

Page 165: ...have EPSON Doubleweight Matte Paper 24 25 m S041385 EPSON Glossy Paper Photo Weight 22 20 m S041388 EPSON Premium Glossy Photo Paper 24 30 5 m S041390 EPSON Premium Semigloss Photo Paper 24 30 5 m S041393 EPSON Watercolor Paper Radiant White 24 18 m S041396 EPSON Glossy Film 610 mm 20 m S041314 EPSON Synthetic Paper 24 45 m S041399 EPSON Adhesive Synthetic Paper 24 30 m S041402 EPSON Watercolor Pa...

Page 166: ... 20 ...

Page 167: ...tacting Customer Support Customer Information B 1 For United Kingdom and the Republic of Ireland Users B 2 For Australian Users B 3 For India Users B 4 For Malaysia Users B 5 For Singapore Users B 5 For Hong Kong Users B 6 For Philippines Users B 7 ...

Page 168: ...m the following information Product serial number The serial number label is usually on the back of the product Product model Product software version Click About Version Info or similar button in the product software Brand and model of your computer Printer software version Click About in your printer driver Your computer operating system name and version Names and versions of the software applic...

Page 169: ... UK or 0044 0870 163 7766 from the Republic of Ireland They can provide the following services Technical information on installing configuring and operating your EPSON products Arranging for faulty EPSON products to be repaired within the warranty period Pre Sales Enquiry Desk Our Enquiry Desk team can be contacted by calling 0800 220546 in the UK or 1 800 409132 from the Republic of Ireland by fa...

Page 170: ...will guide you through a number of choices before faxing the information to your fax machine EPSON Bulletin Board System This is where you can download the latest software and drivers Visit the BBSto check outthe latest versions Ifyouhave a modem phone 02 9417 5090 Internet URL http www epson com au Access the EPSON Australia World Wide Web pages Worth taking you modem here for the occasional surf...

Page 171: ... you ring The more information you prepare the faster we can help solve the problem This information includes your EPSON product documentation type of computer operating system application programs and any other information you feel is required For Users in Singapore Sources of information support and services available from Epson Singapore are World Wide Web www epson com sg Information on produc...

Page 172: ... established a local home page in both Chinese and English on the Internet to provide users with the following information Product information Answers to Frequently Asked Questions FAQs Latest versions of EPSON drivers Users can access our World Wide Web home page at http www epson com hk Electronic bulletin board system An electronic bulletin board system BBS is also available to obtain product i...

Page 173: ...Contacting Customer Support B 7 Technical Support Hotline You can also contact our technical staff at the following telephone and fax numbers Phone 852 2585 4399 Fax 852 2827 4383 ...

Page 174: ...B 8 Contacting Customer Support ...

Page 175: ...The lightness or darkness of an image buffer The portion of the printer s memory used to store data before printing it byte A unit of information consisting of eight bits characters per inch cpi A measure of the size of text characters sometimes referred to as pitch CMYK Cyan blue green magenta yellow and black These colored inks are used to create the subtractive system array of printed color col...

Page 176: ... on how to print this data economy printing Printing in which images are printed with fewer dots to save ink error diffusion Error diffusion blends individual colored dots with the colors of the surrounding dots to create the appearance of natural colors By blending colored dots the printer can achieve excellent colors and subtle color gradation This method is bestsuitedforprintingdocuments thatco...

Page 177: ...s for correct printing high speed printing Printing in which images are printed in both directions This provides faster printing initialization Returns the printer to its defaults fixed set of conditions This happens every time you turn on the printer or reset the printer ink cartridge A cartridge that contains ink ink jet A method of printing in which each letter or symbol is formed by precisely ...

Page 178: ...ne if the print head nozzles are clogged nozzle check A method for checking the operation of the printer When you perform a nozzle check the printer prints the firmware ROM version and a nozzle check pattern online help Helpful comments related to the current window or dialog box parallel interface See interface Peer to peer networks Windows 95 and 98 and Windows NT 4 0 support peer to peer networ...

Page 179: ...mory A portion of memory that can only be read and cannot be used for data storage ROM retains its contents when you turn off the printer RGB Red green and blue These colors in phosphors irradiated by the computer monitor s electron gun are used to create the additive array of screen colors SelecType settings Settings made using the printer s control panel In SelecType mode various printer setting...

Page 180: ... produced by pigments that absorb some colors of light and reflect others See also CMYK utility A program for carrying out a specific function which is usually related to system maintenance WYSIWYG Acronym for What You See Is What You Get This term is used to describe printouts that look exactly as they appear on screen ...

Page 181: ... PRINTER SETTING MENU PLATEN GAP AUTO WIDE PAGE LINE ON OFF INTERFACE AUTO PARA USB OPTION PARA I F COMPAT ECP CODE PAGE PC437 PC850 ROLL MARG T B 15 MM 3 MM 15 MM PAPER SIZE CHK ON OFF PAPER ALIGN CHK ON OFF INIT PANEL EXEC TEST PRINT MENU NOZZLE CHECK PRINT STATUS CHECK PRINT ...

Page 182: ... E F 10 to 0 INK LEFT Y E F to E F 10 to 0 CUTTER LIFE E F to E F TOTAL PRINTS nnnnnn WASTE INK E F to E F CR MOTOR E F to E F PF MOTOR E F to E F HEAD UNIT E F to E F CLEANER E F to E F PAPER CONFIG MENU PAPER NUMBER STD 1 to 4 THICK PAT PRINT PAPER THICK NO 1 to 17 DRYING TIME 0 MIN to 30 MIN SUCTION NORM LOW CUTTER REPLACE MENU CUT REPLACE EXEC OPEN LOWER COVER REPLACE CUTTER CLOSE LOWER COVER ...

Page 183: ...SelecType Menu List 3 HEAD ALIGNMENT MENU PAPER THICK STD 0 0 MM to 1 5 MM 0 1 mm step ADJUST PATT ALL 1 to 6 1 1 to 15 4 2 1 to 15 4 3 1 to 15 4 4 1 to 15 4 5 1 to 15 4 6 1 to 15 4 ...

Page 184: ... 4 SelecType Menu List ...

Reviews: