G
Select the items to adjust according to the color of
the media being used, and then press
Start
.
Pressing the
x
button starts printing the
adjustment pattern. When printing the pattern is
complete, the adjustment value entry screen is
displayed. Continue to the next procedure.
H
Check the printed adjustment pattern.
When
Light Media
is selected, 2 blocks (#1 to #2)
of black patterns are printed. When
Dark Media
is selected, 2 blocks at a time (#1 to #4) of black
patterns are printed.
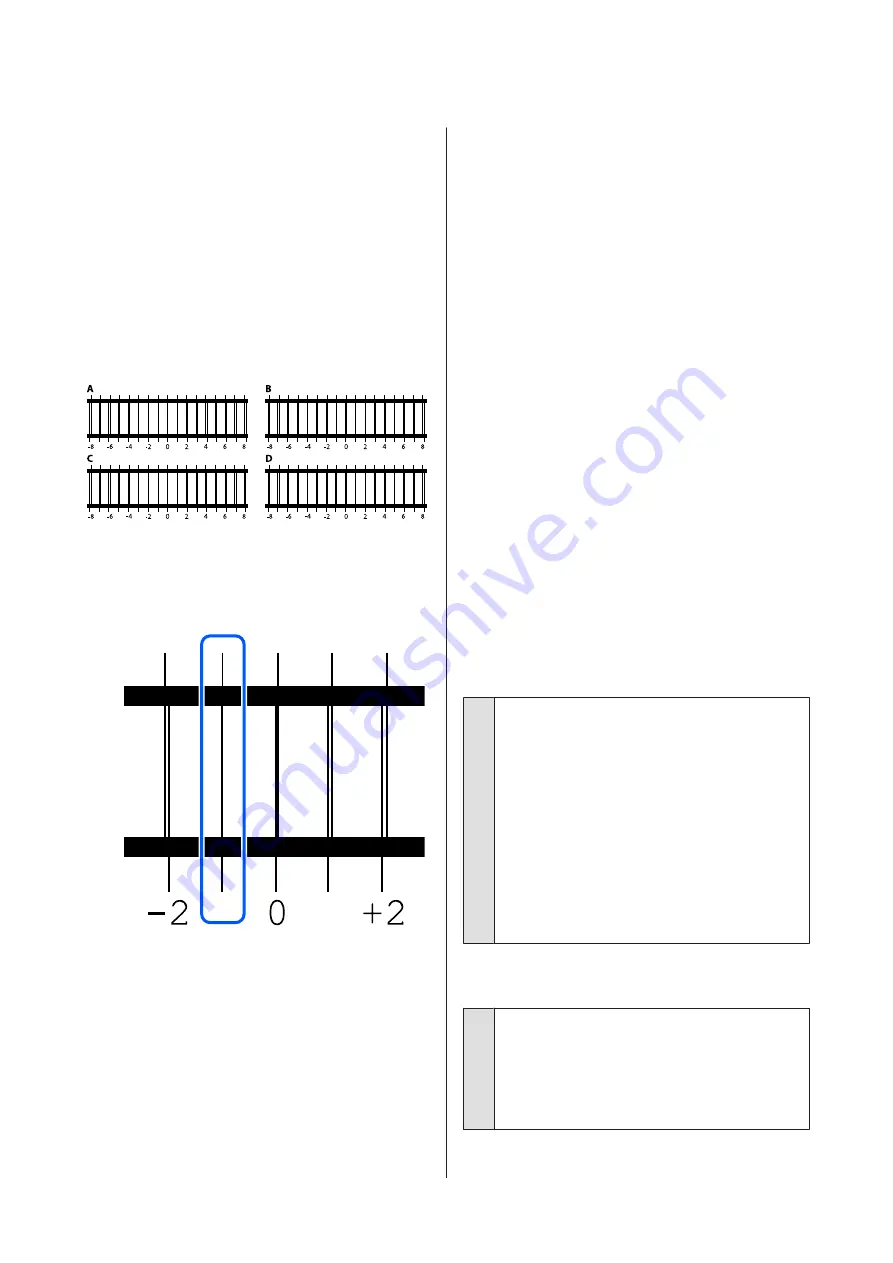
Check the 4 patterns A to D in each block, and
select from -8 to +8, where the line appears
thinnest (lines overlap) in the pattern.
Select "-1" in the following illustration.
Check the patterns in all the blocks, and then go
to the next step.
I
Input the adjustment values.
When executing Standard:
Input the adjustment values in order A to D that
you selected in step 8 for all of the blocks #1 to #4
(#1 to #2 for
Light Media
). Inputting all of the
adjustment values and pressing
OK
opens a
screen for confirming the adjustment values.
Check the adjustment results and press
OK
to
reflect the adjustment results to the media
settings.
When executing Micro Adjust:
You can input setting values from +10 to -10. We
recommend first setting both adjustment values
to +1 and -1 and printing, and then doing further
adjustments based on the value that improved
image quality.
When image quality is not improved after
adjustments
❏
When executing
Standard
:
Next, execute
Micro Adjust
.
❏
When executing
Micro Adjust
:
When using
Auto
for the
Platen Gap
, try setting the
Head Height
to
Narrow
. However, when
Narrow
is set, the surface of the media is more likely to
contact the print head. Load the media carefully so
there are no wrinkles on its surface.
If changing the
Head Height
to
Narrow
does not
improve image quality, try setting the
Platen Gap
to
Manual
.
U
“Media Settings menu” on page 116
Alternatively, try the following measures.
o
Try uni-directional printing.
If the problem is not resolved by doing the above
measures, try setting
Uni-Direction (Low Speed)
for
Print Direction
in Garment Creator for SC-F3000
Series, the software for the printer. To do repeat
printing or to print a job from a USB memory stick that
has already been set to
Bi-Direction (High Speed)
,
set
Head Move Direction
to
Uni-Directional
on the
preview screen.
U
“When reprinting (repeat printing) the same job”
U
“Printing from a USB Memory” on page 73
The printed surface is soiled
o
Is the suction cap clean?
The printed surface may be soiled from dripping ink if
lumps of ink or lint are stuck around the suction cap.
Clean the suction cap.
U
“Cleaning the Suction Cap” on page 85
SC-F3000 Series User's Guide
Problem Solver
129


