175
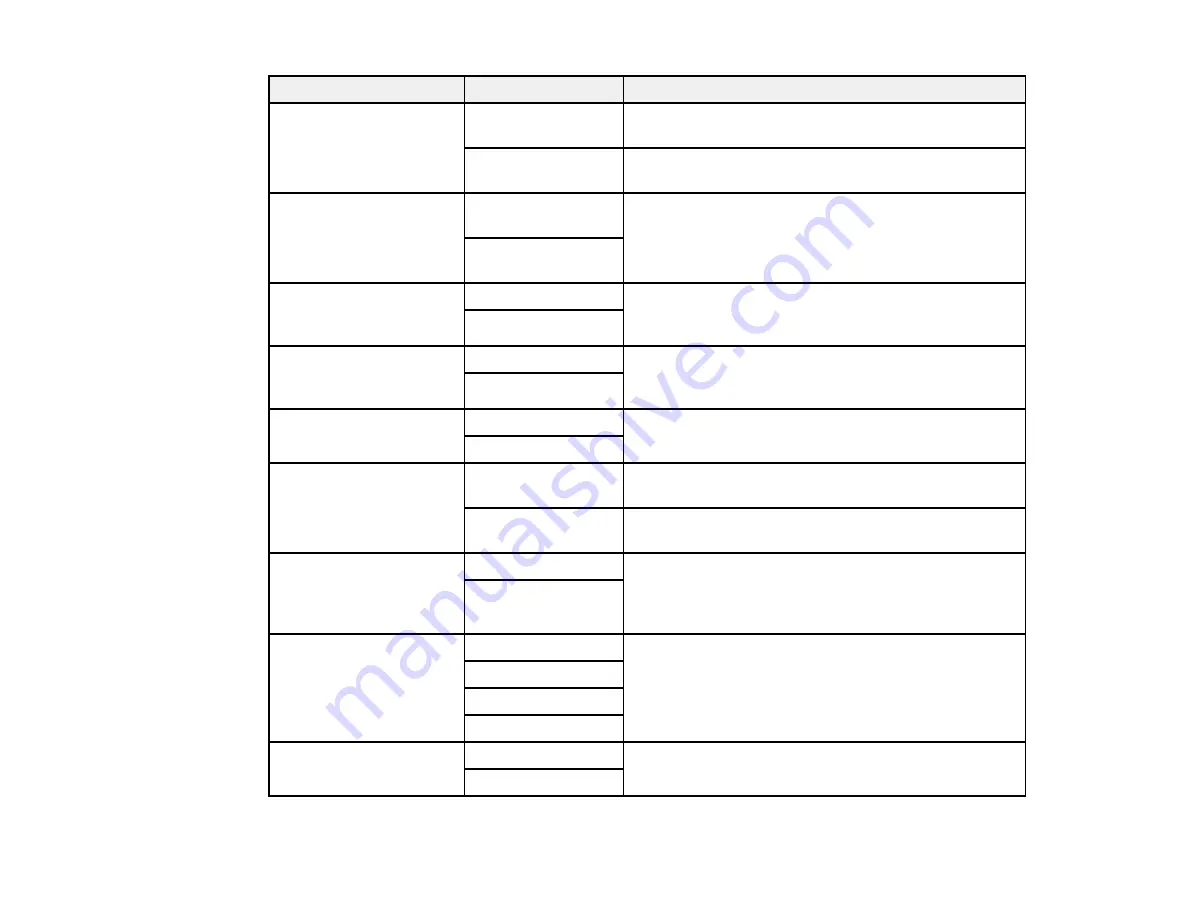
Setting
Options
Description
Auto Reduction
On
Select to reduce the size of large received faxes to fit
on the paper size in the selected paper source
Off
Select to print large incoming faxes at their original
size on multiple sheets, if necessary
Split Page Settings
Delete Print Data
After Split
Select how to split large incoming faxes across
multiple sheets
Overlap When
Split
Auto Rotation
On
If you have loaded A5-size paper, select
On
to rotate
landscape-oriented incoming faxes so that they print
correctly on the paper
Off
Add Reception
Information
On
Select
On
to include the date, time, the sender's
information, and a page number in your incoming
faxes
Off
2-Sided
On
Select
On
to print incoming faxes double sided. You
can also select the
Binding Margin
.
Off
Print Start Timing
All Pages
Received
Select to print incoming faxes after the product
receives all of the pages of the document
First Page
Received
Select to print incoming faxes as soon as the product
receives the first page of the document
Collation Stack
On
Select
On
to print incoming faxes so that the pages
are stacked in the correct page order. (When the
product is low on memory, this option may not be
available.)
Off
Print Suspend Time
Off
Select
On
to set a time period to stop automatic
printing of faxes or reports and save received faxes in
the product’s memory. (Make sure there is enough
free memory before using this function.)
On
Time to Stop
Time to Restart
Quiet Mode
On
Select
On
to reduce noise during printing. (Printing
speed may be reduced.)
Off
Summary of Contents for C11CG36201
Page 1: ...WF 7710 WF 7720 User s Guide ...
Page 2: ......
Page 67: ...67 3 Slide the edge guides outward 4 Slide the edge guide to your paper size ...
Page 76: ...76 3 Open the rear paper feed slot and push it back 4 Slide out the edge guides ...
Page 151: ...151 You see an Epson Scan 2 window like this ...
Page 153: ...153 You see an Epson Scan 2 window like this ...
Page 155: ...155 1 Start Epson Scan 2 You see this window ...
Page 166: ...166 DSL connection 1 Telephone wall jack 2 DSL filter 3 DSL modem ...
Page 167: ...167 ISDN connection 1 ISDN wall jack 2 Terminal adapter or ISDN router ...
Page 247: ...247 You see a window like this 5 Click Print ...
Page 285: ...285 Front 6 Open the duplexer ...
Page 286: ...286 7 Carefully remove any jammed paper stuck inside 8 Reinstall the duplexer ...


