50
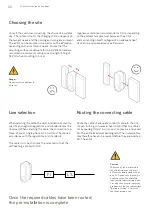
Choosing the site
Consult the customer concerning the choice of a suitable
site. The optimal site for the charging station depends on
the owner’s needs and the parking and wiring environment.
The eClick can be mounted on a wall or on the ePoleDuo,
depending on the customer’s needs. Ensure that the
mounting surface is adequate for the installation and we
recommend a minimum compressive strength rating of
SFK 12 when mounting to bricks.
A generous distance (recommended is 0.5 m, depending
on the ambient temperature) between the eClick
and surrounding objects safeguards an adequate heat
dissipation and unimpeded use afterwards.
Line selection
When selecting the cable, the valid, international, country-
specific and regional regulations and standards must be
observed. When selecting the cable, the connection to a
three-phase or single-phase AC circuit must be made in
accordance with the regulations and standards.
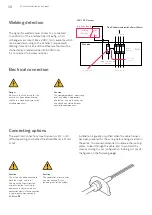
The cable cross-section must be selected so that the
self-heating is limited to 15K.
Routing the connecting cable
Route the cable of adequate conductor area to the site
chosen. In doing so, however, bear in mind that only cables
not exceeding 10 mm² in cross-section may be introduced
into the eClick (maximum bending radii). The routed cables
may therefore have to be rewired before they are inserted
into the eClick.
Once the required cables have been routed,
the pre-installation is complete.
FI
LS
Danger
Do not install in and around
ex-zones!
Caution
When the eClick is mounted in
the ePoleDuo, each and every
eClick must be provided with its
own RCD and circuit breaker. As
a consequence, the ePoleDuo
requires two separate supply lines.
You may then have to repeat the
procedure under the subsections
“Before installing” ff. to install
the second supply line.
eClick installation instructions
Summary of Contents for eClick
Page 2: ...2 Installationsanleitung eClick ...
Page 36: ...36 ...
Page 37: ...eClick installation instructions for eBox smart professional and touch 37 ...
Page 38: ...38 eClick installation instructions ...
Page 73: ...Instruction d installation eClick pour eBox smart professional et touch ...
Page 74: ...2 Instruction d installation eClick ...
Page 109: ...Instrucciones de instalación eClick para eBox smart professional y touch ...
Page 110: ...2 Instrucciones de instalación eClick ...
Page 145: ...Istruzioni per l installazione di eClick per eBox smart professional e touch ...
Page 146: ...2 Istruzioni per l installazione di eClick ...
Page 181: ...Installatiehandleiding eClick voor eBox smart professional en touch ...
Page 182: ...2 Installatiehandleiding eClick ...
Page 217: ...Installering af eClick Til eBox smart professional og touch ...
Page 218: ...2 Installering af eClick ...
Page 253: ...Installasjonsanvisning eClick for eBox smart professional og touch ...
Page 254: ...2 Installasjonsanvisning eClick ...
Page 289: ...Installationsanvisning eClick för eBox smart professional och touch ...
Page 290: ...2 Installationsanvisning eClick ...
Page 325: ...Οδηγίες εγκατάστασης eClick για eBox smart professional και touch ...
Page 326: ...2 Οδηγίες εγκατάστασης eClick ...
Page 361: ...Instalační návod eClick pro eBox smart professional a touch ...
Page 362: ...2 Instalační návod eClick ...
Page 397: ...Návod na inštaláciu eClick pre eBox smart professional a touch ...
Page 398: ...2 Návod na inštaláciu eClick ...
Page 433: ...eClick telepítési útmutató eBox smart professional és touch készülékekhez ...
Page 434: ...2 eClick telepítési útmutató ...
Page 469: ...Instrukcja instalacji modułu eClick do produktu eBox smart professional i touch ...
Page 470: ...2 Instrukcja instalacji modułu eClick ...
Page 505: ...Instrucțiuni de instalare pentru eClick pentru eBox smart professional și touch ...


