


46
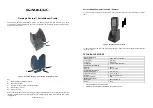
eClick installation instructions
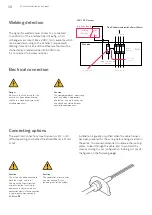
Before installing
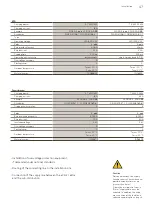
Check and ensure that the electrical installation intended
for connection can supply the required electrical power.
Each eClick must be fused with its own RCD and its own
circuit breaker in the pre-installation. No additional electrical
devices may be integrated in any of these circuits.
Before installing, first consult the owner or operator of
the system for the required output power, and fit adequate
guards.
Please note the following summary of the
most important installation steps:
1. Checks:
Make sure that the RCD
and circuit breaker have been installed
in the sub-distribution.
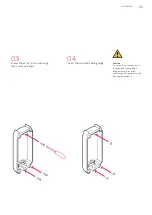
2. Supply line:
The cable routing
plates may have to be switched over,
depending on whether the supply line
is routed from the top or bottom.
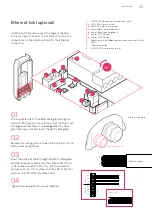
3.
Ethernet cable: Before connecting
an Ethernet cable (optional), first drill
a hole for an M20 thread according
to the enclosed cable gland through
the corresponding routing plate.
4.
eSmartMeter: Check whether an
eSmartMeter is to be installed in the
eClick.
4a.
If necessary, mount the eSmart-
Meter in the eClick, and connect it to
the mains board.
4b.
If an eSmartMeter is not necessary,
route the supply line directly to the
mains board.
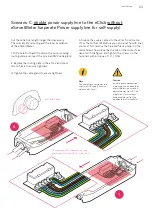
5.
If single-phase connection is
re quired, the mainboard or eSmart-
Meters must not be connected to L2
or L3! The supply line L1 must always
be connected to L1 of the mainboard
or eSmartMeter.
6.
Make sure that the contact guard
is snapped into place.
Use the provided seal to secure the
contact guard on the eClick in such
a manner that unauthorised removal
of the contact guard is not possible
without breaking the seal.
Installation
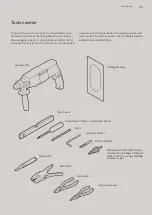
This section is divided into the main categories “Preparations
prior to installation”, “Mounting”, and “Electrical connection”,
which in turn are divided into subsections of greater detail.
Danger
Before installing, familiarise
yourself with the safety
instructions.
Summary of Contents for eClick
Page 2: ...2 Installationsanleitung eClick ...
Page 36: ...36 ...
Page 37: ...eClick installation instructions for eBox smart professional and touch 37 ...
Page 38: ...38 eClick installation instructions ...
Page 73: ...Instruction d installation eClick pour eBox smart professional et touch ...
Page 74: ...2 Instruction d installation eClick ...
Page 109: ...Instrucciones de instalación eClick para eBox smart professional y touch ...
Page 110: ...2 Instrucciones de instalación eClick ...
Page 145: ...Istruzioni per l installazione di eClick per eBox smart professional e touch ...
Page 146: ...2 Istruzioni per l installazione di eClick ...
Page 181: ...Installatiehandleiding eClick voor eBox smart professional en touch ...
Page 182: ...2 Installatiehandleiding eClick ...
Page 217: ...Installering af eClick Til eBox smart professional og touch ...
Page 218: ...2 Installering af eClick ...
Page 253: ...Installasjonsanvisning eClick for eBox smart professional og touch ...
Page 254: ...2 Installasjonsanvisning eClick ...
Page 289: ...Installationsanvisning eClick för eBox smart professional och touch ...
Page 290: ...2 Installationsanvisning eClick ...
Page 325: ...Οδηγίες εγκατάστασης eClick για eBox smart professional και touch ...
Page 326: ...2 Οδηγίες εγκατάστασης eClick ...
Page 361: ...Instalační návod eClick pro eBox smart professional a touch ...
Page 362: ...2 Instalační návod eClick ...
Page 397: ...Návod na inštaláciu eClick pre eBox smart professional a touch ...
Page 398: ...2 Návod na inštaláciu eClick ...
Page 433: ...eClick telepítési útmutató eBox smart professional és touch készülékekhez ...
Page 434: ...2 eClick telepítési útmutató ...
Page 469: ...Instrukcja instalacji modułu eClick do produktu eBox smart professional i touch ...
Page 470: ...2 Instrukcja instalacji modułu eClick ...
Page 505: ...Instrucțiuni de instalare pentru eClick pentru eBox smart professional și touch ...