
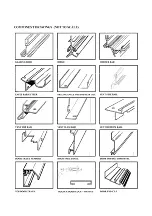


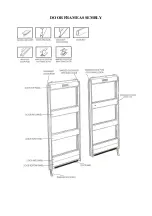


DOOR END ASSEMBLY
Components
1 Door end cill
2 Door end built in base/ cill with handed tab
1 Threshold ramp
5 Glazing bars
2 Short horizontal braces
2 Diagonal angles
2 Roof corner bars (marked “R” )
2 Side corner bars (unmarked)
1 Main door track support
1 Top door track
2 Rectangular plates
From the main bag of fittings you will require the beading, nuts and bolts. You will also require 2
eave plates and 1 ridge plate. These are packed with one of the casement stays and are separate
from the main bag of fittings, unless you have already split this pack for the rear end assembly.
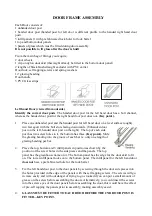
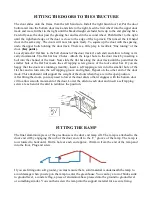
INSTRUCTIONS
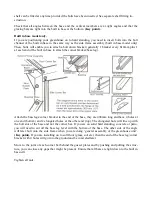
Assemble the frame in exactly the same way as the rear end, up to and including paragraph 3 of the
rear end. The difference with the door end is that instead of 1 long base/cill piece, the door end has
2 smaller pieces (1 either side of the door opening) and 1 door end cill. The long end glazing bars
on the door end are longer than the equivalent rear end glazing bars. Please note, you only require
approx. 200mm of beading in the inside ‘v’ groove of the 2nd and 4th glazing bars. If dwarf wall
model, the cill has a tab on 1 end of each bar making it a handed bar. The tab is fitted towards the
centre of the greenhouse rather than the corner bar.
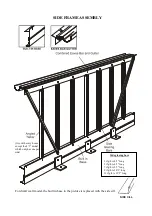
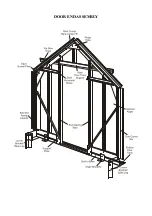
Built in base only.
Now attach the built in base sections/cills to the corner bars, leaving a
space for the door(s) in between.
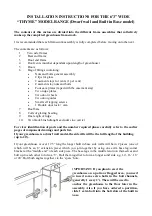
Now engage the door end cill with the 2
built in base cills by pushing the angle of the
cill under the locator as shown in the dia-
gram. At this stage the cill will move freely
left and right but will remain located to the
built in base cill.
Slide 2 bolts into the bottom of the 2nd and
4th glazing bar and 3 bolts (only 1 if green-
house to be sited on soft ground) into the free end of each built in base
section. Attach the bottom bolt in the 2nd and 4th glazing bar to the
hole in the door end cill, but do not put a nut on yet.
Note: the 2nd
and 4th door end glazing bars are longer and do not sit on top of
the base (as the rear end glazing bars do), they go down the side of
the built in base and attach to the bottom cill. (Key point).
Attach the rectangular plate (with 3 slotted holes) to the 2 bolts inserted
in the glazing bars and the last bolt inserted into the base ensuring that
the glazing bar is tight down into the angle of the door end cill. Attach
the diagonal angle brace to the top bolt of the rectangular plate, and
then to the bottom bolt of the eaves gusset plate. The 2 unoccupied
Summary of Contents for 6'3" WIDE THYME
Page 1: ......
Page 2: ......
Page 3: ......
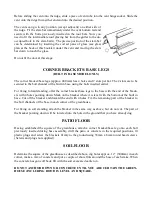
Page 11: ...REAR END ASSEMBLY dotted line indicates corner bracket base leg going into ground ...
Page 16: ...DOOR END ASSEMBLY ...
Page 19: ...DOOR FRAME ASSEMBLY ...
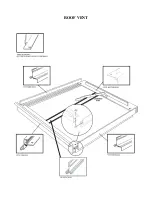
Page 21: ...ROOF VENT ...
Page 33: ...THYME 6 GLAZING PLAN BUILT IN BASE ONLY ...
Page 35: ...THYME 6 GLAZING PLAN DWARF WALL ONLY ...
Page 36: ...ELITE 1601 ...