background image

13

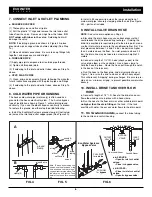
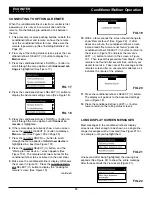
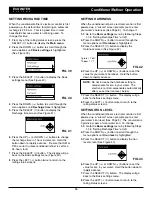
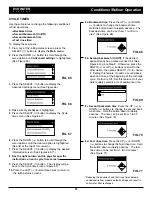
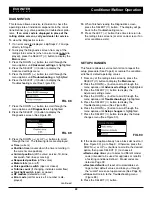
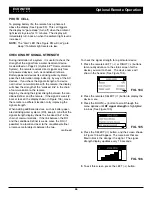
FIG. 34

2

. Make sure 

Recharge

is highlighted (See Figure 33).

3

. Press the SELECT (

¡

) button to display the

Recharge menu (See Figure 34).

FIG. 33

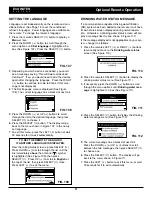
4

. If the desired option already has a black dot next to it

(See Figure 34), go to Step 5.  Otherwise, press the

DOWN (

6

) or UP (

5

) buttons to scroll to the desired

option, then press SELECT (

¡

) to choose it.

=

Automatic

cancels a manually scheduled recharge

(if it has not already begun) and lets the electronic

control determine when to recharge next.

=

Recharge now

begins a recharge immediately

after the SELECT (

¡

) button is pushed again in Step

5.

=

Schedule

sets a recharge to begin at the preset

recharge time (set according to the instructions on

Page 14).

5

. Press the SELECT (

¡

) button.  If 

Recharge now

is

selected, the display immediately goes to the

Recharge status screen (See Figure 35).  If

Automatic

or 

Schedule

are selected, the display

goes back to the Main menu (Figure 33).

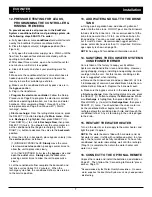
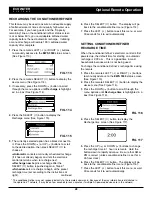
SETTING THE CURRENT TIME

When the conditioner/refiner’s electronic control is first

powered up, a “wizard” screen prompts you to set the

current time (See Page 8).  To change the time at a

later date, such as after a long power loss:

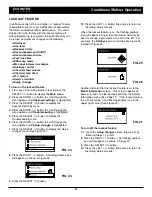
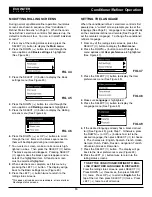
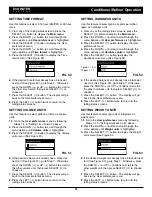
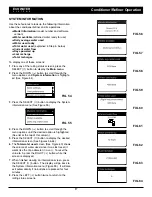
1

. From any of the rolling status screens, press the

SELECT (

¡

) button to display the 

Main menu

.

2

. Press the DOWN (

6

) button to scroll through the

menu options until 

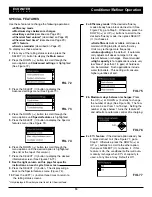
Basic settings

is highlighted

(See Figure 36).

3

. Press the SELECT (

¡

) button to display the Basic

settings menu (See Figure 37).

FIG. 36

FIG. 37

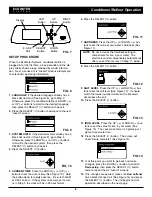
4

. Make sure 

Current time

is highlighted.

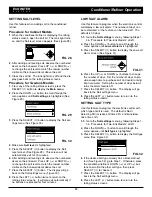
5

. Press the SELECT (

¡

) button to display the Current

time screen (See Figure 38).

6

. Press the UP (

5

) or DOWN (

6

) buttons to change

the time.  Hold the button down to rapidly advance.

Be sure that AM or PM is correct (unless condition-

er/refiner is set for a 24-hour clock).

7

. Press the SELECT (

¡

) button.  The display will go

back to the Basic settings menu (Figure 37).

8

. Press the LEFT (

3

) button twice to return to the

rolling status screens.

FIG. 38

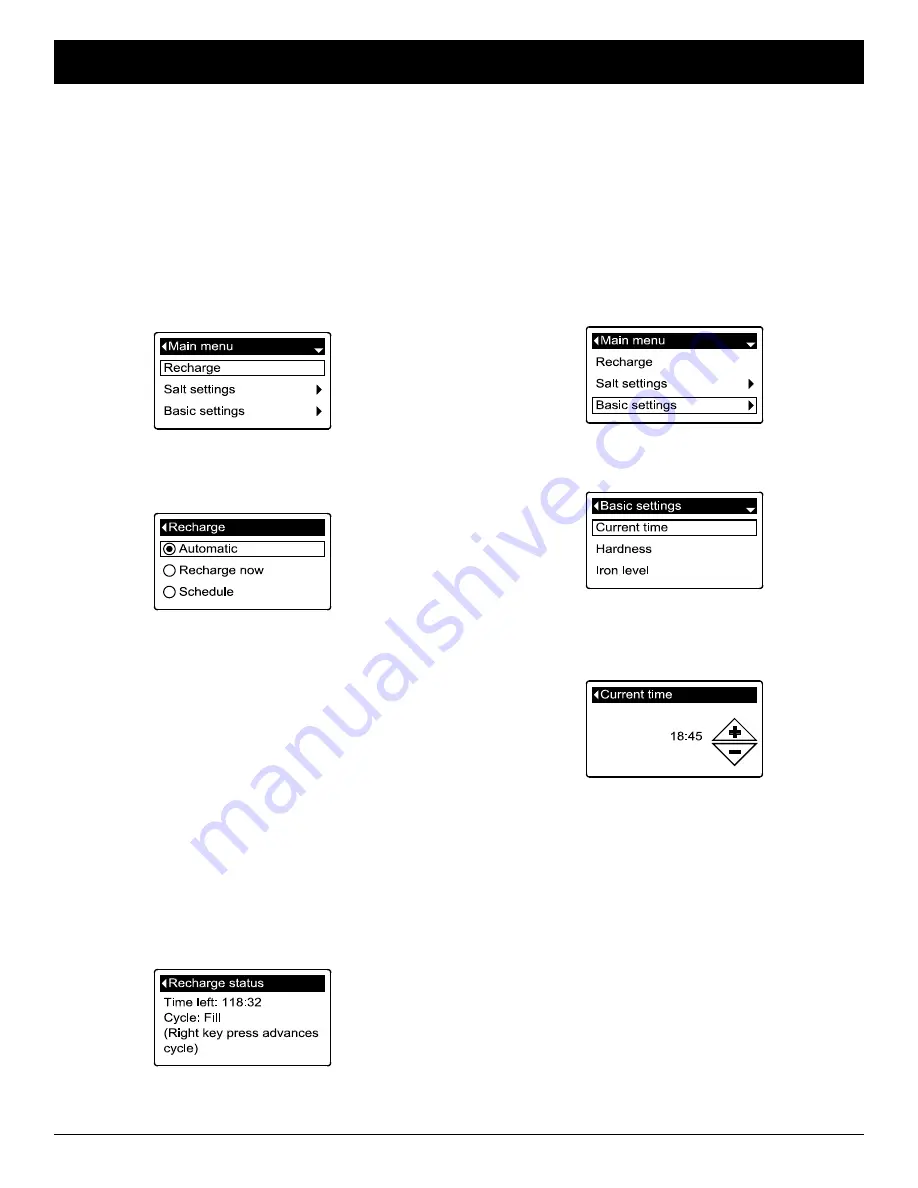
FIG. 35

6

. Press the LEFT (

3

) button (twice from the Recharge

status screen) to return to the rolling status screens.

ECOWATER

S Y S T E M S

Conditioner/Refiner Operation

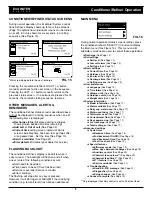
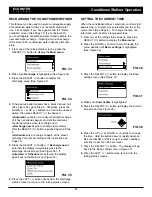
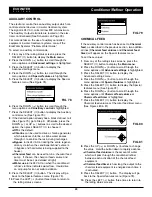
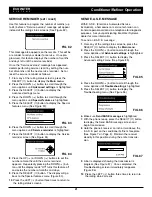
RECHARGING THE CONDITIONER/REFINER

This feature may be used to assure an adequate supply

of conditioned water at times of unusually high water

use.  For example, if you have guests and the “Water

available” screen (See Page 17) is at or below 50%,

you could deplete conditioned water capacity before the

next automatic recharge.  Initiating a manual recharge

will restore 100% conditioned water capacity after com-

plete.

1

. From any of the rolling status screens, press the

SELECT (

¡

) button to display the 

Main menu

.

Summary of Contents for ERM10CE+

Page 1: ...11664 Rev K 8 3 12 EcoWater Systems Conditioner Models ESM9CE ESM11CE ESM15CE ESM18CE ESM25CE ESM42HTE Refiner Models ERM10CE ERM20CE OWNER S MANUAL How to operate your EcoWater Systems Water Conditioner Refiner ...

Page 2: ...Part 15 of the FCC Rules These limits are designed to provide reasonable protection against harm ful interference in a residential installation This equip ment generates uses and can radiate radio frequency energy and if not installed and used in accordance with the instructions may cause harmful interference to radio communications However there is no guarantee that interference will not occur in...

Page 3: ...vandal ism and direct sunlight For future reference enter the following information Model No ______________________ Installation Date _________________ Serial No includes date code ____________________________________________ Water Hardness _________ GPG Iron Content _________ PPM Model No and Serial No are on the shipping carton and on the conditioner refiner s rating decal ...

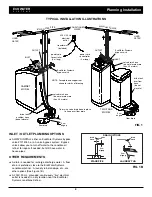
Page 4: ...z grounded continuously live electrical outlet is needed in a dry location near the EcoWater Systems conditioner refiner FIG 1 TYPICAL INSTALLATION ILLUSTRATIONS 4 cm air gap 4 cm air gap 230V 50 Hz electrical outlet floor drain brine tank overflow hose do not elevate valve drain hose do not elevate more than 2 5 meters Tie or wire valve drain hose in place to keep over floor drain NOTE Faceplate ...

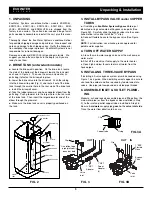
Page 5: ...en insert the larger diameter end of the elbow through the grommet e Make sure the brine tank cover is properly positioned on the tank 3 INSTALL BYPASS VALVE and or COPPER TUBES a If installing an EcoWater Systems Bypass Valve put lubricated o ring seals onto both bypass valve ports See Figure 3B Carefully slide the bypass valve into the condi tioner refiner valve and install the C clips b Connect...

Page 6: ...ising the drain line overhead is required to get to the drain point meas ure the inlet water pressure to the conditioner refiner first For inlet pressures between 1 4 and 3 4 bar do not raise higher than 2 meters above the floor For inlet pressure above 3 4 bar the drain line may be raised to a maximum height of 3 meters b Connect a length of 1 2 I D hose check codes to the valve drain elbow on th...

Page 7: ...2 minutes When the recharge cycle ends the conditioner refiner valve returns to the service position 13 ADD WATER AND SALT TO THE BRINE TANK a Using a pail or garden hose add about 3 gallons of water into the brine tank DO NOT pour into the brinewell b Add salt to the brine tank It is recommended to fill the brine tank no more than 1 2 full Level the salt when fin ished adding You can use most wat...

Page 8: ...s the SELECT button 11 IRON LEVEL Press the UP 5 or DOWN 6 but tons to set the value for iron in your water See Figure 13 The conversion factor is 3 grains per 1 ppm of clear water iron 12 Press the SELECT button The screen will show Setup complete See Figure 14 13 If at this point you want to go back and make changes press the DOWN 6 button to scroll to Redo setup then press the SELECT button twi...

Page 9: ...T button to display the Main menu See Figure 16 This menu and its subsidiary screens are used to control these operations Recharge See Page 13 Salt settings Salt level See Page 12 Low salt alarm See Page 12 Salt type See Page 12 Basic settings Current time See Page 13 Hardness See Page 14 Iron level See Page 14 Recharge time See Page 14 Rolling screens See Page 15 User preferences Language See Pag...

Page 10: ...tes for the conditioner refiner to be activated in the next step 9 Make sure the conditioner refiner s display still shows the screen in Figure 18 Press the conditioner refin er s SELECT button to display the Looking for remote screen See Figure 19 continued FIG 19 10 Within a few seconds the screen should change to show Remote found See Figure 20 If after about one minute the conditioner refiner ...

Page 11: ...me Second backwash On Off Second backwash time Fast rinse time Efficiency mode Max days between recharges Auxiliary control Chemical feed volume Chemical feed timer 97 feature Service reminder Setup changes To turn on the lockout feature 1 From any of the rolling status screens press the SELECT button to display the Main menu 2 Press the DOWN 6 button to scroll through the menu options until Advan...

Page 12: ...ot automatically exit for 15 minutes 6 After adding and leveling salt observe the numbered decal on the brinewell Press UP 5 or DOWN 6 to change the salt level to match the lowest number visible on the brinewell decal above the salt 7 Press the SELECT button The display will go back to the Salt settings menu Figure 30 8 Press the LEFT 3 button twice to return to the rolling status screens It will ...

Page 13: ...LECT button to display the Main menu 2 Press the DOWN 6 button to scroll through the menu options until Basic settings is highlighted See Figure 36 3 Press the SELECT button to display the Basic settings menu See Figure 37 FIG 36 FIG 37 4 Make sure Current time is highlighted 5 Press the SELECT button to display the Current time screen See Figure 38 6 Press the UP 5 or DOWN 6 buttons to change the...

Page 14: ... 8 Press the LEFT 3 button twice to return to the rolling status screens SETTING HARDNESS When the conditioner refiner s electronic control is first powered up a wizard screen prompts you to enter your water s hardness See Page 8 To change it 1 3 Go to the Basic settings menu by following Steps 1 3 in Setting Recharge Time at left 4 Press the DOWN 6 button to scroll through the menu options until ...

Page 15: ...does not include service reminders errors alerts or Recharge status screens SETTING THE LANGUAGE When the conditioner refiner s electronic control is first powered up a wizard screen prompts you to set the language See Page 8 Language is set independently on the conditioner refiner and remote See Page 27 to set the remote s language To change the conditioner refiner s language 1 From any of the ro...

Page 16: ... twice to return to the rolling status screens SETTING HARDNESS UNITS Use this feature to select grains or parts per million ppm as hardness units 1 From any of the rolling status screens press the SELECT button to display the Main menu 2 Press the DOWN 6 button to scroll through the menu options until User preferences is highlighted 3 Press the SELECT button to display the User preferences menu 4...

Page 17: ...m information menu See Figure 55 4 Press the DOWN 6 button to scroll through the menu options until the desired option is highlighted See list at the top of this column 5 Press the SELECT button to display the desired information screen See Figures 56 64 6 The Total water used screen See Figure 60 shows the volume of water used since it was last reset it works like the trip odometer in a car To re...

Page 18: ...from 1 to 30 min utes See Figure 68 FIG 66 4 Make sure Cycle times is highlighted 5 Press the SELECT button to display the Cycle times menu See Figure 67 FIG 65 3 Press the SELECT button to display the Advanced settings menu See Figure 66 FIG 69 8b Second backwash On Off If the desired option already has a black dot next to it See Figure 69 go to Step 9 Otherwise press the DOWN 6 or UP 5 buttons t...

Page 19: ... return to the rolling status screens Only displayed if Auxiliary control is set to Chemical feed FIG 75 FIG 76 FIG 77 8a Efficiency mode If the desired efficiency mode already has a black dot next to it See Figure 75 go to Step 9 Otherwise press the DOWN 6 or UP 5 buttons to scroll to the desired efficiency mode then press SELECT to choose it Salt efficient limits available salt doses to maintain...

Page 20: ... the chemical feed volume and timer must be set as detailed at right Water use turns 24V AC on when the conditioner refiner s turbine indicates water flow Could drive an air pump for iron or sulfur oxidation 9 Press the SELECT button The display will go back to the Special features menu Figure 78 10 Press the LEFT 3 button three times to return to the rolling status screens FIG 79 CHEMICAL FEED If...

Page 21: ...tioner refiner s faceplate See Figure 7 on Page 8 Maintain the receiver steadily in this position during the entire transmis sion 9 A bar is displayed showing the transmission s progress See Figure 87 Once completed the Troubleshooting screen immediately reappears Figure 86 10 Press the LEFT 3 button three times to return to the rolling status screens FIG 85 4 Press the DOWN 6 button to scroll thr...

Page 22: ... options until Setup changes is highlighted 7 Press the SELECT button to display the Setup changes menu See Figure 90 FIG 88 7 Press the DOWN 6 button to scroll through the menu options until Diagnostics is highlighted 8 Press the SELECT button to display the Diagnostics screen See Figure 89 FIG 89 9 Press the DOWN 6 or UP 5 buttons to scroll through the list The following items are displayed Time...

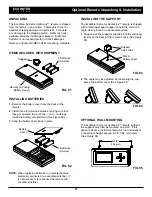
Page 23: ...gure 92 3 Snap the battery cover back in place FIG 92 FIG 94 INSTALLING THE SUPPORT The EcoWater Systems HydroLink remote is shipped with a teardrop shaped support to hold the unit at an angle when placed on a horizontal surface 1 Snap one of the support s two tabs into the rectangu lar slot on the back of the remote s case See Figure 93 OPTIONAL WALL MOUNTING The EcoWater Systems HydroLink remote...

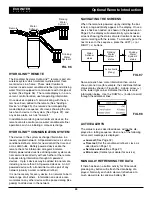
Page 24: ... any network usually a water conditioner refiner It is not necessary for every device in a network to be in radio range of all others Information one device com municates to any other device will be passed along like gossip to all devices in the network Softener Remote Water System 1 Water Drinking Drinking System 2 Water FIG 96 FIG 97 System 1 Water status System 2 Water status Softener status Ac...

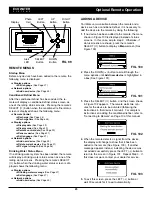
Page 25: ...n to return to the screen in Figure 101 Repeat Step 3 If this does not work contact your dealer for service FIG 100 FIG 101 FIG 102 FIG 103 5 To exit this screen press the LEFT 3 button or wait 30 seconds for it to exit automatically REMOTE MENUS Startup Menu Before any devices have been added to the remote the following menu is displayed Display options Set language See Page 27 Network options Ad...

Page 26: ...mmunication System the remote receives direct signals only from AC powered devices such as conditioner refiners Battery powered devices like drinking water systems pass their information along indirectly by way of the AC devices If you check the signal strength of a device not in direct communication with the remote the display will show the strength of the weakest link in the chain of communicati...

Page 27: ...te all devices Continue If so you would need to add the devices again after changing the language Press the RIGHT 4 button to continue or skip to Step 4 if this mes sage is not displayed 4 The Set language menu is displayed See Figure 108 The current language has a black dot next to it FIG 109 DRINKING WATER STATUS MESSAGE If a communications capable drinking water filtration RO system has been ad...

Page 28: ...ause water is not being used To change the conditioner refiner s recharge time using the remote 1 Press the remote s LEFT 3 or RIGHT 4 buttons to manually advance to the EWS 3500 status screen See Figure 113 2 Press the remote s SELECT button to display the device menu See Figure 114 3 Press the DOWN 6 button to scroll through the menu options until Recharge time is highlighted in a box See Figure...

Page 29: ...u 3 Press the DOWN 6 button to scroll through the menu options until Display data is highlighted in a box See Figure 118 4 Press the SELECT button to display the Display data screen See Figure 119 5 Press the DOWN 6 or UP 5 buttons to scroll through the list of display data items Items with a check mark in the box next to them will be displayed during normal operation 6 To select an unchecked disp...

Page 30: ...will disappear 8 When selections are complete exit this menu by pressing the LEFT 3 button The display will go back to the device menu Figure 123 9 Press the LEFT 3 button to exit this menu or wait 30 seconds for it to exit automatically CHANGING THE ORDER OF DATA ITEMS DISPLAYED IN THE STATUS SCREENS In addition to changing which data items the remote dis plays during normal operation the order o...

Page 31: ...ess the remote s LEFT 3 or RIGHT 4 buttons to manually advance to the status screen of the device you want to rename For example to rename the conditioner refiner manually advance to the EWS 3500 status screen 2 Press the remote s SELECT button to display the device menu 3 Press the DOWN 6 button to scroll through the menu options until Rename device is highlighted in a box See Figure 125 4 Press ...

Page 32: ...MENDED Rock salt high in impuri ties block granulated table ice melting or ice cream making salts etc are not recommended SALT WITH IRON REMOVING ADDITIVE Some salts have an additive to help a water conditioner refiner han dle iron in the water supply Although this may help keep the resin bed clean it may also release corrosive fumes that will weaken and shorten the life of some EcoWater Systems c...

Page 33: ...d screen Then remove the nozzle venturi Wash the parts in warm soapy water and rinse in fresh water If needed use a small brush to remove iron or dirt Be careful not to scratch misshape etc surfaces of the nozzle venturi Also check and clean the gasket and flow plug s if dirty Carefully replace all parts in the correct order Lubricate the o ring seal with silicone grease and put in place Install a...

Page 34: ... BYPASS valve 4 Close all house faucets PRESSURIZE 1 Open HOT and COLD house faucets 2 Close the BYPASS valve and open the OUTLET valve 3 Slowly open the INLET valve 4 Close all house faucets ECOWATER SYSTEMS BYPASS VALVE See Figure 136 DE PRESSURIZE 1 Close the house main water supply valve 2 Open HOT and COLD conditioned water house faucets 3 Push the bypass valve handle to Bypass position 4 Opt...

Page 35: ...13 If display is blank transformer may be unplugged at wall outlet power cable leads may be disconnected from the elec tronic control board fuse may be blown circuit breaker may be popped or trans former may be plugged into a switched outlet which is off Check for power loss due to any of these and cor rect When power is restored if the display shows the Current Time setting screen Figure 38 on Pa...

Page 36: ...t page for position verification Requested position of the valve Motor state on or off Valve position switch open or closed Turbine count indicates water flow See fol lowing section for turbine diagnostics Tank light switch open or closed RF module detected or not Error code FIG 138 3 A steady display of 0 zero indicates no water flow through the meter i e no conditioned water being used 4 Open a ...

Page 37: ...or Dirty or defective nozzle venturi See Page 33 Nozzle venturi not seated on the gasket or gas ket not sealing properly Restriction in valve drain causing back pressure bends kinks elevated too high etc Obstruction in valve or brine tubing Internal valve fault obstructed outlet disc wave washer faulty etc 13 With the Diagnostics screen displayed once again press the RIGHT 4 button to advance the ...

Page 38: ...E 8 Dia x 25 25 kg 70 cm 58 4 cm 83 8 cm ESM11CE 8 Dia x 19 19 kg 54 cm 41 4 cm 66 8 cm ESM15CE 8 Dia x 25 25 kg 70 cm 58 4 cm 83 8 cm ESM18CE 8 Dia x 35 100 kg See figures below for dimensions ERM20CE 10 Dia x 35 90 kg ESM25CE 10 Dia x 35 90 kg ESM42HTE 10 Dia x 47 135 kg Models ESM18CE ERM20CE ESM25CE Model ESM42HTE Models ESM9CE ERM10CE ESM11CE ESM15CE 50 cm 8 6 cm 35 5 cm 83 cm 115 5 cm 8 6 cm...

Page 39: ... 0 62 0 83 0 94 0 97 0 90 Intermittent Flow Rate L min 1 bar 32 9 31 8 34 4 36 5 37 9 41 6 Intermittent Flow Rate L min 2 bar 47 3 53 8 55 5 56 8 67 0 Amount of High Capacity Resin Liters 8 9 10 3 10 5 14 7 17 6 20 5 24 9 43 0 Water Supply Max Hard ness f 27 5 30 1 32 5 49 6 68 4 85 6 99 2 123 1 Water Supply Max Hard ness dH 15 4 16 9 18 2 27 8 38 3 48 1 55 6 69 0 Water Supply Max Clear Water Iron...

Page 40: ... S T E M S Repair Parts ECOWATER SYSTEMS CONDITIONER REFINER ASSEMBLY Models ESM9CE ERM10CE ESM11CE ESM15CE Valve Assembly See Pages 44 45 for parts 1 2 5 6 8 7 9 10 11 12 13 14 15 16 17 18 19 21 20 22 23 24 25 26 3 4 ...

Page 41: ...k Model ESM9CE 7268926 Repl Brine Tank Model ESM11CE 7268934 Repl Brine Tank Models ERM10CE ESM15CE Key No Part No Description 7331258 Overflow Hose Adaptor Kit includes Key Nos 11 13 11 á Hose Clamp 12 á Adaptor Elbow 13 á Grommet 14 RMH001 Resin per liter 30437 Resin 25 liter bag 7175149 Activated Carbon Model ERM10CE 15 7105047 Repl Bottom Distributor 16 7268950 Resin Tank 22 9 cm dia x 35 6 cm...

Page 42: ...SYSTEMS CONDITIONER REFINER ASSEMBLY Models ESM18CE ERM20CE ESM25CE ESM42HTE Valve Assembly See Pages 44 47 for parts 51 52 54 55 53 57 59 58 56 60 80 79 81 82 83 84 59 74 75 64 68 69 65 66 67 70 72 76 50 71 73 68 69 63 70 62 61 66 67 65 64 85 78 77 ...

Page 43: ...l ERM20CE 63 WSM001 Gravel 8 kg req 64 7219888 Brinewell Cover 65 7109871 Brinewell Assembly w decal 7331698 Brinewell Mounting Hardware Kit includes Key Nos 66 67 66 á Washer 67 á Screw Key No Part No Description 7331258 Overflow Hose Adaptor Kit includes Key Nos 68 70 68 á Grommet 69 á Adaptor Elbow 70 á Hose Clamp 71 7218604 Repl Brine Tank Models ESM18 CE ERM20CE ESM25CE 72 7287386 Rim Models ...

Page 44: ...CE ERM10CE ESM11CE ESM15CE ESM18CE ERM20CE ESM25CE 100 101 102 103 104 105 106 107 108 109 110 111 112 117 118 113 121 122 123 124 114 115 119 120 125 116 127 126 130 128 136 131 137 140 132 133 134 139 142 135 141 143 144 145 146 Wear Strip Seal Cross Section View 138 129 ...

Page 45: ...uri 127 7170319 O Ring 6 4 x 9 5 mm 2 req 128 1202600 Nut Ferrule Key No Part No Description 129 7268421 Nozzle Venturi Assembly Model ESM9CE 7187065 Nozzle Venturi Assembly Models ESM11CE ERM10CE ESM15CE ESM18CE 7253808 Nozzle Venturi Assembly Models ERM20CE ESM25CE 130 7081104 Housing Nozzle Venturi 131 7084607 Fill Flow Plug 57 lpm Model ESM9CE 1148800 Fill Flow Plug 1 14 lpm ERM10CE ESM11CE ES...

Page 46: ...rip Seal Cross Section View 150 151 152 153 154 155 156 157 158 159 160 161 162 167 168 163 164 165 169 170 172 173 174 175 166 178 181 179 177 182 183 188 184 185 186 190 187 176 191 192 193 194 195 189 180 ECOWATER S Y S T E M S Repair Parts 171 ...

Page 47: ...89 Spring 171 7089306 Clip 2 req 172 7311127 O Ring 27 0 x 33 3 mm 2 req Ù Key No Part No Description 7290931 Turbine Support Assembly includes 1 ea of Key Nos 173 174 2 ea of Key No 172 173 á Turbine Support Shaft 174 á Turbine 175 7171145 Valve Body 176 7309811 Wire Harness Position Switch 177 7081201 Retainer Nozzle Venturi 178 7170319 O Ring 6 4 x 9 5 mm 2 req 179 1202600 Nut Ferrule 180 72538...

Page 48: ...48 EcoWater Systems Europe NV Geelseweg 56 2250 Olen Belgium ECOWATER S Y S T E M S ...

Reviews: