56
The following steps are repeated when more than one valve operating mechanism is in operation:
• Remove the battery compartment cover of the (first) valve operating mechanism by sliding it down and out.
• Press the button on the valve operating mechanism for approx. 3 seconds until you hear 3 signal tones. The valve
operating mechanism is now ready to receive; ‘AC’ appears on the LCD.
• Start transmitting the code to the valve operating mechanism by pressing the ‘PROG’ button on the control unit (control
centre).
• The valve operating mechanism acknowledges that it has received the code correctly with a tone sequence.
• Replace the valve operating mechanism’s battery compartment cover.
• The valve operating mechanism acknowledges that it has received the first normal radio signal with a signal tone.
Repeat these steps for all the other valve operating mechanisms in the room (‘Code SynC 002’ on the display, and so on).
Once all the valve operating mechanisms have been coded, the control centre automatically returns to the normal operating
mode.
Ö
You can skip any valve operating mechanisms that are already synchronised to a security code. Simply press
the ‘PROG’ button on the control centre (do not open the battery compartment cover of the valve operating
mechanism that has already been synchronised and do not press the button on the valve operating
mechanism).
f) Synchronising the valve operating mechanism, ‘SYNC’
When this menu item is selected, the control centre starts to transmit signals to all valve operating mechanisms for approx.
2 minutes, instructing them to newly synchronise themselves. Afterwards, the normal transmission program is continued
and the valve operating mechanisms generate a signal tone as soon as they receive the first synchronised signal.
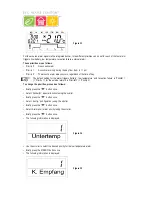
• Keep the ‘PROG’ button pressed until ‘Sond’ (special) appears on the display. Then release the ‘PROG’ button again.
• Use the scroller to select the special ‘SYNC function.
• Confirm this by briefly pressing the ‘PROG’ button.
Afterwards ‘Sync’ and ‘120’ appear on the display.
The control centre now counts down in intervals of 1 second and returns to its normal operating mode after 120 seconds.
g) Test function, ‘TEST’
You can use the ‘TEST’ function to check whether all the valve operating mechanisms receive the radio signal correctly.
The addressed valve operating mechanisms acknowledge correct reception with an acoustic signal. Use the scroller to
select the valve operating mechanisms to be tested.
If the large display shows a ‘0’ (zero), all valve operating mechanisms are tested, otherwise, only the valve operating
mechanism assigned to the displayed number (number of the radiator) is tested. The timer in the left corner of the display
counts down to the time at which the next test cycle is to be started.
• Keep the ‘PROG’ button pressed until ‘Sond’ (special) appears on the display. Then release the ‘PROG’ button again.
• Use the scroller to select the special ‘TEST’ function.
• Confirm this by briefly pressing the ‘PROG’ button.
• Use the scroller to select the valve operating mechanism/s to be tested.
• Pressing the ‘PROG’ button briefly ends the test function.
FHT 8W Heat Demand Relay
Installation and User Guide
Product Code EHC-FH06
1


