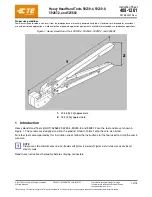
background image


Parts list 


SPECIFIC SAFETY RULES 

1.


Maintain labels and nameplates on the tool which carry important safety information. 
If unreadable or missing, contact the agent to replace.   

2.


This product is not a toy, keep it out of reach of children. 

3.


Do not slide your fingers in the dies profile. 

4.


Do not crimp on live cables or conductors 

5.


Do only crimp copper or aluminum conducting material 

6.


The warnings, precautions, and instructions discussed in this instruction manual 
cannot cover all possible conditions and situations that may occur. It must be 
understood by the operator that common sense and caution are factors which cannot 
be built into this product, but must be supplied by the operator

.   


SAVE THESE INSTRUCTIONS 


Summary of Contents for 902-544

Page 1: ... Crimping Tool 902 544 Due to continuing improvements actual product may differ slightly from the product described herein Read this material before using this product Failure to do so can result in serious injury SAVE THIS MANUAL ...

Page 2: ...This warranty does not apply to damage due directly or indirectly to misuse abuse negligence or accidents repairs or alterations outside our facilities normal wear and tear or to lack of maintenance We shall in no event be liable for death injuries to persons or property or for incidental contingent special or consequential damages arising from the use of our product Some states do not allow the e...

Page 3: ... TO FOLLOW THE INSTRUCTION IT CONTAINS IF YOU DO NOT RESPECT THE INFORMATION WRITTEN IN THE INSTRUCTION MANUAL THE WARRANTY WILL BE CANCELED 1 Work area safety a Keep work area clean and well lit Cluttered or dark areas invite accidents b Keep children and bystanders away while operating the hydraulic crimping tool Distractions can cause you to lose control 2 Personal safety c Stay alert watch wha...

Page 4: ...ned No Description Qty No Description Qty 1 hexagon scrtew M5 30 2 48 pressure release pin 1 2 hexagon scrtew M6 30 3 49 pin 7X29 5 1 3 housing B 1 50 O ring 8X1 5 1 4 die 1 51 pressure adjusting screw M8X9 1 5 guide block 1 52 safety valve body 1 6 retract spring 1X7 8X50 n 15 2 53 spring 1 2X4 5X22 n 15 1 7 moveable die 2 54 O ring 2 2X1 9 1 8 roller pin P 5X11 8 10 55 valve spindle 1 9 holder 2...

Page 5: ...fingers in the dies profile 4 Do not crimp on live cables or conductors 5 Do only crimp copper or aluminum conducting material 6 The warnings precautions and instructions discussed in this instruction manual cannot cover all possible conditions and situations that may occur It must be understood by the operator that common sense and caution are factors which cannot be built into this product but m...

Page 6: ...d cable do not connect tightly after crimping 1 The tool can not reach to the rated pressure 1 Refer to the fault A C Oil leakage on the head or on the plunger 1 Sealing kit is broken 1 Contact manufacturer or distributor and replace it by trained person PLEASE READ THE FOLLOWING CAREFULLY THE MANUFACTURER AND OR DISTRIBUTOR HAS PROVIDED THE PARTS LIST AND ASSEMBLY DIAGRAM IN THIS MANUAL AS A REFE...

Page 7: ...ear Make sure the oil is filtered by 120 mesh net or over 30µm strainer Meantime avoid getting dust into the oil cup How to change oil Code Name Function 1 Die for crimping unchangeable crimping die 2 Head for holding die 3 Limited pin for preventing head from excessive rotating 4 Release valve for releasing pressure and retracting the die and piston back to starting position 5 Active handle for o...

Page 8: ...g position by twisting handle clockwise Make sure the tool is under its original situation before operating 2 Insert cable fully into connector and then center it between dies 3 Pumping the handle the three moveable dies will move toward and hold the connector automatically Be sure the connector was centered between dies Keep pumping until a significant sound was heard it means we have finished on...

Reviews: