43
FRAME MOUNTED ROLL-OUT SHELF
WARNING! The enclosure rack must be stabilized before installing any roll-out type accessory com-
ponent or electronic device into the rack. Failure to stabilize the rack before installing equipment
may cause the enclosure to tip over.
Frame mounted components mount directly to the enclosure’s corner posts. They do not require rack
mount rails.
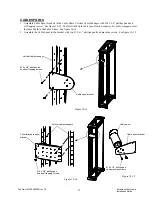
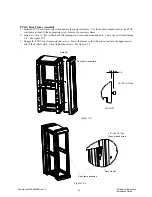
1. One left handed and one right handed bracket is included with a Frame Mounted Roll-out Shelf. (The 48”
wide Frame Mounted Roll-out Shelf has a double slide bracket to support a higher load.) Orient the brackets
so that the slides extend out the front of the enclosure. See figure
9-44
.
2. Install two ¼-20 x ½” hex head self tapping screws into each corner post at the desired shelf height. Leave
the screws protruding 1/8”. See figure
9-45
.
3. Engage the brackets onto the screws and then tighten the screws. See figure
9-46
.
4. Extend the slides. Assemble the roll-out shelf to the brackets with four #10 x 3/8” phillips pan head screws
and four #10-24 locking nuts. See figure
9-46
.
Figure
9-4
4
Figure
9-4
6
Roll-out slide
bracket
1/4”-20 x 1/2” hex head
self-tapping screws
#10-24 x 3/8” phillips
pan head screws
#10-24 keps
locking nuts
Figure 4
5
Roll-out shelf
platform
Pub Num: MN159002EN rev 1.0
Paramount Enclosure
Installation Guide
Summary of Contents for Paramount Enclosure
Page 1: ...Eaton Data Center Racks...
Page 2: ...U...


