UPS OPERATING INSTRUCTIONS
Eaton 9395 Plus 1 UPS (225–275 kVA) Installation and Operation Manual
S
164201710 Rev 2
www.eaton.com\powerquality
7-6
7.2.6
Display Menu Operation
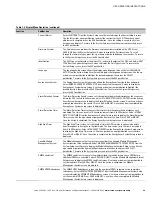
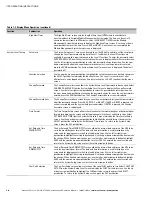
Table 7‐3 describes the menu functions and and how to use them.
Table 7‐3. Display Menu Operation
Function
Subfunction
Operation
Events
Press the
EVENTS
pushbutton on the main menu bar or History menu bar to display a listing of
all system events that are currently active. The most recent event is listed first. As events clear,
they are removed from the Active System Events listing. To scroll through the events, press the
up or down arrow pushbutton on the menu bar.
User History
Press the
HISTORY
pushbutton on the Active Events menu bar to display the User History Log.
The User History Log lists up to 2048 events in chronological order, with the most recent event
listed last (once 2048 is reached, the earliest event is overwritten). The end of the log (the most
recent events) is displayed first; scroll upward to view older event listings. To scroll through the
events, press the up or down arrow pushbutton on the menu bar. To return to the Active Events
screen, press the
EVENTS
pushbutton on the menu bar.
Service History
The Service History Log is for service personnel and is password protected. If the customer
needs access to the log, contact an Eaton service representative.
Press the
SERVICE
pushbutton on the User History menu bar to display the Service History Log.
The Service History Log lists up to 2048 events in chronological order, with the most recent
event listed last (once 2048 is reached, the earliest event is overwritten). The end of the log (the
most recent events) is displayed first; scroll upward to view older event listings. To scroll
through the events, press the up or down arrow pushbutton on the menu bar. To return to the
User History screen, press the
USER
pushbutton on the menu bar. To return to the Active Events
screen, press the
EVENTS
pushbutton on the menu bar.
Meters – UPS
Meters – UPM
The Meter screens show the UPS meter readings for the unit. The default voltage displayed on
these screens is phase-to-neutral. However, an authorized Eaton Customer Service Engineer
can change the screens to display the voltage phase-to-phase (A-B, B-C, C-A). Press the
METERS
pushbutton on the main menu bar to display the Meter screens. To scroll through the
meter screens, press the up or down arrow pushbutton on the menu bar. The current UPS
readings are displayed in the information area of the screen.
Output – UPS
Output – UPM
The Output screen shows output voltage (phase‐to‐neutral), output current (each phase), and
frequency being supplied by the UPS, as well as the kVA, kW, and power factor measurements.
Input – UPS
Input – UPM
The Input screen shows input voltage (phase‐to‐neutral), input current (each phase), and
frequency of the incoming utility source, as well as the kVA, kW, and power factor
measurements.
Bypass
The Bypass screen shows the bypass input voltage (phase‐to‐neutral), input current (each
phase), and frequency of the incoming utility source, as well as the kVA, kW, and power factor
measurements.
Battery – UPS
Battery – UPM
The Battery screen displays the battery voltage (Vdc), the battery current (Idc), the minutes of
battery time remaining, and battery temperature. Battery temperature must be set up by an
authorized Eaton Customer Service Engineer. When battery life decreases to less than 20%,
Check Battery is displayed.
Statistics
The Statistics screen displays the hours on line and the total kW hours used.
Output Current – UPS
Output Current – UPM
The Output Current screen displays a real‐time bar graph of the output current of the UPS. The
graph shows the current for each phase.
Output Power – UPM
The Output Power screen displays the power in kW and kVA for each UPM.
System Level 0 Setup
Function Selection
This screen can be used to set the screen contrast, show the firmware versions installed,
identify the unit type, change the display language, set up Energy Saver functions, set up
Advanced Power Management functions, and enter a password to access Level 1 functions.
Press the
SETUP
pushbutton on the main menu bar to display the System Setup Level 0 Screen.
No password is necessary to access Level 0 functions. Use the up or down arrow pushbutton to
highlight the setup function screen desired, then press the
SELECT
pushbutton to display the
function screen.


