D 30.12 16
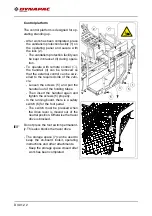
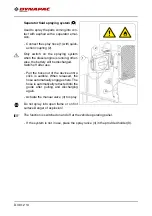
Auger limit switches
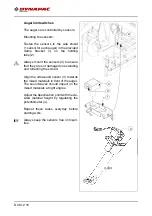
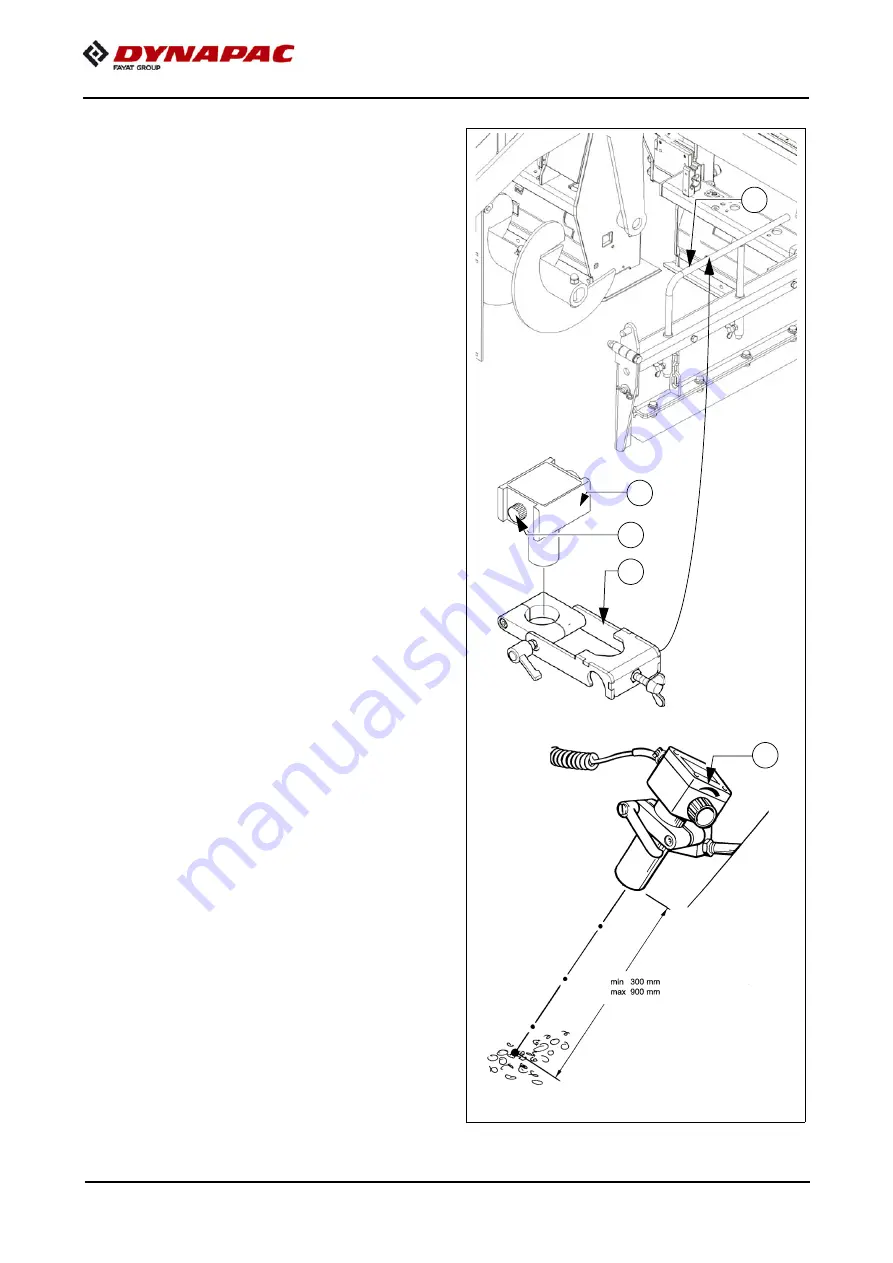
The augers are controlled by sensors.
Mounting the sensors:
Fasten the sensors to the side shield
(1 sensor for each auger) in the provided
clamp bracket (1) on the holding
tube (2).
m
Always mount the sensors (3) to ensure
that they are not damaged on extending
and retracting the screed.
Align the ultrasound sensor (3) towards
the mixed materials in front of the auger.
The sound waves should impact on the
mixed materials at right angles.
Adjust the deactivation point with the de-
sired material height by regulating the
potentiometer (4).
Repeat these tasks everyday before
starting work.
A
Always keep the sensors free of impuri-
ties.
3
2
1
3
4
Summary of Contents for F1200C
Page 2: ...www dynapac com...
Page 10: ...8...
Page 24: ...A 2...
Page 31: ...B 7 4 Safety devices 4 5 6 7 8 8 2 1 9 3 10...
Page 34: ...B 10 5 2 Permissible approach angle max 15 max 10...
Page 41: ...B 17 xxxxxxxxxxxxxxxxx 32 30 31...
Page 52: ...B 28...
Page 74: ...C 10 12 22...
Page 78: ...D 10 12 4 15 16 18 14 13 17 12 11 10 10 19...
Page 80: ...D 10 12 6 15 16 18 14 13 17 12 11 10 10 19...
Page 82: ...D 10 12 8 15 16 18 14 13 17 12 11 10 10 19...
Page 84: ...D 10 12 10 21 20 23 22...
Page 86: ...D 10 12 12 25 24 27 26...
Page 88: ...D 10 12 14 25 24 27 26...
Page 90: ...D 10 12 16 29 30...
Page 92: ...D 10 12 18 32 31...
Page 94: ...D 10 12 20 33...
Page 96: ...D 10 12 22 35 34...
Page 98: ...D 10 12 24 36 38 37...
Page 100: ...D 10 12 26 40 39...
Page 102: ...D 10 12 28 42 41...
Page 104: ...D 10 12 30 44 43...
Page 106: ...D 10 12 32 45...
Page 108: ...D 10 12 34 51 56 58 57 59...
Page 110: ...D 10 12 36 51 56 58 57 59...
Page 112: ...D 10 12 38 Flame monitoring o 73 71 72 70...
Page 114: ...D 10 12 40 77 74 75 76...
Page 118: ...D 10 12 44 95 90 91 92 93 94...
Page 120: ...D 10 12 46 95 90 91 92 93 94...
Page 122: ...D 10 12 48 4 Remote control 103 104 101 106 100 102 105 107 108 109...
Page 124: ...D 10 12 50 103 104 101 106 100 102 105 107 108 109...
Page 126: ...D 10 12 52 103 104 101 106 100 102 105 107 108 109...
Page 128: ...D 10 12 54 103 104 101 106 100 102 105 107 108 109...
Page 130: ...D 10 12 56 5 Malfunctions 5 1 Error code query for engine 3 1 2...
Page 144: ...D 30 12 12 m Tighten all assembly parts properly after setting up...
Page 152: ...D 30 12 20...
Page 157: ...D 40 12 5 1 3 7 8 6 6 7 7 6 2 4 9 5...
Page 160: ...D 40 12 8 1 3 7 8 6 6 7 7 6 2 4 9 5...
Page 163: ...D 40 12 11 1 2...
Page 165: ...D 40 12 13 6 1 2 3 4 5...
Page 167: ...D 40 12 15 4 6 6 6 1 2 5 3...
Page 171: ...D 40 12 19 2 3 2 2 1 4...
Page 173: ...D 40 12 21 1 8 9 8 8 6 4 2 3 5 7 10 13 11 12...
Page 176: ...D 40 12 24 1 2...
Page 178: ...D 40 12 26 1 4 5 10 10 7 3 2 9 6 8 12 10 13 14 16 15 11 4 4 11 11...
Page 186: ...D 40 12 34...
Page 205: ...F 3 12 1 F 3 12 Maintenance conveyor 1 Maintenance conveyor...
Page 211: ...F 4 12 1 F 4 12 Maintenance auger assembly 1 Maintenance auger assembly...
Page 233: ...F 6 12 1 F 6 12 Maintenance hydraulic system 1 Maintenance hydraulic system...
Page 247: ...F 7 12 1 F 7 12 Maintenance drive unit 1 Maintenance drive unit...
Page 260: ...F 7 12 14...
Page 261: ...F 8 12 1 F 8 12 Maintenance electrical system 1 Maintenance electrical system...
Page 276: ...F 8 12 16...
Page 278: ...F 11 12 2 2 7 1 3 5 6 6 4...
Page 284: ...F 11 12 8...
Page 285: ...F 100 1 F 100 Tests stopping 1 Tests checks cleaning stopping...
Page 294: ...F 100 10...
Page 296: ...www dynapac com...

