13
TELESCOPIC ADJUSTABLE LENGTH (DS & DSD Only)
2 models are available in DS and DSD :
• DS or DSD0LAT20 that provide an adjustability range from 14”to 20”
• DS or DSD0LAT32 that provide an adjustability range from 22” to 32
”
NOTE :
This is not load bearing component. If installed in a vertical position,
always install a support above it to support the load from the next sections
.
Installation steps:
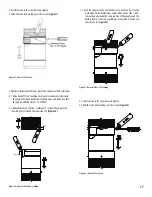
1 - Install the 2 0-rings provided in their respective groove;
2 - Apply a thin film of lubricant on both 0-rings;
3 - Insert the sections into each other until desired length is achieved.
DS: Make sure that both 0-rings penetrate into the section below
DSD: Make sure the outside casing overlaps
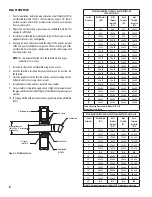
ADJUSTABLE LENGTH DS/DSD/DSID
CAULKING REQUIREMENT
Inside diameter
Qty(oz)
3”
0.2
4”
0.3
5”
0.4
6”
o.s
7”
0.6
8”
0.7
9”
0.8
10”
0.9
12·
1.0
14”
1.2
16”
1.4
18”
1.S
20·
1.7
22”
1.9
24”
2.1
Table 13
Figure 11- Opening clips
ADJUSTABLE LENGTH (DS, DSD, DSID)
For installations that requires non-standard vent lengths, DuraSeal® Adjustable
Length (AL) should be used.
NOTE:
The adjustable length is a non load bearing part. A support
must be used after it to take the load of the sections above.
NOTE:
The inner conduit may be cut to desired length to limit
interference with downstream part. See
Figure 10
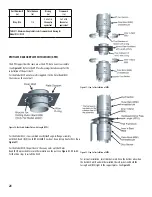
Figure 10 -Adjustable length installation steps
1. Keep a play about 1/8”
to 1/4” to allow thermal
expansion
2. Apply a 1/8” to 1/4” bead
(may vary) of Viton caulking
to fill the gap between the
adjustable length inner
wall and the female end of
the standard part. Please
allow 24-36 hours for Viton
to cure.
1. Keep a play about 1/8”
to 1/4” to allow thermal
expansion
2. Apply a 1/8” to 1/4” bead
(may vary) of Viton caulking
to fill the gap between the
adjustable length inner
wall and the female end of
the standard part. Please
allow 24-36 hours for Viton
to cure.”
3. Slidethecollard own
over the female end of
the downstream part
and tighten the collar
3. Slide the collar down
over the female end of
the downstream part
and tighten the clamp
4. Install the outer shell over end of
downstream part and under the end of
upstream part and tighten the clamps.
Need to cut outer shell to correct length.
DuraSeal DS
DuraSeal DSD
DuraSeal DS
DuraSeal DSD


