background image


 Vigor300B Series User’s Guide


82


Profile 

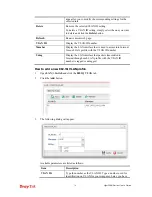
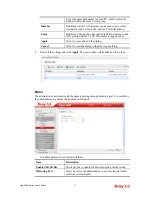
Display the name of the profile. 

Enable The Profile 

Display the status of the profile. False means disabled; True 
means enabled. 

WAN Interface 

Display the WAN interface of this profile. 

Source IP   

Display the source IP used for this entry. 

Private IP 

Display the private IP used for this entry. 

Protocol 

Display the protocol used for the entry. 

Public Port Start 

Display the starting number of the public port. 

Public Port End 

Display the ending number of the public port. 

Private Port 

Display the number of the private port. 

Public IP 

Display what kind of IP is used. 

IP Alias 

Display the selected WAN IP address. 

H

H

o

o

w

w


t

t

o

o


a

a

d

d

d

d


a

a


n

n

e

e

w

w


P

P

o

o

r

r

t

t


R

R

e

e

d

d

i

i

r

r

e

e

c

c

t

t

i

i

o

o

n

n


p

p

r

r

o

o

f

f

i

i

l

l

e

e


1.


Open 

NAT>> Port Redirection

2.


Simply click the 

Add

 button. 


3.


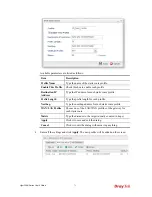
The following dialog will appear. 

Summary of Contents for Vigor300B

Page 1: ......

Page 2: ...Vigor300B Series User s Guide ii Vigor300B Multi WAN Load Balancer User s Guide Version 1 0 Firmware Version V1 0 0_RC3 for future update contact DrayTek Date 18 06 2012 ...

Page 3: ...ions on conservation of the environment Warranty We warrant to the original end user purchaser that the router will be free from any defects in workmanship or materials for a period of two 2 years from the date of purchase from the dealer Please keep your purchase receipt in a safe place as it serves as proof of date of purchase During the warranty period and upon proof of purchase should the prod...

Page 4: ... harmful interference in a residential installation This equipment generates uses and can radiate radio frequency energy and if not installed and used in accordance with the instructions may cause harmful interference to radio communications However there is no guarantee that interference will not occur in a particular installation If this equipment does cause harmful interference to radio or tele...

Page 5: ... Router 16 Chapter 3 Application and Tutorial 19 3 1 How to Configure Load Balance with Multi WAN on Vigor300B 19 Chapter 4 Advanced Configuration 25 4 1 WAN Setup 25 4 1 1 General Setup 26 4 1 2 Default Route 39 4 1 3 Load Balance 40 4 1 4 Switch 48 4 2 LAN 49 4 2 1 General Setup 49 4 2 2 IP Routing 64 4 2 3 Static Route 66 4 2 4 Switch 73 4 2 5 Bind IP to MAC 76 4 2 6 RIP Configuration 79 4 3 NA...

Page 6: ... Management 162 4 8 1 Incoming Class 163 4 8 2 Incoming Filter 166 4 8 3 Outgoing Class 169 4 8 4 Outgoing Filter 175 4 8 5 Sessions Limit 178 4 8 6 Bandwidth Limit 180 4 9 System Maintenance 183 4 9 1 TR 069 183 4 9 2 Administrator Password 184 4 9 3 Configuration Backup 185 4 9 4 Syslog Mail Alert 187 4 9 5 Time and Date 190 4 9 6 Access Control 191 4 9 7 SNMP Setup 192 4 9 8 Reboot System 193 4...

Page 7: ... the Network Connection Settings on Your Computer Is OK or Not 210 5 3 Pinging the Router from Your Computer 212 5 4 Checking If the ISP Settings are OK or Not 213 5 5 Backing to Factory Default Setting If Necessary 214 5 6 Contacting Your Dealer 215 ...

Page 8: ......

Page 9: ... on the web pages are defined as the following Save and apply current settings Cancel current settings and recover to the previous saved settings Clear all the selections and parameters settings including selection from drop down list All the values must be reset with factory default settings Add new settings for specified item Edit the settings for the selected item Delete the selected item with ...

Page 10: ...ady WAN1 WAN4 Blinking It will blink while transmitting data On USB device is connected and ready for use USB1 USB2 Blinking The data is transmitting LED on Connector On The port is connected Off The port is disconnected Left LED Green Blinking The data is transmitting On The port is connected with 1000Mbps LAN 1 2 Giga Right LED Green Off The port is disconnected with 10 100Mbps On The port is co...

Page 11: ...e and keep for more than 5 seconds When you see the ACT LED begins to blink rapidly than usual release the button Then the router will restart with the factory default configuration LAN1 2 Giga Connecters for local networked devices WAN1 2 3 4 Giga Connecters for remote networked devices USB1 2 Connecter for Mobile HDD 3G Modem or printer Connecter for a power cord ON OFF Power switch ...

Page 12: ...evice also can connect to other computers to form a small area network The LAN LED for that port on the front panel will light up 3 Connect the cable Modem DSL Modem Media Converter to any WAN port of router with Ethernet cable RJ 45 4 Connect the power cord to Vigor300B s power port on the rear panel and the other side into a wall outlet 5 Power on the device by pressing down the power switch on ...

Page 13: ... for placing the router Make the screw holes on the short side of the bracket aim at the screw holes on the router Next fasten both the bracket and the router with two screws and fasten both the wall and the bracket with another two screws Refer to the following figure Then continue to fasten the screws on the other side of the router and the wall with other screws When you finished about procedur...

Page 14: ...Vigor300B Series User s Guide 6 This page is left blank ...

Page 15: ...o change the password for this device you have to access into the web browse with default password first 1 Make sure your computer connects to the router correctly Notice You may either simply set up your computer to get IP dynamically from the router or set up the IP address of the computer to be the same subnet as the default IP address of Vigor router 192 168 1 1 For the detailed information pl...

Page 16: ...strator Password 5 Enter the login password admin on the field of Original Password Type a new one in the field of New Password and retype it on the field of Confirm Password Then click Apply to continue 6 Now the password has been changed Next time use the new password to access the Web Configurator for this router ...

Page 17: ...art Wizard from the home page Quick Start Wizard will guide the user to select proper LAN interface profile WAN interface profile and select proper protocol for connection The following will explain in more detail for the various broadband access configurations 2 2 2 2 1 1 S St te ep p 1 1 S Sp pe ec ci if fy yi in ng g t th he e W WA AN N P Pr ro of fi il le e In the first page of Quick Start Wiz...

Page 18: ...to Point Protocol over Ethernet It relies on two widely accepted standards PPP and Ethernet It connects users through an Ethernet to the Internet with a common broadband medium such as a single DSL line wireless device or cable modem All the users over the Ethernet can share a common connection PPPoE is used for most of DSL modem users All local users can share one PPPoE connection for accessing t...

Page 19: ...ta at ti ic c i is s s se el le ec ct te ed d If Static is selected the following screen will appear You can manually assign a static IP address to the WAN interface and complete the configuration by applying the settings and rebooting your router Please type in values for Static IP address Static Mask Static Gateway and Static DNS specified by your ISP and then click Next Available parameters are...

Page 20: ...ppear for you to type the IP address When you finish the settings click Save Add Click this button to display the IP address field for adding a new IP address Type the IP address on the tiny boxes one by one Save After finished the IP address configuration click it to save the setting onto the router Click the icon to remove the selected entry Previous Click it to return to previous setting page F...

Page 21: ... for Vigor300B automatically It is not necessary for you to assign any setting Host Name is required for some ISPs Available parameters are listed as follows Item Description Host Name Optional Type a name as the host name for identification Previous Click it to return to previous setting page Finish Click it to finish the configuration Cancel Click it to exit the wizard without saving the configu...

Page 22: ...ction for accessing the Internet Your service provider will provide you information about user name password and authentication mode If your ISP provides you the PPPoE Point to Point Protocol over Ethernet connection please select PPPoE for this router to get the following page Enter the username and password provided by your ISP on the web page Available parameters are listed as follows Item Desc...

Page 23: ...s User s Guide 15 When you finished the above settings please click Finish Later you can surf the Internet at any time When the following screen appears it means you have finished the Quick Start Wizard configuration ...

Page 24: ...llow the steps below to register the router 1 Before using such function please register your router online first Log into the web configurator of Vigor300B and click Product Registration 2 A Login page will be shown on the screen Please type the account and password that you created previously And click Login ...

Page 25: ...ce List all the Vigor routers that you have registered to MyVigor website will be displayed in sequence 4 When the following page appears please type in Nick Name for the router and choose the right registration date from the popup calendar it appears when you click on the box of Registration Date After adding the basic information for the router please click Submit ...

Page 26: ...8 5 Now your router information has been added to the database Click OK to leave this web page and return to My Information web page 6 Take a look at the page of My Information the new added Vigor300B is listed under Your Device List ...

Page 27: ... ti i W WA AN N o on n V Vi ig go or r3 30 00 0B B There are two different LANs configured in the following figure One is for Sale 192 168 1 1 24 and the other is for FAE 192 168 2 1 24 Sale s LAN will be configured to go Internet always via WAN1 When WAN1 is down Sale s LAN will automatically failover to WAN2 FAE s LAN will be configured to go Internet always via WAN2 but when WAN2 is down Sale s...

Page 28: ...e web configurator page of Vigor300B 2 Go to LAN General Setup to create a profile for LAN1 192 168 1 1 24 3 Click Add to open the following page Type the information specified for LAN1 profile then click Apply to save the settings and exit the screen ...

Page 29: ... Guide 21 4 Click Add again to create a profile for LAN2 192 168 2 1 24 Type the information specified for LAN2 profile then click Apply to save the settings and exit the screen 5 Open WAN Load Balance and click the Pool tab ...

Page 30: ...ance as the Mode option 7 Click the Load_Balance tab to open the following page Setup the Weights e g 1 of WAN1 and WAN2 as you want In this case ratio of WAN1 and WAN2 is 1 1 Also you can type 2 and 1 for WAN1 and WAN2 then the ratio of line speed of WAN 1and line speed of WAN 2 will be 2 1 8 After clicking Apply the created profile will be shown on the screen ...

Page 31: ...e a profile for Rule1 accepting the data coming from 192 168 1 0 24 which always goes Internet via WAN1 when WAN1 is up Type the information specified for such rule e g Rule1 for Profile 192 168 1 0 for Source IP Address wan1 for Load Balance Pool WAN Profile and so on Next click Apply to save and exit ...

Page 32: ...the created profiles will be shown on the screen 13 Next open WAN Default Route Choose the profile of WAN1WAN2 as WAN Profile Loadbalance Pool Name Note The priority of WAN Load Balance Rule is higher than WAN Default Route Now you have completed the configuration Next time when WAN1 is down the connection for PCs behind Sale s LAN 192 168 1 1 24 will automatically failover to WAN2 ...

Page 33: ...in the following ranges From 10 0 0 0 to 10 255 255 255 From 172 16 0 0 to 172 31 255 255 From 192 168 0 0 to 192 168 255 255 W Wh ha at t a ar re e P Pu ub bl li ic c I IP P A Ad dd dr re es ss s a an nd d P Pr ri iv va at te e I IP P A Ad dd dr re es ss s As the router plays a role to manage and further protect its LAN it interconnects groups of host PCs Each of them has a private IP address ass...

Page 34: ... the transmission through the network Each WAN port can connect to different ISPs even if the ISPs use different technology to provide telecommunication service such as DSL Cable modem etc If any connection problem occurred on one of the ISP connections all the traffic will be guided and switched to the normal communication port for proper operation Each item will be explained as follows Item Desc...

Page 35: ...ed di it t t th he e W WA AN N p pr ro of fi il le e 1 Open WAN General Setup Choose wan1 wan2 wan3 wan4 profile and click the Edit button to open the following dialog Only the tab of the protocol specified in IPv4 Protocol field will be available for you to modify If you want to change and specify another connection mode for such WAN profile remember to choose the mode from the drop down list of ...

Page 36: ...e MAC address for such profile if you click Disable for Default MAC address In default the system will determine it automatically Mode Determine such profile will be used for NAT or routing IPv4 Protocol There are four connection modes for you to specify for IPv4 protocol type Each mode will bring up different web page IPv6 Protocol There are four connection modes for you to specify for IPv6 proto...

Page 37: ... IP address specified for such profile Subnet Mask Use the drop down list to choose the subnet mask for such profile Gateway IP Address Type a public gateway address for such WAN profile click it to remove the IP address if you are not satisfied with it DNS Server IP Address Add Click this button to display the IP address field for adding a new IP address Type the IP address on the tiny boxes one ...

Page 38: ...e setting onto the router Click the icon to remove the selected entry MTU MRU Type the value of MTU MRU The default value is 1500 Connection Detection Mode Select a detecting mode for this WAN interface There are three ways ARP PING and HTTP supported in Vigor router for you to choose to send the request out Connection Detection Host Add Click this button to have a field for adding a new IP addres...

Page 39: ...ace After passing the times you set in this field and no reply received by the router the connection of WAN interface will be regarded as breaking down Apply Click it to save the configuration and exit the dialog Cancel Click it to exit the dialog without saving the configuration z If you choose DHCP as IPv4 protocol type click the DHCP Tab to open the following page Available parameters are liste...

Page 40: ...nterface There are three ways ARP PING and HTTP supported in Vigor router for you to choose to send the request out Connection Detection Host Add click this button to have a field for adding a new IP address Assign an IP address or Domain name as a destination to be detected whether the host is active sending reply to the router or not If not the connection of WAN interface will be regarded as bre...

Page 41: ...lt value is 1492 Debug Click Enable to display the PPPoE debug message in Syslog The default setting is Disable Always On Enable Click it to enable the function of Always On The router will keep network connection all the time Disable Click it to disable the function of Always On Fixed IP Enable Click it to enable the function of Always On The router will keep network connection all the time Disab...

Page 42: ...the icon to remove the selected entry Connection Detection Interval Assign an interval period of time for each detecting Connection Detection Retry Assign detecting times to ensure the connection of the WAN interface After passing the times you set in this field and no reply received by the router the connection of WAN interface will be regarded as breaking down IP Alias Type other IP addresses to...

Page 43: ...only available in wan4 profile as IPv4 protocol type click the DMZ Tab to open the following page Available parameters are listed as follows if you choose NAT as DMZ Mode Item Description DMZ Mode Choose NAT or Routing as DMZ mode IP Address Type the IP address specified for such profile Subnet Mask Use the drop down list to choose the subnet mask for such profile Apply Click it to save the config...

Page 44: ... DMZ outgoing DMZ Host IP List Enter the private IP address of the DMZ host Apply Click it to save the configuration and exit the dialog Cancel Click it to exit the dialog without saving the configuration z If you choose Link Local as IPv6 protocol type Link Local address is used for communicating with neighbouring nodes on the same link It is defined by the address prefix fe80 64 You don t need t...

Page 45: ...efix Length Type your IPv6 address prefix length IPv6 Gateway Address Type your IPv6 gateway address IPv6 DNS Server Address Type your IPv6 primary DNS Server address Add Click this button to have a field for adding a new IP address Save Click this button to save the setting Click the icon to remove the selected entry Apply Click it to save the configuration and exit the dialog Cancel Click it to ...

Page 46: ...ion DHCP IA_NA Gateway Address Type the gateway IP address for IPv6 DHCP IA_NA mode DHCP IA_NA DNS Address Add Click this button to type primary DNS server address for IPv6 Save Click this button to save the setting Click the icon to remove the selected entry Apply Click it to save the configuration and exit the dialog Cancel Click it to exit the dialog without saving the configuration ...

Page 47: ...ave and apply the settings 4 4 1 1 2 2 D De ef fa au ul lt t R Ro ou ut te e This page allows you to assign a WAN profile as the default route Available parameters are listed as follows Item Description WAN Profile Loadbalance Pool Name Display the WAN or load balance profiles for the user to choose as a default route Refresh Renew the page configuration Apply Click it to save the configuration ...

Page 48: ...iles as a pool profile specified with the function of load balance or failover The profiles configured here will be selected in the field of WAN Default Route page Each item will be explained as follows Item Description Add Add a new pool profile Edit Modify the selected pool profile To edit a profile simply select the one you want to modify and click the Edit button The edit window will appear fo...

Page 49: ... you choose Load_Balance the tab of Load_Balance will be shown which allows you to configure for different WAN interfaces If you choose Failover the tab of Failover will be displayed which allows you to specify the primary profile and backup profile for such Pool setting H Ho ow w t to o a ad dd d a a p po oo ol l p pr ro of fi il le e f fo or r L Lo oa ad d B Ba al la an nc ce e 1 Open WAN Load B...

Page 50: ...lick the Load_Balance Tab 4 Click Add A new line for adding new entry will appear Use the drop down list of Interface to choose one of the WAN profiles Type the value e g 20 for Weight 5 Click Apply A new profile will be added on the page ...

Page 51: ...l lo ov ve er r Such page allows you to set a backup profile which will be activated when the primary profile is invalid by any reason 1 Open WAN Load Balance and click the tab of Pool 2 Simply click the Add button to open the following dialog Type a name for such profile e g FL_1 Choose Failover as the Mode selection ...

Page 52: ...ilover Tab In default the system will apply Primary Profile If Primary Profile cannot be used any more the Backup Profile will be used instead 4 Use the drop down list to choose the one you need 5 Click Apply A new profile will be added on the page ...

Page 53: ... corresponding settings for the selected rule Delete Remove the selected rule profile To delete a rule simply select the one you want to delete and click the Delete button Refresh Renew current web page Move Up Move Down Move the selected profile up or down Profile Display the name of the rule Enable This Profile Display the status of such profile Protocol Display the protocol used for such rule S...

Page 54: ...ule H Ho ow w t to o a ad dd d a a n ne ew w r ru ul le e f fo or r L Lo oa ad d B Ba al la an nc ce e 1 Open WAN Load Balance Policy and click the tab of Rule 2 Simply click the Add button 3 The following dialog will appear Available parameters are listed as follows Item Description Profile Type the name of the rule Enable This Profile Check this box to enable such profile Protocol Choose a proto...

Page 55: ...mask for the destination Destination Port Start Type a value as the destination port starting for such rule Destination Port End Type a value as the destination port ending for such rule Load Balance Pool WAN Profile Choose one of the profiles to be used by such rule In which wan1 to wan5 profiles are configured in default In addition profiles configured in WAN Load Balance Policy Pool page also w...

Page 56: ...Available parameters are listed as follows Item Description Enable This Profile Check the box to enable the Mirror function for the switch Mirroring Port Select a port for the administrator to use for viewing traffic sent from mirrored ports Mirrored Port Select a port to make the packets passing through it monitored by the administrator Refresh Renew current web page Apply Click it to save the co...

Page 57: ... to public IP address to forward the right packets to the right host and vice versa Besides Vigor router has a built in DHCP server that assigns private IP address to each local host 4 4 2 2 1 1 G Ge en ne er ra al l S Se et tu up p This page allows you to set LAN profiles for PCs in LAN Settings of DHCP DHCP Relay RADVD and DHCPv6 settings are generated automatically by the system when the LAN pr...

Page 58: ... edit window will appear for you to modify the corresponding settings for the selected rule Delete Remove the selected LAN profile To delete a rule simply select the one you want to delete and click the Delete button Refresh Renew current web page Profile Display the name of the LAN profile Enable This Profile Display the status of the profile False means disabled True means enabled Description Di...

Page 59: ...on web page Available parameters are listed as follows Item Description Profile Type the name of the LAN profile Enable This Profile Check this box to enable such profile Description Type the description for the new LAN profile VLAN ID Type a number as the VLAN ID to make the data be identified while performing data transmission Default MAC Address Enable Click it to enable the default MAC address...

Page 60: ...s if you click Add for adding a new entry Subnet Mask Use the drop down list to choose the one you want Mode Specify NAT or Routing as the mode click the icon to remove the selected entry IPv6 Protocol It defines the IPv6 connection types for LAN interface Possible types contain Link Local Static and DHCP SLA Except Link Local each type requires different parameter settings Link Local Link Local a...

Page 61: ...d DHCPv6 SLA ID The ID number set here is used by an individual organization to create its own local addressing hierarchy and to identify subnets Apply Click it to save and exit the dialog Cancel Click it to exit the dialog without saving anything 3 When you finish the above settings please click Apply to save the configuration and exit the dialog ...

Page 62: ...e you will see the private IP address defined in RFC 1918 Usually we use the 192 168 1 0 24 subnet for the route Each item will be explained as follows Item Description Edit Modify the selected LAN profile To edit a profile simply select the one you want to modify and click the Edit button The edit window will appear for you to modify the corresponding settings for the selected rule Refresh Renew ...

Page 63: ...IP Display the start IP address for an IP range The DHCP server can assign an IP address for remote dial in user from such IP range Remote Dial in End IP Display the end IP address for an IP range The DHCP server can assign an IP address for remote dial in user from such IP range H Ho ow w t to o e ed di it t a a L LA AN N p pr ro of fi il le e f fo or r D DH HC CP P 1 Open LAN General Setup and c...

Page 64: ... Click it to add a new IP address for DNS server Save Click it to save the setting click the icon to remove the selected entry Routers In general this box will be blank It means Vigor300B will be regarded as the gateway for the user However if you want to use other gateway please assign the IP address in this field Lease Time Set a lease time for the DHCP server The time unit is minute Apply Click...

Page 65: ...profile To edit a profile simply select the one you want to modify and click the Edit button The edit window will appear for you to modify the corresponding settings for the selected rule Refresh Renew current web page Profile Display the name of the LAN profile Enable This Profile Display the status of the profile False means disabled True means enabled DHCP Server Location Display the LAN or WAN...

Page 66: ...e parameters are listed as follows Item Description Profile Display the name of the LAN profile Enable This Profile Check this box to enable this profile DHCP Server Location Specify a WAN profile as the server location DHCP Server IP Type the IP address of DHCP Server Apply Click it to save and exit the dialog Cancel Click it to exit the dialog without saving anything 3 When you finish the above ...

Page 67: ...quired for IPv6 stateless auto configuration Each item will be explained as follows Item Description Edit Modify the selected LAN profile To edit a profile simply select the one you want to modify and click the Edit button The edit window will appear for you to modify the corresponding settings for the selected rule Refresh Renew current web page Profile Display the name of the LAN profile Enable ...

Page 68: ...tab 2 Choose one of the LAN profiles by clicking on it and click the Edit button to open the following dialog Available parameters are listed as follows Item Description Profile Display the name of the LAN profile Enable This Profile Check this box to enable this profile Advertisement Lifetime Type a value for advertisement lifetime The lifetime associated with the default router in units of minut...

Page 69: ... address to PC according to the Start End IPv6 address configuration Each item will be explained as follows Item Description Edit Modify the selected LAN profile To edit a profile simply select the one you want to modify and click the Edit button The edit window will appear for you to modify the corresponding settings for the selected rule Refresh Renew current web page Profile Display the name of...

Page 70: ... the ending IP address of the IP address pool for DHCP server DNS Display the private IP address for DNS server H Ho ow w t to o e ed di it t a a L LA AN N p pr ro of fi il le e f fo or r D DH HC CP Pv v6 6 1 Open LAN General Setup and click the DHCPv6 tab 2 Choose one of the LAN profiles by clicking on it and click the Edit button to open the following dialog Available parameters are listed as fo...

Page 71: ...e format the IP address shall be similar to the following example 2000 0000 0000 0000 0000 0000 0000 10 or 2000 10 DNS Set the private IP address for DNS server If this field is blank users on LAN will treat Vigor300B as the DNS server Add Click it to add a new IP address for DNS server Save Click it to save the setting click the icon to remove the selected entry Apply Click it to save and exit th...

Page 72: ...the local device directly without any difficulty Each item will be explained as follows Item Description Add Add a new IP Routing profile Edit Modify the selected IP routing setting To edit the IP routing setting simply select the one you want to modify and click the Edit button The edit window will appear for you to modify the corresponding settings for the selected profile Delete Remove the sele...

Page 73: ...IP Routing 2 Click the Add button 3 The following dialog will appear Available parameters are listed as follows Item Description Profile Type the name of the IP routing profile Enable This Profile Check this box to enable such IP routing profile WAN Profile Choose one of WAN profiles for sending data out LAN Profile Choose one of LAN profiles for the local device IP Type the private IP address for...

Page 74: ... will be added on the screen 4 4 2 2 3 3 S St ta at ti ic c R Ro ou ut te e When there are several subnets in LAN a more effective and quicker way for connection is static route rather than other methods Simply set rules to forward data from one specified subnet to another specified subnet ...

Page 75: ...ed static route setting To delete a static route setting simply select the one you want to delete and click the Delete button Refresh Renew current web page Rename Allow to modify the selected profile name Profile Display the name of such static route Enable This Profile Display the status of the profile False means disabled True means enabled Destination IP Address Display the IP address for such...

Page 76: ...ear Available parameters are listed as follows Item Description Profile Type the name of the static route profile Enable This Profile Check this box to enable such profile Destination IP Address Type the IP address for such static route profile Subnet Mask Use the drop down list to choose the subnet mask for such static route profile Gateway Type the gateway address for such static route profile W...

Page 77: ... added on the screen I IP Pv v6 6 S St ta at ti ic c R Ro ou ut te e For IPv6 protocol click the IPv6 Static Route tab to configure detailed settings Each item will be explained as follows Item Description Add Add a new static route setting Edit Modify the selected static route setting To edit static route setting simply select the one you want to modify and click the Edit button The edit window w...

Page 78: ... False means disabled True means enabled Destination IP Address Display the IP address for such static route profile Prefix Length Display the prefix length of the profile Nexthop Display the nexthop address for such static route profile WAN LAN Profile Display the subnet LAN or WAN profile of the gateway Metric Display the distance to the target H Ho ow w t to o a ad dd d a a n ne ew w I IP Pv v6...

Page 79: ...oute profile Prefix Length Type the prefix length for such profile Nexthop Type the nexthop address for such static route profile WAN LAN Profile Choose one of the LAN WAN profiles of the gateway for such static route Metric Type the distance to the target usually counted in hops Apply Click it to save and exit the dialog Cancel Click it to exit the dialog without saving anything 4 Enter all the s...

Page 80: ...Vigor300B Series User s Guide 72 I In nt te er r L LA AN N R Ro ou ut te e To make the users in different LAN communicating with each other please check the box to enable Inter LAN route function ...

Page 81: ... a company might have one VLAN for its Engineering Department another for its Marketing Department and another for its guest who can only use Internet not Intranet VLANs can also be set up according to the organization structure within a company For example the company president might have his own VLAN his executive staff might have a different VLAN and the remaining employees might have yet a dif...

Page 82: ...to Internet for such LAN profile with the VLAN ID number Untag Display the LAN interface that packets transmitted to Internet through such LAN profile with the VLAN ID number is tagged or untagged H Ho ow w t to o a ad dd d a a n ne ew w 8 80 02 2 1 1Q Q V VL LA AN N p pr ro of fi il le e 1 Open LAN Switch and click the 802 1Q VLAN tab 2 Click the Add button 3 The following dialog will appear Avai...

Page 83: ... to save and exit the dialog Cancel Click it to exit the dialog without saving anything 4 Enter all the settings and click Apply The new profile will be added on the screen M Mi ir rr ro or r The administrator can monitor all the packets passing through mirrored port It is useful for the administrator to analyze the troubles on Network Available parameters are listed as follows Item Description En...

Page 84: ...ternet Each item will be explained as follows Item Description Select All Allow you to choose all the items listed in ARP Table Move Move the selected item to IP Bind List ARP Table This table is the LAN ARP table of this router The information for IP and MAC will be displayed in this field Each pair of IP and MAC address listed in ARP table can be selected and added to IP Bind List by clicking Mo...

Page 85: ...profile MAC Display the MAC address specified for the profile H Ho ow w t to o c co on nf fi ig gu ur re e B Bi in nd d I IP P t to o M MA AC C 1 Open LAN Bind IP to MAC and click the Global Setting tab 2 Use the drop down menu to specify a suitable mode There are three modes offered for you to choose Disable The function of Bind IP to MAC is disabled Enable Specified IP addresses on the Bind Tabl...

Page 86: ...eters are listed as follows Item Description Profile Type the name of the profile IP Address Type the IP address that will be used for the specified MAC address MAC Type the MAC address that is used to bind with the assigned IP address Apply Click it to save and exit the dialog Cancel Click it to exit the dialog without saving anything 5 Enter all the settings and click Apply ...

Page 87: ...e there is no obstruction on the network routine In addition it will choose a correct route based on the method of Distance Vector Routing and use the Bellman Ford algorithm to calculate the routing table RIP can update the routing table automatically and find a route to send packet See the following figure as an example a unique Suppose A supports RIP on WAN1 WAN2 WAN3 WAN4 B supports RIP on WAN1...

Page 88: ...nternal IP addresses of many computers on a LAN to be translated to one public address to save costs and resources of multiple public IP addresses It also plays a security role by obscuring the true IP addresses of important machines from potential hackers on the Internet The Vigor 3900 Series is NAT enabled by default and gets one globally routable IP addresses from the ISP by Static PPPoE or DHC...

Page 89: ...ser can also translate the port to another port by configuration For example port number with 1024 can be transferred into IP address of 192 168 1 100 of LAN The packet is forwarded to a specific local host if the port number matches that defined in the table Each item will be explained as follows Item Description Add Add a new port redirect profile Edit Modify the selected profile To edit a profi...

Page 90: ... entry Protocol Display the protocol used for the entry Public Port Start Display the starting number of the public port Public Port End Display the ending number of the public port Private Port Display the number of the private port Public IP Display what kind of IP is used IP Alias Display the selected WAN IP address H Ho ow w t to o a ad dd d a a n ne ew w P Po or rt t R Re ed di ir re ec ct ti...

Page 91: ...x to enable this profile WAN Interface Specify the WAN interface for such profile Source IP Type the source IP address used for port redirection click the icon to clear the IP setting Private IP Specify the private IP address of the internal host providing the service Simply type the private IP used for this entry Protocol Choose the protocol used for the entry ...

Page 92: ...ate Port End Specify the private port number of the service offered by the internal host Type the starting ending number of the private port Apply Click it to save and exit the dialog Cancel Click it to exit the dialog without saving anything 4 Enter all the settings and click Apply 5 A new profile has been added onto Port Redirection table ...

Page 93: ...st is not able to initiate a session back into the private network It can only forward packets that have already been requested Users of the public network outside the company can access only the DMZ host The DMZ may typically also have the company s Web pages so these could be served to the outside world If an outside user penetrated the DMZ host s security only the Web pages will be corrupted bu...

Page 94: ...rofile that such DMZ host profile will be applied to Private IP Display the private IP used for this entry Use IP Alias Display the using status enabled or disabled for WAN IP alias IP Alias Display the selected WAN IP address H Ho ow w t to o a ad dd d a a n ne ew w D DM MZ Z H Ho os st t p pr ro of fi il le e 1 Open NAT DMZ Host 2 Simply click the Add button 3 The following dialog will appear ...

Page 95: ...te IP used for this entry Use IP Alias Click Enable to invoke IP Alias function IP Alias IP alias that can be selected and used for port redirection Before using it please go to WAN General Setup and enable the wan1 profile Add several IP addresses under Static mode for wan1 Apply Click it to save and exit the dialog Cancel Click it to exit the dialog without saving anything 4 Enter all the settin...

Page 96: ...hen it sends packet out to Internet You can use address mapping function to achieve this demand Simply type 192 168 1 10 as the Private IP and type 86 123 123 2 as the WAN IP Each item will be explained as follows Item Description Add Add a new DMZ host profile Edit Modify the selected profile To edit a profile simply select the one you want to modify and click the Edit button The edit window will...

Page 97: ...isplay the protocol used for the entry Use IP Alias Display the using status enabled or disabled for WAN IP alias IP Alias Display the selected WAN IP address H Ho ow w t to o a ad dd d a a n ne ew w A Ad dd dr re es ss s M Ma ap pp pi in ng g p pr ro of fi il le e 1 Open NAT Address Mapping 2 Simply click the Add button 3 The following dialog will appear Available parameters are listed as follows...

Page 98: ...e the protocol used for the entry Use IP Alias Click Enable to invoke IP Alias function IP Alias IP alias that can be selected and used for port redirection Before using it please go to WAN General Setup and enable the wan1 profile Add several IP addresses under Static mode for wan1 Apply Click it to save and exit the dialog Cancel Click it to exit the dialog without saving anything 4 Enter all th...

Page 99: ...4 4 4 F Fi ir re ew wa al ll l The firewall controls the allowance and denial of packets through the router The Firewall Setup in the Vigor300B mainly consists of packet filtering Denial of Service DoS and URL Universal Resource Locator content filtering facilities These firewall filters help to protect your local network against attack from outsiders A firewall also provides a way of restricting ...

Page 100: ...ile Extension Object IM Object P2P Object P2P Object Protocol Object Web Category Object Time Object and etc and form a powerful firewall to protect your computer I IP P F Fi il lt te er r This page allows you to create new IP filter rule s and group them for your request The upper part displays the information of IP Filter Group s the lower part displays the information of IP Filter Rule s You sh...

Page 101: ...lete a rule simply select the one you want to delete and click the Delete button Refresh Renew current web page Rename Allow to modify the selected profile name Group Display the name of the IP filter group profile Enable The Profile Display the status of the profile False means disabled True means enabled Comment Display the description for such profile IP Filter Rule Group of Selected Group Add ...

Page 102: ...ime Profile If no time schedule is set None will be shown in this field Source IP Display the source IP object profile selected for each rule Destination IP Display the destination IP object profile selected for each rule Service Type Display the service type object profile selected for each rule Action Display the action pass or block of such rule will use Next Group Display the name for next gro...

Page 103: ...Group Type the name of the IP filter group Enable This Profile Check the box to enable this profile Comment Give a brief description for the profile 4 Enter all the settings and click Apply 5 A new filter group has been added onto the table 6 Choose the IP filter group first and then click the Add tab the lower one in this page ...

Page 104: ...Vigor300B Series User s Guide 96 7 The following page for configuration will appear Available parameters are listed as follows ...

Page 105: ...ype You can click to create another new service type object profile Input Interface Choose one of the LAN or WAN profiles as data receiving interface Output Interface Choose one of the LAN or WAN profiles as data transmitting interface Fragments Specify the action for fragmented packets do_not_care No action will be taken towards fragmented packets unfragment Apply the rule to unfragmented packets...

Page 106: ...nything 8 Enter all the settings and click Apply 9 A new IP filter rule has been added onto IP Filter Rules of Selected Group table Note You can create multiple IP filter groups Each IP Filter Rules of Selected Group belongs to an IP Filter Rule Group Click an IP Filter Rule Group to show its members in the lower display window ...

Page 107: ... the one you want to modify and click the Edit button The edit window will appear for you to modify the corresponding settings for the selected rule Delete Remove the selected profile To delete a rule simply select the one you want to delete and click the Delete button Refresh Renew current web page Rename Allow to modify the selected profile name Profile Display the name of the application filter...

Page 108: ...lected for such application profile Protocol Block Display the protocol object profile selected for such application profile H Ho ow w t to o c cr re ea at te e a an n A Ap pp pl li ic ca at ti io on n F Fi il lt te er r p pr ro of fi il le e 1 Open Firewall Filter Setup and click the Application Filter tab 2 Simply click the Add button 3 The following dialog will appear ...

Page 109: ...not be filtered by the router for such group You can click to create another new IP object profile IM Block Choose one or more IM object profiles from the drop down list which will not be allowed to pass through the router You can click to create another new IM object profile P2P Block Choose one or more P2P object profiles from the drop down list which will not be allowed to pass through the rout...

Page 110: ...lete Remove the selected profile To delete a rule simply select the one you want to delete and click the Delete button Refresh Renew current web page Rename Allow to modify the selected profile name Profile Display the name of the application filter profile Enable The Profile Display the status of the profile False means disabled True means enabled Time Profile If no time schedule is set None will...

Page 111: ...ch rule which is not allowed to pass through the router Web Category Administration Message The message will display on the user s browser when he she tries to access the blocked web page H Ho ow w t to o c cr re ea at te e a a U UR RL L F Fi il lt te er r p pr ro of fi il le e 1 Open Firewall Filter Setup and click the URL Filter tab 2 Simply click the Add button 3 The following dialog will appea...

Page 112: ...e another new keyword object profile Keyword Block Choose one or more keyword object profiles from the drop down list which will not be allowed to pass through the router You can click to create another new keyword object profile File Extension Block Choose one or more P2P object profiles from the drop down list which will not be allowed to pass through the router You can click to create another n...

Page 113: ...re listed as follows Item Description Enable This Profile Check the box to enable this profile Block SYN Flood Click Enable to activate the SYN flood defense function If the amount of TCP SYN packets from the Internet exceeds the user defined threshold value the router will be forced to randomly discard the subsequent TCP SYN packets within the user defined timeout period SYN Flood Threshold The d...

Page 114: ... destination addresses and port number as those of the victim Block SMURF Click Enable to activate the Block Smurf function The router will reject any ICMP echo request destined for the broadcast address Block Trace Route Click Enable to activate the Block Trace Route function Block SYN Fragment Click Enable to activate the Block SYN fragment function Any packets having the SYN flag and fragmented...

Page 115: ... filter some unnecessary packets or attacking packets on LAN network Each item will be explained as follows Item Description Add Add a new profile Edit Modify the selected profile To edit a profile simply select the one you want to modify and click the Edit button The edit window will appear for you to modify the corresponding settings for the selected rule Delete Remove the selected profile To de...

Page 116: ...MAC Block 2 Simply click the Add button 3 The following dialog will appear Available parameters are listed as follows Item Description Profile Type the name which can briefly describe the reason of the MAC block of such profile Enable This Profile Check the box to enable this profile MAC Address Type the MAC address which will be blocked by the system for such profile Apply Click it to save and ex...

Page 117: ... je ec ct ts s S Se et tt ti in ng g Vigor300B allows users to set different filter profiles based on IP service type keyword file extension instant message application P2P application protocol application web category and time setting These objects setting profiles can be applied in Firewall ...

Page 118: ...plied in Firewall Each item will be explained as follows Item Description Add Add a new profile Edit Modify the selected profile To edit a profile simply select the one you want to modify and click the Edit button The edit window will appear for you to modify the corresponding settings for the selected rule Delete Remove the selected profile To delete a rule simply select the one you want to delet...

Page 119: ...y the subnet mask for such profile H Ho ow w t to o c cr re ea at te e a a n ne ew w I IP P O Ob bj je ec ct t p pr ro of fi il le e 1 Open Objects Setting IP Object 2 Simply click the Add button 3 The following dialog will appear Available parameters are listed as follows Item Description Profile Type the name of such profile Interface Determine the category any source or destination of this IP o...

Page 120: ... IP Address Type the IP address of the ending point for such profile if you choose Range as Address Type Subnet Mask Use the drop down list to choose the subnet mask for such profile if you choose Subnet as Address Type Apply Click it to save and exit the dialog Cancel Click it to exit the dialog without saving anything 4 Enter all the settings and click Apply 5 A new IP object profile has been cr...

Page 121: ...u to modify the corresponding settings for the selected rule Delete Remove the selected profile To delete a rule simply select the one you want to delete and click the Delete button Refresh Renew current web page Profile Number Limit Display the total number 32 of the object profiles to be created Group Name Display the name of the object group Interface Display the interface of the object group D...

Page 122: ...this IP object If an IP object is set to Source it will only appear in the field of Source IP on Firewall IP Filter Rule Description Make a brief explanation for such profile if the group name is set not clearly Objects Use the drop down list to check the IP object profiles under such group All the available IP objects that you have added on Objects Setting IP Object will be seen here Apply Click ...

Page 123: ... been created in this page Each item will be explained as follows Item Description Add Add a new profile Edit Modify the selected profile To edit a profile simply select the one you want to modify and click the Edit button The edit window will appear for you to modify the corresponding settings for the selected rule Delete Remove the selected profile To delete a rule simply select the one you want...

Page 124: ... Port End Display the ending destination port for such profile H Ho ow w t to o c cr re ea at te e a a n ne ew w S Se er rv vi ic ce e T Ty yp pe e O Ob bj je ec ct t p pr ro of fi il le e 1 Open Objects Setting Service Type Object 2 Simply click the Add button 3 The following dialog will appear Available parameters are listed as follows Item Description Profile Type a name for such profile The nu...

Page 125: ... is available for TCP UDP protocol It can be ignored for ICMP Type a port number 0 65535 as the ending destination port Apply Click it to save the configuration Cancel Click it to exit the dialog without saving anything 4 Enter all the settings and click Apply 5 A new Service Type Object profile has been created 4 4 5 5 4 4 S Se er rv vi ic ce e T Ty yp pe e G Gr ro ou up p This page allows you to...

Page 126: ...e a rule simply select the one you want to delete and click the Delete button Refresh Renew current web page Profile Number Limit Display the total number 32 of the object profiles to be created Group Name Display the name of the service type group Description Display the description for such profile Objects Display the service type object profiles grouped under such group H Ho ow w t to o c cr re...

Page 127: ...e type object group The number of the characters allowed to be typed here is 20 Objects Use the drop down list to check the service type object profiles under such group All the available service type objects that you have added on Objects Setting Service Type Object will be seen here Apply Click it to save the configuration Cancel Click it to exit the dialog without saving the configuration 4 Ent...

Page 128: ... profile Edit Modify the selected profile To edit a profile simply select the one you want to modify and click the Edit button The edit window will appear for you to modify the corresponding settings for the selected rule Delete Remove the selected profile To delete a rule simply select the one you want to delete and click the Delete button Refresh Renew current web page Profile Number Limit Displ...

Page 129: ...he service type object group The number of the characters allowed to be typed here is 10 Member Type the content for such profile For example type gambling as Contents When you browse the webpage the page with gambling information will be watched out and be passed blocked based on the configuration on Firewall settings Add Type the word in the box of Member and click this button to add the new wor...

Page 130: ...n be grouped under a keyword group Different keyword group can contain different keyword profiles Each item will be explained as follows Item Description Add Add a new profile Edit Modify the selected profile To edit a profile simply select the one you want to modify and click the Edit button The edit window will appear for you to modify the corresponding settings for the selected rule Delete Remo...

Page 131: ... wo or rd d G Gr ro ou up p P Pr ro of fi il le e 1 Open Objects Setting Keyword Group 2 Simply click the Add button 3 The following dialog will appear Available parameters are listed as follows Item Description Group Name Type the name of the service type object group The number of the characters allowed to be typed here is 20 Description Make a brief explanation for such profile if the group nam...

Page 132: ...s page allows you to set file extension profiles which will be applied in Firewall All the files with the extension names specified in these profiles will be processed according to the chosen action Each item will be explained as follows Item Description Add Add a new profile Edit Modify the selected profile To edit a profile simply select the one you want to modify and click the Edit button The e...

Page 133: ...y the selected file extension of video Audio Display the selected file extension of audio Java Display the selected file extension of java ActiveX Display the selected file extension of activeX Compression Display the selected file extension of compression Execution Display the selected file extension of execution H Ho ow w t to o c cr re ea at te e a a n ne ew w F Fi il le e E Ex xt te en ns si i...

Page 134: ...e box es to select the file extension you need Java Several file extensions for Java offered for you to choose Use the drop down list to check the box es to select the file extension you need ActiveX Several file extensions for ActiveX offered for you to choose Use the drop down list to check the box es to select the file extension you need Compression Several file extensions for compression offer...

Page 135: ...ar instant message application for you to choose to block Choose the one s you want to block and save as an IM Object profile Later it can be applied to Firewall as a filter rule and reach the purpose of block Each item will be explained as follows Item Description Add Add a new profile Edit Modify the selected profile To edit a profile simply select the one you want to modify and click the Edit b...

Page 136: ...ebIM Display the status of IM object whether including the specified set of web IM or not H Ho ow w t to o c cr re ea at te e a a n ne ew w I IM M O Ob bj je ec ct t P Pr ro of fi il le e 1 Open Objects Setting IM Object 2 Simply click the Add button 3 The following dialog will appear Available parameters are listed as follows Item Description Profile Type the name of the IM object group The numbe...

Page 137: ... want to add for such profile WebIM It lists a package of IM application based on web page You may check the box to include all of them Apply Click it to save the configuration Cancel Click it to exit the dialog without saving the configuration 4 Enter all the settings and click Apply 5 A new IM Object profile has been created ...

Page 138: ...ck Each item will be explained as follows Item Description Add Add a new profile Edit Modify the selected profile To edit a profile simply select the one you want to modify and click the Edit button The edit window will appear for you to modify the corresponding settings for the selected rule Delete Remove the selected profile To delete a rule simply select the one you want to delete and click the...

Page 139: ...appear Available parameters are listed as follows Item Description Profile Type the name of the IM object group The number of the characters allowed to be typed here is 10 Member Several P2P applications offered for you to choose Check the one s you want to add for such profile Apply Click it to save the configuration Cancel Click it to exit the dialog without saving the configuration 4 Enter all ...

Page 140: ...selected to be blocked by the router Each item will be explained as follows Item Description Add Add a new profile Edit Modify the selected profile To edit a profile simply select the one you want to modify and click the Edit button The edit window will appear for you to modify the corresponding settings for the selected rule Delete Remove the selected profile To delete a rule simply select the on...

Page 141: ...cr re ea at te e a a n ne ew w P Pr ro ot to oc co ol l O Ob bj je ec ct t P Pr ro of fi il le e 1 Open Objects Setting Protocol Object 2 Simply click the Add button 3 The following dialog will appear Available parameters are listed as follows Item Description Profile Type the name of the protocol object profile The number of the characters allowed to be typed here is 10 Member Several protocols o...

Page 142: ...hazards With web category filtering service of the Vigor router you can protect your business from common primary threats such as productivity legal liability network and security threats For parents you can protect your children from viewing adult websites or chat rooms WCF adopts the mechanism developed and offered by certain service provider No matter activating WCF feature or getting a new lic...

Page 143: ...ered by Commtouch If you want to use such service trial or formal edition you have to perform the procedure of activation first For the service of formal edition please contact with your dealer distributor for detailed information W We eb b C Ca at te eg go or ry y O Ob bj je ec ct t Each item will be explained as follows ...

Page 144: ...t profile Child Protection Display the items under certain category that you choose to block for protecting the children Leisure Display the items under certain category that you choose to block Business Display the items under certain category that you choose to block Chatting Display the items under certain category that you choose to block Computer Display the items under certain category that ...

Page 145: ...don t want the children to visit Leisure Simply check the one s that you don t want the user to visit Business Simply check the one s that you don t want the user to visit Chatting Simply check the one s that you don t want the user to use for gossip with remote people Computer Simply check the one s that you don t want the user to visit Other Simply check the one s that you don t want the user to...

Page 146: ...t t F Fi il lt te er r L Li ic ce en ns se e Move your mouse to the link of Activate URL and click it The system will guide you to access into MyVigor website After finishing the activation for the trial version of WCF remember to purchase Silver Card for WCF service from your DrayTek dealer or distributor ...

Page 147: ...dow will appear for you to modify the corresponding settings for the selected rule Delete Remove the selected profile To delete a rule simply select the one you want to delete and click the Delete button Refresh Renew current web page Profile Number Limit Display the total number 16 of the object profiles to be created Profile Display the name of the time object profile Frequency Display the durat...

Page 148: ... will appear Available parameters are listed as follows Item Description Profile Type the name of the time object profile The number of the characters allowed to be typed here is 10 Frequency Specify how often Weekdays or Once the schedule will be applied Start Date Specify the starting date of the time object profile Start Time Specify the starting time of the time object profile End Date Specify...

Page 149: ...le Apply Click it to save the configuration Cancel Click it to exit the dialog without saving the configuration 4 Enter all the settings and click Apply 5 A new Time Object profile has been created 4 4 5 5 1 13 3 T Ti im me e G Gr ro ou up p This page allows you to group several time object profiles ...

Page 150: ...le To delete a rule simply select the one you want to delete and click the Delete button Refresh Renew current web page Profile Number Limit Display the total number 8 of the object profiles to be created Group Name Display the name of the group Description Display the brief explanation for such group Objects Display the time objects selected by such group H Ho ow w t to o c cr re ea at te e a a n...

Page 151: ...ject will be seen here Apply Click it to save the configuration Cancel Click it to exit the dialog without saving the configuration 4 Enter all the settings and click Apply 5 A new Web Category Object profile has been created 4 4 6 6 U Us se er r M Ma an na ag ge em me en nt t User Management can manage all the accounts user profiles to connect to Internet via different protocols 4 4 6 6 1 1 G Ge ...

Page 152: ... you choose such mode the router will apply the filter rules configured in User Management User Profile to the users Rule Based If you choose such mode the router will apply the filter rules configured in Firewall General Setup and Filter Rule to the users Authentication Type Under User_Based mode please specify the authentication type White IP List Under User_Based mode use the drop down list to ...

Page 153: ...uccess user s IP when or how much time the user uses and how much rest time for the user Available parameters will be explained as follows Item Description Refresh Renew current web page Auto Refresh Specify the interval of refresh time to obtain the latest status The information will update immediately when the Refresh button is clicked User Name Display the name of the client IP Display the IP a...

Page 154: ...ing PPTP L2TP System user and so on Each item will be explained as follows Item Description Add Add a new profile Edit Modify the selected profile To edit a profile simply select the one you want to modify and click the Edit button The edit window will appear for you to modify the corresponding settings for the selected rule Delete Remove the selected profile To delete a rule simply select the one...

Page 155: ...il le e 1 Open User Management User Profile 2 Simply click the Add button 3 The following dialog will appear Available parameters are listed as follows Item Description Username Type a name for such user profile e g LAN_User_Group_1 WLAN_User_Group_A WLAN_User_Group_B etc When a user tries to access Internet through this router an authentication step must be performed first The user has to type th...

Page 156: ...Usage Time min It means the maximum usage duration for the user By default the Usage Time is 480 minutes System User Choose True to allow the user accessing into WUI of Vigor300B via the username and password above If you choose False you can set SSL for such profile Group Choose the level for such profile from the drop down list User the user that accessing into the web configurator of Vigor300B ...

Page 157: ...nt to modify and click the Edit button The edit window will appear for you to modify the corresponding settings for the selected rule Delete Remove the selected profile To delete a rule simply select the one you want to delete and click the Delete button Refresh Renew current web page Profile Number Limit Display the total number 200 of the object profiles to be created Usergroup Display the name ...

Page 158: ... appear Available parameters are listed as follows Item Description Usergroup Type the name of such profile Enable This Profile Check this box to enable such profile Member Use the drop down list to check the user profile s under such group Apply Click it to save the configuration Cancel Click it to exit the dialog without saving the configuration 4 Enter all the settings and click Apply 5 A new U...

Page 159: ... directory service protocols For LDAP is defined to perform inquire and modify the information within the directory and acquire the data in the directory securely therefore users can apply LDAP to search or list the directory object inquire or manage the active directory Available parameters are listed as follows Item Description Enable This Profile Check this box to enable such profile Server IP ...

Page 160: ...namic DNS server Once the router is online you will be able to use the registered domain name to access the router or internal virtual servers from the Internet It is particularly helpful if you host a web server FTP server or other server behind the router Before you use the Dynamic DNS feature you have to apply for free DDNS service to the DDNS service providers The router provides up to ten acc...

Page 161: ...em Description Refresh Renew current web page Auto Refresh Specify the interval of refresh time to obtain the latest status The information will update immediately when the Refresh button is clicked Profile Display the name of the DDNS Status Display the connection status of the DDNS server Domain Name Display the domain name for the DDNS server ...

Page 162: ...o modify the corresponding settings for the selected rule Refresh Renew current web page Profile Display the name of the profile Enable This Profile Display the status of the profile False means disabled True means enabled WAN Profile Display current WAN profile used by such DDNS profile Routing Policy Display the routing policy used for such DDNS profile Service Provider Display the name of servi...

Page 163: ... and click the Edit button on the top Available parameters are listed as follows Item Description Profile Display the name of the profile Enable This Profile Check this box to enable such profile WAN Profile Choose a WAN profile that such profile will apply to Routing Policy Choose the routing policy of such profile Selected_wan_first Choose it to make such profile being applied by the selected WA...

Page 164: ... the login name that you set for applying domain Password Type in the password that you set for applying domain Wildcard and Backup MX The Wildcard and Backup MX features are not supported for all Dynamic DNS providers You could get more detailed information from their websites Mail Extender Type the IP Domain name of the mail server Apply Click it to save the configuration Cancel Click it to exit...

Page 165: ...an receive the VLAN information coming from other devices Available parameters are listed as follows Item Description Enable This Profile Check this box to enable GVRP function Interface Choose LAN and WAN profiles Join Time Define the time for the system to send GVRP packet to other device The unit is second Refresh Renew current web page Apply Click it to save the configuration ...

Page 166: ...ent web page Apply Click it to save the configuration 4 4 7 7 4 4 U UP Pn nP P The UPnP Universal Plug and Play protocol is supported to bring to network connected devices the ease of installation and configuration which is already available for directly connected PC peripherals with the existing Windows Plug and Play system For NAT routers the major feature of UPnP on the router is NAT Traversal ...

Page 167: ... information can be requested by UPnP clients External Interface Select a WAN profile for UPnP protocol Internal Interface Select a LAN profile for UPnP protocol Max Session Determine the maximum session number for UPnP function Refresh Renew current web page Apply Click it to save the configuration After enabling UPNP service setting an icon of IP Broadband Connection on Router on Windows XP Netw...

Page 168: ...an t work with Firewall Software Enabling firewall applications on your PC may cause the UPnP function not working properly This is because these applications will block the accessing ability of some network ports Security Considerations Activating the UPnP function on your network may incur some security threats You should consider carefully these risks before activating the UPnP function Some Mi...

Page 169: ...L function must be set as Enable on the BIOS setting Available parameters are listed as follows Item Description Wake by Two types provide for you to wake up the binded IP If you choose Wake by MAC Address you have to type the correct MAC address of the host in MAC Address boxes If you choose Wake by IP Address you have to choose the correct IP address IP Address The IP addresses that have been co...

Page 170: ... sensitive applications will not be impacted by web surfing traffic or other non critical applications such as file transfer Without QoS guaranteed control there would be virtually no way to prioritize users services or guarantee allocation of finite bandwidth resources to network or servers for supporting timing sensitive and mission critical network applications such as VoIP Voice over IP and on...

Page 171: ...llows you to configure bandwidth percentage for data and voice signals transmission Click the Bandwidth Management option and choose Incoming Class T To ot ta al l R Ra at te e C Co on nt tr ro ol l This page can set the total rate of incoming data for the QoS policer Available parameters are listed as follows ...

Page 172: ...s page allows you to edit the incoming class rate for the QoS policer Each item will be explained as follows Item Description Edit Modify the selected policy To edit a profile simply select the one you want to modify and click the Edit button The edit window will appear for you to modify the corresponding settings for the selected policy Refresh Renew current web page QoS Policer Display the name ...

Page 173: ...f the incoming class rates and click the Edit button 3 The following dialog will appear Available parameters are listed as follows Item Description QoS Policer Display the name of the incoming class profile Mode Click Enable to invoke such incoming class profile Rate Type the number of rate for such profile Apply Click it to save the configuration and exit the page Cancel Click it to exit the dial...

Page 174: ...Edit Modify the selected policy To edit a profile simply select the one you want to modify and click the Edit button The edit window will appear for you to modify the corresponding settings for the selected policy Refresh Renew current web page Filter Rule Display the name of the filter rule Policer Display the name of filter Policer Drop Display the status for the packet to be discarded or not Re...

Page 175: ...ed di it t t th he e i in nc co om mi in ng g f fi il lt te er r f fo or r t th he e Q Qo oS S p po ol li ic ce er r 1 Open Bandwidth Management Incoming Filter 2 Choose one of the filter rules and click the Edit button 3 The following dialog will appear ...

Page 176: ...oming filter rule Source IP Address Mask Type the mask address for the source IP address Source Port Enable Choose Enable to restrict the source port value Source Port Start Type the starting port number 0 65535 in the range of the source port Source Port End Type the ending port number 0 65535 in the range of the source port Destination IP Address Type the destination IP address for such incoming...

Page 177: ...l the settings and click Apply 5 The incoming filter rule for QoS Policer has been modified 4 4 8 8 3 3 O Ou ut tg go oi in ng g C Cl la as ss s Outgoing Class Setup allows you to configure bandwidth percentage for data and voice signals transmission Click the Bandwidth Management option and choose Incoming Class ...

Page 178: ...the QoS policer Available parameters are listed as follows Item Description Status Click Enable to enable such function Rate Type the rate for outgoing data The range can be set from 64000 to 10000000 Description Describe the meaning of such parameter Refresh Renew current web page Apply Click it to save the configuration and exit the page ...

Page 179: ... edit a profile simply select the one you want to modify and click the Edit button The edit window will appear for you to modify the corresponding settings for the selected policy Refresh Renew current web page Profile Display the name of the outgoing class rate profile Status Display the status enable or disable of such profile Rate Display the limitation from 64000 to 10000000 for the rate of qu...

Page 180: ...llowing dialog will appear Available parameters are listed as follows Item Description Profile Display the name of the QoS Shaper profile Status Click Enable to enable such function Rate Type the limitation for the rate of queue Click the unit for such rate Description Such information is offered by the system automatically It is not necessary to change it Apply Click it to save the configuration ...

Page 181: ...s in the data group to be initialized with weights of zero resulting in a strict service to completion STC mechanism across all queues 0 Each item will be explained as follows Item Description Edit Modify the selected policy To edit a profile simply select the one you want to modify and click the Edit button The edit window will appear for you to modify the corresponding settings for the selected ...

Page 182: ... 5 is 1 Then session of queue 1 will have the largest bandwidth for it occupies largest weight 5 5 4 3 2 1 1 Open Bandwidth Management Outgoing Class and click the Queue 1 5 Weight tab 2 Choose one of the profiles and click the Edit button 3 The following dialog will appear Available parameters are listed as follows Item Description QoS Queue Display the name of the QoS queue Weight Type the weigh...

Page 183: ...y select the one you want to modify and click the Edit button The edit window will appear for you to modify the corresponding settings for the selected profile Delete Remove the selected profile To delete a profile simply select the one you want to delete and click the Delete button Refresh Renew current web page Rename Allow to modify the selected profile name Profile Display the name of the prof...

Page 184: ...g g f fi il lt te er r f fo or r t th he e Q Qo oS S p po ol li ic ce er r 1 Open Bandwidth Management Outgoing Filter 2 Simply click the Add button 3 The following dialog will appear Available parameters are listed as follows Item Description Profile Type the name of the filter profile Enable This Profile Check this box to enable such profile Source IP Type the source IP address with subnet mask ...

Page 185: ...the start end number for the port range of the source port for such filter Destination Port Start End Type the start end number for the port range of the destination port for such filter Queue Number Choose a queue number to category the packets matching with the condition configured as above Queue 7 is the highest 0 is the lowest Apply Click it to save the configuration and exit the page Cancel C...

Page 186: ...ined as follows Item Description Add Add a new profile Edit Modify the selected profile To edit a profile simply select the one you want to modify and click the Edit button The edit window will appear for you to modify the corresponding settings for the selected profile Delete Remove the selected profile To delete a profile simply select the one you want to delete and click the Delete button Refre...

Page 187: ...file Enable This Profile Check this box to enable such profile Source IP Type the source IP address with subnet mask for limit session Max Sessions Defines the available session number for each host in the specific range of IP addresses If you do not set the session number in this field the system will use the default session limit for the specific limitation you set for each index This field cann...

Page 188: ...e efficient In the Bandwidth Management menu click Bandwidth Limit to open the web page Each item will be explained as follows Item Description Add Add a new profile Edit Modify the selected profile To edit a profile simply select the one you want to modify and click the Edit button The edit window will appear for you to modify the corresponding settings for the selected profile Delete Remove the ...

Page 189: ... Display the limitation for the speed of the downstream for the profile H Ho ow w t to o a ad dd d a a b ba an nd dw wi id dt th h l li im mi it t p pr ro of fi il le e f fo or r t th he e Q Qo oS S p po ol li ic ce er r 1 Open Bandwidth Management Bandwidth Limit 2 Simply click the Add button 3 The following dialog will appear Available parameters are listed as follows Item Description Profile Ty...

Page 190: ... be saved RX Limit Define the limitation for the speed of the downstream If you do not set the limit in this field the system will use the default speed for the specific limitation you set for each index Do not type the value with 0 otherwise the profile cannot be saved Apply Click it to save the configuration and exit the dialog Cancel Click it to exit the dialog without saving the configuration ...

Page 191: ...trol SNMP Setup Reboot System Firmware Upgrade and Upload Language File Below shows the menu items for System Maintenance 4 4 9 9 1 1 T TR R 0 06 69 9 This device supports TR 069 standard It is very convenient for an administrator to manage a TR 069 device through an Auto Configuration Server e g VigorACS Each item will be explained as follows Item Description Enable This Profile Check this box to...

Page 192: ...sm of notification Periodic Time Set the time for VigorACS to send notification to CPE CPE Username Type the user name for the CPE which will be used by the administrator of VigorACS to log into the WUI of Vigor300B CPE Password Type the password for the CPE which will be used by the administrator of VigorACS to log into the WUI of Vigor300B Refresh Renew current web page Apply Click it to save th...

Page 193: ...ch item will be explained as follows Item Description Encrypt Config Check this box to encrypt the configuration file for saving Backup Type Choose one of the types to determine where the file will be stored Backup to Local File The configuration file will be stored in local host Backup to Remote TFTP Server The configuration file will be stored in the remote TFTP server specified Backup Selected ...

Page 194: ...wnloaded from Restore Settings via Local Config File Click it to restore the configuration settings through a configuration file stored locally Restore Settings via TFTP Server Click it to restore the configuration settings through TFTP server Selected File Use the Browse button to locate the file for uploading to the router Restore Click it to upload the selected file to the router After finishin...

Page 195: ...n is provided for users to monitor router There is no bother to directly get into the Web Configurator of the router or borrow debug equipments S Sy ys sl lo og g A Ac cc ce es ss s S Se et tu up p To configure settings for Syslog open System Maintenance Syslog Mail Alert and click the Syslog Access Setup tab ...

Page 196: ...e the port number for the Syslog server Router Name Type the name of the router The default name is Vigor Firewall Log Click Enable to make the firewall log recorded in the Syslog VPN Log Click Enable to make the VPN log recorded in the Syslog User Access Log Click Enable to make the user access log recorded in the Syslog WAN Log Click Enable to make the WAN log recorded in the Syslog Others Log C...

Page 197: ...g g F Fi il le e Available parameters are listed as follows Item Description Refresh Renew the web page M Ma ai il l A Al le er rt t Available parameters are listed as follows Item Description Enable This Profile Check the box to enable such function ...

Page 198: ...a an nd d D Da at te e This page allows you to specify where the time of the router should be inquired from As an NTP Network Time Protocol client the router gets standard time from the time server Some time based functions cannot work properly until the system time functions run successfully Typically NTP achieves high accuracy and reliability with multiple redundant servers and diverse network p...

Page 199: ...he web configurator ofVigor300B by using Telnet SSH HTTP HTTPS and etc Available parameters are listed as follows Item Description Web Allow Click Enable to allow system administrator to login from the Internet and management the web page of the router Web Port Type the port number for the management through web page Telnet Allow Click Enable to allow system administrator to login from the telnet ...

Page 200: ...1 Allowed IP3 Type the first IP address for the system administrator to login The former box indicates an IP address allowed to login to the router and the later box indicates a subnet mask allowed to login to the router Allow Ping from WAN Click Enable to allow system administrator to ping the router from WAN interface Allow Ping form LAN Click Enable to allow system administrator to ping the rou...

Page 201: ...gs that you made before If you want to reboot the router using the current configuration choose Reboot with Current Configurations and click Reboot To reset the router settings to default values click Reboot with Factory Default Configurations and click Reboot The router will take a period of time to reboot the system Open System Maintenance Reboot System Available parameters are listed as follows...

Page 202: ...l guide you to upgrade firmware by using such page Download the newest firmware from DrayTek s web site or FTP site The DrayTek web site is www DrayTek com or local DrayTek s web site and FTP site is ftp DrayTek com Click System Maintenance Firmware Upgrade Available parameters are listed as follows Item Description Current Firmware Version Display current version of the firmware Selected File Use...

Page 203: ...or other routing information The Vigor300B supports five functions Routing Table ARP Cache Table DHCP Assignment Table NAT Sessions Table and Traffic Graph for the user to review such information 4 4 1 10 0 1 1 R Ro ou ut ti in ng g T Ta ab bl le e Click Diagnostics and click Routing Table to open the web page R Ro ou ut ti in ng g T Ta ab bl le e Display the information for each route ...

Page 204: ...g of the routing entry Possible flags include U route is up H target is a host G use gateway R reinstate route for dynamic routing D dynamically installed by daemon or redirect M modified from routing daemon or redirect A installed by addrconf C cache entry reject route Metric Display the distance to the target usually counted in hops It may be needed by routing daemons Iface Display the direction...

Page 205: ... for such route Flags Display the flag of the routing entry Possible flags include U route is up H target is a host G use gateway R reinstate route for dynamic routing D dynamically installed by daemon or redirect M modified from routing daemon or redirect A installed by addrconf C cache entry reject route Metric Display the distance to the target usually counted in hops It may be needed by routin...

Page 206: ... Ta ab bl le e Click Diagnostics and click ARP Cache Table to view the content of the ARP Address Resolution Protocol cache held in the router The table shows a mapping between an Ethernet hardware address MAC Address and an IP address A AR RP P C Ca ac ch he e T Ta ab bl le e ...

Page 207: ...ch complete entry in the ARP cache will be marked with the flag of 0x2 Permanent entries are marked with 0x4 and published entries have the 0x8 flag Profile Display the direction of such route represented with LAN WAN profile starting from LAN WAN profile to LAN WAN profile Clear Delete the selected profile I IP Pv v6 6 N Ne ei ig gh hb bo or r T Ta ab bl le e Each item will be explained as follow...

Page 208: ...to be reachable and the traffic has recently been sent to the neighbor Rather than probe the neighbor immediately however delay sending probes for a short while in order to give upper layer protocols a chance to provide reachability confirmation PROBE The neighbor is no longer to be reachable and unicast Neighbor Solicitation probes are being sent to verify reachability 4 4 1 10 0 3 3 D DH HC CP P...

Page 209: ...play the MAC address of the static DHCP server 4 4 1 10 0 4 4 N NA AT T S Se es ss si io on n T Ta ab bl le e This table can display about 30000 sessions with 20 pages Each item will be explained as follows Item Description Refresh Renew the web page Source Display the source IP address and port of local PC Destination Display the destination IP address and port of remote host WAN Display the WAN ...

Page 210: ...box to enable such profile LAN Use the drop down menu to choose a LAN profile WAN Use the drop down menu to choose a WAN profile Refresh Click it to renew the web page under the Setup tab Apply Click it to save the configuration configured under the Setup tab CPU Click the CPU tab There are three selections provided for you to specify Recent 24 Hours Display the information of CPU operation about ...

Page 211: ...he information of LAN operation about recent 24 hours Recent 7 Days Display the information of LAN operation about recent 7 days Recent 4 Weeks Display the information of LAN operation about recent 4 weeks WAN Click the WAN tab There are three selections provided for you to specify Network Interface Display the information of WAN or WAN operation Recent 24 Hours Display the information of WAN oper...

Page 212: ...4 4 1 10 0 6 6 W We eb b C Co on ns so ol le e Click Diagnostics and click Web Console to pen the web page for typing commands used in console connection A remote user can operate Vigor300B from this web page without installing and opening other connection utility ...

Page 213: ... of route trace will be shown on the screen Each item will be explained as follows Item Description Ping TraceRoute Click Ping to perform ping function Click TraceRoute to invoke trace router function Host Type the IP address of the host Interface Choose one of the LAN or WAN profile to be applied by such function Start Click it to start the action of Ping or Trace Route Stop Click it to terminate...

Page 214: ... such function Refresh Click it to renew the web page Chart Click this button to illustrate data chart Refer to the following figure as an example Block Prevent the specified PC accessing into Internet within 5 minutes UnBlock Allow the specified PC accessing into Internet within 5 minutes Recent 5 Minutes Recent 24 Hours Display the records with 5 minutes 24 hours recently Auto Refresh Specify th...

Page 215: ...an be used to connect with many types of external devices In order to control or manage the external devices conveniently open External Devices to make detailed configuration Each item will be explained as follows Item Description Enable Auto Discovery Check the box to detect the external device connected to Vigor300B Refresh Click it to renew the web page Status Display Model Name Display the mod...

Page 216: ...de 208 From this web page check the box of Enable Auto Discovery Later all the available devices will be displayed in this page with icons and corresponding information Note Only DrayTek products can be detected by this function ...

Page 217: ...ings are OK or not z Backing to factory default setting if necessary If all above stages are done and the router still cannot run normally it is the time for you to contact your dealer for advanced help 5 5 1 1 C Ch he ec ck ki in ng g I If f t th he e H Ha ar rd dw wa ar re e S St ta at tu us s I Is s O OK K o or r N No ot t Follow the steps below to verify the hardware status 1 Check if the powe...

Page 218: ...ter trying the above section if the link is stilled failed please do the steps listed below to make sure the network connection settings is OK F Fo or r W Wi in nd do ow ws s The example is based on Windows XP As to the examples for other operation systems please refer to the similar steps or find support notes in www draytek com 1 Go to Control Panel and then double click on Network Connections 2...

Page 219: ...atically and Obtain DNS server address automatically F Fo or r M Ma ac c O OS S 1 Double click on the current used Mac OS on the desktop 2 Open the Application folder and get into Network 3 On the Network screen select Using DHCP from the drop down list of Configure IPv4 ...

Page 220: ...uter correctly F Fo or r W Wi in nd do ow ws s 1 Open the Command Prompt window from Start menu Run 2 Type command for Windows 95 98 ME or cmd for Windows NT 2000 XP Vista The DOS command dialog will appear 3 Type ping 192 168 1 1 and press Enter If the link is OK the line of Reply from 192 168 1 1 bytes 32 time 1ms TTL 255 will appear 4 If the line does not appear please check the IP address sett...

Page 221: ...g gs s a ar re e O OK K o or r N No ot t Open Online Status to check current network status Be careful to check if the settings coming from your ISP have been typed correctly or not If there is something wrong with the configuration please go to WAN page and choose General Setup again to modify the WAN connection ...

Page 222: ...ing After pressing factory default setting you will lose all settings you did before Make sure you have recorded all useful settings before you pressing The password of the factory default is null S So of ft tw wa ar re e R Re es se et t You can reset router to factory default via Web page Go to System Maintenance Reboot System on the web page The following screen will appear Choose the selection ...

Page 223: ...restore the factory default setting you can configure the settings for the router again to fit your personal request 5 5 6 6 C Co on nt ta ac ct ti in ng g Y Yo ou ur r D De ea al le er r If the router settings are correct at all and the router still does not connect to internet please contact your ISP technical support representative to help you for configuration Also if the router still cannot w...

Page 224: ...Vigor300B Series User s Guide 216 This page is left blank ...

Reviews: