background image

To register for this service, please visit the
website

https://vod.divx.com/.

The

registration code required for this can be
found in this menu.

Audio Setup Page

Use the navigation key >, to call up this menu:

Select SPEAKER SETUP to access the individual
adjustment dialogue for the speakers.

Speaker Setup Page

DOWNMIX

Use the navigation key > to activate the right
column. DOWNMIX means the reductions of
the audio signal to the front left & right
channels. Choosing “LT/RT” activates a
theatrical downmix mode for those front
speakers. Choose “STEREO” for normal
stereo sound.

To enjoy the 5.1 channel surround
sound, DOWNMIX has to be disabled, so
in this case please choose “OFF”.

FRONT / CNTR / REAR / SUB / Speaker

If you’ve disabled the downmix function, you

can specify whether your front, centre, and
rear speakers are of small size (SML) or big
and powerful ones (LRG). If you choose
“LRG”, the unit will also send the low
frequencies

to

these

speakers.

Small

speaker can’t handle the power of low
frequencies

and might get damaged

.

So please choose “SML”, if you’ve connected
small speakers. In this dialogue, you can
also

disable

the

centre

and

surround

speaker, as well as the subwoofer.

TEST TONE

You can access this function, only when no
disc is inserted or the tray is open.
When you’ve activated the test tone, one
speaker after the other will reproduce a test
noise. In the lower left corner of the menu
window the currently active speaker will be
indicated. So you can check, that the wiring
was

done

properly

and

each

speaker

receives exactly the signals assigned to that
channel. This is a vital condition for an
i m p r e s s i v e

a c o u s t i c

e x p e r i e n c e !

Additionally, this function lets you adjust the
volume for each 5.1 channel individually.

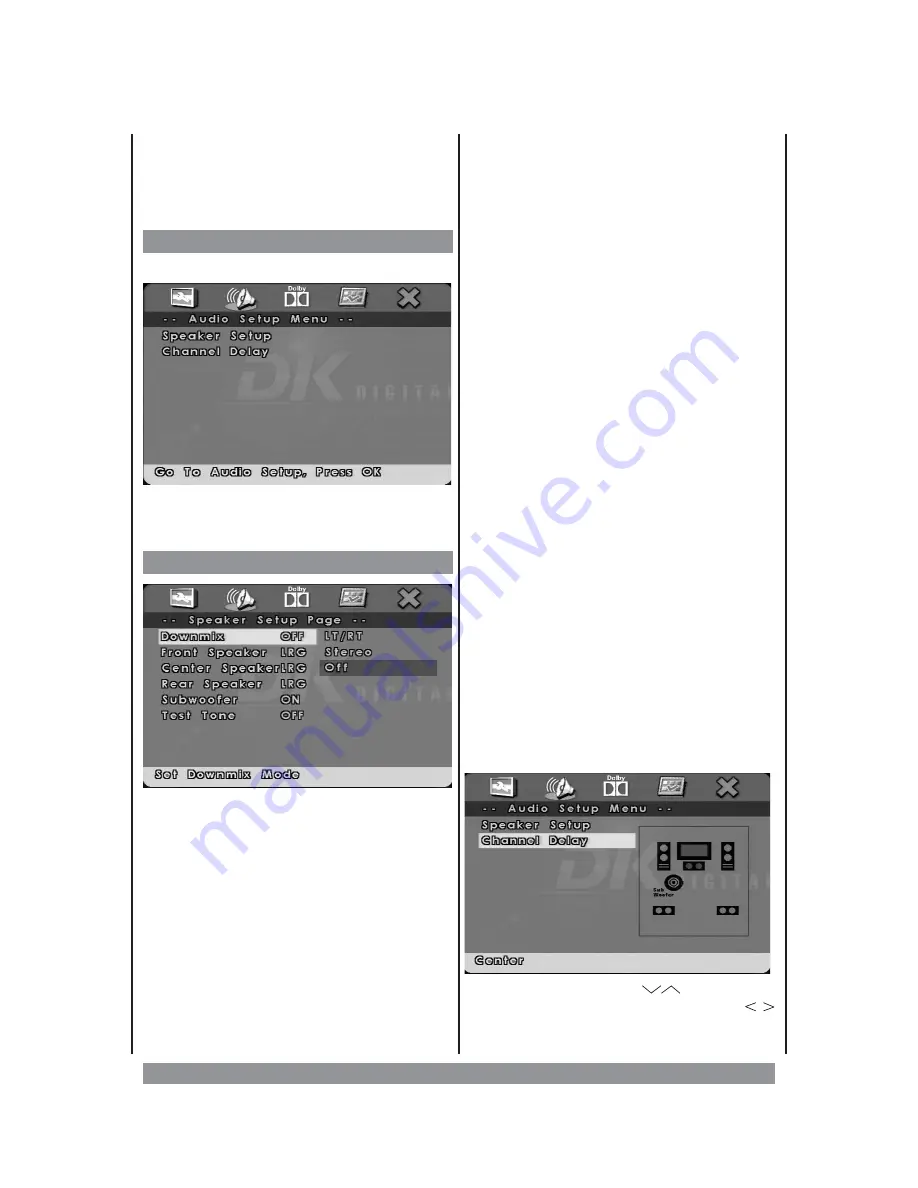
CHANNEL DELAY

Use the navigation key < to go back to the
audio setup page. Then choose “CHANNEL
DELAY” to set certain delays for the signals of
the centre, both surround speakers and the
subwoofer. That simulates a larger distance
between the speaker box and the listeners
position, making the room sound bigger and
the surround sound more efficient.

Use the navigation keys

to select the

channel to be adjusted. With the
buttons you can now set the virtual distance
from 0 - 600 cm (170 cm for centre). When

26

Summary of Contents for DVD-1080

Page 1: ......

Page 2: ...s For your own safety and in order to learn all about the functions available please read this manual and keep it for future reference And if you once sell the unit please include the manual www dk di...

Page 3: ...lug from the mains immediately and consult qualified service personnel Never let children play with the unit or stick anything into it Otherwise you face the risk of electric shock Do not place the un...

Page 4: ...15 Home Cinema Digital Audio Connection 16 Optical Digital Output 16 Home Cinema Analog Audio Connection 17 Inserting Memory Cards 18 Operation 19 Switching On and Off Stand by 19 Panel Key Lock 20 D...

Page 5: ...play DVD ROM CD ROM etc And there is no way to play back discs in SECAM colour system just PAL and NTSC will be supported The types of functions and operations that can be used for a particular disc...

Page 6: ...ion 8 or Windows Media Player for Windows XP Files are recognized by their file extension wma or WMA Windows Media and Windows are trademarks or registered trademarks of Microsoft Corporation in the U...

Page 7: ...CD recording procedures and copy protection procedures now in use and many different kinds of DVD R DVD RW CD R and CD RW blank disks Therefore in some cases read errors or read delays may be encounte...

Page 8: ...3 supplied enclosed Please make sure the polarity matches the marks inside the compartment Otherwise the r c will not work and may be damaged Replace the cover 3 Please point the r c towards the main...

Page 9: ...to stop play back 6 Standby standby indicator lights up red in standby mode 7 Display display area for play back information 8 IR Infrared receives the signals from the R C 9 Disc tray put in the disc...

Page 10: ...rame by frame view 16 RANDOM plays the CD tracks in random no function in DVD mode 17 MUTE mutes the sound 18 REPEAT activates repeat modes 19 A B repeats a selectable part of the program 20 78 speeds...

Page 11: ...11...

Page 12: ...ck indicator shows the number of the current chapter DVD or track CD 6 ALL indicates repeat mode 7 D Dolby symbol Dolby symbol indicates a disc with DOLBY DIGITAL program is loaded 8 Playtime indicato...

Page 13: ...nections This will protect your speakers from possible damage 1 When using a 3 wire RCA cable plug one of the yellow A V plugs into the VIDEO OUT socket at the rear panel of the DVD player Plug the ot...

Page 14: ...Using the S video Connection If your TV set provides a S video input we recommend to use this connection Using the SCART cable To use the SCART connection please proceed as shown here 14...

Page 15: ...Media Interface and provides optimum picture quality This jack gives you an uncompressed digital interface that carries both video and audio data by way of an integrated cable Note Make sure to confi...

Page 16: ...ptical Digital Output To keep the optical output from dust and dirt we ve put in a protective cap If you re going to use the socket please carefully remove the cap and store it When you remove the con...

Page 17: ...17 Home Cinema Analog Audio Connection...

Page 18: ...other format to one of the slots mentioned above Make sure to insert the cards correctly Never use force to insert a card You can play back files in MP3 WMA JPEG and MPEG 4 format from an inserted ca...

Page 19: ...ps etc Put the disc with its shiny unprinted side downward onto the drawer x Press again the OPEN CLOSE button to close the tray Play back starts automatically Usually DVD discs now show a menu to cho...

Page 20: ...the play back to the beginning of the previous or next chapter v During play back press repeatedly the SLOW R or SLOW F button to start a slow motion backward or forward with 1 8 or 1 16 speed Press t...

Page 21: ...r 5 seconds you see Type in the desired point in time HH MM SS within the chapter and play back jumps exactly there beginning of the chapter 0 00 00 Should the requested data be incorrect or not avail...

Page 22: ...the program press the A B button when this portions starts Press it again at the portion s end This selection will be repeated again and again until you press A B again to cancel the function Programm...

Page 23: ...vigation keys to select the desired chapter the number of the selected chapter is highlighted in green and press ENTER Play back starts with the requested chapter 5 Or maybe you choose TITLE INTERVAL...

Page 24: ...Display Function During play back you can display various information about elapsed and remaining playing time by pressing the DISPLAY button Please note the following overview 24...

Page 25: ...ideo type to fit with your connector type Choose RGB for a RGB video signal Choose CVBS for S video and video out MENU LANGUAGE Please select the preferred language for the OSD menus English Spanish G...

Page 26: ...So please choose SML if you ve connected small speakers In this dialogue you can also disable the centre and surround speaker as well as the subwoofer TEST TONE You can access this function only when...

Page 27: ...e DVD menu stored on the disc will be shown on the screen again depending on the program of the DVD PARENTAL CONTROL This function allows to prevent the play back of DVDs containing material inappropr...

Page 28: ...s have been played once play back stops To cancel that mode just press RANDOM again The screen shows OFF Special Information about MP3 CD Play back When you have inserted a MP3 coded CD you see a menu...

Page 29: ...button Now the screen shows the files inside the folder and in the right column you can see a preview of the picture Use the navigation buttons to select the desired file und press the ENTER button Th...

Page 30: ...some DVD programs could affect picture quality If you still experience problems after checking your connections please try connecting your DVD system directly to your TV S Video input if your TV is e...

Page 31: ...vailable The language for the sound cannot be changed when you play a DVD Multilingual sound is not recorded on the DVD Changing the language for the sound is prohibited on the DVD Call up the title m...

Page 32: ...Disc Video output level 1 Vp p Audio output level 2 Vrms 1 KHZ 0dB Audio Signal Output Characteristics Frequency range DVD linear audio 20Hz 20KHz 48KHz sampling 20Hz 20KHz 96KHz sampling CD audio 20...

Reviews: