13
VL.Pro.Owner’s.Manual
Getting.Started.
1.
Make sure the Vocalist® Live Pro’s power switch is in the off position (up), connect the power
cord to the power input (located on the back panel) and plug it into the AC outlet.
2.
Make sure the Vocal Input Level knob is turned all the way down (counter-clockwise).
3.
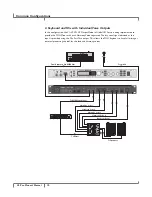
Plug a microphone into the Vocal Mic In jack.
4.
Plug your guitar directly into the Guitar Input jack.
Regarding External Effects Pedals: Do not hook up any effects pedals to your guitar prior to
plugging it into the Vocalist Live Pro, as this could affect vocal harmony generation. The only thing
between your guitar and the Vocalist Live Pro should be the guitar cable. Use the Guitar Thru to
connect your effects and stomp boxes.
5.
Make sure your guitar amplifier is turned off and the volume level is turned all the way down.
6.
Make sure your P.A. or mixer is turned off and the volume levels are turned all the way down.
7.
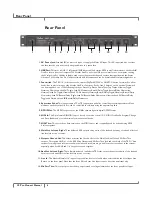
Connect the Guitar Thru to your guitar effects, amplifier or P.A. system.
8.
Plug the Vocalist Live Pro Left and Right Main or Aux Outputs into your P.A. system or mixer.
Note: The Vocalist Live Pro Main Out XLR outputs are line level outputs. Many mixers accept only
mic levels on the XLR inputs. You will know this is the case if you find that you have to turn your
Input Level completely down in order to avoid clipping at the mixer’s XLR input. To remedy this
you will need to either use an XLR to ¼” cable or XLR to ¼” adapter on an XLR cable to plug into
your mixer’s ¼” line inputs. Alternatively, you can use a Direct Injection (DI) box to provide a mic
level signal to the mixer’s XLR inputs.
9.
Turn on the Vocalist Live Pro power by turning the Power switch on the front panel to the
down position exposing red button indicator.
10..
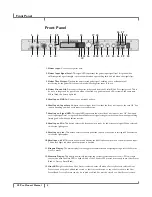
Press the Vocal Input Mic Select button. If your microphone needs phantom power, press the
Vocal Input Phantom Power switch. The red Phantom Power LED will light.
Note: Phantom power is normally only needed with condenser microphones, and should never be
used with ribbon microphones. To avoid damaging the microphone, please consult your microphone
documentation to ensure phantom power is applied only when appropriate.
11.
Setting the Guitar Level
Ideally the Guitar Signal LED should be green or amber while playing. Most electric and
acoustic/electric guitars send their signal at a level appropriate for the Vocalist Live Pro. Observe
the Guitar Signal LED while playing your guitar and confirm an appropriate guitar signal level is
Getting.Started-.Basic.Setup


