background image


page 8

Digital Projection HIGHlite Cine 330 3D Series

Installation and Quick-Start Guide

CHANGING THE LAMP

Rev E August 2014

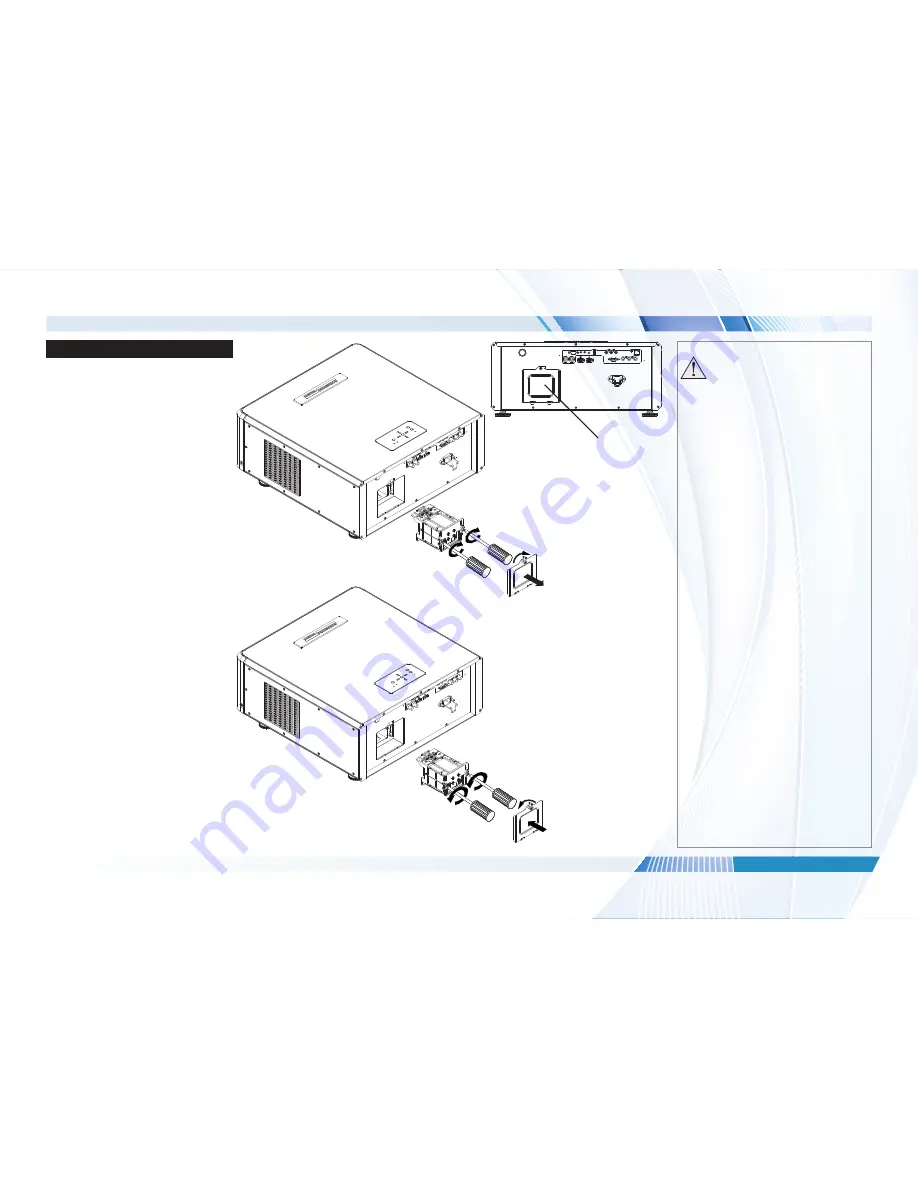
Changing The Lamp

1.  Remove the lamp compartment 

cover. 

Unscrew the two captive screws 

securing the lamp module and pull 

firmly to remove the lamp module.

2.  Insert a new lamp module. Fasten 

the screws and replace the lamp 

compartment cover.

Lamp 

compartment cover

Notes

 Always allow the lamp to cool for 

5 minutes before:


- disconnecting the power 

- moving the projector 

- changing the lamp

Summary of Contents for HIGHlite Cine 330 3D Series

Page 1: ...August 2014 4INSTALLATION AND QUICK START GUIDE 4CONNECTION GUIDE 4OPERATING GUIDE 4REMOTE COMMUNICATIONS GUIDE 4REFERENCE GUIDE 113 827E HIGHlite Cine 330 3D Series High Brightness Digital Video Proj...

Page 2: ...ely followed WARNING this symbol indicates that there is a danger of physical injury to yourself and or damage to the equipment unless the instructions are closely followed NOTE this symbol indicates...

Page 3: ...rocessing can be used to multiply the displayed frame rate for 3D sources Dual Pipe Processing Two sources in parallel for Left and Right Eyes Synchronisation of active glasses or polarising switcher...

Page 4: ...G THE PROJECTOR 10 Switching the projector on 10 Selecting an input signal or test pattern 10 Input signal 10 Test pattern 10 Adjusting the lens 11 Adjusting the image 11 Projector mode orientation an...

Page 5: ...26 Accessing sub menus 26 Executing commands 26 Editing projector settings 27 Choosing a value from a list 27 Changing the value without viewing the list 27 Using a slider to set a value 27 A TOUR OF...

Page 6: ...agonal screen sizes 68 Fitting the image to the screen 69 Positioning the screen and projector 70 CHOOSING A LENS 71 Choosing a lens by calculation 72 Useful lens calculations 73 Examples of lens calc...

Page 7: ...rojection HIGHlite Cine 330 3D Series Rev E August 2014 APPENDIX A LENS PART NUMBERS 90 APPENDIX B SUPPORTED SIGNAL INPUT MODES 91 2D input modes 91 3D input modes 93 APPENDIX C GLOSSARY OF TERMS 95 C...

Page 8: ...Digital Projection HIGHlite Cine 330 3D Series This page is intentionally left blank...

Page 9: ...Rev E August 2014 HIGHlite Cine 330 3D Series High Brightness Digital Video Projector INSTALLATION AND QUICK START GUIDE 4...

Page 10: ...rs 6 POWER indicator blue and STANDBY indicator amber 6 ISSUE indicator red 6 Fitting The Lens 7 Changing The Lamp 8 Positioning The Screen And Projector 9 Operating The Projector 10 Switching the pro...

Page 11: ...iginal box and packing materials in case you ever need to ship your projector The projector is shipped without a lens A power cable suitable for the destination territory will also be supplied with th...

Page 12: ...tion and Quick Start Guide GETTING TO KNOW THE PROJECTOR Rev E August 2014 Getting To Know The Projector Front and rear views Air outlet Lens Front infra red window Control panel Rear infra red window...

Page 13: ...ailable aspect ratios USER MEMORY A C Recall Preset A C CONTRAST Show and hide the Contrast slider BRIGHTNESS Show and hide the Brightness slider SHARP Show and hide the Sharpness slider GAMMA Cycle t...

Page 14: ...when the projector is in STANDBY mode Condition Power indicator blue light Standby indicator amber light Standby Off On Cooling Warming up Flashing Off Power on Normal On Off ISSUE indicator red Condi...

Page 15: ...ojector 3 Push down the lens holder tab 4 Hold down the tab and insert the lens into the lens aperture making sure that the plug on the zoom drive mechanism lines up with the socket on the right of th...

Page 16: ...the lamp compartment cover Unscrew the two captive screws securing the lamp module and pull firmly to remove the lamp module 2 Insert a new lamp module Fasten the screws and replace the lamp compartme...

Page 17: ...nt optional accessory The illustration below shows the positions of the feet for table mounting and the fixing holes for ceiling mounting Notes Always allow the lamp to cool for 5 minutes before disco...

Page 18: ...owing ways Press one of the Input buttons 1 to 5 on the remote control or Open the On screen display OSD by pressing the MENU button on either the control panel or the remote Navigate to Main Input Se...

Page 19: ...n menu and then select Aspect Ratio Picture To change brightness and contrast do either of the following Press BRIGHTNESS or CONTRAST on the remote control then use the arrow buttons to move the slide...

Page 20: ...Digital Projection HIGHlite Cine 330 3D Series Installation and Quick Start Guide This page is intentionally left blank...

Page 21: ...Rev E August 2014 HIGHlite Cine 330 3D Series High Brightness Digital Video Projector CONNECTION GUIDE 4...

Page 22: ...sources up to 60Hz requiring frame doubling and left right interleaving 16 Dual Pipe 3D 16 3D Sync in 16 3D Sync out 16 Control Connections 17 USB 17 Wired remote 17 RS 232 17 RJ45 17 12V Trigger I a...

Page 23: ...menu set Colorspace to Auto or if necessary to RGB PC Component 1 RGsB In the Advanced Image menu set Colorspace to Auto or if necessary to RGB Video YPbPr In the Advanced Image menu set Colorspace t...

Page 24: ...or has problems selecting between Side by Side Half Top and Bottom and Frame Sequential Dual Pipe 3D 1 Connect to both HDMI Inputs 2 Set 3D Format in the 3D Control menu to Dual Pipe HDMI 1 is the lef...

Page 25: ...g the text strings described in the Remote Communications Guide Use a crossed LAN cable to connect directly to a computer or an uncrossed cable to connect to a network hub 12V Trigger I and II These o...

Page 26: ...MDS Data 2 Shield 3 TMDS Data 2 4 TMDS Data 1 5 TMDS Data 1 Shield 6 TMDS Data 1 7 TMDS Data 0 8 TMDS Data 0 Shield 9 TMDS Data 0 10 TMDS Clock 11 TMDS Clock Shield 12 TMDS Clock 13 CEC 14 not connect...

Page 27: ...round 9 5V 10 Digital Ground V Sync DDC 1 unused 12 SDA 13 H Sync 14 V Sync 15 SCL Component 1 3 x 75 ohm RCA Phono RGsB YPbPr YCbCr Y G G Sync Y Y Pb B B Pb Cb Pr R R Pr Cr Component 2 3 x 75 ohm BNC...

Page 28: ...nected Sleeve Ground RS 232 9 way D type connector 1 unused 2 Received Data RX 3 Transmitted Data TX 4 unused 5 Signal Ground 6 unused 7 unused 8 unused 9 unused Notes For full details of all network...

Page 29: ...12V Trigger I and II 3 5mm mini jack Tip Power Ring Signal Sleeve Ground Sync IN and Sync OUT 75 ohm BNC LAN connection Notes Only one remote connection RS 232 or RJ45 should be used at any one time...

Page 30: ...Digital Projection HIGHlite Cine 330 3D Series Connection Guide This page is intentionally left blank...

Page 31: ...Rev E August 2014 HIGHlite Cine 330 3D Series High Brightness Digital Video Projector OPERATING GUIDE 4...

Page 32: ...anging the value without viewing the list 27 Using a slider to set a value 27 A Tour Of The Menus 28 Main menu 28 Aspect Ratio 29 Presets 30 Overscan 31 3D Control 32 Input Select 33 Resync 33 Image m...

Page 33: ...control or SELECT on the control panel This guide refers to the above two buttons as ENTER SELECT Exiting menus and closing the OSD To go back to the previous page press MENU When you reach the top l...

Page 34: ...current value opens a sub menu says Sub menu executes a command says Execute Accessing sub menus Use the UP and DOWN arrow buttons to highlight the sub menu then press ENTER SELECT Executing commands...

Page 35: ...ut viewing the list To switch to the next or previous value without viewing the list press the LEFT or RIGHT arrow button Using a slider to set a value Some parameters with a numeric value open a slid...

Page 36: ...into six menus as shown in the illustration Main menu Selecting Main from the top level opens the Main menu Notes See also Using the Menus earlier in this guide and Menu Map later in this guide Main...

Page 37: ...is used with the TheaterScope setting to ensure that for a 2 35 1 image the maximum area of the DMD is used giving maximum image brightness The 4 3 Narrow setting is used to compensate for the distor...

Page 38: ...open Presets 2 Highlight Save Preset on the left and then move to the list on the right Select the preset you wish to save and press ENTER SELECT To recall a saved preset 1 From the Main menu open Pr...

Page 39: ...ves unwanted artefacts from the edges of your image by cropping the edges or increasing the size of the image to force the edges off screen Unwanted artefacts along the image edges usually occur when...

Page 40: ...hing Sync Delay set to compensate for signal processsing delays in the projector Notes Main Menu 3D Control 3D video is only possible on the HDMI inputs Set 3D Format to Auto to display the Frame Pack...

Page 41: ...urrent input signal Notes Main Menu Input Select See the Connection Guide for further information about the available inputs and connections You can also select an input source by pressing the buttons...

Page 42: ...enu Highlight the setting you wish to edit and then press ENTER SELECT or the LEFT or RIGHT arrow button to open the slider Use the LEFT and RIGHT arrow buttons to adjust the slider Press MENU to clos...

Page 43: ...sets black at 0 and white at 255 Known as Full Range RGB Video uses RGB colorspace and sets black at 16 and white at 235 Known as Limited Range Highlight the setting you wish to edit and then either p...

Page 44: ...Native no correction Highlight the setting you wish to edit and then either press ENTER SELECT to access it or use the LEFT and RIGHT arrow buttons to switch between values Press MENU to go back Note...

Page 45: ...no correction Dynamic Black Allows for increased contrast in darker scenes by modulating the light source Highlight the setting you wish to edit and then either press ENTER SELECT to access it or use...

Page 46: ...balance of the projected image Highlight the setting you wish to edit and then either press ENTER SELECT to access it or use the LEFT and RIGHT arrow buttons to switch between values Press MENU to go...

Page 47: ...e voltage level of the signal detection circuitry Adjust if the projector loses sync during scenes where the signal drops below black Highlight the Fine Sync setting and then either press ENTER SELECT...

Page 48: ...op is for a unit standing on its feet set to Ceiling if the projector is mounted upside down Front and Rear define whether the projector is in front of the screen or behind it Startup Splash Show or h...

Page 49: ...hould appear on the screen when activated Menu Transparency Time Out determines how long the OSD should remain on the screen if no buttons are pressed Choose Always On to disable this feature Message...

Page 50: ...ore the factory default settings 1 Navigate to Factory Reset and press ENTER SELECT 2 When prompted use the LEFT and RIGHT arrow buttons to highlight the Yes button and then press ENTER SELECT to conf...

Page 51: ...5 ms Sync Delay value between 3 0 ms and 3 0 ms 0 0 ms Input Select HDMI 1 HDMI 2 RGB COMP 1 COMP 2 Resync executable command IMAGE Brightness value between 0 and 200 100 Contrast value between 0 and...

Page 52: ...e between 0 and 200 100 Blue Offset value between 0 and 200 100 Red Gain value between 0 and 200 100 Green Gain value between 0 and 200 100 Blue Gain value between 0 and 200 100 Fine Sync V Position v...

Page 53: ...cope 4 3 4 3 Narrow RS232 Trigger 2 Screen 16 9 Theaterscope 4 3 4 3 Narrow RS232 Auto Source Off On Infrared Remote Off On Standby Network Off On Lens Control Focus adjust Zoom adjust Lens Shift adju...

Page 54: ...Digital Projection HIGHlite Cine 330 3D Series Operating Guide This page is intentionally left blank...

Page 55: ...Rev E August 2014 HIGHlite Cine 330 3D Series High Brightness Digital Video Projector REMOTE COMMUNICATIONS GUIDE 4...

Page 56: ...tions Guide IN THIS GUIDE Rev E August 2014 IN THIS GUIDE Introduction 49 Examples 49 The Operation Commands 50 Main menu 50 Image menu 51 Advanced Image menu 51 System menu 52 Control menu 53 Service...

Page 57: ...formats Command command Description Set value Makes the setting take that value Get Asks what the current value is The value is returned as an ASCII text string Increment Adds 1 to the current value...

Page 58: ...B 2 Preset C 3 Preset D 4 Default save mem 0 Preset A 1 Preset B 2 Preset C 3 Preset D overscan 0 Off 1 Crop 2 Zoom s3d inputtype 0 Off 1 Auto 2 Side by Side Half 3 Top and Bottom 4 Dual Pipe 5 Frame...

Page 59: ...200 saturation 0 200 hue 0 200 sharpness 0 200 nr 0 200 Advanced Image menu color space 0 Auto 1 YPbPr 2 YCbCr 3 RGB PC 4 RGB Video gamma 0 CRT 1 Film 2 Video 3 Punch 4 Graphics color temp 0 5500K 1...

Page 60: ...On adcontrast 0 Off 1 On red offset 0 200 green offset 0 200 blue offset 0 200 red gain 0 200 green gain 0 200 blue gain 0 200 vert pos 0 200 hori pos 0 200 phase 0 200 tracking 0 200 sync level 0 20...

Page 61: ...o poweroff 0 Off 1 On auto poweron 0 Off 1 On proj mode 0 Front Tabletop 1 Front Ceiling 2 Rear Tabletop 3 Rear Ceiling logo disp 0 disable 1 enable altitude 0 Auto 1 High lamp pow 0 Standard 1 Econom...

Page 62: ...model name string ser number string soft version string act source 0 HDMI 1 1 HDMI 2 2 RGB 3 Component 1 4 Component 2 signal string pixel clock number h refresh number v refresh number lamp hours num...

Page 63: ...ent Grid 11 Vertical Burst 12 Horizontal Burst 13 Color Bars Miscellaneous commands blue only 0 Off 1 On powon none none powoff none none status check 0 standby 1 warm up 2 imaging 3 cooling 4 error n...

Page 64: ...d Gateway DHCP can also be switched on or off To access the IP Configuration utility Type the URL http LAN IP Address into the address bar of your browser then press ENTER The embedded web page shown...

Page 65: ...Rev E August 2014 HIGHlite Cine 330 3D Series High Brightness Digital Video Projector REFERENCE GUIDE 4...

Page 66: ...ions 73 Examples of lens calculations 73 Lens charts 74 How to use the lens charts 74 1080p 1920 x 1080 pixels 75 DMD resolution 1080p full DMD width images 76 DMD resolution 1080p 1 25 1 images 77 DM...

Page 67: ...th each one representing a pixel in the final projected image The outermost micromirrors in the array remain inactive and are not used in constructing the image 1 Casing 2 Light shield 3 Inactive mirr...

Page 68: ...rror element tilted to the right 4 Mirror element tilted to the left 5 Reflected light left tilt 6 Light dump 7 Reflected light right tilt The projector optically filters white light from the lamp int...

Page 69: ...ct Ratio setting of the projector 16 9 forces a 16 9 ratio on the image TheaterScope is a special setting used in combination with an anamorphic lens an optional accessory It removes letterboxing from...

Page 70: ...jection HIGHlite Cine 330 3D Series Reference Guide ASPECT RATIOS EXPLAINED Rev E August 2014 Aspect ratio examples for DMD resolution 1080p Source 4 3 1 Unused screen areas Notes Aspect Ratio 4 3 1 1...

Page 71: ...Projection HIGHlite Cine 330 3D Series Reference Guide ASPECT RATIOS EXPLAINED Rev E August 2014 Aspect ratio examples for DMD resolution 1080p continued Source 16 9 native resolution Notes Aspect Ra...

Page 72: ...es Reference Guide ASPECT RATIOS EXPLAINED Rev E August 2014 Aspect ratio examples for DMD resolution 1080p continued Source 16 10 1 Unused screen areas 2 Cropped parts of the image Notes Aspect Ratio...

Page 73: ...p and bottom of the 16 9 screen to make up for the difference in aspect ratios Without an anamorphic lens and without the TheaterScope setting applied a 16 9 source containing a 2 35 1 image looks lik...

Page 74: ...MD resolution the image will not fill the DMD The following examples show how a number of common formats may be displayed 1080p images displayed full width Notes The images are shown here scaled autom...

Page 75: ...displayed full height Notes The images are shown here scaled automatically by the projector The image may be scaled differently if the aspect ratio is set differently in the Main menu 4 3 1 33 1 1440...

Page 76: ...projection distances at different aspect ratios it is more convenient to measure screen width W and height H The example calculations below show how to convert diagonal sizes into width and height at...

Page 77: ...w to check that you are able to display the full image on your screen If you have insufficient height or width you will have to reduce the overall image size in order to display the full image on your...

Page 78: ...range from the face of the screen Notes The projector should be installed as close to the power outlet as possible The power connection should be easily accessible so that it can be disconnected in an...

Page 79: ...zoom lens 4 34 6 76 1 zoom lens If the image does not fill the full width of the DMD this effectively increases the throw ratio of the lens This can be corrected by applying a throw ratio factor TRF...

Page 80: ...tio Throw distance range 0 77 1 fixed lens 1 3 2 5 m 4 3 8 2 ft 1 16 1 fixed lens 1 4 6 2 m 4 6 20 3 ft 1 45 1 74 1 zoom lens 1 8 9 3 m 5 9 30 5 ft 1 74 2 17 1 zoom lens 2 2 11 8 m 7 2 38 7 ft 2 17 2...

Page 81: ...o x TRF Screen width Screen width x Throw ratio x TRF Throw distance Notes The throw ratio for a particular lens is fixed but assumes that the image fills the width of the DMD For images that do not f...

Page 82: ...width of your screen In the chart for the required DMD resolution find the point where the throw distance corresponds to the screen width as shown in the example below Example For a 1080p projector w...

Page 83: ...x 817 pixels TRF 1 1 85 1 Flat 1920 x 1037 pixels TRF 1 1 78 1 16 9 1920 x 1080 pixels native resolution TRF 1 Full height images A throw ratio factor TRF has been applied to the following charts 1 25...

Page 84: ...17 1 zoom lens 5 2 17 2 90 1 zoom lens 6 2 90 4 34 1 zoom lens 7 4 34 6 76 1 zoom lens Notes This chart has a TRF of 1 0 for use with the following images For information about individual lens part nu...

Page 85: ...90 1 zoom lens 6 2 90 4 34 1 zoom lens 7 4 34 6 76 1 zoom lens Notes This chart has a TRF of 1 42 for use with the following images For information about individual lens part numbers see Appendix A at...

Page 86: ...90 1 zoom lens 6 2 90 4 34 1 zoom lens 7 4 34 6 76 1 zoom lens Notes This chart has a TRF of 1 33 for use with the following images For information about individual lens part numbers see Appendix A at...

Page 87: ...0 1 zoom lens 6 2 90 4 34 1 zoom lens 7 4 34 6 76 1 zoom lens Notes This chart has a TRF of 1 11 for use with the following images For information about individual lens part numbers see Appendix A at...

Page 88: ...0 1 zoom lens 6 2 90 4 34 1 zoom lens 7 4 34 6 76 1 zoom lens Notes This chart has a TRF of 1 07 for use with the following images For information about individual lens part numbers see Appendix A at...

Page 89: ...ove or below the centre or to one side and adjust the image using the Lens shift feature known as rising and falling front to maintain a geometrically correct image Notes For more information on shift...

Page 90: ...ptable level of distortion particularly at the corners of the image due to the image passing through the periphery of the lens optics If the lens is to be shifted in two directions combined the maximu...

Page 91: ...nt on which lens is used Shifting the lens beyond its undistorted limits may be physically possible however you may experience some vignetting or distortion for 1080p projectors vertical pixels horizo...

Page 92: ...ce that obeys the EDID protocol the source will automatically configure itself to suit the projector Otherwise please refer to the documentation supplied with the source to manually set the resolution...

Page 93: ...August 2014 Control Connections LAN connection The projector s features can be controlled via a LAN connection Hub or LAN Computer Projector Projector Un crossed LAN cables Notes For more information...

Page 94: ...GHlite Cine 330 3D Series Reference Guide CONTROL CONNECTIONS Rev E August 2014 RS232 connection Notes For more information see the Remote Communications Guide Connection panel 1 1 RS232 Projector Com...

Page 95: ...chosen switching glasses When 3D is disabled 1080i will be treated conventionally For a 60Hz Side by Side Half source the two halves of the image will automatically be extracted to create a displayed...

Page 96: ...fy left and right frames If no sync is available from the sequential source the projector will generate an output sync but it may then be necessary to manually reset the dominance each time the player...

Page 97: ...to compensate for processing delays in the projector Sync Delay introduces a delay to the sync output signal sent to the ZScreen or 3D glasses Fully on Fully off Left Right Dark time Dark time Dark ti...

Page 98: ...805 110 019 2 7 15 4 m 8 9 50 5 ft 2 90 4 34 1 zoom lens 110 806 110 020 3 6 22 5 m 11 8 73 8 ft 4 34 6 76 1 zoom lens 110 807 110 021 5 5 35 m 18 115 ft Notes The Throw ratio for a particular lens i...

Page 99: ...5 63 EDTV 480p59 720 x 480 59 94 525 31 47 480p60 720 x 480 60 00 525 31 50 576p50 720 x 576 50 00 625 31 25 HDTV 720p50 1280 x 720 50 00 750 37 50 720p59 1280 x 720 59 94 750 44 96 720p60 1280 x 720...

Page 100: ...00 75 00 625 46 88 XGA60 1024 x 768 60 00 806 48 36 XGA70 1024 x 768 70 07 806 56 48 XGA75 1024 x 768 75 03 800 60 02 XGA 75 1152 x 864 75 00 900 67 50 WXGA50 1280 x 720 49 83 744 37 07 WXGA60 1280 x...

Page 101: ...60 00 1235 74 10 720p50 Frame Packing 1280 x 720 50 00 750 37 50 720p60 Frame Packing 1280 x 720 60 00 750 45 00 720p50 Side by Side Half 1280 x 720 50 00 750 37 50 720p60 Side by Side Half 1280 x 720...

Page 102: ...1920 x 1080 24 00 1125 27 00 1080p30 Frame Packing 1920 x 1080 30 00 1125 33 75 1080p30 Side by Side Half 1920 x 1080 30 00 1125 33 75 1080p30 Top and Bottom 1920 x 1080 30 00 1125 33 75 1080p30 Dual...

Page 103: ...eft lens and light with right hand polarisation can pass through the right hand lens These glasses are used in conjunction with another device which polarizes the image such as a ZScreen Anamorphic le...

Page 104: ...ptical Describes how bright an image that is projected onto a screen appears to an observer C See Chrominance Chrominance Also known as C this is the component or pair of components of an S Video or C...

Page 105: ...posite video A signal line that carries luminance chrominance synchronization pulses and blanking Contrast electronic control The adjustment of the white point of the image without affecting the black...

Page 106: ...an IP network for example by allocating an IP address DMD Digital Micromirror Device The optical tool that transforms the electronic signal from the input source into an optical image projected on th...

Page 107: ...viewing Ghosting occurs when an image intended for one eye is partially seen by the other eye Ghosting can be removed by optimizing the dark time and sync delay HDCP High bandwidth Digital Content Pro...

Page 108: ...ndwidth Interleaving The alternation between left and right eye images when displaying 3D IRE A unit used to show the range from black to white in Composite Video signals LED Light Emitting Diode An e...

Page 109: ...itted at 50 interlaced fields per second Pillarboxing Black margins at the left and right of the image Pillarboxing appears when a narrower image is packed into a wider frame without changing the aspe...

Page 110: ...576i for NTSC it is 480i SECAM Sequential Color with Memory The television system used in France Russia and some other countries 625 lines transmitted at 50 interlaced fields per second SPDIF Sony Ph...

Page 111: ...th of the DMD TRF 1 For images that do not fill the DMD TRF is effectively increased UXGA A display resolution of 1600x1200 pixels with a 4 3 screen aspect ratio Stands for Ultra Extended Graphics Arr...

Page 112: ...deo signal YUV See Pr Pb ZScreen A special kind of light modulator which polarizes the projected image for 3D viewing It normally requires that images are projected onto a silver screen The ZScreen is...

Page 113: ...uk Digital Projection Inc 55 Chastain Road Suite 115 Kennesaw GA 30144 USA Tel 1 770 420 1350 Fax 1 770 420 1360 powerinfo digitalprojection com www digitalprojection com Digital Projection China 101...

Reviews: