Upgrading a Model 30 (With Diskette)
55
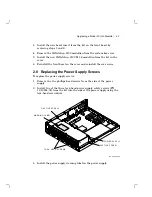
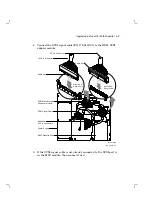
1. Check the position of the S3 switch next to the LEDs on the back
of the system module. Be sure S3 is in the down position (the down
position enables the monitor to be the console and the up position
enables a terminal connected to the printer port to be the console).
2. Install the connector end of the system module first through the
openings in the rear of the box. Push the module back to load
the connector ground tabs, then snap the module on both locating
standoffs. All screw holes will then be aligned.
3. Install the eight screws on the system module.
P O W E R
C A B L E
B A T T E R Y
C A B L E
P A N H E A D
S C R E W S
G R O U N D
T A B S
P A N H E A D
S C R E W S
L O C A T I N G
S T A N D O F F
L O C A T I N G
S T A N D O F F
( 3 )
( 5 )
M A - X 0 8 0 5 - 8 8 A
4. Connect the power cable and the battery cable to the system module.
5. Reconnect all cables to the back of the system box.
Summary of Contents for VAXstation 3100
Page 5: ...Contents v Tables 1 Related Documents viii 3 1 RX23 SCSI ID Switch Settings 66 ...
Page 105: ...Upgrade and Return Forms 97 ...
Page 107: ...Upgrade and Return Forms 99 ...
Page 109: ...Upgrade and Return Forms 101 ...
Page 111: ...Upgrade and Return Forms 103 ...
Page 113: ...Upgrade and Return Forms 105 ...


