background image

UTM-00330 

|

 Rev 5 

Page 

65

 of 

91


DetNet South Africa Copyright © 2019  


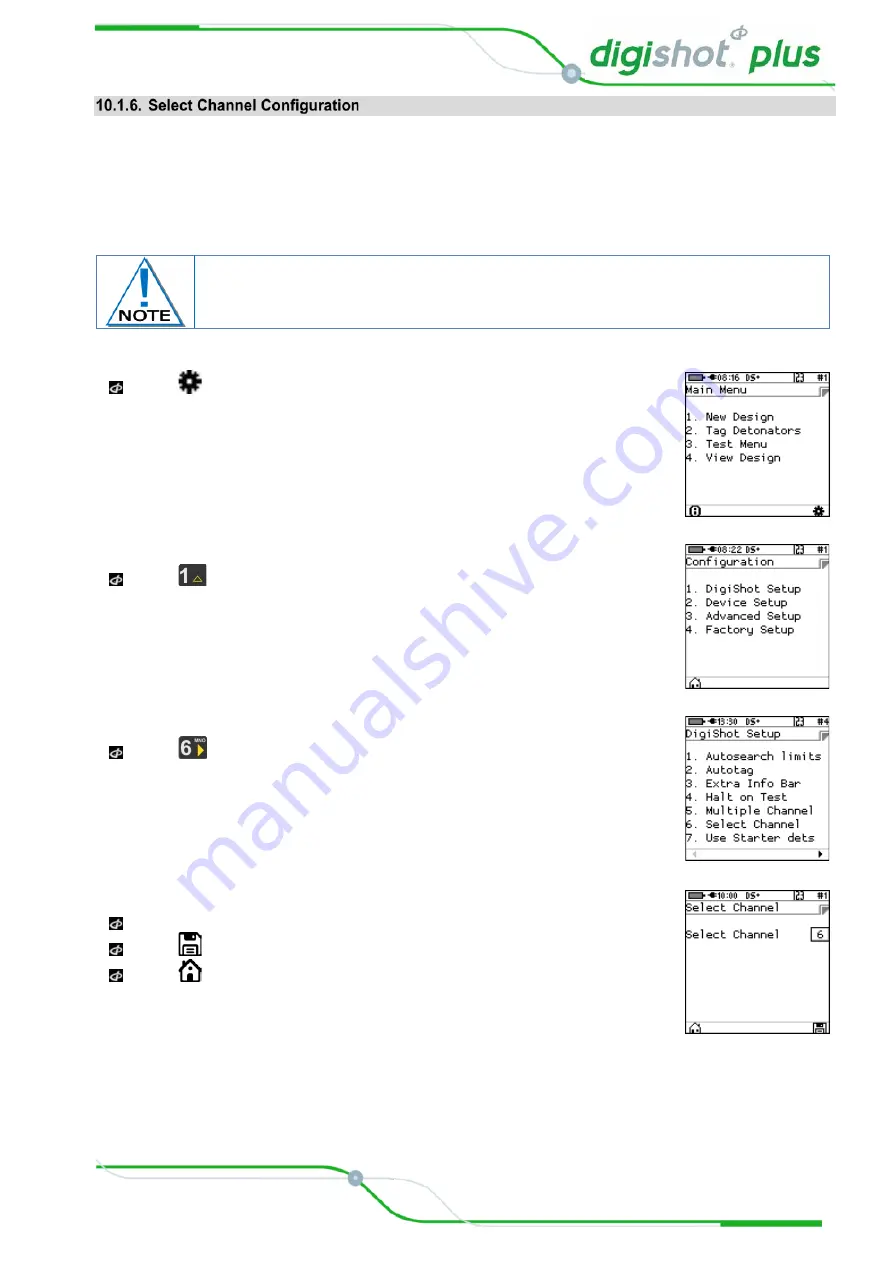
This function enables the user to set the current working channel  

All functions (Autosearch, test all, etc.) will prompt the user to select a channel to work with.  Operations will 

only affect the currently selected channel and all other channels will be unaffected.  During tagging however, 

the software will check the entire list across all channels for ‘location exists’ errors, to avoid duplicate 

detonators. 


1. Main Menu 

  Press 

 to select 

Configuration


2. Configuration Menu 

  Press 

 to select 

DigiShot Setup


3. DigiShot

®

 Setup 

  Press 

 to select the 

Select Channel

 setup 


6.   Select


Channel 

  Use the numerical keypad to enter Channel number 

  Press 


Soft Key to save 

  Press 

 Soft Key to return to Main Menu. 


The Select Channel function will only be available when the Multiple Channel function 

is enabled. 

Summary of Contents for Plus CE4 Tagger

Page 1: ...DigiShot Plus CE4 Tagger UTM 00330 Rev 5 SVN 34374B 2019 APPROVER _________________________________________________ 2019 01 17 Vinesh Naidoo yyyy mm dd APPROVED...

Page 2: ...MERGENCY 8 2 8 WARNING CAUTION AND NOTE STATEMENTS 9 2 9 RF COMPLIANCE FCC USA AND ICES CANADA 9 2 9 1 Unauthorised Changes 9 2 9 2 Radio Interference 9 2 9 3 RF Exposure 10 2 9 4 FCC Class B digital...

Page 3: ...GGER BATTERY 21 5 1 CHARGING THE DIGISHOT PLUS CE4 TAGGER 21 5 1 1 Low Battery 22 5 2 POWER DIGISHOT PLUS CE4 TAGGER ON AND OFF 23 5 2 1 DigiShot Plus CE4 Tagger Power ON 23 5 2 2 DigiShot Plus CE4 Ta...

Page 4: ...Configuration 63 10 1 5 Multiple Channel Configuration 64 10 1 6 Select Channel Configuration 65 10 1 7 Use Starter Dets 66 10 2 DEVICE SETUP 67 10 2 1 Contrast 67 10 2 2 Brightness 68 10 2 3 Time Zo...

Page 5: ...earch 87 11 4 2 High Leakage 88 11 4 3 Leakage through conductive materials 89 12 SPECIFICATIONS 90 12 1 TEMPERATURE LIMITATIONS 90 12 2 BATTERY LIFE 90 12 3 STORING THE DIGISHOT PLUS TAGGER 90 12 4 C...

Page 6: ...e manufacturer must be followed Training and software upgrades shall only be performed by a DetNet SA subject matter expert Contact the DetNet head office for additional information ALL USERS OPERATIN...

Page 7: ...CE4 DigiShot Plus CE4 Tagger is Inherently Safe as it cannot produce the necessary minimum required firing voltage to blast the electronic DigiShot Plus detonator In addition the DigiShot Plus CE4 Ta...

Page 8: ...en glass and to prevent liquid crystal from the screen touching the skin or entering the eyes or mouth Batteries may leak or explode if incorrectly handled Only use batteries approved for use in the D...

Page 9: ...tion which is always placed in cautions or warnings Refer to http www detnet com for additional detail and documentation DetNet South Africa has not approved any changes or modifications to this devic...

Page 10: ...io or television reception which can be determined by turning the equipment off and on the user is encouraged to try to correct the interference by one or more of the following measures Reorient or re...

Page 11: ...the LCD screen a buzzer and a vibration motor to draw the user s attention to the system s current state The DigiShot Plus Tagger is designed for use on the blast front and it is incapable of producin...

Page 12: ...th Africa Copyright 2019 Harness wire terminals Pogo Pin Connector Blue Status LED White Charge LED Red Error LED LCD Screen Soft Keys Navigation keys yellow arrows Enter key Backspace key Escape key...

Page 13: ...onments where the temperature drops below 15 C the internal heater pad will automatically switch on to warm the display The Soft Keys will activate functions that appear at the bottom of the LCD scree...

Page 14: ...es a rechargeable 3 7V Lithium Polymer battery Although the battery has sufficient power to operate the DigiShot Plus CE4 Tagger the operating voltage is significantly lower than the minimum firing vo...

Page 15: ...ated via the internal GPS The CE4 Tagger version 4 and later is equipped with a Near Field Communication NFC reader located on the rear of the Tagger NFC functionality will be activated in a future so...

Page 16: ...iShot mode and the keyboard mode It will also indicates when the device is charging if the heater is on or if GPS is available Use the Numerical keys to enter numerical values to select a function fro...

Page 17: ...eturn a changed numeric input field to the original value Pressing escape will exit the menu Fixed range numeric input may be scrolled if indicated by up down arrows associated with the field Pressing...

Page 18: ...splayed and this function will not alter the operation of any other menus A quick access information screen is available in all menus Press the key to view system notifications If any and quick info T...

Page 19: ...Heater Pad can operate with the internal polymer battery independently of the external battery pack and will switch ON when the temperature drops below 15 C External Battery Pack enclosure is attached...

Page 20: ...trol equipment The Surface harness wire is yellow and green individually sheathed copper wire 0 63mm in diameter DigiShot can be connected in any order to the surface harness as the detonator connecto...

Page 21: ...er The DigiShot Plus CE4 Tagger will automatically start charging as soon as the USB connector port is plugged into a USB socket A battery level indication will be displayed during charging The tagger...

Page 22: ...System information screen Detailed in Chapter 9 of this manual to check that the Tagger is being charged Detailed information such as current consumption state of health of the battery and temperatur...

Page 23: ...ing screen is only displayed when the tagger is plugged into a USB Wireless charger external battery pack or charging source Pressing ESCAPE returns the user to the original screen and prevents this s...

Page 24: ...E SOFTWARE NOT RESPONDING TO THE KEY IN COMBINATION WITH THE KEY IT IS POSSIBLE TO FORCE THE TAGGER TO POWER OFF BY PRESSING AND HOLDING THE KEY FOR AT LEAST 10 SECONDS TO POWER OFF THE TAGGER NOTE TH...

Page 25: ...onator list 1 Main Menu Press to select New Design 2 Clear Memory Press Soft Key to clear detonator list Press Soft Key to exit option and return to Main Menu 3 Warning If YES was selected Det List Cl...

Page 26: ...hole 1 15 OR a Special an out of pattern detonator 1 255 1 Main Menu Press to select Tag Detonators 2 Tag Detonators Warning Press Soft Key to acknowledge warning 3 Tag Side Press Soft Key to tag onl...

Page 27: ...ica Copyright 2019 This screen will only be displayed if the option to tag on one side only was selected 5 Tag Detonators Use the numerical keypad to enter number of detonators used in each hole Press...

Page 28: ...e displayed if the option to tag on both sides was selected The Function key may be used to select the required side while in the Tagging mode as follows Press and hold key while pressing the Soft Key...

Page 29: ...key may be used to select Channels while in the Tagging mode as follows Press and hold key while pressing or key to toggle up or down between Channels Test Single Det While in the Tagging menu the use...

Page 30: ...e user enters the tagging menu but can also be changed while in the tagging menu Press and hold the key while pressing the or key to adjust this setting A message will display the new Maximum Dets per...

Page 31: ...o change sides of Initiation Point Press Soft Key to toggle between Left and Right side Tagging left hand side Tagging right hand side The Tagger will display the selected side When tagging ensure the...

Page 32: ...are assigned later Adding Special detonators Use the Pattern Soft Key to toggle between IN and OUT of pattern holes to add Special detonators Press to adjust the detonator number manually if required...

Page 33: ...d in any order Row numbers have to be manually changed ROW denotes row number being tagged Press to increase row number Press to decrease row number When tagging ensure the row number is selected acco...

Page 34: ...oser to the initiation point and higher numbers are further away from the initiation point as with chevron blasting practices HOLE denotes the hole number being tagged Press to increase hole number ma...

Page 35: ...bel to avoid wrong position tagging Decked DigiShot Plus detonators also need to be clearly marked on the blast plan to ensure their locations are correctly assigned Refer to the Advanced Setup sectio...

Page 36: ...the hole numbering for each hole At the end of a row the row number and increment decrement may need to be manually adjusted before tagging the next row To change hole increment and decrement Press So...

Page 37: ...us CE4 Tagger to one end of the Harness wire and untagged detonators are connected one at a time The tagger will automatically tag the location as each detonator is connected The existing tagged deton...

Page 38: ...ect the channel to test in the test all row menu only if multiple channels are used An option to halt on errors while testing is available and may be configured as Halt on test under the DigiShot Setu...

Page 39: ...displayed Press Soft Key to continuously repeat test Press Soft Key to stop continuously repeating test The information bar at the bottom of the Tagger screen displays the CURRENT state i e the Soft K...

Page 40: ...rness wire that are not in the detonator list will be ignored Use Autosearch or Check Pattern to locate newly connected detonators 1 Main Menu Press to select Test Menu 2 Test Menu Connect all detonat...

Page 41: ...Test all detonators in the row Failed detonators will be displayed Total amount of detonators will be displayed Press Soft Key to continuously repeat test Press Soft Key to stop continuously repeatin...

Page 42: ...Press to select Test Single Det 3 Test Single Det Tagged location is displayed If the Detonator contains a wire length this value is displayed This value is displayed in meters and feet Press Soft Key...

Page 43: ...In multi channel mode only the detonators in the selected channel will be erased 1 Main Menu Press to select Test Menu 2 Test Menu Ensure that the detonator is connected to the Tagger Press to select...

Page 44: ...er the Last row number on which the search will end Press to continue Use numerical keys to enter maximum detonators per hole to search for Press to continue Use numerical keys to enter maximum specia...

Page 45: ...e in the same hole or move to a new hole a new side or a new row To ensure that the search is performed as rapidly as possible it will proceed to a new hole side or row after a selected number of bad...

Page 46: ...t in blasting problems This should be addressed and the leakage problem resolved Leakage higher than 1mA is considered high leakage and will likely result in blasting problems potential misfires and s...

Page 47: ...Test Menu 2 Test Menu Press to select Untagged Test 3 Untagged Test OK message displayed when no untagged detonators are found Error message displayed when untagged detonators are found While performi...

Page 48: ...Pattern generates a list of Missing detonators that were not found when compared to the detonator list Check Pattern generates a list of new detonators found during test which were not part of the ori...

Page 49: ...om the first row specified to the last row specified and the maximum number of special detonators in the list or as found taking bad holes detonators into account 6 Check Pattern After Check Pattern f...

Page 50: ...e This function enables the user to scroll to the next or previous page Press the Soft Key to scroll to the next and the Soft Key to scroll to the previous page Sort Mode Press the Soft Key to sort by...

Page 51: ...est Single Det In the Detlist View menu the user has the option to test a single detonator Connected to the pogo pin connector by pressing the minus power key During this test any detonators connected...

Page 52: ...ain Menu Press to select View Design 2 View Design Menu Press to select List Detonators 3 List Detonators The List Detonators screen will be displayed Use Soft Keys to navigate pages and sort filter t...

Page 53: ...screen lists the DigiShot Plus detonators that were not found during the Check pattern test or test all 1 Main Menu Press to select View Design 2 View Design Menu Press to select List Missing Dets 3 L...

Page 54: ...es not overwrite the detonator list 1 Main Menu Press to select View Design 2 View Design Menu Press to select List New Dets 3 List New Dets The List New Detonators screen will be displayed Use Soft K...

Page 55: ...rn test A bad status indicates the detonator may have a bad fuse or other internal problem 1 Main Menu Press to select View Design 2 View Design Menu Press to select List Bad Status 3 List Bad Status...

Page 56: ...Blast Summary The Blast Summary screen displays the Rows in the first column The number of detonators holes on the Left and Right side per corresponding row is displayed The total number of Special de...

Page 57: ...have been found The list also includes any missing detonators 1 Main Menu Press to select View Design 2 View Design Menu Press to select Det Totals 3 Det Totals The Det Totals screen will display a s...

Page 58: ...a negative value indicates that current is being drawn from the battery Cell Status Good indicates the state of health of the battery Should the status indicate Low the unit should be serviced to have...

Page 59: ...ocation will be displayed Altitude and the number of satellites found will also be displayed 6 System Info User ID Press to select page right Press to enter or edit User ID Use alphanumeric characters...

Page 60: ...e before the search progresses to the following hole Press to continue Use numerical keys to enter Maximum consecutive missing holes on a row before the search progresses to the alternate side or the...

Page 61: ...on 2 Configuration Menu Press to select DigiShot Setup 3 DigiShot Setup Press to select Autotag 4 Autotag Press to enable disable Autotag Press Soft Key to save Press Soft Key to return to Main Menu W...

Page 62: ...on bar displays side leakage and the signal strength of the detonator reply 1 Main Menu Press to select Configuration 2 Configuration Menu Press to select DigiShot Setup 3 DigiShot Setup Press to sele...

Page 63: ...during testing 1 Main Menu Press to select Configuration 2 Configuration Menu Press to select DigiShot Setup 3 DigiShot Setup Press to select Halt on test 4 Halt on test Press to select Halt on test...

Page 64: ...tonators spread across 6 channels 1 Main Menu Press to select Configuration 2 Configuration Menu Press to select DigiShot Setup 3 DigiShot Setup Press to select Multiple Channel 5 Multiple Channel Pre...

Page 65: ...ted During tagging however the software will check the entire list across all channels for location exists errors to avoid duplicate detonators 1 Main Menu Press to select Configuration 2 Configuratio...

Page 66: ...elect Configuration 2 Configuration Menu Press to select DigiShot Setup 3 DigiShot Setup Press to select Use Starter dets 4 Use Starter Dets Use the arrow key to display the YES NO option as required...

Page 67: ...ation Menu Press to select Device Setup 3 Device Setup Press to select Contrast 4 Contrast Use the arrow key to adjust contrast Adjust to ensure the displayed contrast blocks are distinguishable to al...

Page 68: ...ser to adjust the LCD screen brightness 1 Main Menu Press to select Configuration 2 Configuration Menu Press to select Device Setup 3 Device Setup Press to select Brightness 4 Adjusting the Brightness...

Page 69: ...me zone cannot be configured automatically it should always be set by the user in order to ensure the correct local time display 1 Main Menu Press to select Configuration 2 Configuration Menu Press to...

Page 70: ...o conserve battery power The user can set the idle time between 2 and 120 minutes 1 Main Menu Press to select Configuration 2 Configuration Menu Press to select Device Setup 3 Device Setup Press to se...

Page 71: ...igiShot Plus Tagger menus 1 Main Menu Press to select Configuration 2 Configuration Menu Press to select Device Setup 3 Device Setup Press to select Language 4 Language Press on the keypad to select E...

Page 72: ...elect Advanced Setup Use numerical keypad to enter Unique Tagger Password Press ENTER to continue 3 Advanced Setup Press to select Tagger ID 4 Tagger ID Using numerical keypad to enter Unique Tagger I...

Page 73: ...vanced Setup Use numerical keypad to enter Unique Tagger Password Press ENTER to continue 3 Advanced Setup Press to select Clear Tags 4 Clear Tags An information screen will be displayed Press Soft Ke...

Page 74: ...d from unauthorised use by assigning a password 1 Main Menu Press to select Configuration Settings 2 Configuration Settings Menu Press to select Advanced Setup Use numerical keypad to enter Unique Tag...

Page 75: ...Passwords Use the numerical keypad to enter New Password Press to confirm 7 Passwords Information message confirming password changed will be displayed briefly Tagger will display Password Screen Pres...

Page 76: ...Configuration Settings Menu Press to select Advanced Setup Use numerical keypad to enter Unique Tagger Password Press ENTER to continue 3 Advanced Setup Press to select Hole Load Mode 4 Hole Load Mode...

Page 77: ...onfiguration Settings Menu Press to select Advanced Setup Use numerical keypad to enter Unique Tagger Password Press ENTER to continue 3 Advanced Setup Press to select DigiShot Mode 4 DigiShot Mode Pr...

Page 78: ...numerical keypad to enter Unique Tagger Password Press ENTER to continue 3 Advanced Setup Press to select Storage Mode 4 Storage Mode When the battery capacity is more than 50 the tagger will discharg...

Page 79: ...to logs 1 Main Menu Press to select Configuration Settings 2 Configuration Settings Menu Press to select Advanced Setup Use numerical keypad to enter Unique Tagger Password Press ENTER to continue 3...

Page 80: ...e Tagger Password Press ENTER to continue 3 Advanced Setup Leave Tagger in Advanced menu and open the PC software to connect Remote View This function enables the user to demonstrate the Tagger in act...

Page 81: ...ESC to abort tagging While the tagger waits for user input other key presses are ignored as the user must respond to the indicated problem with ENTER or ESCAPE On completion of the tagging process a m...

Page 82: ...Location exists The chosen location already exists in the detonator list Manually adjust location according to blast plan if required Tagger vibrates to inform the user of an error condition Press to...

Page 83: ...status indicates the detonator may have a bad fuse or other internal problems Tagger vibrates to inform the user of an error condition Press to retag with the new location or ESC to abort tagging Lab...

Page 84: ...message will be displayed indicating High leakage and or Untagged Dets Found The untagged test is also integrated into Test All Test Row Check Pattern and Autosearch but there it elicits a custom erro...

Page 85: ...Status Dets Detonators in the design has tested with a bad status Bad status indicates the detonator may have a bad fuse or other internal problems Replace the detonator to avoid a possible misfire Fa...

Page 86: ...s not correctly de sludged rubbing of down hole line against hole wall bent cable when lowering booster into a hole Detonator cable damaged around the insulation exposing the steel wire Ingress of wat...

Page 87: ...he search area 6 By repeating this process the fault is narrowed down to a small and manageable area At this point DigiShot Plus detonators may be disconnected from the surface harness and tested one...

Page 88: ...us Tagger display high leakage it indicates a fault present 3 Connect DigiShot Plus Tagger and check front half for leakage Should the DigiShot Plus Tagger display satisfactory leakage it indicates no...

Page 89: ...Plus Tagger and check the rear half of the installation for leakage Tagger displays satisfactory leakage Connect DigiShot Plus Tagger and check front half of the installation for leakage Tagger displ...

Page 90: ...the DigiShot Plus Tagger body wipe gently using a soft dry cloth Dust on the screen should be blown off before gently wiping with a soft dry cloth so as to avoid scratches Ensure the Pogo pin connecto...

Page 91: ...vent ingress of moisture or condensation into the battery pack enclosure Do not apply undue pressure to the LCD screen as this could damage the Tagger or cause a malfunction Should the LCD screen brea...

Reviews: