13
ENGLISH
9
USING THE ON-SCREEN DISPLAY
2
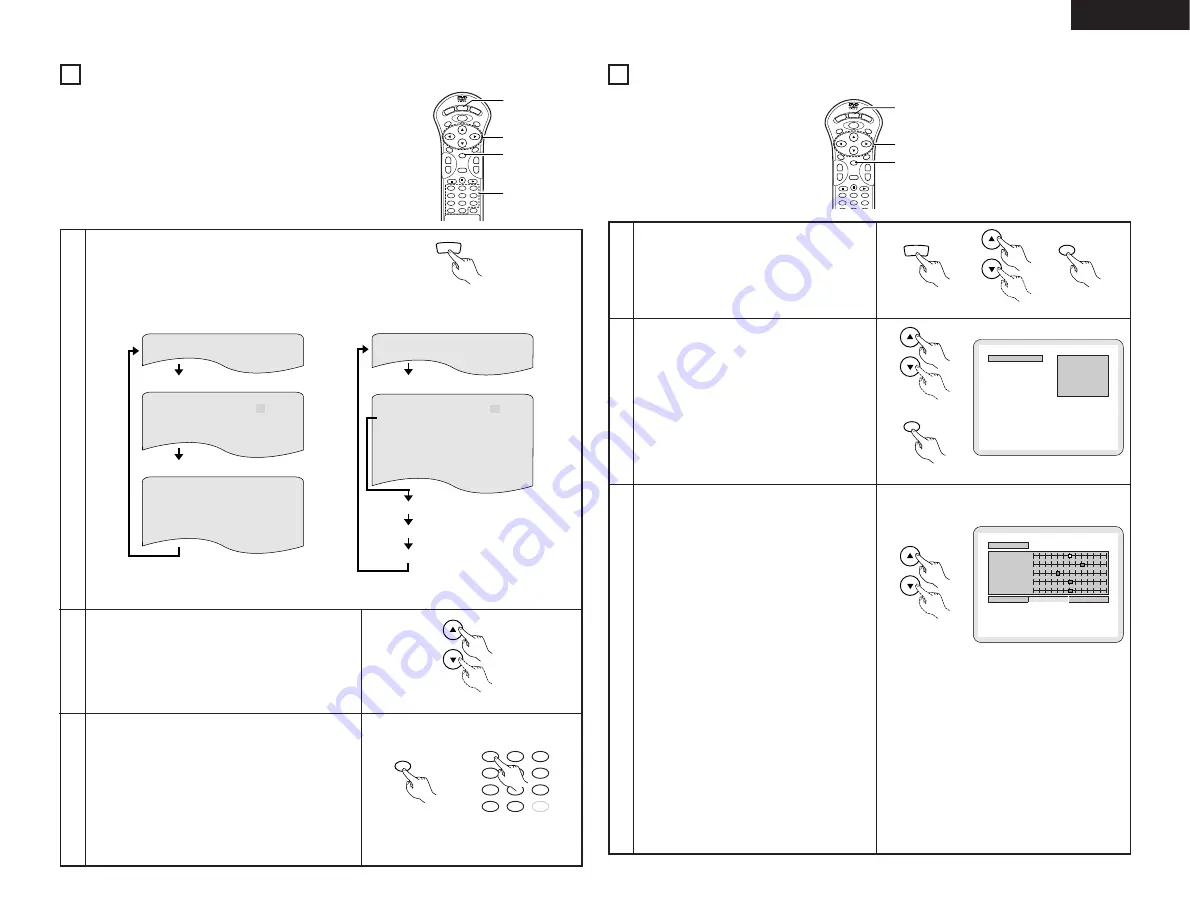
Use this function to display and change information on the disc
(titles, chapters, time, etc.)
1
In the play mode, press the DISPLAY button.
• The On-Screen Display appears.
• The picture on the TV screen switches each time
the button is pressed.
• The items displayed differ from disc to disc.
T I T L E 0 1 / 0 5
CHAP T E R 0 2 / 0 8
T I T L E E L AP S E D 0 : 2 6 : 1 1
P I C T UR E MODE
S TANDARD
ON
SUBT I T L E 0 1 / 0 3 E NGL I SH
AUD I O 0 1 / 0 3 E NG
DOL B Y D 3 / 2.1
AUD I O OUTPUT D I G I T A L
• Normal playback screen
• Disc information screen
• Disc information screen
2
3
Use the
•
and
ª
cursor buttons to select the item you wish to
change.
• The selected item is displayed with a yellow frame.
Use the number buttons to change the item.
• Time search is possible by pressing the DISPLAY button,
selecting the title time using the cursor buttons, inputting the
time using the number buttons, then pressing the ENTER
button.
• When the title or chapter is selected with the cursor buttons,
the title number or chapter number is selected with the
number buttons and the ENTER button is pressed, playback
starts from the title number or chapter number you have input.
For video CDs and regular CDs, when the track number is
input with the number buttons, playback starts from the track
number you have input.
1
2
3
4
5
6
7
8
9
0
+10
CLEAR
Remote control unit
Example: For DVDs
S I NGL E E L AP SE D 0 1 : 2 6
A–B R E P E AT OF F
R E P EA T OF F
P L A Y MODE NORMAL
P I C T UR E MODE S TANDARD
AUD I O MODE L / R
AUD I O OU T PU T D I G I T AL
T R ACK 0 2 / 1 0
S I NGL E R EMA I N 0 3 : 1 7
T OT A L E L AP S E D 0 6 : 1 5
TO T AL R EMA I N 3 2 : 0 5
• Normal playback screen
• Disc information screen
Example: For video and music CDs
10
ADJUSTING THE PICTURE QUALITY
1
2
3
4
5
6
7
8
9
0
+10
CLEAR
ENTER
RETURN
ANGLE
AUDIO
MENU
SUBTITLE
TOP MENU
DISPLAY
OP/CL
POWER
SKIP
+
-
SLOW/SEARCH
+
-
3
3
1
2
Remote control unit
Remote control unit
DISPLAY
1
2
3
4
5
6
ENTER
RETURN
ANGLE
AUDIO
MENU
SUBTITLE
TOP MENU
DISPLAY
OP/CL
POWER
SKIP
+
-
SLOW/SEARCH
+
-
2, 4
1
1, 3
• For the on-screen display for video CDs and regular
CDs, only the disc time changes.
ENTER
3
Use the
•
and
ª
cursor buttons to select the picture
memory, then press the ENTER button.
• The display switches as follows:
STANDARD
Æ
MEMORY 1
Æ
MEMORY 2
Æ
MEMORY 3
Æ
MEMORY 4
Æ
MEMORY 5
STANDARD (Factory default)
When this is selected, both the picture quality and
function are reset to normal.
MEMORY 1 to MEMORY 5
Picture quality settings you have adjusted can be
stored here.
2
P I CTURE MODE
STANDARD
MEMORY 2
MEMORY 3
MEMORY 4
MEMORY 5
MEMORY 1
Remote control unit
ENTER
Remote control unit
Select the item to change using
•
and
ª
buttons
• CONTRAST, BRIGHTNESS, SHARPNESS, HUE and
GAMMA can be adjusted as you like.
CONTRAST (-6 ~ +6)
Adjusts the contrast of the image.
BRIGHTNESS (0 ~ +12)
Adjusts the picture’s brightness.
SHARPNESS (-6 ~ +6)
Adjusts the sharpness of the picture.
HUE (-6 ~ +6)
Adjusts the balance of the green and red. (This does
not affect Progressive Scan images.)
GAMMA (-6 ~ +6)
Select this if dark portions of the picture are too dark
or bright portions are too bright.
(This does not affect Interlaced images.)
• Black Level
To select the black level of the picture, “LIGHTER” or
“DARKER”.
LIGHTER
The black level of the picture is selected to the lighter
one.
Select this setting normally when the player is
connected to a TV set through the VIDEO OUT
connector or S-VIDEO OUT connector or AV 1
connector.
DARKER
The black level of the picture is selected to the darker
one.
Select this setting normally when the player is
connected to a TV set through the COMPONENT VIDEO
OUT (Y, P
B
/C
B
, P
R
/C
R
) connector.(Factory preset)
MEMORY 1
CONTRAST
SHARPNESS
HUE
GAMMA
BRIGHTNESS
0
- 2
0
0
+ 8
BLACK LEVEL
LIGHTER
DARKER
DISPLAY
Remote control unit
Press the DISPLAY button, use the
•
and
ª
cursor
buttons to select the “PICTURE MODE”, then press
the ENTER button.
1
ENTER
Remote control unit


