209499 Rev. A
www. s p e c s e l e c t . c o m
Page 8
MAINTENANCE
Care and cleaning of chrome and special finishes
DO NOT
use steel wool or cleansing agents containing alcohol, acid, abrasives, or the like. Use of any prohibited cleaning or maintenance products or
substances could damage the surface of the faucet. For surface cleaning of faucet, use ONLY soap and water, then wipe dry with clean cloth or towel. When
cleaning bathroom tile, the faucets should be protected from any splattering of harsh cleaners.
Filter cleaning instructions
This faucet is provided with in-line filter(s) to prevent foreign particles from entering the faucet through the water supply lines. If the water flow has decreased,
this may be an indication that the in-line filter(s) have become clogged. The filter(s) can be cleaned as follows:
1.
Shut off the water at the supply stop(s).
2. Activate the faucet to relieve water pressure built up within the faucet.
3.
Use screw driver to open in-line filter chamber.
4.
Remove the filter(s) and wash them under running water.
5. Reassemble the parts.
6. Restore water by opening the supply stop(s).
7. Activate faucet several times and check for leaks.
Aerator cleaning instructions
(see Figure 8)
1.
Shut off the water at the supply stop(s).
2. Activate the faucet to relieve water pressure built up within the faucet.
3. Use supplied aerator wrench to remove the aerator.
4. Rinse aerator under running water to remove debris.
5. Reassemble the aerator to the faucet. Ensure the aerator washer is installed properly.
6. Restore water by opening the supply stop(s).
7. Activate faucet several times and check for leaks.
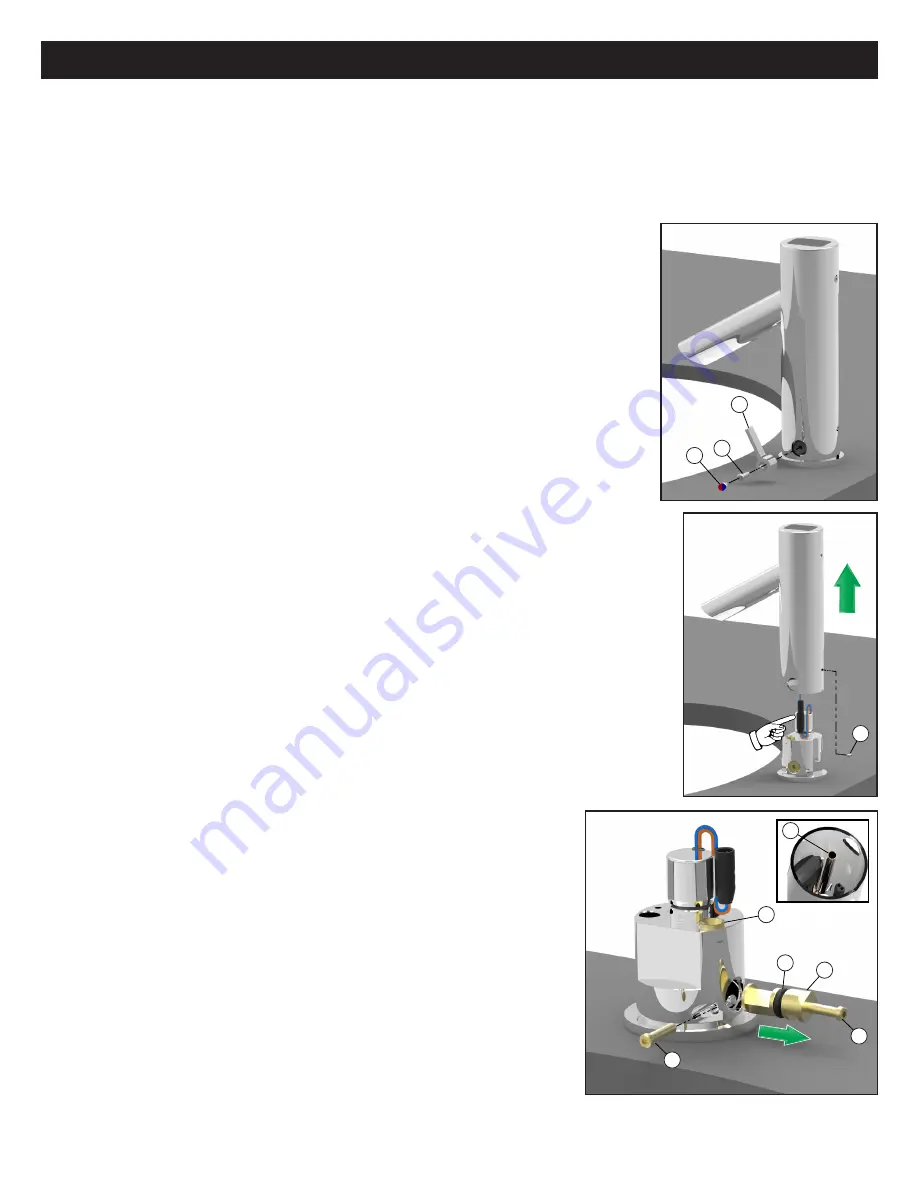
Side mixer cleaning instructions (DEMD-321LF)
(see Figures 10 - 12)
1.
Shut off the water at the supply stop(s).
2. Activate the faucet to relieve water pressure built up within the faucet.
3. Remove the side mixer handle (1) by pulling out the red/blue temperature indicator plug (2) and handle screw (3).
4.
Remove the set screw (4) at the back of the faucet near the base, lift the body assembly off the faucet base and
disconnect the solenoid.
5. Remove the bolt (5) from the faucet base using a 3/32” or 2.5mm Allen wrench.
6. Use the bolt (5) to pull out the mixer assembly (6) from the faucet base.
7. Clean the mixer assembly of any debris by rinsing under water.
8. Apply silicone compatible lubrication onto the o-ring (7) before reassembling the mixer assembly (6) and bolt (5)
to the faucet base.
9. Reconnect the solenoid cable.
10. There is a copper tube (9) in the body assembly that must be aligned to the outlet port (8) in the
faucet base so the body assembly can fit back over the faucet base.
11. Lock the faucet base to the body assembly using the set screw (4).
12. Reassemble the handle (1) and red/blue temperature indicator plug (2).
Note:
The temperature indicator plug (2) should be oriented with blue on the left and red on the right.
13. Restore water by opening the supply stop(s).
14. Activate faucet several times and check for leaks.
3
1
2
Fig. 10
4
Fig. 11
5
5
6
7
8
9
Fig. 12


