background image

Model 9330-150-A01 Installation Instructions 


Page 6 of 16 

Document: INS-9330-A01, Rev. C 

Do not copy or distribute without written permission. Unpublished Work 

 2022 Delphi Display Systems, Inc. All rights reserved. 

Printed copies are Uncontrolled unless clearly marked as a Controlled document. User is responsible for verifying document is the current revision. 


4


System Overview 

The model 9330-150-A01 OCS display is 15” diagonal sunlight readable, ruggedized outdoor fully sealed full 
color display system with an embedded processor and environmental management system.  The system is 
designed to be connected directly to the local area network (LAN) via a CAT5 cable connection on the rear of 
the unit.  An IP67 rated outdoor external 120-220VAC DC power supply is provided to 15VDC to the 
display via a power input connector on the rear of the unit. 
 

4.1


Front of Display  

The front of the display is shown in the figure below.  The light sensor is located in the lower left-hand 
corner of the display. 


Figure 1 – Front of Display


4.2


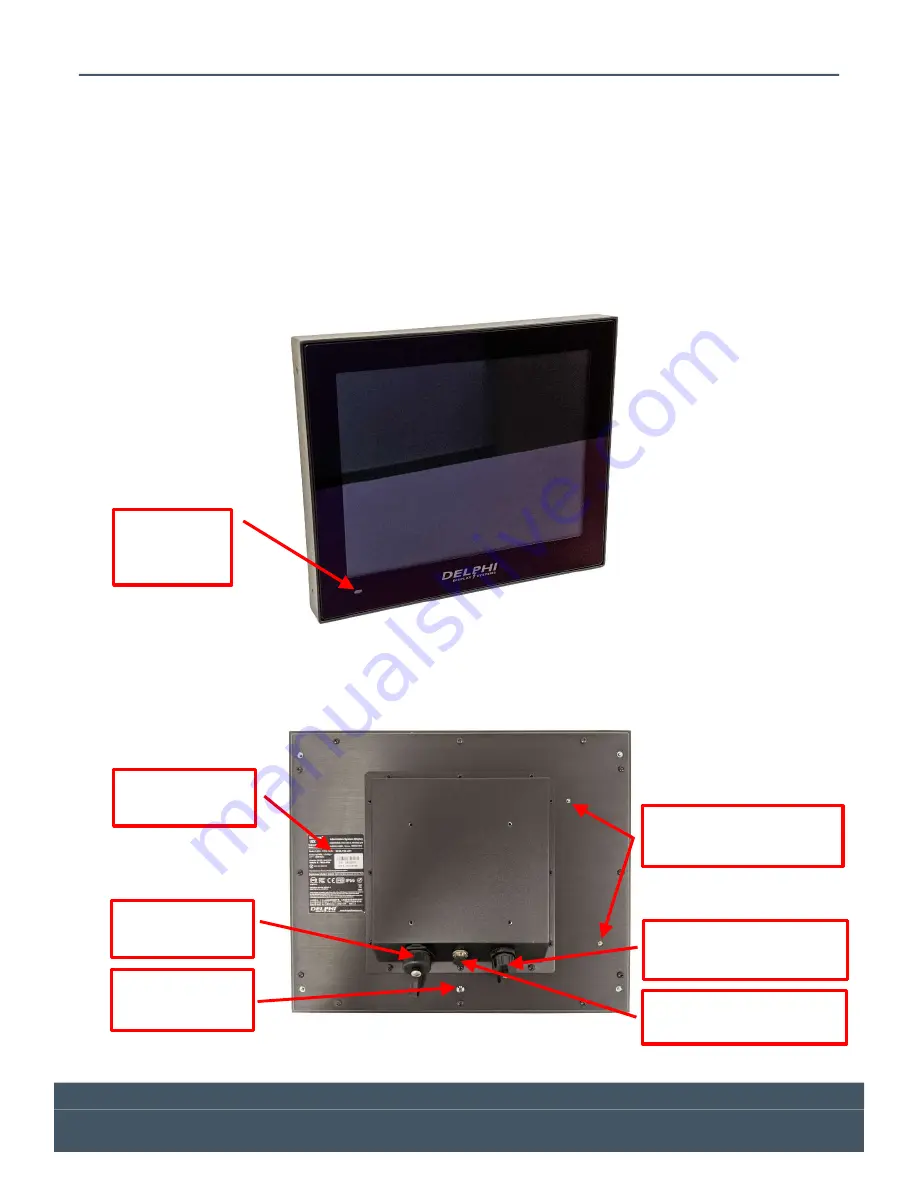
Back of Display 

The back of the display is shown in the figure below.   


Figure 2 – Back of Display


Network (RJ45) 

Connector) 

Power 

Indicator Light 

Diagnostic Connector – 

NOT USED 

DC Power Input 

Connector 

Ambient 

Light Sensor 

DC Power Supply 

Mounting Points 

DC Power Supply 

Mounting Points (2) 

Serial Number 

Label 

Summary of Contents for 9330-150-A01

Page 1: ...itten permission Unpublished Work 2022 Delphi Display Systems Inc All rights reserved Printed copies are Uncontrolled unless clearly marked as a Controlled document User is responsible for verifying d...

Page 2: ...T NETWORK CONNECTION TO POS 7 5 2 SERIAL SERVER CONNECTION TO POS 8 5 3 SERIAL SERVER CONNECTIVITY 8 5 4 VIDEO ENCODER CONNECTION TO POS VIDEO OUTPUT 9 5 5 SUPPLIED EQUIPMENT 10 5 6 DISPLAY MOUNTING O...

Page 3: ...K OF DISPLAY 6 FIGURE 3 SYSTEM CONNECTIONS DIRECT CONNECTION TO POS 7 FIGURE 4 SYSTEM CONNECTIONS SERIAL SERVER CONNECTION TO POS 8 FIGURE 5 SERIAL SERVER BOTH ENDS 8 FIGURE 6 SYSTEM CONNECTIONS VIDEO...

Page 4: ...30 150 A01 Order Confirmation System OCS display including instructions on the connections all cabling and any additional hardware required for installation 2 Warnings Warning This is a Class A produc...

Page 5: ...VDC Power Wireless BLE Ibeacon Enclosure Rating IP66 IEC 60529 Construction Aluminum Steel Weight 11 6 lbs Glass Optically bonded w UV IR blocking Anti Glare AG Dimensions in 14 75w x 12 25h x 2 80d R...

Page 6: ...The system is designed to be connected directly to the local area network LAN via a CAT5 cable connection on the rear of the unit An IP67 rated outdoor external 120 220VAC DC power supply is provided...

Page 7: ...15VDC power supply that is connected to a 120 220VAC power provided at the point of installation The display is connected to an available port on the store network switch using the supplied CAT5 cabl...

Page 8: ...itch as shown below Figure 4 System Connections Serial Server Connection to POS 5 3 Serial Server Connectivity If the POS system relies on connectivity directly to the order taking register then the S...

Page 9: ...re the POS system renders the video content for the OCS display directly the video source can be streamed directly to the OCS using a digital video encoder as shown below The encoder converts the HDMI...

Page 10: ...U Power Cable Japan PSE certified DEL PWR CD JP Power Cable Taiwan DEL PWR CD TW Note The country specific power cord is supplied with the 15X Display part number and description above It is only used...

Page 11: ...ther type of connector on the back of the display will result in a loose connection and will void the customer s warranty Although the shielded connector is necessary it is not actually used as a shie...

Page 12: ...shown below Figure 11 Field Connector Assembly Step 2 Next untwist the wires and place them into the correct order for 568B termination Cut the length of the wires down to approximately 13mm then ter...

Page 13: ...connection to the display Plug the connector to the back of the display at the RJ45 receptacle Once connected screw the Connector Nut into the back of the display until it is tight Connect the 15V po...

Page 14: ...st PC or laptop computer connect to the switch and try to ping the display Make sure to change the IP address on your PC or laptop to allow communications with the display If you cannot ping the displ...

Page 15: ...nless clearly marked as a Controlled document User is responsible for verifying document is the current revision 9 Technical Support For technical assistance please contact Delphi Display Systems Inc...

Page 16: ...nted copies are Uncontrolled unless clearly marked as a Controlled document User is responsible for verifying document is the current revision 11 Document Revisions Revision Date Notes Author A 7 20 2...

Reviews: