background image


MIOX AE Series Operators Manual 


 102-00085-E 

Page 

21 


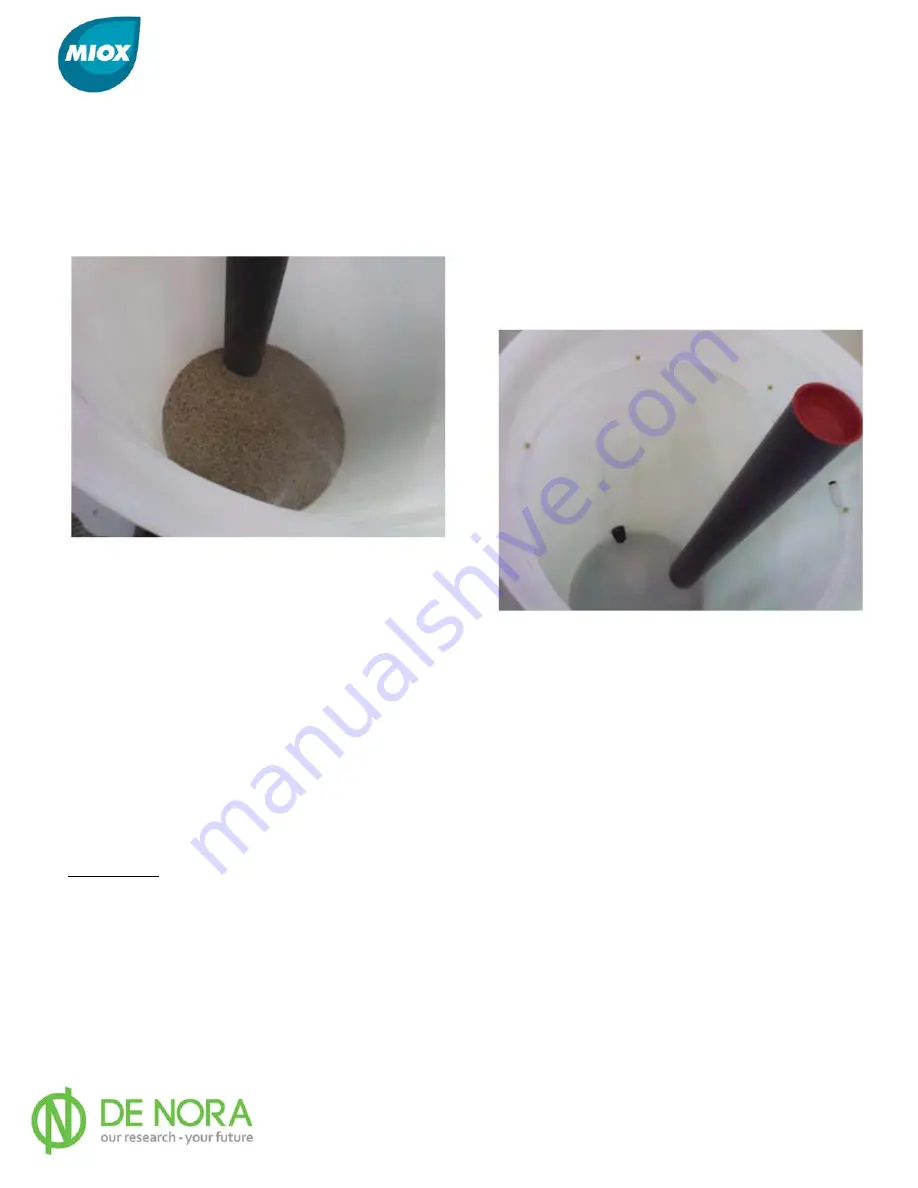
The spray ring assembly provides a more consistent means of mixing the salt and water to meet the 
brine saturation requirement. The spray ring at the top of the tank eliminates possibility of channeling 
(or short circuiting) the water through the outlet of the tank. Adding a quartz rock bed at the bottom the 
tank also reduces the possibility of brine channeling for any application. The following pictures provide 
an illustration of the spray ring assembly installed in a quartz rock bed (right) and tank assembly 
without quartz rock. 


Figure 7 Internal View Float Valve Assembly and Detail 

For instances where the float needs to be removed, turn off the water to the system. Remove the (red) 
cap on top of the stillwell. Unscrew the 3/8” PVC coupler that mates to the feed water line and the black 
threaded flange connection protruding through the tank wall. Unscrew the coupler that mates to the 
plastic spray ring. The float valve can now be pulled out the stillwell. The float itself, can be unscrewed 
at the clevis hinge that mates with the open/close poppet valve. To re-install the valve assembly, repeat 
step in reverse order, making sure to use Teflon tape for replacing all NPT connections. Replace red cap 
and return water supply. Verify float does close once high level is reached and system is not flowing 
water. 


Quartz Rock  

In order to accommodate various salt types, MIOX provides a cross-shaped, slotted pipe manifold. 
Thread the manifold into the bottom tank adapter. Place 7 inches of ½” x ¼” NSF quartz rock in the 
bottom of the tank. Rake it flat and cover the slotted pipe manifold.  Place 5 inches of ¼” x 

” NSF 

quartz rock on top of the first layer of quartz rock. Rake flat. 


Summary of Contents for MIOX AE Series

Page 1: ...AE SERIES ON SITE GENERATOR AE4 AE6 and AE8 Installation Operation and Maintenance Manual March 26 2019 ...

Page 2: ...MIOX AE Series Operators Manual 102 00085 E Page 1 AE SERIES ON SITE GENERATOR AE4 AE6 and AE8 Installation Operation and Maintenance Manual ...

Page 3: ...t to make these changes without prior notice or liability Portions of the MIOX OSGs are covered by U S Patent Customer Service 5601 Balloon Fiesta Parkway NE Suite A Albuquerque NM 87113 Phone 1 505 343 0090 Toll Free 1 866 MIOX HLP 1 866 646 9457 FAX 1 505 343 0093 contact mioxservice com www MIOX com www DeNora com International distributors and sales agents located worldwide ...

Page 4: ...s 7 AE Series OSG System Optional Equipment 9 Receiving and unpacking the AE Series OSG 10 Installation 11 Control Panel and Cell Installation 12 System Description 14 Electronic Connections Required for Start Up 15 Electrical Power Connection 15 Control Box Electrical Connections 15 Wiring of the Control Box Interface Block 16 Connecting Alarm Relay from Control Box 16 Plumbing Connections Requir...

Page 5: ... 36 Weekly Maintenance 36 Monthly Maintenance 36 Quarterly Maintenance 37 Annual Maintenance 37 Storage of Equipment 37 Troubleshooting Guide 38 Procedures 41 Brine Pump Replacement 41 Rupture Disk Maintenance 41 Replacing the Rupture Disk Diaphragm 42 Acid Washing Cell 42 Oxidant Demand Testing 43 Chlorine Production Testing 45 APPENDICES 49 Appendix A Water Quality Guidelines 50 Appendix B Salt ...

Page 6: ...d Detail 21 Figure 8 Oxidant Tank Vents 22 Figure 9 Safety Placards 23 Figure 10 Ventilation Requirements 24 Figure 11 Level Switch Installation 24 Figure 12 Oxidant Tank Level Switch Wiring to Control Box 25 Figure 13 System Display Primary View 29 Figure 14 System Display Secondary View 30 Figure 15 External Controls Relay 34 Figure 16 Rupture Disk 41 Figure 17 Ruptured Diaphragm 42 List of Tabl...

Page 7: ...vels MCLs and the operator must be capable of reliably operating the technology The on site oxidant category was added to this list in 1997 primarily based on independent research of MIOX technology List of Certifications EPA Registration Number 69723 NM 001 NSF International MIOX maintains a policy of verification and compliance of MIOX technology for water applications The NSF Standard provides ...

Page 8: ...poration equipment must be installed in a building or protected structure that provide shelter from the weather and extreme temperature variances and which can be locked or otherwise secured Physical security is required to ensure that unauthorized persons cannot access the unit Salt and Water Quality Requirements See Appendix A for water quality requirements See Appendix B for salt quality requir...

Page 9: ...s an integral part of an on demand system The oxidant tank is shipped with a drop tube The oxidant tank must be vented to the atmosphere to allow the escape of any evolved hydrogen gases Refer to the MIOX Hydrogen Safety White Paper for additional information on the required ventilation Tubing and Fittings All tubing and fittings shipped by MIOX Corporation meet Schedule 80 specifications The U S ...

Page 10: ...n 95 F 35 C damage to the electrolytic cell may occur A water heater or chiller must be used to bring the water temperature into range Water Pressure Boost System A water pressure boost system can be included to insure minimum water pressure for OSG operation and support of water softener regeneration A separate electrical circuit is required for the water pressure boost system ...

Page 11: ...ccurred during shipping Save the shipping materials for cell storage and shipping Unpack Installation Kits Remove the contents from the brine generator and oxidant storage tanks if provided These items include the OSG installation kit the solution tank level switch the softener installation kit and the solution tank drop tube Unpack the water softener if provided Remove the water softener towers f...

Page 12: ...l authority having jurisdiction for more information Untrained persons should not attempt to install or operate MIOX Corporation OSGs A liquid barrier system is mandatory Ensure that all hydrogen vent lines slope towards the oxidant tank Ensure that no valves drop legs or P traps are in the hydrogen vent lines Do NOT cross connect vent lines Ensure that storage tanks are labeled properly Disconnec...

Page 13: ...ting the strut to a wall depending on the construction of the wall 1 Wood screws to mount to a stud wall 2 Toggle bolts for a hollow wall such as cinder block or paneling 3 Expansion anchors for concrete The strut should be mounted to the wall by drilling suitable holes through them The vertical distances from the upper to lower strut and the horizontal distances between holes are shown in Figure ...

Page 14: ...allation is complete Cell Installation Remove the cell from its packaging and place it vertically into the cell support bracket on the mounting panel Refer to Figure 3 for orientation of cell placement in the support bracket Connect the cell electrical leads matching the red lead to the anode side of the cell the side facing the panel and the black lead to the cathode side of the side of the cell ...

Page 15: ...made up of two major compartments Controls and Plumbing Figure 3 While the cell is shipped independently of the Plumbing compartment the cell is to be installed inside the compartment during commissioning of the unit Figure 3 AE Series OSG Compartments Controls Compartment Plumbing Compartment ...

Page 16: ...cal Electrical Codes See Appendix G for AE System Wire Schematic Do not apply power to the system until installation is complete Control Box Electrical Connections Eight electrical feed through fittings are provided on the bottom of the control box to facilitate field wiring of the water solenoid flow sensor brine pump temperature sensor tank level switch current transducer and cell leads One or t...

Page 17: ...ace block is the termination for all electrical components outside of the control box Refer to Appendix C AE System Wiring Schematic for wiring details of the system control board interface block and power supplies Connecting Alarm Relay from Control Box The AE System comes wired from the factory with an alarm control circuit This circuit can be connected to a relay circuit to lock out water syste...

Page 18: ...ure to a range of 25 100 psi 172 689 kPa Table 1 Feed Water Requirements AE Model GPH GPM LPH AE4 6 0 1 22 7 AE6 9 0 15 34 1 AE8 9 0 15 34 1 The feed water connection to the AE Series OSG comes from the water softener The feed water temperature is recommended to be between 50 85 F 10 29 C to avoid damage to the cell Glue the supplied PVC reducer bushings into the water softener adapter fitting App...

Page 19: ...ns kit A primer bulb is also included in the operations kit and should be placed in line upstream of filter assembly but as close to the unit as possible The primer bulb will aid in removing air bubbles for brine delivery to the cell Figure 5 Figure 5 Brine Feed Connection Note On initial start up cell replacement or when brine plumbing connections are modified air is introduced to the brine line ...

Page 20: ...ional check valve and 3 way valve for sampling may be included in the plumbing from OSG to Oxidant Tank Do not use any valves in the mixed oxidant or sodium hypochlorite lines other than the three way valve provided by MIOX Corporation These valves have an open center configuration that prevents the blockage of flows from the cell Failure to use MIOX Corporation supplied three way valves may void ...

Page 21: ...he water line prior to the tank to assist with maintenance Plumb the overflow fitting to a drain Verify the overflow line has an adequate air gap to prevent cross contamination of the brine generator Plumb the outlet fitting to the OSG Figure 5 Note Outlet plenum should be installed before float assembly Note Use Teflon tape on threaded plumbing connections Brine Tank Float and Spray Ring Assembly...

Page 22: ...tillwell Unscrew the 3 8 PVC coupler that mates to the feed water line and the black threaded flange connection protruding through the tank wall Unscrew the coupler that mates to the plastic spray ring The float valve can now be pulled out the stillwell The float itself can be unscrewed at the clevis hinge that mates with the open close poppet valve To re install the valve assembly repeat step in ...

Page 23: ...ch or pressure transducer is also included depending on the tank s capacity Ventilation Requirements MIOX Corporation oxidant tanks require a drop tube Liquid Barrier System LBS hydrogen vent and Oxidant Tank hydrogen vent Figure 8 A drop tube assembly and LBS vent assembly are shipped with the oxidant tank The user is responsible for supplying CPVC piping to attach to the top of the LBS vent tee ...

Page 24: ...e attached to all oxidant tanks shipped directly from MIOX Corporation Oxidant tanks shipped directly from the tank manufacturer must have the MIOX supplied safety placards attached to the outside wall of the oxidant tank Figure 9 The plumbing and ventilation requirements explained in MIOX s Hydrogen Safety Whitepaper and this manual must be fallowed explicitly to ensure proper hydrogen venting MI...

Page 25: ...ed to operate with the AE Series OSG To install the level switch in the tank complete the following steps Figure 11 1 Wrap the male end of the street elbow with Teflon tape and connect it inside the solution tank into the bulkhead adapter at the top of the tank 2 Feed the electrical cord through the elbow and out of the tank 3 Seal the male end of the liquid level switch with Teflon tape and screw...

Page 26: ...ss through The terminals for the oxidant switch are shown Appendix C AE System Wiring Schematic and Figure 12 Figure 12 Oxidant Tank Level Switch Wiring to Control Box When more than one system is installed a jumper cable 3 wires must be placed between pin 18 on unit 1 and pin 18 on unit 2 Similarly pin 17 on unit 1 must be jumpered to pin 17 on unit two and pin 15 on unit 1 to pin 15 on unit 2 Af...

Page 27: ...ank This should be piped to a drain or other suitable discharge outlet with 1 schedule 80 CPVC pipe For sites with two oxidant tanks installed the overflow ports should be piped to each other with a common drain If the customer elects not to run the overflow drain then the outlet must be plugged to prevent gasses in the storage tank from venting to the room Do not plumb brine and oxidant tank over...

Page 28: ...m salt water but instead uses salt water in making disinfectant solution For water treatment ensure the proper dose of oxidant for the water to be treated Consult a qualified engineer MIOX Corporation distributor or salesperson for proper dose rates Do not add other chemicals to the brine or oxidant tanks Ensure that all venting requirements are strictly followed Refer to MIOX Corporation s Hydrog...

Page 29: ...ull Salt can be loaded up to the cap on the brine float assembly 6 Open the brine generator water supply valve and fill with softened water The generator has a float that will stop the flow of water to the brine generator 7 After filling the brine generator with salt and softened water allow 60 minutes for the salt to dissolve before priming the brine peristaltic pump Checks Prior to Start Up Prio...

Page 30: ...nerator verify that there is sufficient brine in the brine generator for the water softener to regenerate Confirm that brine flows freely out of the tank Routine Operations Initial Startup AE System Controls Prior to turning the unit on verify that the correct AC power is applied to the unit There is one toggle switch on the front of the control box that turns the system ON OFF There is a circuit ...

Page 31: ...rators Manual 102 00085 E Page 30 Figure 14 System Display Secondary View NOTE excessive startups and shutdowns will result in the oxidant solution in the storage tank to become diluted due to the excess flushing cycles ...

Page 32: ...peration the top line of the display screen will show that the unit is RUNNING The top RUNNING line is common for all five screens that are cycled during normal operation The second or bottom line of the display screen cycles through the key operational parameters They are as follows Note X represents the actual value during RUNNING Mode Display 1 Current at the electrolytic cell displays X AMPS D...

Page 33: ...the operating window the unit enters into Low Current Hard Fault Additional Displays One additional screen that may be encountered occurs when the feed water supply is lost during normal operation The top display line still reads RUNNING even though system is actually not running but rather in Standby Mode while the bottom display reads WAITING FOR FLOW If water flow is restored the unit controlle...

Page 34: ...excessive current to the cell The system will shut down to prevent damage to the electrolytic cell Possible causes are low water supply pressure and low water flow 3 HIGH TEMP X F display rotates through the following screens X AMPS X VOLTS X F SPEED X This condition is the result of the oxidant outlet temperature exceeding 150 F 66 C The system will shut down to prevent damage to the electrolytic...

Page 35: ...formation is provided This condition is the result of the 12VDC power supply not turning on or fails to meet the minimum 10 VDC to the cell 8 RELAY FAILURE No other display information is provided This condition occurs when the cell power supply solid state relay is damaged and cannot be turned off by the controller The system must be turned off manually with the main breaker on off switch Contact...

Page 36: ...n this manual be copied and used for this purpose SAFETY PRECAUTIONS AND WARNINGS Disconnect power before working on OSG Do not defeat or tamper with electrical interlocks or lockout mechanisms Proper venting of the oxidant tank is mandatory Refer to MIOX Corporation s Hydrogen Safety White Paper NO flames or ignition sources in or around the oxidant tank Use confined space procedures prior to ent...

Page 37: ...e proportion pump or water softener If the cell perimeter is seeping tighten all perimeter bolts Check for Loose Connections Corrosion Check cell leads and lugs for corrosion For light corrosion clean cell leads and lugs with a fine sandpaper or a wire brush If severe corrosion is present replace the cell lead Torque cell lead connections to 72 in lbs 8 13 N m Check Chlorine FAC Production Check a...

Page 38: ...or every year to remove build up that can be up to several inches thick Drain and clean the oxidant solution tank annually to remove particulates Avoid any ignition sources in the vicinity of the oxidant solution tank NOTE A yearly acid wash is good preventative maintenance that will ensure reliable and efficient operation of the system Storage of Equipment If the system will be off for a prolonge...

Page 39: ...ctioning 1 Wait for tank to reach low level for OSG to begin generation again 2 Verify low level float is actuating wired properly Figure 12 Oxidant Tank Level Switch Wiring to Control Box STANDBY TANK FULL Mixed oxidant solution has reached the top level float 1 Oxidant tank is full normal operation 2 High level float malfunctioning 1 Wait for tank to reach low level for OSG to begin generation a...

Page 40: ...e outside system specifications 1 Increase feed water temperature to above 50 F 10 C before restarting HARD FAULT RELAY FAILURE Relay cannot be turned on off by the controller 1 Damaged Relay 1 Turn system off manually using power switch Contact MIOX Customer Support HARD FAULT LOW FLOW Insufficient feed water to the system 1 Sudden loss of feed water to cell 2 Low pressure surges in in feed line ...

Page 41: ...e 3 Cell exit ports blocked 4 Injection system malfunction 5 Cell life depleted 6 Break in water distribution lines 7 FAC requirements exceed system capacity 8 Mixed oxidant stored too long before use 1 Measure flow and verify it meets system set point 2 Disassemble and clean solenoid 3 Check cell exit ports for obstructions 4 verify injection system working properly 5 Contact MIOX Customer Suppor...

Page 42: ... and or work tubing within the pump Rupture Disk Maintenance The rupture disk is designed to prevent excessive pressure to be built up inside of the cell If the cell pressure exceeds 25 psi then a diaphragm inside of the rupture disk union bursts The liquid that was in the cell is discharged to drain in this event and a HIGH CURRENT fault will display Figure 16 Rupture Disk Rupture Disk Housing ...

Page 43: ...made of Teflon and the thickness determines the rupture pressure If it is ruptured a hole will be seen 4 Remove the damaged disk and replace with a new one Replacement disks have been furnished with the MIOX operations kit If more are needed contact MIOX customer service 5 Carefully thread the union back together with the disk centered inside Figure 17 Ruptured Diaphragm Acid Washing Cell See MIOX...

Page 44: ... 20 ppm should be used for testing Conversely if the 5 ppm dose is only moderately decreased in 30 minutes testing should be performed with 1 3 and 5 ppm doses Use the following formulas to determine the amount of oxidant and sample water to use based on 100 mL samples Dilution Factor X Oxidant FAC Dose mL of oxidant 100 X mL of sample water 100 100 X Oxidant FAC is the concentration of oxidant wh...

Page 45: ...idant and sample water volumes for the 1 3 and 5 ppm doses Given that MIOX OSG is still generating an oxidant concentration of 250 ppm 1 ppm 3ppm 5ppm Dilution Factor X 250 1 250 250 3 83 3 250 5 50 mL of Oxidant 100 250 0 4 100 83 3 1 2 100 50 2 mL of Sample Water 100 0 4 99 6 100 1 2 98 8 100 2 98 For a 1 ppm dose 0 4 mL of oxidant should be mixed with 99 6 mL of sample water For a 3 ppm dose 1 ...

Page 46: ...hich is usually the standard required by the state Subtract the selected FAC reading from the initial FAC dose for the corresponding sample This signifies how much of the oxidants were consumed by the water and thus how much of an oxidant demand there is in the sample water Example Determine the oxidant demand of the water In this case let s assume the operator wants a 1 0 FAC residual in the wate...

Page 47: ...s for making demand free water The first and preferred method requires UV exposure over an extended period and may not be practical for quick analysis The second method is quicker but the calculations must be modified to account for the excess chlorine residual in the water Note Distilled water whether purchased at the store or made in a lab cannot be trusted to be demand free Method One 1 Add 5mL...

Page 48: ...Rinse the pipette several times by drawing in several mL of oxidant and discarding it 4 With the pipette accurately measure the solution sample needed according to the dilution technique used above and add to the jar containing demand free water 5 Cap and shake the jar several seconds to mix thoroughly 6 Using the solution from the jar take a reading by following the directions provided with the t...

Page 49: ...roduction In order to calculate the total production for the system the flow rate must also be determined and adjusted if necessary 1 Remove the tubing that feeds the oxidant tank and insert into the graduated cylinder for exactly 30 seconds 2 Record the number of milliliters mL collected in the 30 second time period 3 Assign the number recorded in step 2 to F in the equation below to determine th...

Page 50: ...IOX AE Series Operators Manual 102 00085 E Page 49 APPENDICES A Water Quality Guidelines B Salt Quality Guidelines C AE Wiring Schematic D MIOX System Log Sheet E Brine Peristaltic Pump Maintenance Guide ...

Page 51: ... L Lead Pb mg L 2 mg L Dissolved Sulfides as H2S mg L Ammonia Nitrogen NH3 N mg L Organic Nitrogen Org N mg L Total Organic Carbon TOC mg L pH 5 9 Water Temperature Range F or C 55 75 F 10 27 C Caution water softeners will remove these components up to a limit See references to maximum ferrous iron and manganese in water softener documentation Total hardness affects cell life only in that higher h...

Page 52: ...ds the purity percentages listed below For additional information consult the MIOX Salt Guidelines white paper P N 106 00008 Note Failure to use salt that does not meet these specification VOIDS the Cell Warranty Component Percent NaCl dry 99 5 Impurity Percent Calcium in all forms 0 01 Magnesium in all 0 01 Manganese 0 00002 Iron as Fe 0 0005 Insolubles 0 005 Additives 0 0001 ...

Page 53: ...MIOX AE Series Operators Manual 102 00085 E Page 52 Appendix C AE System Wiring Schematic ...

Page 54: ...MIOX AE Series Operators Manual 102 00085 E Page 53 Appendix D MIOX System Log Sheet ...

Page 55: ...MIOX AE Series Operators Manual 102 00085 E Page 54 Appendix E Brine Peristaltic Pump Maintenance Guide ...

Reviews: