background image

venTest OPERATORS MANUAL

or the Symbols key 

 :

The connection of a standard USB keyboard for large editing operations or stationary device use
is supported.

4.2.2  Swipe screens

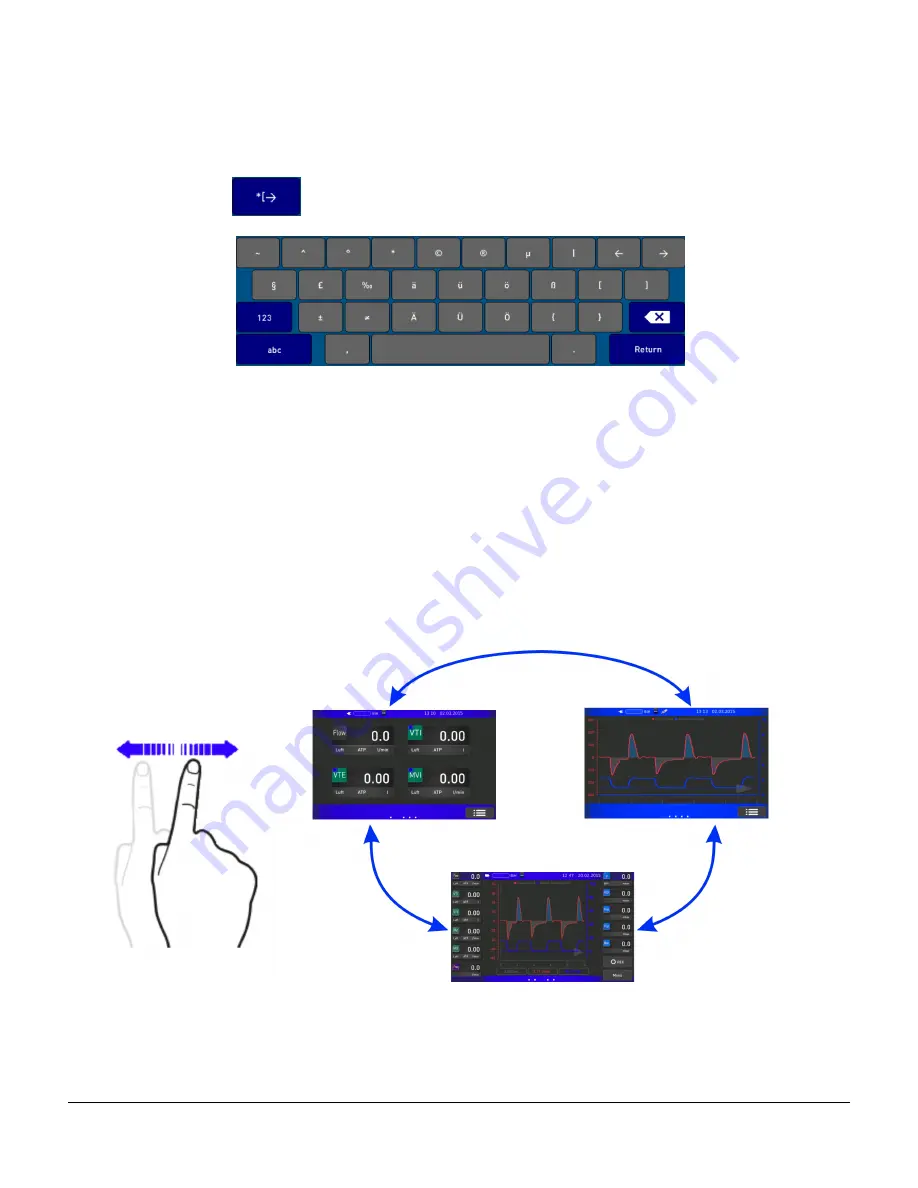
The main screen of the venTest utilizes three windows, selectable via a ‘swipe’ or ‘wipe’ motion. 
At the bottom middle of the display, there are 3 small rectangles representing the windows -
Traces; Measured Values; and Main Display.

Figure 6

Operation/Chapter 4 

#

 Page 28

Summary of Contents for venTest

Page 1: ...Operating Manual venTest Ventilator Tester MN 108 ...

Page 2: ......

Page 3: ...lator Tester Operating Manual 2016 2018 Datrend Systems Inc Unit 130 4020 Viking Way Richmond BC CANADA V6V 2L4 Tel 800 667 6557 North America Only or 604 291 7747 Fax 604 294 2355 e mail customerservice datrend com ...

Page 4: ......

Page 5: ...istinct serial number and accessories are eligible for partial refund and or credit Non serialized parts and accessory items cables carrying cases auxiliary modules etc are not eligible for return or refund In order to receive a partial refund credit the product must not have been damaged and must be returned complete meaning all manuals cables accessories etc within 90 days of original purchase a...

Page 6: ...rument Fire water damage theft war riot hostility acts of God such as hurricanes floods etc Only serialized products those items bearing a distinct serial number tag and their accessory items are covered under this warranty PHYSICAL DAMAGE CAUSED BY MISUSE OR PHYSICAL ABUSE IS NOT COVERED UNDER THE WARRANTY Items such as cables and non serialized modules are not covered under this warranty This wa...

Page 7: ...n for breaking the Quality Seal You should break this seal only after you have received factory authorization Do not break the Quality Seal before you have contacted us Following these steps will help ensure that you will retain the original warranty on your instrument without interruption WARNING Unauthorized user modifications or applicationbeyond thepublished specifications mayresultinelectrica...

Page 8: ...Page iv ...

Page 9: ...ns 10 1 6 Weight 10 1 7 Standard Accessories 10 1 8 Optional Accessories 10 1 9 Compliance With Standards 10 2 OVERVIEW 11 2 1 Features 12 2 1 1 Analyzer Base Unit 12 2 1 2 Pressure Connections 14 2 1 3 Flow Sensor Connection 14 2 1 4 Oxygen Sensor Connection 16 2 1 5 IRMA Sensor Connection 16 TM 2 1 6 Ethernet 17 2 1 7 USB 17 2 1 8 SD Card slot 17 2 1 9 Reset 17 3 GENERAL INSTRUCTIONS 18 3 1 Safe...

Page 10: ...on 40 4 9 Graph Configuration Menu 41 4 10 Main Menu 42 4 10 1 Setup Sub Menu 43 4 10 1 1 Info and Update 44 4 10 1 2 Date Sound and Language 45 4 10 1 3 Network 46 4 10 1 4 Service 48 4 10 2 Display Sets Sub Menu 49 4 10 3 Selection of Display Sets 50 4 10 4 Creation of New Display Sets 51 4 10 5 Modifying Existing Display Sets 51 4 10 6 Import Export of Display Sets 52 4 10 7 Deleting Display Se...

Page 11: ...3 4 17 1 venTest 73 4 17 2 Oxygen sensor 73 4 17 3 Waste Management 75 4 17 4 Technical Support 76 APPENDIX A TRIGGERING OPTIONS 77 1 Trigger Options of venTest 77 2 Volume measuring of Gases 80 3 Consequences of Physical Characteristics Of a Gas 83 APPENDIX B UNDERSTANDING DATA RECORDS 87 1 Recording Data from a Test 87 APPENDIX C CONNECTING TO A WINDOWS DATA SHARE 91 1 General 91 2 Workgroup or ...

Page 12: ...iter l min liters per minute ml min milliliters per minute l s liters per second cfm cubic feet per minute s sec second ms msec millisecond kPa kilopascal hPa hectopascal MPa megapascal 2 cmH O centimeters of water psi pounds force per square inch bar bar mbar millibar percent mmHg millimeters of mercury Torr Torr 2 inH O inches of water inHg inches of mercury F o degrees Fahrenheit C o degrees Ce...

Page 13: ...venTest OPERATORS MANUAL Hz Hertz 1 min 1 per minute Vol Volume percent r f Percent relative humidity h Percent per hour mAh milliamp hours Definitions Page ix ...

Page 14: ...before operating the device It is possible to damage the Equipment and or cause harm to the operator if venTest is used incorrectly The following symbols may appear on the device or in the manual Symbol Description Symbol Description ON OFF Button Read Instruction Manual SD Memory Card Warning USB Type A Host port Differential Pressure USB Type B Device Port L Attention Information Ethernet Port N...

Page 15: ...8 mm L x W x H Connector 1 Cone ID 22 mm Connector 2 Cone OD 22 mm ID 15 mm Weight Approx 290 g Environmental Conditions Parameter Operation Storage Temperature 10 to 40 EC 20 to 50 EC Ambient Humidity 5 to 95 RH non condensing 5 to 95 RH non condensing Gas Temperature 10 to 40 EC Gas Humidity 0 to 95 RH non condensing Ambient Pressure 60 110 kPa 60 110 kPa Specifications Chapter 1 Page 1 ...

Page 16: ... 2 2 O AIR O MVi l min ml min 0 5 50 L min AIR 2 0 5 50 L min O 2 AIR O 2 of m v or 0 2 l min AIR 4 of m v or 0 4 2 2 l min O AIR O MVe l min ml min 0 5 50 L min AIR 2 0 5 50 L min O 2 AIR O 2 of m v or 0 2 l min AIR 4 of m v or 0 4 2 2 l min O AIR O Breath Rate Freq BrPM 1 100 BrPM 101 200 BrPM 0 1 BrPM 0 2 BrPM 2 Ventilation Pressure kpa mbar cmH O mmHg psi hpa 0 10 kPa 1 of m v or 0 2 hPa 2 PEE...

Page 17: ...min ml min 0 300 L min AIR 2 0 200 L min O 2 AIR O 2 of m v or 0 1 l min AIR 4 of m v or 0 2 2 2 l min O AIR O 2 HFO Pmean kpa mbar cmH O mmHg psi hpa 0 10 kPa 2 of m v or 0 04 kPa 2 HFO PMax kpa mbar cmH O mmHg psi hpa 0 10 kPa 2 of m v or 0 04 kPa 2 HFO PMin kpa mbar cmH O mmHg psi hpa 0 10 kPa 2 of m v or 0 04 kPa 2 HFO amplitude kpa mbar cmH O mmHg psi hpa 0 10 kPa 2 of m v or 0 04 kPa HFO fre...

Page 18: ... EC 20 to 50 EC Ambient Humidity 5 to 95 RH non condensing 5 to 95 RH non condensing Gas Temperature 10 to 40 EC Gas Humidity 0 to 95 RH non condensing Ambient Pressure 60 110 kPa 60 110 kPa Range and Accuracy Parameter Units Range Accuracy whichever is greater Flow Air 12 l min 2 or 0 01 l min STPD 2 Flow O 12 l min 4 or 0 02 l min STPD 2 Flow Air O 12 l min 4 or 0 02 l min STPD Vti l ml 0 7 5 L ...

Page 19: ...01 200 BrPM 0 1 BrPM 0 2 BrPM Ventilation Pressure kpa Mpa bar mbar 2 cmH O mmHg psi 2 hpa Torr inH O inHg 0 10 kPa 1 of m v or 0 2 hPa 2 PEEP kpa mbar cmH O mmHg psi hpa 0 10 kPa 1 or 0 02 kPa 2 Peak kpa mbar cmH O mmHg psi hpa 0 10 kPa 1 or 0 02 kPa 2 Plateau kpa mbar cmH O mmHg psi hpa 0 10 kPa 1 or 0 02 kPa 2 Mean kpa mbar cmH O mmHg psi hpa 0 10 kPa 1 or 0 02 kPa I E 300 1 1 300 0 1 Ti s ms 0...

Page 20: ...psi hpa 0 10 kPa 2 of m v or 0 04 kPa 2 HFO PMax kpa mbar cmH O mmHg psi hpa 0 10 kPa 2 of m v or 0 04 kPa 2 HFO PMin kpa mbar cmH O mmHg psi hpa 0 10 kPa 2 of m v or 0 04 kPa 2 HFO amplitude kpa mbar cmH O mmHg psi hpa 0 10 kPa 2 of m v or 0 04 kPa HFO frequency Hz 0 20 1 Hz HFO I E 3 1 1 3 0 3 Please note that due to the pneumatic resistance of the Flowsense 012 Sensor the measured pressure from...

Page 21: ...ns Parameter Operation Storage Temperature 5 to 40 EC 20 to 60 EC Ambient Humidity 10 to 90 RH non condensing 0 to 100 RH non condensing Gas Temperature 10 to 40 EC Gas Humidity 0 to 95 RH non condensing Ambient Pressure 80 121 kPa 51 152 kPa Range and Accuracy Parameter Units Range Accuracy 2 O concentration Vol 0 100 1 of m v Specifications Chapter 1 Page 7 ...

Page 22: ... EC Ambient Humidity 10 to 95 RH non condensing 0 to 100 RH non condensing Gas Temperature 10 to 40 EC Gas Humidity 0 to 95 RH non condensing Ambient Pressure 53 120 kPa Range and Accuracy Parameter Units Range Accuracy 2 CO Vol 0 10 10 15 0 2vol 2 of reading 0 3vol 2 of reading 2 N O Vol 0 100 2vol 2 of reading HAL ISO ENF Vol 0 8 0 15vol 5 of reading SEV Vol 0 10 0 15vol 5 of reading DES Vol 0 2...

Page 23: ...mum Equipment Technical Specifications 1 3 Electrical Ratings External Adapter 100 240 VAC 10 50 60 Hz 900mA 12V DC 3A Internal Battery LiPo 7 4V 5 2 Ah approx 6 hours operation 1 4 Environment for Use 10 to 40 EC operation 20 to 50 EC storage 5 to 95 RH non condensing 10 to 40 EC gas temperature 5 to 95 RH non condensing gas humidity 60 110 kPa Ambient Pressure Altitude 2000m max Indoor use only ...

Page 24: ...n O2 Air gas mix option Test Lung 1Liter For a complete list of available accessories visit www datrend com or contact Datrend Customer Service 1 9 Compliance With Standards venTest has been designed to meet the following safety standards CAN CSA C22 2 No 61010 1 2 Edition Safety Requirements for Electrical Equipment nd for Measurement Control and Laboratory Use Part 1 General Requirements UL Std ...

Page 25: ...l of parameter adjustment which is accessed via a clearly arranged menu driven user interface Handle the venTest with care The flow and oxygen sensor have the benefit of not being integrated into the device and therefore may be placed in areas that a larger system may not normally fit However it is necessary to handle the sensors with care The same applies to the corresponding sensor cables Exposu...

Page 26: ... 2 1 1 Analyzer Base Unit The Datrend venTest is comprised of a Base Unit which provides the control and displays and connection to either a high or low flow sensor Referring to Figure 1 controls interfaces and features of the Analyzer Base Unit are Overview Chapter 2 Page 12 ...

Page 27: ...ection to IRMA AX multigas sensor option 7 O2 Sensor 3 pin connection to oxygen sensor option 8 Label Refer to instruction manual 9 Flow Sensor connector Connection to FlowSense air flow sensor Hi or Lo flow 10 Hi Pressure connector 0 1 Mpa 10 bar option 11 Differential Pressure connector A 100 kPa 1 bar 12 Differential Pressure connector B 20 kPa 200 mbar 13 Differential Pressure connector C 2 kP...

Page 28: ...n section 4 12 1 Zeroing of Pressure Sensors The optional high pressure connection 10 bar has a quick release fastener When inserting the hose hold behind the connector and push allowing the connector to lock in place To remove the hose pull back on the connector sleeve to release the lock Note that the High Pressure sensor option must be activated before it can be identified by venTest For furthe...

Page 29: ... connector on or off or pull on the sensor cable Permanent damage to the cable and connector may occur IMPORTANT When first received some zero flow variation may be observed It is recommended that a zero point adjustment be performed before first use See Section 4 12 1 Figure 2 Overview Chapter 2 Page 15 ...

Page 30: ...or for measuring anesthesia gases connect the sensor to the DB9 RS232 connector using the cable adapter 7200 241 as shown in Figure 3 Note The IRMA sensor option must be activated before it can be identified by venTest For pricing and activation information please contact Datrend see section 4 17 4 WARNING Do not force the connector on or off or pull on the sensor cable Permanent damage to the cab...

Page 31: ...an also be used for data logging transfer of display sets test protocols and screenshots to from the storage media An SD card is also used for software updating A detected SD card is displayed as a symbol on the status bar If there is no SD card installed or detected then the status bar will not show the symbol Note If an external memory device shows instead of a name then no name has been assigne...

Page 32: ...venTest OPERATORS MANUAL Overview Chapter 2 Page 18 ...

Page 33: ...bles shall be used for all external connections and the peripheral devices must comply with valid regulations This does not apply for connections which are used for service purposes only The measurement of flow with the venTest can be calibrated to the following gases AIR 100 2 2 2 O O Air Mix and additionally with the small sensor 100 N O As the venTest itself cannot detect which type of gas is b...

Page 34: ...d agent Only original spare parts should be used The operating staff assumes the responsibility for damages and regulatory violation resulting from improper handling or service activities carried out by a non authorized personnel 3 3 Manufacturer Liability The manufacturer is liable for the safety reliability and proper function of the device only if The device is used according to the description...

Page 35: ...e device must be properly calibrated and or the corresponding routine device tests as described in this manual must have been carried out Before turning on the device make sure that the operating voltage of the power supply corresponds with the local mains voltage Only the original power supply unit is to be used Please use and store the device only within the defined environmental conditions Do n...

Page 36: ...cted from environmental influences heat cold humidity electrically safe etc Selection of test parameters of the venTest will be made via the integrated touch screen in combination with a wide range of accessories venTest is designed to carry out tests independent from the mains power supply using an integrated battery The internal battery is on charge whenever the external 12 V power adapter unit ...

Page 37: ...is connected whether the venTest is turned ON or OFF When venTest is OFF all power is applied to charging the battery A battery charge level icon bar graph is displayed next to the power icon indicating the approximate capacity level of the battery A low battery is indicated by a a warning message on the display screen b the battery status bar will blink and c the ON OFF power button will flash Op...

Page 38: ...l memory and maintain their calibration data independently 4 1 2 Power OFF Power Button Menu To switch the unit OFF the ON OFF button is pressed momentarily causing the Power Menu screen to be displayed as in Figure 4 To complete the power OFF process select Shutdown 1 To cancel select the Back icon 4 WARNING If the device fails to respond to the request to turn OFF the venTest may be switched OFF...

Page 39: ... no additional setup time is required To cancel the power OFF process press the Back button 4 as shown in Figure 4 4 1 4 Screenshots To save a screen shot from a display press the ON OFF switch to show in Figure 4 Select the appropriate storage medium from the pop down list and then press the Screenshot icon 3 After saving the display image the filename of the image will be displayed for reference...

Page 40: ... may not react to the use of gloves pens prosthesis or other objects Repeated fast touching on the same position may trigger a touch electronics re calibration and may delay response for several seconds Some buttons may respond to a press and hold action to enable faster selection of function values making frequent touching superfluous Figure 5 displays the possible states a button may display Opt...

Page 41: ... text and or numbers is required double tap in the text field and a software keyboard will appear in the lower part of the screen Additional characters are available by pressing the Shift key to expose and or the Numeric key Operation Chapter 4 Page 27 ...

Page 42: ...or stationary device use is supported 4 2 2 Swipe screens The main screen of the venTest utilizes three windows selectable via a swipe or wipe motion At the bottom middle of the display there are 3 small rectangles representing the windows Traces Measured Values and Main Display Figure 6 Operation Chapter 4 Page 28 ...

Page 43: ... in the lower right corner of the graph When in Pause mode the cursor can be moved to the right or left to get more precise values at specific points in time The values are displayed in the lower graph display area When paused the Pause symbol changes to a Play symbol To resume normal display press the Play icon ATTENTION If the display is Paused the wipe function has limited operation Window sele...

Page 44: ...his window displays up to 4 parameters in a large text format These parameters are the first four values displayed on the main window Touch on a value to adjust the configuration Refer to the section 4 4 for more details Figure 8 Operation Chapter 4 Page 30 ...

Page 45: ...bout data logging refer to SubMenu Logging 1 11 Measured Value numeric display 19 Time hh mm 12 Start Stop Pause 20 Date dd mm yyyy 13 Menu 21 Y axis red trace 1 14 Battery mode Mains mode 22 Cursor Pause mode 23 X axis sec 15 Battery Charge status 24 Y axis blue trace 2 16 Status Bar 25 Record data logging 17 Trace 1 red 26 Cursor values Pause mode 18 Trace 2 blue axis units at top line in graphi...

Page 46: ...yed below the graph display area When paused the Pause symbol changes to a Play symbol To resume normal display press the Play icon ATTENTION If the display is Paused the wipe function has limited operation Window selection is only possible by using controls outside of the graphical display area The configuration window is also not available when in the Pause mode 4 3 Status Bar In the status bar ...

Page 47: ...venTest OPERATORS MANUAL Printer connected Network connected WiFi stick connected WiFi connected Operation Chapter 4 Page 33 ...

Page 48: ...ages like n c Sensor not connected Err Error occurred ov Value overflow uv Value underflow 4 4 1 Measured Value Configuration Menu Touching on one of the measured value segments on the display enters the respective configuration menu for this value Note There are 3 pages of parameter button selections with parameters on the top and bottom of the display If you do not see the parameter you think sh...

Page 49: ...red parameter The selected button is indicated by the colored background If the field is transparent the respective sensor must be connected or the respective function has to be released In the configuration area all available sensors for this parameter are displayed ie FSH 2 FSL O Irma AX Select a sensor More selectable items are displayed in columns like Units Standard Conditions and Filter Figu...

Page 50: ...the selection s and return the display to the previous screen ATTENTION The Apply button is only active if a selection is made in each column otherwise the button is disabled transparent and cannot be selected Press the Cancel button to cancel the selection s and return the display to the previous screen If during configuration or selection of the configuration menu no sensor was detected a messag...

Page 51: ... Flow Peak inspiratory flow 4 5 2 Ventilation Values Sign Abbreviation Measured Value Vti Inspiratory tidal volume Vte Expiratory tidal volume MVi Minute volume inspiration MVe Minute volume expiration Freq Frequency I E Breathing time relation Ti Inspiration time include Tip Te Expiration time include Tep Tip Pause phase inspiration time Operation Chapter 4 Page 37 ...

Page 52: ...ep Pause phase expiration time Humi Relative humidity 4 5 3 Pressure Measured Values Sign Abbreviation Measured Value P Pressure PEEP Positive end expiratory pressure Peak Peak pressure Plateau Plateau pressure MEAN Average pressure Operation Chapter 4 Page 38 ...

Page 53: ...n Values Sign Abbreviation Measured Value 2 2 O O Concentration 2 2 CO CO Concentration AGAS Anesthesia gas concentration 2 2 N O N O Concentration 4 5 5 Other Sign Abbreviation Measured Value No Parameter Value not used Operation Chapter 4 Page 39 ...

Page 54: ...013 25 hPa 0 rel STPS 20 C 1013 25 hPa 100 rel BTPS Body temperature 37 310 K Actual 100 rel STP 21 1013 21 1 C 1013 25 hPa Actual STPH USA 21 1 C 1013 25 hPa Actual STP 0 1013 0 C 1013 25 hPa Actual STPD 21 1013 21 1 C 1013 25 hPa 0 rel STPD USA 21 1 C 1013 25 hPa 0 rel STPD 0 1013 0 C 1013 25 hPa 0 rel 20 981 20 C 981 0 hPa 0 rel 15 1013D 15 C 1013 25 hPa 0 rel 25 991D 25 C 991 0 hPa 0 rel AP21 ...

Page 55: ...or the numeric values 4 8 FlowSense Settings Button Pressing the FlowSense icon leads directly to the menu of connected FlowSense Sensors in sub menu Sensors On this screen a number of additional settings such as invert flow samples to average Insp and Exp Trigger levels can be selected In addition the ability to reset the flow and pressure zero point is available under the Adjustment selection IM...

Page 56: ...aces display To start configuration of the graph area please touch inside the graph Parameters for trace 1 red are on the left side of the screen for trace 2 blue are on the right The zero offset can not be changed when the zoom factor is auto The time base for both channels can also be selected Figure 13 Operation Chapter 4 Page 42 ...

Page 57: ...n Menu 5 Sub menu Logging 3 Sub menu Setup 6 Sub menu Sensors In the center area the available swipe windows are displayed Here the desired window can be selected directly to be able to quickly change the display Return to the previous window by touching the Back to main Display button 1 The main window provides access to the following sub menus Figure 14 Operation Chapter 4 Page 43 ...

Page 58: ... Menu Pressing the Setup button 3 Figure 14 leads to the general settings functions of the device as shown below Info Update Date Sound Language Network Service Detailed descriptions of the settings follow Figure 15 Operation Chapter 4 Page 44 ...

Page 59: ...rial numbers If external memory devices are connected they are listed here with their device names If a software update is available it will be displayed in the Update window and can be started from this screen Note that a software update can only be done while powered from the mains electrical supply not when running from battery power Figure 16 Operation Chapter 4 Page 45 ...

Page 60: ... be set by using the up and down arrows for each digit The available languages are displayed and can be selected By pressing the Apply button the language is set after a restart of the device Speaker volume can be set by the and buttons The Back button returns to the previous menu Figure 17 Operation Chapter 4 Page 46 ...

Page 61: ...twork symbol in the setup menu If the venTest is connected to a network via cable or via a WiFi module the actual network configuration is displayed EDIMax AC450 Wi Fi USB Adapter 11ac EW 7711ULC or equivalent Figure 18 Figure 19 Operation Chapter 4 Page 47 ...

Page 62: ...cific network drive Click on the Network drive button complete the required fields and press the Mount button A message displays the actual connection status and the Mount button changed to Unmount as shown in Figure 20 Figure 20 Operation Chapter 4 Page 48 ...

Page 63: ... 4 10 1 4 Service This sub menu is for service purposes and the activation of additional sensors options and is password protected Contact Datrend for instructions when activating features Figure 21 Operation Chapter 4 Page 49 ...

Page 64: ...ttings for different devices and applications which can be reloaded at any time without setting up the individual parameters again In a display set all settings like configuration of measured values display corresponding graph settings and general FlowSense settings are saved Figure 22 Operation Chapter 4 Page 50 ...

Page 65: ...ed using the selected settings Any number of display sets can be saved The number of possible settings is only limited by storage capacity in the internal memory Any display set can be defined as the start set by using the Set as start set button to have this set selected after device start The Last setting entry contains the actual setting at power down and is always available and cannot be delet...

Page 66: ...display set name The following characters should not be used in Display sets names If an illegal character is detected it will be replaced with the _ character All display sets on internal memory can be exported to an external memory device 4 10 5 Modifying Existing Display Sets To modify an existing display set first load apply the set of interest In the main window make the desired modifications...

Page 67: ...ngle multiple selection or all and the transfer activated using the direction keys In this window it is also possible to delete display sets 4 10 7 Deleting Display Sets Select a display set s to be deleted from any memory device internal or external and using the Delete button Multiple sets or the All selection is also supported The Delete process must be confirmed with Yes Figure 25 Operation Ch...

Page 68: ...vice can be used By pressing the Log button you get to the configuration menu for the data logging Available recording parameters Readings 250 ms 500 ms 1 s 2 s 5 s 10 s 20 s 30 s 1 min Graph 10 ms 20 ms 50 ms 100 ms 250 ms 500 ms 1 s 2 s 5 s Available recording types modes Duration 1 min 30 min 1 h 2 h 5 h 12 h 25 h unlimited Start delay none 5min 30min 1 h 2 h 5 h 12 h Figure 26 Operation Chapte...

Page 69: ...played to confirm the end of recording Example Readings 1 s Graph off Duration 1 h Delay 5min With these settings the device starts logging 5 min after pressing the Rec button All 11 values are logged each second for 1 hour and stored on selected media The actual status of the data logging process is displayed on the Rec button of main window Recording not active ready Recording active Recording a...

Page 70: ... connected and selected to enable the logging function Logged data is stored on selected external storage media under the venTest Logging directory The file format is csv can be read by many spreadsheet programs like Excel etc For more information on the contents of the file see Appendix B Operation Chapter 4 Page 56 ...

Page 71: ...n and calibration ATTENTION External sensors can only be selected if they are connected and detected by the device Otherwise the symbol is displayed transparently If a sensor is an option and has not been activated a locked icon will be visible over the sensor icon Contact your Distributor or Datrend to purchase the option and unlock the sensor function Figure 29 Operation Chapter 4 Page 57 ...

Page 72: ...lied to any of the sensors All pressure connections of the venTest shall be left open no hoses shall be connected After confirming that no pressure is applied to the sensors press the Start button to enter the zero adjustment process Start has to be confirmed by pressing Yes or No If Yes is selected a message appears after successful zero adjustment This message must be confirmed In the lower part...

Page 73: ...of all measuring parameter of the connected sensor like gas type or trigger conditions All settings in this menu may influence all measured parameters of the display 1 Gas type Selection 7 Adjustment screen 2 Invert direction of flow 8 Expiration trigger screen 3 Average values 9 Inspiration trigger screen 4 Trigger status 10 General screen 5 Apply 11 Restore defaults of Additional Settings 6 Canc...

Page 74: ... N O mixtures a Low flow sensor with an N O calibration is required For option availability please visit the Datrend Website www datrend com or contact Datrend see section 4 17 4 Invert Direction 2 Figure 31 The flow measurement direction is swapped This leads to a sign change for the flow for displayed values and graphs Also remember that ventilation related parameters insp and exp are swapped sa...

Page 75: ... measurement of TI and TE is very important for measurement accuracy See Appendix A for detailed information and examples of flow and pressure curves with various trigger settings 4 12 2 2 Inspiration Expiration Trigger Button Detection of inspiration and expiration phases of ventilation depend on the start and end trigger conditions These conditions can be set in this window It is possible to tri...

Page 76: ...measurement such as those from fluttering values can be suppressed Start and end triggers for flow and pressure can be set in steps of 0 1 l min or mbar using the and buttons Start and end delay can be modified in steps of 10 ms The buttons have an auto repeat function so that a quick change of values is very convenient A click on the value itself opens a numerical keyboard for direct value input ...

Page 77: ...lly be used in the future Using the display set function these optimum settings can be stored Optimization of trigger conditions It is not easy to define general rules for trigger conditions due to the wide variety of possibilities In a closed loop system circle system it may be useful to switch from flow to pressure triggering In open loop systems only flow triggering is possible because there is...

Page 78: ... delivered with the sensor Adjustment expects the sensor being exposed to ambient air In case of any doubts the sensor should be flushed with ambient air for a few seconds After confirming the above conditions the adjustment process can be started by pressing the desired button Flow or Pressure Simultaneous illumination of both direction indicators of the FlowSense sensor indicates an active adjus...

Page 79: ... adjustment must be carried out again Any adjustments made with this menu are the responsibility of the user Since the measurement accuracy of the venTest also depends on the quality of these adjustments these have to be carried out very carefully IMPORTANT When first received some zero flow variation may be observed It is recommended that a zero point adjustment be performed before first use See ...

Page 80: ... 100 oxygen to the sensor The actual value measured by the sensor appears at the top right and can be used as an indicator of whether the measuring value has stabilized at each selected concentration It should be noted here that the absolute oxygen value in the calibration is not important but whether the measuring value is stabilized During calibration the sensor should not be exposed to pressure...

Page 81: ...as shown below appears and the adjustment must be repeated Additional hints Do not apply shock to the sensor at any time If it occurs as an accident the sensor must be left standing for a minimum of 2 to 3 hours The built in sensor temperature compensation is very slow rapid temperature changes should be avoided Figure 36 Figure 37 Operation Chapter 4 Page 67 ...

Page 82: ...S232 socket by turning on the IRMA supply voltage Be sure that no other device is connected to the RS232 port otherwise the device could be damaged A zero adjustment is required if the sensor deviates from its zero point The zero adjustment is completed when the IRMA sensor stops flashing and the green light is on steadily The sensor must be attached to a Masimo multigas tubing adapter 7050 070 Ad...

Page 83: ...hat may apply to more than one accessory part eg Ultrasound probe s and show pictures instructions videos as part of a test step A vPad venTest plugin has been developed for vPad Check that allows control of the venTest during testing and retrieval of test data as the test progresses Test reports may be printed saved and or transmitted to a PC or to a CMMS system For additional information on the ...

Page 84: ... the FlowSense Sensor High Flow FSH is displayed and for the FlowSense Sensor Low Flow FSL After connecting the sensor shows its initialization by alternately flashing the flow direction LEDs on the sensor When initialization is completed both LEDs go off and the sensor has reached its specified accuracy after a setup time of 15 minutes In subsequent operation of the sensor the flow direction is i...

Page 85: ...s been turned on IRMA connects to the device and indicates this by flashing LED s Once a green LED lights up steadily the IRMA is connected 4 15 Troubleshooting Error Handling 4 15 1 BiFlow Sensor Error Messages DISPLAY MESSAGE ERROR DESCRIPTION TROUBLE SHOOTING Flow sensor defective BiFlow Sensor was detected as defective Disconnect sensor and re connect again Check sensor for contamination If th...

Page 86: ...n Pressure value of IRMA is out of measurement range Please check applied pressure Following error occurred on IRMA Error 1 A software error occurred Please restart sensor Following error occurred on IRMA Error 2 A hardware error occurred Please restart sensor If the error still occurs the sensor has to be replaced Following error occurred on IRMA Error 4 A motor error occurred Please restart sens...

Page 87: ...s and chemical cleaning agents is not recommended 4 16 3 FlowSense Sensor The flow sensors have a measuring wire per direction that can be damaged by improper cleaning Therefore the following information is essential The case can be cleaned with a soft cloth and a mild soap solution Never allow fluids to penetrate the device or the connections Never clean the sensor with high pressure or under run...

Page 88: ...nition is based on an ambient temperature of 20 C and an oxygen concentration of 21 which means that under these circumstances the sensor has an operating life of 5 years However an ambient temperature of 30 C shortens the operating life to 75 an ambient temperature of 40 C to 50 of the specification The impact of a higher oxygen concentration is even more significant With a constant supply of 2 2...

Page 89: ...the oxygen measurements only apply if calibrations have been carried out properly Please note that the sensor reacts on overpressure related to the ambient pressure during calibration adjustment with a relative error of 0 1 per mbar Attention not Vol At a measuring value of 50 Vol and an overpressure of 10 mbar an error of 0 5 Vol is generated this means that 50 5 Vol is displayed This effect is a...

Page 90: ... to protect human health by restricting the use of hazardous substances in such equipment The device contains components batteries sensors that must be disposed of in accordance with the legal regulations Directive 2002 96 EC of the European Parliament requires that electrical and electronic equipment according to this directive has to be disposed of in an environmentally friendly way in a separat...

Page 91: ...f you have any queries or problems do not hesitate to contact our technical support Datrend Systems Inc 130 4020 Viking Way Richmond BC Canada V6V 2L4 Phone 1 604 291 7747 Fax 1 604 294 2355 E Mail customerservice datrend com Operation Chapter 4 Page 77 ...

Page 92: ...o be regarded as examples as they can take many other forms in practice according to the measuring application and instrument under test 1 1 Volume Measuring with Flow Triggering Volume measurement with 2 flow trigger 1 thresholds F and F2 The volume measurement is going to start with flow exceeding F1 ending with flow being below F2 Volume measurement with a continuous flow base and two flow trig...

Page 93: ...ending with pressure being below P2 In volume calculation an existing flow base will be added 1 3 Volume Measuring with Pressure Flow Triggering Volume measurement with a flow trigger threshold F1 and a pressure trigger threshold P2 Volume measurement is going to start with flow exceeding F1 ending with flow being below P2 In volume calculation an existing flow base will be added Appendix A Page 7...

Page 94: ... T1 time frame the volume measurement will be terminated Otherwise the volume measurement will be terminated if trigger threshold 2 F2 P2 becomes true Flow pressure must be above trigger threshold F1 P1 for time T1 minimum to accept volume measurement If within time T2 flow pressure exceeds trigger threshold 2 F2 P2 volume measurement will not be terminated Volume measurement will be terminated if...

Page 95: ...hich is dependent on the amount of gas molecules and their mass An amount of gas always takes up the volume at their disposal and in doing so a pressure is created Example Assume a closed receptacle filled with air showing a volume of 1 l and a pressure of 1 bar If volume is reduced to 0 5 l pressure in the recipient will increase to 2 bar If the original volume is increased to 2 l pressure will d...

Page 96: ...me V and temperature T are shown in the gas law P1 x V1 P2 x V2 T1 T2 The gas law therefore says that the ratio between pressure volume and temperature has to be the same both before and after modification of ambient conditions Example At a temperature of 20 C and a pressure of 1 bar a gas takes up a volume of 1 l The gas is now heated up from T1 20 C 293 2K to T2 30 C 303 2 K a The container s wa...

Page 97: ...a pressure of 1 bar a gas takes up a volume of 1 l Now ambient pressure is going to be increased from 1bar to 1 1 bar a The container s walls are flexible Volume can expand V1 to V2 temperature remains the same T1 T2 T The gas law can now be adapted as follows P1 x V1 P2 x V2 T1 T2 leads to º P1 x V1 P2 x V2 Result V2 V1 x P1 P2 In our case V2 1 Liter 1 1 1 0 909 Liter b The container s walls are ...

Page 98: ...andard temperature and a standard pressure Unfortunately there is a great variety of standard conditions with different standard temperatures and pressures DIN 1343 Tn 0 C and Pn 1013 mbar 1 atm physical Atmosphere DIN 02 ISO 1 1975 Tn 20 C and Pn 981 mbar 1 at tech Atmosphere STPD Tn 21 1 C 70 F and Pn 1013 mbar 760 mmHg It is important to check to which standard condition the value is referring ...

Page 99: ...manually therefore it is necessary to know the current pressure and the pressure during which the measuring device had been calibrated 3 4 Air Humidity Air humidity can also have a significant influence on the measurements The compensation of this determining factor is not easy and can only be carried out by very expensive measuring devices In general it is recommended that the gas have a relative...

Page 100: ...ains an error factor because you cannot choose the time period dt small enough that the flow is really constant within this time segment A major criteria is the time resolution dt The smaller this time interval is the more exact the flow curve will be scanned The user generally has no control of this value You have to count on the manufacturer of the measuring device to have chosen an adequate tim...

Page 101: ...ld This means that with a trigger threshold set too high the volume measurement displayed may be much too low if you have error triggering or fluctuating measuring values from measurement to measurement when the trigger threshold is set too low So the trigger threshold can only be a compromise between accuracy and error triggering Often one can set certain time criteria and or time delays which su...

Page 102: ...an only be recorded from the combined parameter data and dual trace graphic screen Data recording is configured on the Logging menu screen see section 4 11 and the frequency of data capture can differ for the parameters and the graphical data 1 Recording Data from a Test 1 1 Test Records Test records whether it is parameter data or graphical data can only be recorded from the combined parameter da...

Page 103: ...S 1st column Start time in seconds starting at 1970 2nd column Start time date and time R Remark not used at this time T Time resolution value unit C Number of channels based on how many of the 11 available slots are in use D Channel description number of D lines correspond to value from C Name of channel Unit minimum value maximum value resolution Resolution value Value 1000 1000 resolution 0 Val...

Page 104: ...00 0 4 0 000 56 2 07 39 44 000 6633 0 9 0 0 0 0 20 6 0 993 0 0 00 0 4 0 000 56 6 07 39 45 000 7057 1 3 0 0 46 9 20 6 0 993 0 0 00 0 4 0 000 56 4 07 39 46 000 7212 2 2 0 0 44 8 20 6 0 993 0 0 00 0 4 0 000 62 3 07 39 47 000 8061 1 4 0 0 44 8 20 6 0 993 0 0 00 0 3 0 000 61 7 07 39 48 000 5858 1 1 0 0 44 8 20 6 0 993 0 0 00 0 4 0 000 71 9 07 39 49 000 5871 1 3 0 0 44 8 20 6 0 993 0 0 00 0 3 0 000 72 4...

Page 105: ...values file but is limited to the 2 columns of data which are on the graphical display S 1450852775260 23 12 2015 07 39 35 260 R T 1000 ms C 2 D Flow high l min 300 00 300 00 2 D Beatm Druck mbar 10 0 100 0 1 07 39 35 000 0 22 0 1 07 39 36 000 0 22 0 1 07 39 37 000 0 22 0 1 07 39 38 000 0 87 0 1 07 39 39 000 0 30 0 1 07 39 40 000 7 62 3 0 07 39 41 000 5 18 1 3 07 39 42 000 3 92 0 6 07 39 43 000 6 ...

Page 106: ...it s not required In a Domain One or more computers are Servers Network administrators use Servers to control the security and permissions for all computers on the Domain This makes it easy to make changes because the changes are automatically made to all computers Domain users must provide a password or other credentials each time they access the Domain If you have a user account on the Domain yo...

Page 107: ...re pictures music videos documents and printers with other people on a home network A homegroup is protected with a password but you only need to type the password once when adding your computer to the homegroup It should also be noted that Home versions of Windows cannot join a Domain In order to join a Domain the computer must be running at least the Pro or Enterprise version of Windows Windows ...

Page 108: ... Data Share is on a computer which is part of a Domain then it is most likely you will have to involve your Network System Administrator to set the required permissions to allow you access to your target Data Share The examples in this Appendix deal with the Data Share named SharedTestData which exists on a computer named Spare Examples are provided for both Workgroup and Domain shares 3 Connectin...

Page 109: ...ettings In this example the name of the computer is Spare and it is part of the Workgroup WORKGROUP This means that the computer is not part of a Domain and the Data Share can be created and administered on the Spare computer Figure 44 Select Properties Figure 45 Computer Properties Workgroup Appendix C Page 95 ...

Page 110: ...me Services Proceed as follows In the search box located to the right of the start window icon lower left corner of the Desktop type cmd and then click on Command Prompt This will cause a command line interface window to open At the prompt type ipconfig The results should be similar to Figure 47 Make note of the IPv4 Address Figure 46 Finding the Command Prompt Figure 47 IPv4 Address Appendix C Pa...

Page 111: ...er which has been specifically identified as Shared For this example there is a folder named SharedTestData located in C on the Spare computer To Share the SharedTestData folder right click on the SharedTestData folder and select Properties Figure 48 SharedTestData folder Figure 49 SharedTestData folder properties Appendix C Page 97 ...

Page 112: ...log opens the Everyone group should show with only the Read permission checked off Put a checkmark in the box for Change and then click OK to close the 3 dialog boxes The SharedTestData share is now ready for the venTest to connect to Figure 50 SharedTestData Advanced Sharing Properties Figure 51 Sharing Permissions Appendix C Page 98 ...

Page 113: ...access the computer so in this example the user BioMedLocal is a user account that exists on the Spare computer with Administrator permissions Enter the username and associated password as shown as shown in Figure 52 then select the Mount soft button on the venTest screen The venTest will take approximately a minute or so and then the message Mounting the remote folder was successful should appear...

Page 114: ...ain via Active Directory Users and Computers by your Network System Administrator Your Network System Administrator should also be able to assign administrator status to the account on the domain computer which contains the Windows Data Share Note Do NOT use the Administrator account when trying to connect to a Data Share There is no practical way to differentiate between the Administrator account...

Page 115: ...venTest OPERATORS MANUAL The Domain User BioMedDomain can then connect to SharedTestData on Spare Figure 54 venTest connected Domain Appendix C Page 101 ...

Page 116: ...venTest OPERATORS MANUAL Appendix C Page 102 ...

Page 117: ......

Reviews: