background image


Directory for bitmap files


– this directory specifies the default location to look for bitmaps that are used 

as the backgrounds for the disc label and case wrap.   Any other bitmap files that might be used on the print 
assets would typically be stored here. 


Directory for wave files


– this directory specifies the default location for the wave files that are used for 

audio notifications. 


Directory for *.PRN files


– this directory specifies the default location for *.PRN files to be used for the 

print assets. 


Directory for menu themes


– this directory specifies the default location for menu theme files.  The *. 

menu files should be in this directory and there should be bitmap subdirectories directories where the bitmaps 
for the menus are stored. 


 Preferences 


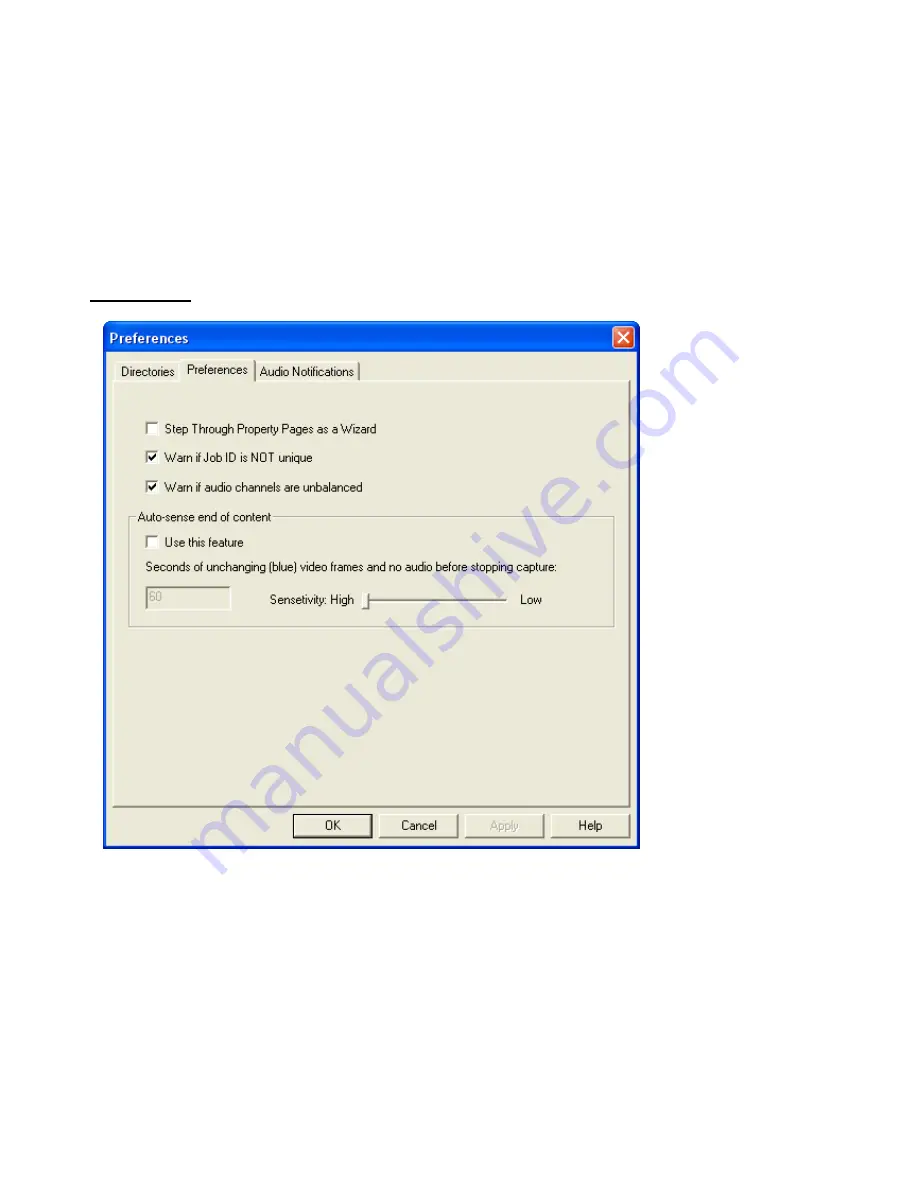
Step Through Property Pages as a Wizard


– this option is typically checked for the application 

initially, but once the user becomes familiar with the usage of the program, they may turn off the wizard mode.  
Turning off the wizard mode makes it so the operator can jump directly to any configuration page they wish 
without having to step through each one.  The application must be restarted for a change in this option to take 
effect. 


Warn if Job ID is NOT unique


– if this box is checked, every time the Job ID edit field on the Job Page 

loses focus, the Job ID is checked against all job files in the default job directory.  If a job is found with the 
same Job ID, a warning is issued.  If not checked, no warning is issued and the pre-existing job will be 
automatically overwritten. 


Warn if audio channels are unbalanced


– if this box is checked, the left and right audio channels will 

be monitored.  If one channel is consistently higher (2x) than the other over a period, a warning will be issued.  
The warning will give the option of aborting capture or not.  If capture is not aborted, this warning will not be 
given for the remainder of the capture even if the audio channels remain unbalanced. 


Summary of Contents for DVD-100

Page 1: ......

Page 2: ...VD menu use the MenuMaker application It is probably best to save the new template and menu theme under different filenames because if you install an upgrade it will most likely overwrite the project and menu theme templates If you change the menu make sure to change the name of menu in the project theme to points to your modified menu Finally if you choose the project theme shown the rest of the ...

Page 3: ...o Select Live or Pre Captured Video Select DVD Writer On this page you can specify where your DVD s will typically be written The choices are either a local DVD writer robotic DVD duplicator printers On this page simply make your selection from the drop down listbox As has been mentioned repeatedly setting up this preference as a default will not prevent you from changing the writer on each job ...

Page 4: ... Printers On this page you can specify where your paper assets will normally be printed The choices are either a local DVD writer robotic DVD duplicator printers On this page simply make your selection from the drop down listbox As has been mentioned repeatedly setting up this preference as a default will not prevent you from changing the writer on each job ...

Page 5: ...ade that you have completed the Setup Wizard Since the Quick Start Guide used the HOME Movie theme as an example the following example creates a DVD with the HOME Movies DVD menu theme If no Menu Theme is selected the Setup Wizard was probably not correctly started You can re start the Setup Wizard by right clicking on the application logo located in the upper left hand corner of the DVD 100 user ...

Page 6: ...de LED should be blinking 4 If the video is a live feed such as a TV or camera feed simply press the play button If it is a tape deck queue the video to the desired starting place and then start it playing You should click the play button very shortly after starting the video feed Once capture has started the green LED will be on without blinking and the display should automatically have switched ...

Page 7: ...g only supports full D1 size video and we don t resize the frame size so your pre capture files will need to be full D1 size which is either 720x480 or 704x480 for NTSC or 720x576 or 704x576 for PAL 2 Now as for compression formats we either support a DVD ready compression which is DVD compliant MPEG 2 This can come in several different formats Elementary streams where the audio and video are stor...

Page 8: ...setting up the project let s set one of the preferences to suit our needs Click the preferences button and the Preferences tab from the property page dialog that pops up Uncheck the option to Step Through Property Pages as a Wizard Don t worry about the other options for now If you want to read more about the this options on this page you can do that in the section titled Preferences After making ...

Page 9: ...d Now click the button to bring up the project property pages The four text fields are the values entered on the setup page of the display If you changed any of the text here the change would be reflected on the setup display page Now check the Use Pre Captured File option Next click on the Pre Captured Files tab and that property page should appear ...

Page 10: ...ve Select the type of files you have on your hard disc that you will be making a DVD from Next click the Enter Edit FileList button and the following should appear Now click cell under the Video File header Click again this time in the area circled in red to get a browse button ...

Page 11: ... video bitrate The bitrate is the factor that determines how many minutes of video can be stored on a standard DVD The bitrate can be computed automatically if the length of the video clip is known The length of the video clip can be entered in the cell under the heading Length hh mm ss If the length of the video clip is not known but you know what to set the bitrate to so that the compressed audi...

Page 12: ...lay tab and continue with the DVD authoring When the DVD authoring is finished your DVD may be viewed using the PowerDVD application that was provided with this software For help on using PowerDVD to test your DVD before writing it to disc go to Testing Your DVD using PowerDVD To learn how to print the paper assets and write the DVD proceed to Printing the Paper Assets and Writing the DVD Start Au...

Page 13: ...default chapter selection algorithm the application must first select chapter points and then acquire bitmaps of the first frame of each chapter to use on the chapter selection menu After the chapter section is done the application display area should automatically switch to the Author tab and appear as shown ...

Page 14: ...ideo feed or files on the hard drive 4 This time however the job will not stop after the authoring stage but will proceed to the printing and writing stages 5 Once the printing and writing are complete if you printed a paper label you can apply the label to the DVD You can also tear or cut the perforated case wrap and cut out the chapter insert You should be able to use your DVD in most DVD player...

Page 15: ...ing flexibility and quality Using 4x DVD R writers a two hour DVD can be captured and authored in approximately 2 1 2 hours and a one hour DVD can be authored in less than 1 1 2 hours DVD 100 can also output to robotic CD DVD duplicating systems The output of the completed job is A written DVD sitting in the ejected DVD writer tray containing the following features options Full D1 NTSC or PAL vide...

Page 16: ...hed manually from the popup menu obtained by a right click on the application logo The purpose of this wizard is to setup your hardware specific settings to simplify making your first DVD All these settings can also be set through the project wizard or property pages If the wizard is cancelled without finishing it will be run again the next time the application is launched unless the settings are ...

Page 17: ... are not provided The browse button will bring up the following dialog box to select your default look Select Live or Pre Captured Video The page allows you to specify whether you will primarily be creating DVD s from a live video feed such as a camera or VCR or whether you will be making your DVD s from pre captured files on your hard drive If you select from a live video source each time the app...

Page 18: ...llows default audio video input settings to be set On a project by project basis this default can easily be overridden by the options on the Encoding Property Page Your default settings can also be changed by re running the wizard or by simply pressing the save settings button after changing the setting on the Encoding Property Page ...

Page 19: ...atio if available will specify whether the default video feed has a 4x3 or 16x9 aspect ratio Select DVD Writer This page allows the DVD writing device to be selected If no DVD duplicators or towers are attached a local DVD writer must be accessible to select a writing device Again as is the case on each other setup wizard page on a project by project basis this default can easily be overridden by ...

Page 20: ...the case on each other setup wizard page on a project by project basis these defaults can easily be overridden by the options on the Disc Label Property Page Case Wrap Property Page or Case Insert Property Page wizard pages Your default settings can also be changed by re running the wizard or by simply pressing the save settings button after changing the setting on the project property pages menti...

Page 21: ...part of the project file name This usage is the project job history usage model When a project is run a job file is saved to the default project file directory using the JobID as the base name with a job extension In addition to this at the completion of each stage the job file is written to the default work directory This is useful if a failure ever occurs because then the job file written to the...

Page 22: ... Control Hardware Dependent Text Variables Professional Version First Play Pre Captured Files Encoding OSD Hardware Dependent Authoring Data Files Professional Version Burning Disc Label Printing Case Wrap Printing Chapter Insert Printing Job Property Page Job ID this is an alpha numeric string which is composed of characters valid for a filename A job file will be written in the default job direc...

Page 23: ...even taking longer than realtime to encode the clips Video Signal is used to specify whether in the input video source is NTSC or PAL The option chosen here will also affect the DVD authored Deck Control Page This feature is not available in all versions of DVD 100 If you do not have access to this feature and you wish to use it please contac http www dmapp com or your local dealer Deck control re...

Page 24: ...venience This mark is not used with the In OUT marks when automatically capturing video Edit In Out Points this button brings up a spreadsheet like interface which allow deleting or inserting rows as well as editing of IN OUT marks Text Variables Page This feature is not available in all versions of the product If you do not have access to this feature and you wish to use it please con http www dm...

Page 25: ...me exists as a text object in menus labels or case wraps the variable name will be replaced with the substitution value at runtime If you have a text object that was not intended to be a variable but it happens to have the same text as a variable name it will be treated as a variable Because of this it is a good idea to adopt a unique naming convention for your variable names that will hopefully a...

Page 26: ...lexed together into a single file which typically has the extension mpg VOB file This is a file that has already been multiplexed for DVD This file also has audio and video multiplexed together into a single file which should have the extension vob Optional Audio Elementary Stream The audio stream is a DVD compliant audio stream If a multiplexed format was selected for the video file no audio file...

Page 27: ... will be used to create the DVD compliant elementary streams Pre Captured Files Type this option specifies the type of pre captured files for the entire project What this means is that multiple segments can being joined together into a single title and the pre encoded files specified for each segment must be of the type specified Currently for files to be encoded or transcoded the file must be Ful...

Page 28: ...fied then no thumbnails would be available for the case wrap either Since only one thumbnail per segment can be specified only one chapter per segment should be specified on the authoring page if chapter thumbnails are to be used Length this column is also optional if making a DVD with only one chapter per segment and no chapter insert If lengths are not specified the following chapter selection m...

Page 29: ...DV Capture Software Encoding Options ...

Page 30: ...he SDI video connector Video Aspect Ratio for capture cards that support it is used to specify the aspect ratio of the video source Bitrate the MPEG 2 video encoder can be configured to use a constant bit rate encoder or a more advanced variable bit rate encoder The variable bit rate encoder will typically produce better results than the constant bit rate encoder but the file sizes may be slightly...

Page 31: ...than realtime and at the highest setting the encoding may be slower than realtime When choosing a setting for DV capture and realtime encoding the value should not be set so that the encoding is slower than realtime Finally turning on halfpel search will improve the quality but increase the encoding time OSD Property Page This feature is not available in all versions of DVD 100 It is currently ava...

Page 32: ... Enable OSD this control enables or disables the feature for the current project Edit this button pops up the following window which allow WYSIWYG layout of the OSD graphics or text ...

Page 33: ...t box The font and size can be changed using the combo boxes shown at the top of the edit window The font size and color can also be set using the Font dialog from the context sensitive right click menu The transparency of the text foreground or background can be set independently The default transparency for the background is 100 transparent and the default transparency for the foreground is 0 tr...

Page 34: ...many scene breaks as the specified desired number of chapters Forced chapter breaks are simply chapter points occurring at points that are not the start of a new video scene These will usually occur within the context of long natural scene breaks For example if a camera was set up on a tripod to video tape a lecture or party etc there would be few if any natural scene breaks but it would still be ...

Page 35: ...hapter titles text on the scene selection page this is the text that will be displayed there 2 If the chapter insert is printed the chapter text will be printed there if specified Menu Theme A default directory can be specified for menu theme files in the Directories tab of the Preferences dialog As mentioned above menu themes can be created using the MenuMaker application Menu themes are text rea...

Page 36: ...is checked an image of the specified type is created from the VIDEO_TS and AUDIO_TS folders This option should usually be checked since it speeds up the DVD writing and it allows another DVD to be authored to the DVD directory without losing the ability to write another DVD by using the image The format of the image is ISO 9660 UDF 1 02 bridge file system The drop down listbox allows the extension...

Page 37: ...e quantity of the printed assets Job Priority is used by some duplicators to allow jobs to be completed ahead of other jobs that are already in the queue Select Primary DVD writer to use specifies which local drive or which duplicator to use for writing the DVD Write DVD Now button is used to write a DVD to the specified DVD writer This is useful for testing or for simply writing another DVD for a...

Page 38: ...job to be created but not run immediately you can change the directory and then copy the job file to the job directory when ready for the job to be run Options if there are additional options that are not specified by the controls in the upper half of this page they might be configurable by the Options button if it is enabled UserID some duplicators may require or allow a UserID File System this o...

Page 39: ...ecifically prepared PRN file to be used instead of the disc layout shown in the dialog above In fact if this option is checked irrelevant options will be hidden Use Duplicator Printer is only enabled if a duplicator is specified on the Burn page If this option is specified a paper label will not be printed but the duplicator will be used to print directly onto the disc surface Furthermore this opt...

Page 40: ... This page also allows the user to customize the layout of the contents on the case wrap To change the layout double click on the picture of the case wrap or click the Edit Layout button This will bring up a larger WYSIWYG layout of the case wrap on which the text and graphics can be added moved or removed Font and text color can also be modified as well The size number of and placement of the cha...

Page 41: ...d Print Now can be used for testing the print layout It can also be used to print a single case wrap for a previously executed job Background bitmap for case wrap this optional field allows a full background bitmap to be specified for the case wrap printing This bitmap will of course be behind any text or other graphics that are printed Currently the format of this file must be a 24 bit bmp file o...

Page 42: ... used These settings will be saved as part of the job and need not be reset unless a different printer is being selected Print Now can be used for testing the print layout It can also be used to print a single chapter insert for a previously executed job Load a Project This button on the application is used to load a template tpl previously executed job job or a saved project prj Once loaded the j...

Page 43: ...d a project template in without overwriting any of those settings in the current project Those system type settings can be saved as default by clicking the Save Settings button and project templates can be loaded without losing those settings Generally the settings that are loaded as part of a template are those that are set on the following property pages Authoring Property Page Disc Label Proper...

Page 44: ...case wrap if they are enabled for the current job This allows you to make sure your text fields fit properly on the printed assets If you are about to start a job using an existing job file the preview may show capture length and thumbnails from the prior job If Print Disc Label is checked the disc label will be previewed first Press the space bar or click the close box to close the preview window...

Page 45: ... will be created using the jobID as the folder name This directory is where the audio and video elementary streams will be written as they are captured and encoded For optimal performance of the DVD authoring stage it is suggested that the Work Directory Capture Directory and the DVD directory be located on different physical hard drives not just different partitions of the same hard drive Drive f...

Page 46: ...the user becomes familiar with the usage of the program they may turn off the wizard mode Turning off the wizard mode makes it so the operator can jump directly to any configuration page they wish without having to step through each one The application must be restarted for a change in this option to take effect Warn if Job ID is NOT unique if this box is checked every time the Job ID edit field o...

Page 47: ...hink it should be decrease the sensitivity by moving the slider to the right This will lessen the tolerances on what is considered a solid frame or what is considered unchanging frame to frame video Audio Notifications This tab is the page that allows the audio notifications to be set up They can be enabled or disabled and the wave files for each can be specified The user can create their own noti...

Page 48: ...ation When any file with a txt extension is found in the directory that file will be opened and if parsed successfully will launch a job based on the contents of the text file The syntax of the pooled job file is described in the section on launching a Job from a polled directory Save Settings This button will save the current job profile minus the JobID Title Subtitle Date Pre Encoded Files and D...

Page 49: ...next If the audio notification pause is being used the next stage LED will blink and the corresponding display page will allow some editing of job data which will be used by the next stage upon resuming Setup Display The setup display should be treated as the job staging area A new job can be created by simply If more details are needed the More button in the lower right quadrant can be pressed Th...

Page 50: ...ure display page will be automatically switched to when the REC button is pressed to setup for video capture Chapter Selection Display The Chapter display tab displays the current progress of the chapter selection stage for pre encoded files The progress resets to zero at the start of each new segment ...

Page 51: ... not be used depending on the options selected The overall progress is an estimate of the overall progress of the entire authoring stage Print Display The Print display will show the status of the job currently being printed The Printing display page will be automatically switched to when a job advances to the printing stage The check boxes on this display page are read only and cannot be used to ...

Page 52: ...iguration will be given For example if only composite and s video are available for a given configuration pressing the bottom left button will alternately show Composite and S Video but it will not show RGB YUV or SDI These settings can all be made from the encoding page of the job property page dialog Once a video capture is under way these buttons are locked and cannot be pressed until the video...

Page 53: ...o preview the video before during and after starting the capture this video preview can take the place of a physical video monitor When pressing the silver buttons you should get realtime feedback on how the video looks based on the current settings Deck Control Deck control refers to controlling a remote tape deck via Firewire or Serial bus This feature is not available in all product configurati...

Page 54: ... using the current timestamp The value can also be entered or edited manually in the edit field where it is shown Use In Out Marks for capture This control is used to indicate whether IN OUT marks are to be used for the job s capture stage Segment Number Because the deck control feature allows multiple IN OUT points to be specified this control is used to view the IN OUT points for a given segment...

Page 55: ...th it is important to know that this length of time directly affects the calculation of the bitrate The best quality video is obtained by keeping the video length to an hour Anything less than an hour will utilize the same video bitrate since it is limited by the maximum bitrate allowed by the DVD standard Depending on the video content the length can be set to two hours or more but don t expect t...

Page 56: ...icking on the stop button with the square Unlike the abort button when capture is stopped the job is advanced to the next stage There is a short time between when the stop button is pressed and when the job is advanced to the next stage while the scene selection and audio encoding finished up 3 Capture can be automatically stopped by the capture limit set on the front panel area shown below or on ...

Page 57: ... background bitmap CaseWrapPrnFile Full path the new case wrap PRN file if the job template is not set to use a PRN file for the case wrap this option will set it to do so CaseWrapBackground Full path to new case wrap background bitmap UsePre EncodedFiles this interface is still supported but is supersceded by UsePre CapturedFiles yes no UsePre CapturedFiles yes no Pre EncodedFileType this interfa...

Page 58: ...rough to completion As was mentioned in Starting a Job stages of a job can be re run The key word here is re which means the job has been run before It is crucial to understand that data is added to the job file as the job progresses from stage to stage For example after the capture stage completes the job contains the number of frames and time captured as well as potential chapter points If using...

Page 59: ... located in the directory working directory JobID If producing a DVD with chapters the video capture stage would also have identified candidates for chapter starting points and thumbnail bitmaps of those frames The quantity and frame number for each of those potential chapter starting points must be found in the job file in order to successfully author the DVD The thumbnail bitmaps are stored in t...

Page 60: ...n LED for that stage will be lit In that state the button will serve the purpose of aborting that stage Please note that just because the abort button is pressed doesn t mean that the stage will immediately abort It may take some time for the stage to abort This is especially the case with the writing stage when writing to a local DVD writer The abort functionality is currently not implemented for...

Page 61: ... from the Start Menu or the quick launch toolbar You should see a Window and application as shown below Click on the control which is circled in red You should get the following popup menu Make the selection shown and you should get a folder browser ...

Page 62: ...d if you used the menu shown in the Quick Start Guide the PowerDVD window should show the following DVD main menu You can now use the cursor keys on your keyboard as you would the cursor keys on a DVD remote control and the Enter key as the DVD remote select button You can also use the mouse to navigate your DVD ...

Reviews: