________________________________________________________
__
Page - 66
Using the Printer
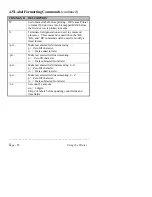
4.12 Label Formatting Commands
There are several commands listed in the label formatting tables in
Section 4.5 that have not been covered in the examples. This section
examines these commands. The following commands are sent to the
Printer after the STX L command, which causes the Printer to switch
from the SYSTEM level command processor to the LABEL
FORMATTING command processor. Any commands received while in
the LABEL FORMATTING command processor not starting with a 1, 2,
3, or 4 (specifying a field rotation) are interpreted as printing process
commands.
1.
“R####” COMMAND. SETTING THE ROW OFFSET VALUE.
“SETTING THE ROW OFFSET VALUE” is a FORMATTING
command that is used to adjust the printing of data on a label. This
feature is useful when you need to print a single format on several
different types of preprinted labels. If the preprinted data does not
appear in the same place every time, the data you image onto the
label may overlap the preprinted data. The “R####” command
instructs the Printer to print the following label formats further up
on the label than the format actually specifies. The numbers in the
command are digits 0 to 9, which can specify a number from 0000
to 9999. This value is the number of 1/100th of an inch of label to
feed before the printing of the label format data begins.
2.
“H##” COMMAND. CHANGING THE BURN TIME.
The “H##” formatting command changes the “dot on time” for the
individual dot rows on the Printer. The Printer powers up with a
default value of 10. Varying this number changes the amount of
time the dots are “turned on.” This changes the amount of heat that
is transferred from the head to the media, causing lighter and darker
images to be burned. The range of valid settings are from 01 to 20.
Each step increases or reduces the burn time by 100 µS.
Summary of Contents for Prodigy
Page 1: ...Prodigy Operator s Manual ...
Page 3: ......
Page 4: ......
Page 8: ......
Page 54: ...________________________________________________________ __ Page 46 Using the Printer ...
Page 84: ...________________________________________________________ __ Page 76 Using the Printer ...
Page 125: ...Appendix D Page D 9 6 Continued 152 DPI Printer ...
Page 140: ......
Page 142: ...Page E 2 Appendix E ...
Page 146: ...4 Warranty Information ...


