background image


VideoSpider Installation Guide    

40


1.


Launch the setup program from the original 

VideoSpider CD-ROM

 or downloaded files 

folder on your hard disk.   

[As soon as the setup program starts, it will determine that the product has been already installed 
in the system.] 

2.


Select the 

accepting

 option to proceed further or the 

rejecting

 one to abort the setup 

program and the upgrade/re-installation process.   


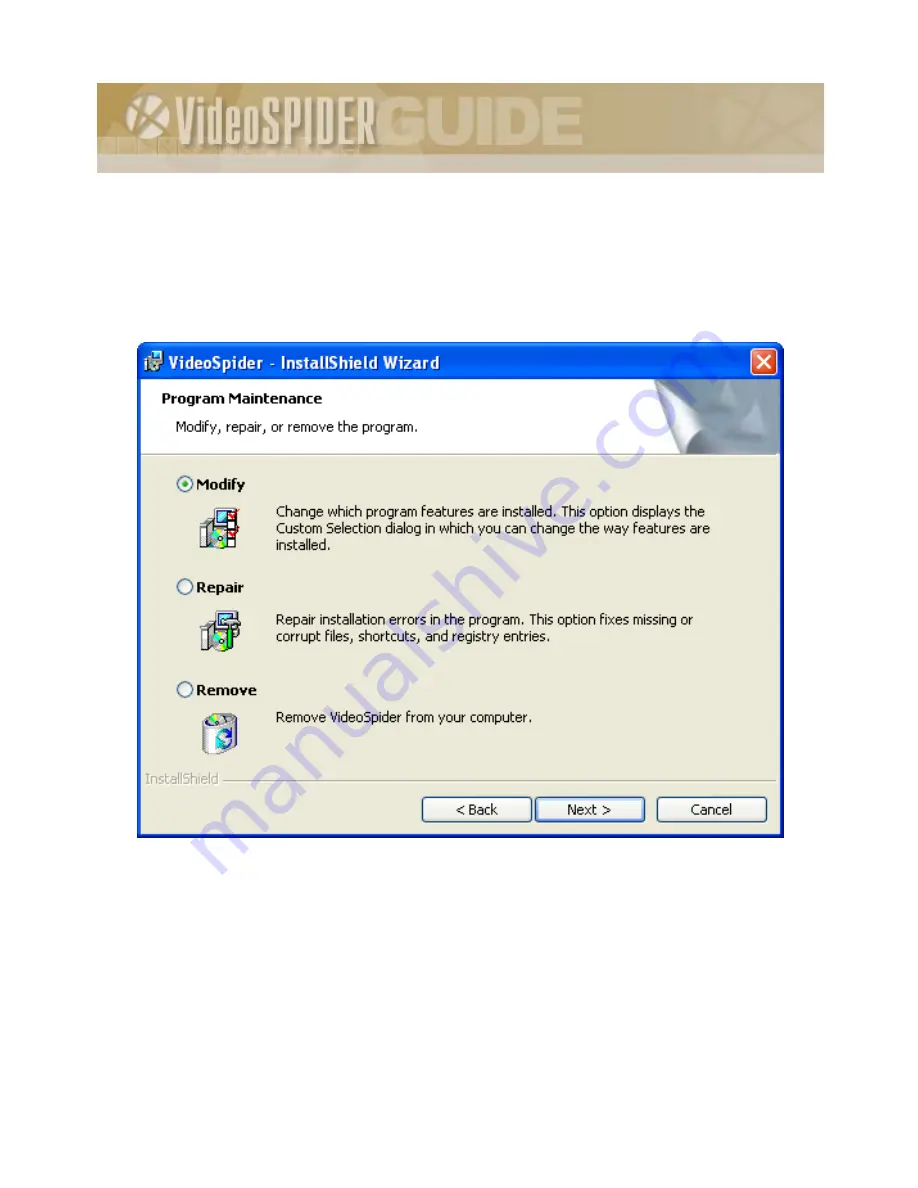
Figure 19 – Choosing the uninstallation/upgrade options 


3.


Select the option 

Modify

 and click the [Next>] button.   

[You will see a very similar setup program screens as were described in section 3.2.  In the 

Custom Setup

 dialog providing the components to choose for installation, the components 

installed before will be selected.] 
 

Summary of Contents for VIDEOSPIDER PVE400 edition

Page 1: ...VideoSpider Multi channel digital video surveillance system PVE400 edition INSTALLATION GUIDE Rev 8 2 Printed 2007 10 17 Darim Vision Corp ...

Page 2: ... companies We are using these names for identification purposes only with no intention of infringement of the trademarks Changes or modifications not expressly approved in writing by Darim Vision Co Ltd may void the user s authority to operate this equipment Limited Warranty Our company warrants this product against defects in materials and workmanship for a period of one year from the date of pur...

Page 3: ...ions to the Windows network domain 19 3 2 SPIDER SOFTWARE PVE 400 SETUP PROGRAM IN DETAIL 22 3 2 1 The Client component and its subcomponents 23 3 2 2 The Server component and its subcomponents 24 3 2 3 Spider service access properties 25 3 2 4 Spider resource parameters 28 3 2 5 File Storage settings 30 3 2 6 Finalizing the installation 32 4 INITIAL SPIDER CONFIGURATION 35 5 UNINSTALLING AND UPGR...

Page 4: ... 7 1 1 Network connections and configuration considerations 47 7 1 2 Network access rights considerations 48 7 1 3 Network bandwidth considerations 49 7 1 4 Locating Spider stations in the network 50 7 2 TECHNICAL SUPPORT CONTACT INFORMATION 52 7 3 LIST OF TABLES 53 7 4 LIST OF FIGURES 53 ...

Page 5: ...onfiguration Chapter 2 of this guide will help you to install VideoSpider in the most simple and straightforward way thus avoiding potential problems associated with the entire system operation reliability and performance 1 1 How to use this manual For the purposes of simplicity and overall clarity we will be using the following conventions when referring to certain things and people All informati...

Page 6: ...ResourcesÆDisplayÆConnect This indicates Go and select the Resources option from the main menu then select Display item from the pop up menu and finally choose Connect command This will give you the appropriate command to perform the desired Spider function The following table lists the most general typographic conventions used throughout this guide Table 1 List of general typographic conventions ...

Page 7: ...rces menu 9 Choose the item Add Round bullets List of items points There are the following resources our VideoSpider system supports effectively File Storage Spider Numbered list 1 2 3 Sequential steps The VideoSpider software package consists of the following parts 1 SpiderAdmin 2 Spider client program 3 Images Normally all user graphical interface buttons actually their icons used for clarity ar...

Page 8: ...ion mark inside a blackened triangle correspondingly Caution The warning message body typed a point bigger for distinction Please be sure to read this guide thoroughly before installing Spider software to avoid potential problems that can result from an incorrect installation procedure ...

Page 9: ... the same laptop with MEA card as a simple scenario In this case an operator can monitor several PVE400 devices on the same screen and record video data locally PVE400 s picture laptop If the dedicated server is used with LAN connection to other client computers then video from the PVE400 devices can be monitored from different locations without affecting the wireless traffic The Spider Server sof...

Page 10: ...er wireless adapter 9 Microsoft Windows XP Windows Vista or Windows 2003 Server 9 Microsoft DirectX 9 0c or higher 2 1 2 Networked servers Set up user access and security rights If you are installing Spider server that will be accessed remotely from Spider Client stations over the network it is very important to grant clients proper access to the system in order for them to use various resources o...

Page 11: ... Spider related resources The Spider Operator and Spider User accounts should be created within the domain or on the given server during the Spider system installation process described in section 3 1 1 Now you have completed the operating system installation and configuration phase It is time to proceed with Spider software installation as explained in section 2 1 4 2 1 4 Setting up and configuri...

Page 12: ... network resources change communication protocol etc Also you may refuse to make them complete the installation but after that return to these settings by performing the STEP 5 STEP 5 Run the SpiderAdmin program if necessary to review and change settings for various Spider resources See Spider Online Help for more information on the SpiderAdmin program and how to use it Congratulations If you have...

Page 13: ...ccessed remotely by one or more client stations In that case it is imperative for the remote client to get proper authentication in order to access Spider server The clients no matter which version of Windows they run must use the exact same user account names and passwords as were defined on the server side or inside the Windows XP network domain Make sure to follow instructions in section 3 1 1 ...

Page 14: ...s and Groups line The right pane should show two folders named Users and Groups respectively It is not critical whether new user accounts or the new group to be created first However since having the corresponding user accounts is required while the group is optional the next subsection will begin by explaining how to create a new user group 3 1 1 1 Creating a new user group The creation of user g...

Page 15: ...y the group membership at any time in a group centric fashion by double clicking the group s name in the list and clicking the Add or Remove buttons to add or remove existing user accounts Another way to do this in a user centric fashion is to modify new or existing user account as shown in Figure 3 and explained on page 17 3 1 1 2 Creating a new user account To create a new user account right cli...

Page 16: ...assword Never Expires box You may also fill out the optional Full Name and Description fields with whatever information that would help you identify the owner of this user account Click the Create button After that repeat the creating procedure for a new user account or click the Close button To add existing user account into a group or change other properties open the Users folder in the right pa...

Page 17: ...n Figure 4 will appear In the editing field enter the name of the group you want to join and click the Check Names button The system will check the group name automatically If you are not sure in the group name click the Advanced button and try to find the group by clicking the Find now button In the groups list appeared select the group and click OK twice ...

Page 18: ... to prevent unauthorized management of the Spider system and the entire machine or network domain Ignoring this principle will defeat the whole purpose of access rights control for local on site as well as remote over network access It may also introduce management conflict problems in a networked Spider environment for example if a several privileged users attempt to issue conflicting commands to...

Page 19: ...indows network domains in general it may be beneficial to the Spider Operator to know how to make computers running different versions of Windows OS part of the domain This applies to Spider Server and Storage Server configurations as well as all kinds of Spider Clients If all Spider stations join the same network domain the procedure of user account and group creation described in section 3 1 1 w...

Page 20: ...VideoSpider Installation Guide 20 Figure 5 Modifying the Properties in Windows XP Click the Change button in Windows XP OS to modify the existing values You will get a dialog similar to Figure 6 ...

Page 21: ... domain administrator and the corresponding message will appear not shown here Enter the User name and Password of an existing account with enough privileges to modify domain membership You may use the SpiderOp account created earlier in section 3 1 1 2 since it has been included in the Administrators group After that click OK to memorize all changes It may take a short while before the computer a...

Page 22: ... the Next button you agree to be bound by terms and conditions of the agreement shown on the screen 2 Enter the name of the person or group who is installing the system and the company or organization that he she works for These names are usually the same as were entered during Windows OS installation 3 Select the location where setup will create shortcuts for Spider components Typically the Spide...

Page 23: ... item of the left pane currently highlighted with cursor Nevertheless it is highly recommended to read the rest of this section to completely understand the purpose of all available options 3 2 1 The Client component and its subcomponents The Client component represents the receiving end of the Spider system that shows video and status information to users and interacts with them Clients can recei...

Page 24: ... Note that the Server configuration actually consists of several components which can be selected individually after expanding the Server branch and clicking on the corresponding item s icon 9 The Spider Server subcomponent is the vital core of the entire Spider system It represents the Spider hardware one or more Spider interface cards physically installed in this system as well as any number of ...

Page 25: ...optimal software installation Click the Next button to see the following setup screen 3 2 3 Spider service access properties The following configuration dialog is shown in Figure 8 It allows you to specify how the Spider service software for Windows XP called SpiderMan will be logged onto the system during startup The SpiderMan service does not have any user interface and works invisibly in the ba...

Page 26: ...tem Account option Important Note There are certain situations when the default log on account and its associated access rights are not sufficient One such scenario may occur when you plan to have Spider Server or more specifically the SpiderMan service recording the MPEG video data onto a remote machine a File Storage Server elsewhere in the network Additionally if you intend to use Autostart Rec...

Page 27: ...ake while typing in the user name or password or there really is no such user account available As soon as you click the OK button the setup will advance you to the next setup dialog Click Back to return to the previous dialog If you think you have made a mistake in typing username and password try again If you are positive that both username and password are correct leave it as it is In the latte...

Page 28: ...Name edit box of the dialog allows specifying the name for your Spider resource which will be used for designating this resource in the SpiderAdmin program as well as for identifying the resource by other remote Spider stations The rest of the settings can also be changed later using the SpiderAdmin program Changing the rest of the settings supposes that you are quite familiar with the Spider syst...

Page 29: ...ult storage is unavailable the video data are stored to Reserve Storage Important Note By default the SpiderMan service is running under the System account This does not pose a problem for the Autostart feature if the File Storage and Spider server are located on the same computer or the default security settings are used But if the File Storage is located on a remote computer some additional conf...

Page 30: ...le Storage Server component on this system Otherwise skip this section and proceed to section 3 2 6 Figure 11 Specifying the required parameters for File Storage Server component The dialog shown in Figure 11 lets you specify the File Storage settings The first setting is the resource name which will be used for designating this storage in the SpiderAdmin program Remote Spider stations will identi...

Page 31: ...erMan service you will need to specify a user account that exists either on both the local machine and the remote File Storage Server Refer to section 3 2 3 on page 25 for more information The option Split video data on volumes allows you to set a maximum size for the file where the video data is recorded This can make a later access much easier When this limit is reached the file will be closed a...

Page 32: ...omponent requires the USB protection key for activation Insert the USB dongle and make sure that its green LED is on If you are sure in all the settings made click the Install button and proceed with copying files and updating the system Otherwise click the Back button as many times as required to return back to any previous dialog and modify the desired settings If the USB key is not inserted at ...

Page 33: ...ocess It is not used for normal operation of the Spider software The USB key allows activating Spider server only on one PC After the activation the unique hardware ID will be stored in the USB key If you need to move installation to another computer insert the USB key again and uninstall the program This will allow a new installation of the Spider Server to another computer using the same USB key...

Page 34: ...on dialog The Launch VideoSpider Configuration program checkbox allows to start the SpiderAdmin application for configuring the parameters of the PVE400 device right after the termination of the installation process Click the Finish button to complete the setup ...

Page 35: ...ONFIGURATION At the end of installation process the setup program will suggest to launch automatically the VideoSpider configuration program SpiderAdmin The initial dialog allows entering IP address of PVE400 see Figure 15 Figure 15 Configuring IP camera ...

Page 36: ...entered the IP addresses you may check the connection Press the Probe button if the device is currently online This will issue the ping command to the specified address and check the MAC address of the device To edit the current parameters of the IP camera press the Edit button to bring the dialog for changing the parameters Using the Up and Down buttons you can change the appearance of the connec...

Page 37: ... the message interrogating whether to save made changes or not as shown on the figure below Press Yes to save the new configuration Then the following dialog will be brought as shown in Figure 18 Press Restart button for the made changes to take effect The service restart will take some time and you will see the progress bar of the restart process ...

Page 38: ...eoSpider Installation Guide 38 Figure 18 Service restart When done the SpiderAdmin application will be automatically closed Launch the Spider application to get live video from the specified PVE400 device ...

Page 39: ...commended you also halt the Spider service software by the SpiderAdmin program To do that simply click the Stop button on the SpiderAdmin program s toolbar and confirm your action when prompted All Spider service modules are invisible but very important part of the Spider software and must be terminated stopped before any attempt to modify or remove them If you are about to uninstall the Spider so...

Page 40: ... 2 Select the accepting option to proceed further or the rejecting one to abort the setup program and the upgrade re installation process Figure 19 Choosing the uninstallation upgrade options 3 Select the option Modify and click the Next button You will see a very similar setup program screens as were described in section 3 2 In the Custom Setup dialog providing the components to choose for instal...

Page 41: ...e you start the actual uninstallation Then proceed according to the following step by step instructions 1 Launch Windows Control Panel program and click the Add Remove Programs icon 2 Select Spider line in the list of the currently installed software and double click it or click the Change Remove button After a short delay needed to start up the uninstallation program you will see the same uninsta...

Page 42: ... is a checklist that should narrow down the possible causes for a remote access problem which will then help identify solutions 6 1 1 Verifying generic accessibility of the Spider Server system To identify or narrow down various sources of problems related to communication between Spider Clients and Servers check all of the items in the following list and correct any problems if found This generic...

Page 43: ...the Run command Then type DCOMCNFG and press ENTER You will see the Microsoft Management Console In the tools tree placed on the left select the Component Services branch and expand it Then expand the nested Computers branch and right click the appeared My Computer one Click the Properties command in the appeared pop up menu On that the operation system will show the property page where the tab De...

Page 44: ...am aborts at the beginning without showing any dialogs or shows an error message saying file not found The Spider installation package is distributed in the self extracting compressed form Before the installation procedure actually begins the setup program needs to decompress itself to the temporary folder on your system hard disk drive If for any reason the decompression could not be completed th...

Page 45: ...em in most of the cases However if the problem persists you can try stopping the Spider services manually as described below Launch the Control Panel click the Administrative Tools icon then once more on the Services icon A dialog shown in Figure 21 will appear Scroll down the list of installed services to locate the SpiderMan service there and note if its status appears as Started If so highlight...

Page 46: ...eo quality settings type of interface card that was used for capturing and encoding and of course recording duration The following tables will help you to estimate the worst case numbers for continuous non stop recording for NTSC video at 100 quality depending on the interface card that was used for encoding the video data being recorded IFinally note that you can save a considerable amount of sto...

Page 47: ...Server or other later Microsoft Windows platform that can operate as a primary domain controller as a part of the network or its segment The Windows Server with DHCP and WINS services enabled and properly configured would allow all other stations automatically obtain proper IP address and other parameters as soon as they join the network Use IPCONFIG A command in Windows DOS box to display the com...

Page 48: ...r network the access rights are controlled by the running Spider Server Since all Spider components operate in Windows environment all access rights are granted or revoked using standard Windows XP user management tools not by programs supplied with Spider package The required modifications of user accounts and access rights are outlined in section 3 1 1 on page 13 Consider the following recommend...

Page 49: ...hannels in use In addition the network traffic may or may not increase with expansion of the number of receiving client stations depending on the data transmission method protocol in use When a Spider Client requests the live video feed from any Spider Server for real time monitoring the server will transmit data using one of the following methods protocols depending on the client s preference Eac...

Page 50: ...Storage Server for playback the server will transmit data using the TCP protocol only The playback operation requires a reliable point to point communication and therefore cannot be performed using multicasting 7 1 4 Locating Spider stations in the network There are generally two ways to locate and identify Spider stations as well as other computers on the TCP IP network 1 By name defined during W...

Page 51: ...ment 9 If the DHCP lease for the given IP address has expired the computer may be assigned a different usually unpredictable address unless the reservation for this PC is used For small scale Spider surveillance networks where stations addresses are mostly fixed the explicit IP addresses or static mapping through HOSTS or LMHOSTS files can be used For medium scale networks it is recommended to use...

Page 52: ...im com Please note that technical support staff will be able to help you faster and with greater efficiency if you include the following information in the description of your question or problem 9 The basic computer configuration CPU model clock speed number of CPUs if more than one amount of the physical RAM other devices installed 9 The video adapter information model amount of video memory dis...

Page 53: ...s of VideoSpider for PVE400 configuration 23 Figure 8 Defining log on options for the main Spider service 26 Figure 9 User account error message 27 Figure 10 Specifying Spider server component properties 28 Figure 11 Specifying the required parameters for File Storage Server component 30 Figure 12 Finalizing the installation 32 Figure 13 USB dongle confirmation 33 Figure 14 Final installation dial...

Reviews: