background image


 55

Move cursor with 

 and 

  on the front panel and select item with 

 and 

¾


Channel number: 

Select one channel for setting. 

¾


Cover Channel: 

whether to display current channel or not 

¾


Activate Shielding

Provide you to mask the


sensitive area. Move cursor to “Area Set” and set the area.   

In the shelter area setup interface, there are four small panes. You can press “

”, “

”, “

” and 

” or number “1-4” keys to move the cursor. When you choose one pane, use direction keys to move 

the pane to your hope position; And press “ENTER” key to fix the pane; Then use direction keys again to 

extend the pane. This pane is the shelter area.   

After you finish setup, press “ESC” key to exit. 

¾


In the color mode menu

is brightness

is color

is constrast

is saturation. 

Section 13 


PTZ Setup


Through DVR_WEB could control PTZ. About the DVR_WEB setting please refer “Chapter

”. 

Enter “Main Menu

Advanced

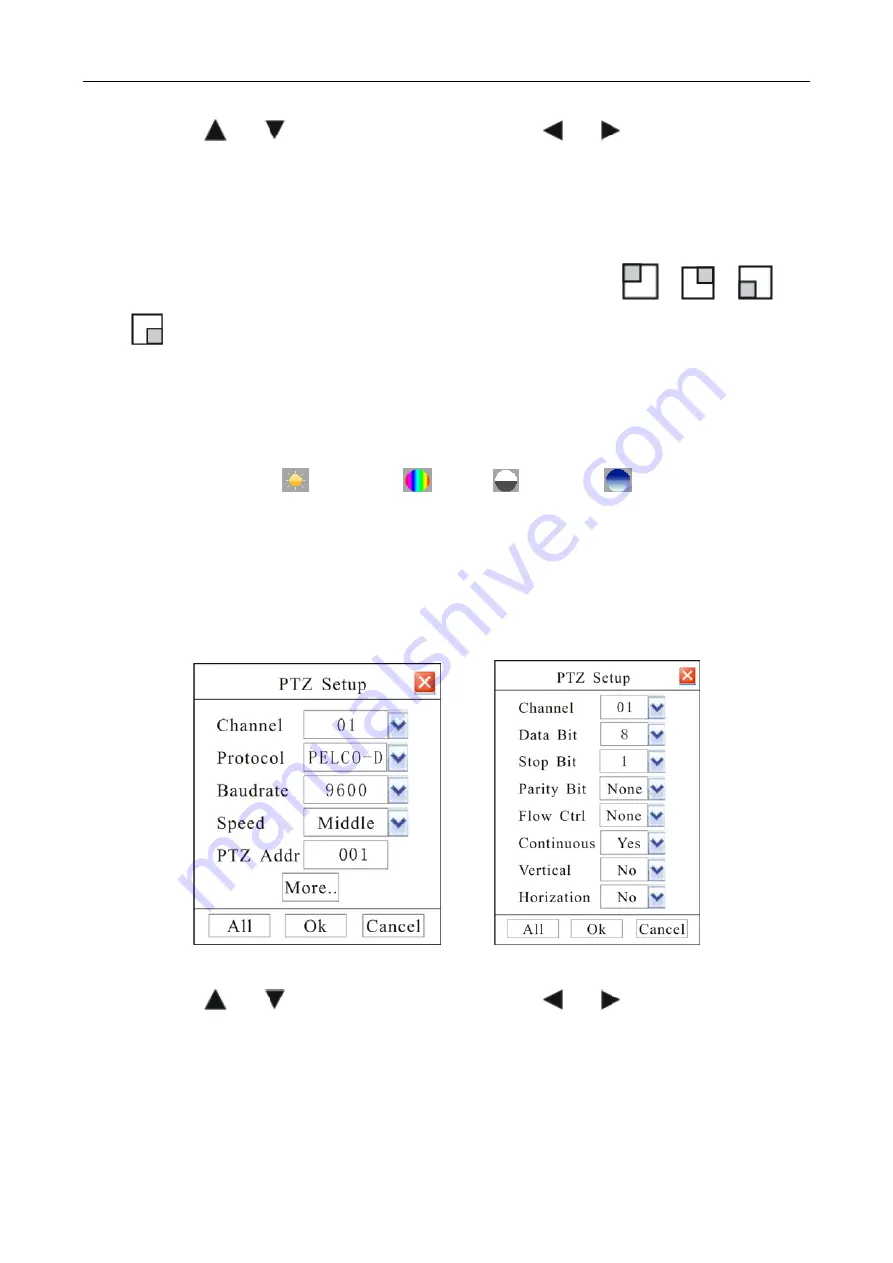
PTZ ” as shown in Fig.51. 


Fig. 51                                                      Fig. 52     

Move cursor with 

 and 

  on the front panel and select item with 

 and 

¾


Channel number:

 connect channel number of decipherer 

¾


Protocol: 

DVR had the following PTZ protocol: PELCO-D

PELCO-P2

PELCO-P1

W110

P3

PLD

ENKEL

YAAN

SONY

JC4116

PD-NW

PD-CONST

PIH-1016

KRE301

PELCO9760

LILIN

T3609HD

HD600

KTD

SAMSUNG

ELEC

PANASONIC

FASTRAX

DL-0001. 

Summary of Contents for DVR-404DB

Page 1: ...lone Multi channel Digital Video Recorder User Instruction Manual VERSION 1 2 Before attempting to connect or operate this product please read these instructions carefully and save this manual for fut...

Page 2: ...ervice personnel or system installers The connections should comply with local electrical code The lightning flash with arrowhead symbol within an equilateral triangle is intended to alert the user to...

Page 3: ...maintenance of the product for the cases including but not limited to below 1 Any damage and loss including without limitation direct or indirect special consequential or exemplary arising out of or...

Page 4: ...drive is easily affected by heat used at high temperature characteristically It is recommended to use this unit at temperatures between 20 30 68 86 It is possible to damage it if it is moved while it...

Page 5: ...indicated on the manufacturer s label Special Note If you need to change the TIME DATE always clear the Hard Drive If you don t follow this step first it may cause erratic behaviour of the DVR and pos...

Page 6: ...wide blade or the third prong are provided for your safety If the provided plug does not fit into your outlet consult an electrician for replacement of the obsolete outlet z Protect the power cord fr...

Page 7: ...ion 22 Section 1 DVR Front Panel 22 Type 4 channel model and type model page 6 22 Type 16 channel model page 6 23 Type model without LCD page 6 25 Type model with LCD page 6 26 Section 2 IR remote dev...

Page 8: ...etup 55 Serial Port 56 PTZ Control 57 Section 14 Restore Defaults Setting 58 Section 15 Information Inquiry 59 Log Information 59 Version Information 60 User Information 60 Section 16 System Update 60...

Page 9: ...8 Local Setup 69 Advance Setup 69 Remote control 71 Chapter Frequency Asked Questions 72 Appendix 1 HDD Capability Calculate 73...

Page 10: ...the operation modes and performance criteria of our stand alone H264 DVR Please read the manual carefully before using the DVR and install the system according to the instructions Mainframe software...

Page 11: ...the recorded files Support USB memory USB HDD Support cycle or none cycle record 3 Control Support exception alarm motion detection alarm external alarm etc Support user authority setting the authori...

Page 12: ...95 Power Supply 12V volts D C input Please pay particular attention to the following Keep away from heat sources and high temperatures and avoid direct sunlight Do not leave in humid places and never...

Page 13: ...ews 4 Replace HDD mounting bracket 5 Connect the ATX power cable to the power connection on the HDD Pay attention to the correct orientation 6 Plug HDD cable into SATA port on HDD 7 Plug HDD cable int...

Page 14: ...6 channel model page 6 should be as fig 5 Fig 5 8 Replace the top of the DVR enclosure Note Please fix the screws at the back side of DVR before the flank side while assembling the lid NOTE Please for...

Page 15: ...in out connection Alarm output connect alarm output device 1CH details refer to Section 4 External alarm in out connection 6 VGA interface connect VGA display device such as PC VGA display 7 RJ45 inte...

Page 16: ...Alarm output connect alarm output device 1CH details refer to Section 4 External alarm in out connection 5 2 4 CH alarm input connect alarm input device 4CH details refer to Section 4 External alarm i...

Page 17: ...al video signal output 5 Reserved AOUT2 N A Audio output AOUT1 Connect the audio output device standard RCA port 6 RS 232 port System Debug port 7 VGA Port Connect VGA displays 8 Network port UTP Conn...

Page 18: ...485 2 is set for PTZ control R R are receivers of RS485 connect to keyboard This DVR can only use 485 1 port for keyboard Remark 2 RS485 matched resistance Open the cover there is a 2 4 pin header SW1...

Page 19: ...zoom control connection Alarm input ALARM IN connect alarm input device 8CH details refer to Section 4 External alarm in out connection Alarm output ALARM OUT connect alarm output device 2CH details r...

Page 20: ...or alarm input 8 CH series DVR has 8 ports for alarm input 16 CH series DVR has 16 ports for alarm input Fig 11 Note external input voltage can not be higher than 5V Alarm out Alarm output is NO NC ou...

Page 21: ...with the Rx Rx on PTZ or High Speed Dome After all the above connection please enter the PTZ menu to setup camera and PTZ address baud rate PTZ protocol After the setup click icon on the status bar to...

Page 22: ...output of DVR About the DVR_WEB setting please refer Chapter NOTE 1 Type 16 channel model and type model s page 6 intercom is independent 2 Type 4 channel model and type model s page 6 intercom input...

Page 23: ...eceive indicator flashing when control this DVR with IR controller ALARM Alarm indicator flashing when alarm is activated Record indicator Corresponding channel record indicator it lights when corresp...

Page 24: ...ting Entry the backup menu Pop up the dialogue box of manual recording 1 Entry search and playback interface 2 Pause Play recording file under playback mode Stop playback Jump backward under playback...

Page 25: ...number 3 in input mode window 4 1 Number key 4 Corresponds relevant letter 2 Select pane 4 in cover area setting 3 input number 4 in input mode window 5 9 1 Number key 5 9 Corresponds relevant letter...

Page 26: ...eceiver POWER Power indicator lighting constantly when connected power HDD HDD indicator flashing when access HDD date ALARM Alarm indicator flashing when alarm is activated RUN Working indicator flas...

Page 27: ...area setting 4 input number 1 in input mode window 2 1 Number key 2 Corresponds relevant letter 2 Motion and Shelter area disable 3 Select pane 2 in cover area setting 4 input number 2 in input mode...

Page 28: ...Hide the status bar in preview mode Direction key LEFT Direction key RIGHT 1 4 screen display or channel 1 full screen 2 Motion and Shelter area enable 3 Select pane 1 in cover area setting 1 4 screen...

Page 29: ...Press ID in IR remote controller then input 000 in Remote Control Address Set will control all DVRs in the effective range The defaulted host address is 001 the value field among 001 255 It can be mod...

Page 30: ...then the mouse cursor will appear on the screen Note Type 16 channel model and type model page 6 plug the USB mouse into either of the USB ports User Login Right click on screen and a pop up login box...

Page 31: ...atus bar will reveal automatically then click icon to switch image Full Screen Image when multi screen display move mouse cursor to a channel double click mouse left key to view Full screen double cli...

Page 32: ...input interface use mouse to click 123 to change input modes click and to move cursor click Select to confirm selection click Clear to delete the character in front of cursor Right click to quit the i...

Page 33: ...erwrite automatically setup Advanced General DVR name remote control number system time menu alpha VGA resolution auto logout circular monitor NTP time format setup and video format display User Add a...

Page 34: ...Fig 26 Status bar button function definition Icon Function Entering main menu Split screen mode switch Entering Manual Record dialog Entering Playback dialog Mute mode and cancel mute mode Cancel buz...

Page 35: ...lay the second channel in full screen mode Press again display 1 4 channels press again display 5 8channel press again display 9 screen Press again display the first channel in full screen mode So as...

Page 36: ...et into input interface in which to input the password Language can also be selected in this dialogue box For type 16 channel model page 6 password can be input immediately by press the number key in...

Page 37: ...n interface will pop up DVR will be Shutdown after inputting the username and the password correctly Method 2 Enter Main Menu Advanced Maintenance and select Shutdown to shutdown DVR Note After power...

Page 38: ...nputting Time Format Setting the time format and DST Please refer Fig 30 Note If you need to modify system time please close the record Fig 30 Time Format 12H and 24H is selectable Data Format yyyy mm...

Page 39: ...el name and display location can be modified Modify channel name move cursor to Name item box Press or on front panel to enter text input interface then channel name can be defined with uppercase or l...

Page 40: ...please move cursor to DVR name edit box and press or key to enter into input mode Note type 16 channel model page 6 can get into input interface by while other model by Details refer to section 4 chap...

Page 41: ...Section 7 HDD Management HDD State Inquiry Enter Main Menu Rec Alarm HDD as shown in Fig 32 Fig 32 Move cursor with and on the front panel and select item with and Auto Overwrite Select it and it will...

Page 42: ...verwrite function whether activate overwrite function when HDD is full Select on then system will overwrite the earliest recording when HDD is full Section 8 Recording Record Parameter Setup Enter Mai...

Page 43: ...ct CBR DVR will use the fixed bit rate to compress image Frame Rate Frame per second Quality Define the image quality There are 5 options Basic Medium Good High and Best High image quality needs high...

Page 44: ...c Alarm Schedule as shown in Fig 36 Fig 36 If user need to open the corresponding record or alarm the effective time should be set in this menu ALL means whole week Holiday means special date the holi...

Page 45: ...en power is off Click manage to get into holiday menu as fig 38 Fig 38 Move cursor to one record with or on the front panel then move to the Del box Press ENTER to delete the record Recording Alarm Se...

Page 46: ...port for setup Open This is sensor type Alarm Out Activate alarm out or not Rec CH When external alarm activated relevant channel can be selected to record if recording period has been setup in Alarm...

Page 47: ...press number 2 key to cancel chose area and press number 1 key to recover chose area Rec CH When alarm activated relevant channel can be selected to record if recording period has been setup in Alarm...

Page 48: ...l haven t this option Search Search the matched recorded files and display them in the list box If there is not matched file NO RECORD will be displayed in the list box Playback Playback the recorded...

Page 49: ...earch interface Note type 16 channel model and type model page 6 plug the USB mouse into either of the USB ports In searching box after moved cursor to a certain record section use left or right butto...

Page 50: ...e DVR Section 10 Network Setup Enter Main Menu Advanced Network as shown in Fig 42 Static DHCP Fig 42 Move cursor with and on the front panel and select item with and Mode Could choose Static DHCP or...

Page 51: ...connect it with internet Enter Platform to setup the IP address of P2P service provider Default server IP 60 191 28 165 and enable this function Access this server through IE and add the DVR which is...

Page 52: ...r in Host name option Username and Password user name and password registered in supplier s website Section 11 User Management Enter Main Menu Advanced User as shown in Fig 45 Fig 45 Move cursor with...

Page 53: ...ator s default authority PTZ control record management information view set parameter tools playback all channels and monitor all channels PS Detail refer to Authority Setup Modify the password for us...

Page 54: ...g 48 Authority PTZ Ctrl PTZ control Rec Manage General schedule and alarm recording parameter setting Start Stop manual recording and mute control Set Para General setting display setting PTZ setting...

Page 55: ...locked by itself and warning do not allowed to login any more Only Administrator can add user in DVR Normal user do not allow add any user And can not add same name user in one DVR Only Administrator...

Page 56: ...the pane Then use direction keys again to extend the pane This pane is the shelter area After you finish setup press ESC key to exit In the color mode menu is brightness is color is constrast is satu...

Page 57: ...set the same in all channels you can select ALL after finishing the setup of parameters of one channel The system will pop up a dialog box When pressing OK parameters setup for all channels will be a...

Page 58: ...tual situation user can adjust it by modify coefficient and correction Temperature or humidity value displayed coefficient value from transducer correction PTZ Control After the PTZ parameter is set c...

Page 59: ...lect the line of the cruise Setup Get into the interface as like Fig 59 to set line Stop Time The time which the camera stops in the cruise dot AUX setup Choose AUX to control lighting and screen wipe...

Page 60: ...nformation Log as shown in Fig 61 Fig 61 Move cursor with and on the front panel and select item with and Input start time and stop time and then move cursor to Search button and press ENTER key to st...

Page 61: ...x Display the remote user name State and IP address Use and key to move the cursor If user presses Enter key on one item in list box affirmation dialog box will appear When user selects Enter the syst...

Page 62: ...USB port of DVR after modification 2 Enter Main Menu Advanced Maintenance USB Upgrade as shown in Fig 64 Fig 64 Press OK to update system Cancel to give up update New firmware will be applied after re...

Page 63: ...higher Install DirectX9 0 or higher version adjust hardware acceleration to highest Section 3 Network Connection Operation 1 Insure DVR connect the network correctly 2 Using ping DVR IP check if the n...

Page 64: ...click the Local Setup Language at the lower right corner on the main interface The main interface shown as Fig 69 Fig 69 The main interface includes the following module 1 Login logout 2 Switch the im...

Page 65: ...e the video connect display remote setup only after login the system 4 The subtitle auto change Login to Logout after login the operation authority auto cancel after logout Switch the image view scale...

Page 66: ...en has the hover shortcut status bar on the top Provide local record and local image snap function PTZ Control Open the surveillance channel control the PTZ by control the PTZ Control status bar on th...

Page 67: ...split button 2 Screen split button will choose channel number by judging the equipment channel number As shown fig72 the 9 screen button unavailable when the equipment has 4 channels 8CH DVR can swit...

Page 68: ...Control modules Recording And Playback 1 Click entry Search Playback interface 2 Searching record select the start time channel number model click Search finds out the qualified record 3 Record playb...

Page 69: ...Alarm interface setup the remote DVR recording configuration reference to Recording Section8 Chapter 1 Basic record setup setup the channel resolution rate rate type frame rate image quality and auto...

Page 70: ...Click entry Advance Setup interface These configurations are corresponding to the Advance Setup in the menu in DVRs 1 System configuration take reference at Basic Parameter Setup Section6 Chapter 2 Ch...

Page 71: ...o email box SMTP is SMTP MAIL YAHOO COM support the IP input and DN domain name Input SMTP server ports Usually 25 e Authority select ON OFF Start SMTP email AMF Authentication Management Function avo...

Page 72: ...provide DVR system image file update web software update remote DVR reboot restore default factory default export Remote system configuration import remote system configuration shutdown system and do...

Page 73: ...on If the HDD is not detected by DVR the recording will sure not working 2 Please check whether there is available space of HDD left If not Please replace the HDD or set Yes in Rec Alarm HDD Auto Over...

Page 74: ...regsvr32 scrrun dll Press the enter 12 Connect DVR through DVR_WEB if the icon or caption can not be displayed you should close the IE and then install the DVR_WEB_XXXXX msi which burned in CD XXXXX i...

Page 75: ...elp to save valuable resources and prevent any potential negative effects on human health and the environment which could otherwise arise from inappropriate waste handling Please contact your local au...

Reviews: