background image

Installation    9


Table 3-4 Installation item list 

No. 

Item 

No. 

Item 

No. 

Item 


Mounting surface 


Expansion bolt 


Pedestal 


Self-tapping screw 


Device   


Enclosure 

  Slightly squeeze the enclosure

  and take the pedestal

  off. 

Step 1

  Confirm the position of screw holes (and the cable outlet hole if it needs to go through 

Step 2

the mounting surface

) and drill them on the mounting surface

, and then insert the 

expansion bolts

 in the screw holes. 

  Align the screw holes on the pedestal

 to those on the mounting surface

, and then 

Step 3

pull the cable out through mounting surface or the side cable tray. Attach the pedestal

  to the mounting surface

 with the self-tapping screws

  Put the enclosure

  back on, and then connect the device

  to power source and the 

Step 4

XVR device, and the live view screen is displayed. 

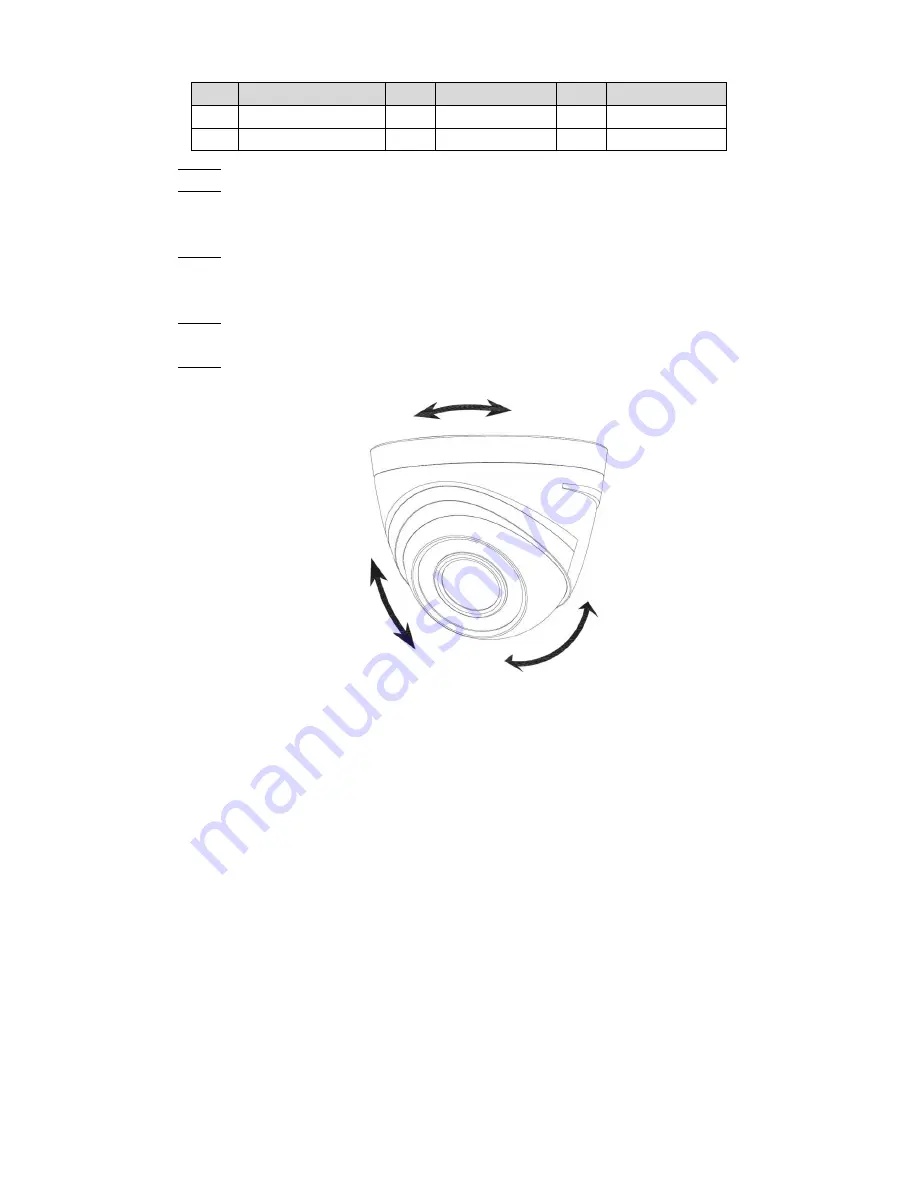
  Aim the lens to the ideal angle, see Figure 3-8. 

Step 5

 Model D adjustment 

Figure 3-8


Summary of Contents for Lite series

Page 1: ...HDCVI Eyeball Camera Lite User s Manual V1 0 0...

Page 2: ...controller you might collect personal data of others such as face fingerprints car plate number Email address phone number GPS and so on You need to be in compliance with the local privacy protection...

Page 3: ...ations description or errors in print If there is any doubt or dispute please refer to our final explanation Upgrade the reader software or try other mainstream reader software if the Guide in PDF for...

Page 4: ...y or responsibility for all the fires or electrical shock caused by improper handling or installation Environment Do not aim the device at strong light to focus such as lamp light and sun light Transp...

Page 5: ...rwise it might damage the device When the camera is in the condition of PoC power supply do not connect any other device between the camera and PoC transceiver including UTC Balun optical transceiver...

Page 6: ...imits are designed to provide reasonable protection against harmful interference in a commercial environment Operation of this equipment in a residential area is likely to cause harmful interference i...

Page 7: ...mension 2 2 1 Cable 3 2 2 3 Installation 5 Installing Model A 5 3 1 Installing Model B 1 and Model B 2 6 3 2 Installing Model C 7 3 3 Installing Model D 8 3 4 Installing Model E 10 3 5 Installing Mode...

Page 8: ...able to cover the high definition monitoring needs for locations with low ambient light including road warehouse underground parking lot bar pipeline and gas station Features 1 2 720p series support o...

Page 9: ...Design 2 2 Design Dimension 2 1 Model A mm in Figure 2 1 Model B 1 and Model B 2 mm in Figure 2 2 Model C mm in Figure 2 3 Model D mm in Figure 2 4...

Page 10: ...odel G 1 and Model G 2 mm in Figure 2 7 Cable 2 2 Cable type might vary with different cameras and the actual product shall prevail Cable list Figure 2 8 For more information about cable ports see Tab...

Page 11: ...amage could occur if power is not supplied correctly Video Output Connects to XVR to output video signal Audio Input Connects to sound pick up devices to receive audio signal DIP Switch Dial switches...

Page 12: ...pedestal counterclockwise to take it off Step 1 Confirm the position of screw holes and the cable outlet hole if it needs to go through Step 2 the mounting surface and drill them on the mounting surf...

Page 13: ...Pedestal Self tapping screw Device Locking screw Enclosure Loosen the locking screw with the supplied wrench and take the pedestal off Step 1 Confirm the position of screw holes and the cable outlet h...

Page 14: ...gure 3 4 Installing Model C 3 3 Model C installation Figure 3 5 Table 3 3 Installation item list No Item No Item No Item No Item Mounting surface Expansion bolt Pedestal Self tapping screw Device Encl...

Page 15: ...th the self tapping screws Put the fixing ring and the enclosure back on to the hold the device and then Step 4 connect the device to power source and the XVR device and the live view screen is displa...

Page 16: ...rill them on the mounting surface and then insert the expansion bolts in the screw holes Align the screw holes on the pedestal to those on the mounting surface and then Step 3 pull the cable out throu...

Page 17: ...l them on the mounting surface and then insert the expansion bolts in the screw holes Align the screw holes on the pedestal to those on the mounting surface and then Step 3 pull the cable out through...

Page 18: ...o take Step 1 the fixing ring off Slightly squeeze the enclosure and take the pedestal off Step 2 Confirm the position of screw holes and the cable outlet hole if it needs to go through Step 3 the mou...

Page 19: ...oning map Expansion bolt Pedestal Self tapping screw Device Locking screw Enclosure Loosen the locking screw with the supplied wrench and take the pedestal off Step 1 Confirm the position of screw hol...

Page 20: ...odel G 1 is different from which of model G 2 Step 5 For model G 1 1 Aim the lens to the ideal angle and then fasten the locking screw see Figure 3 14 Model G 1 and Model G 2 adjustment Figure 3 14 2...

Page 21: ...er of the coaxial port on XVR will display at the lower left corner of each window to indicate the corresponding camera Interfaces of different XVR might vary and the actual product shall prevail Open...

Page 22: ...screen Setting Audio Input 4 2 Audio signal acquisition is available on select models In the Main Menu interface Figure 4 2 select CAMERA ENCODE Encode Step 1 The Encode setting interface is displaye...

Page 23: ...to save the settings Step 5 The Encode setting interface is displayed Figure 4 3 In the Encode setting interface Figure 4 3 click Apply Step 6 Operating OSD Menu 4 3 The OSD menus of different cameras...

Page 24: ...re 4 7 For the function of the buttons in the MENU OPERATION panel see Table 4 1 Table 4 1 Menu Operation panel function Button Function Button Function Enter or confirm an item Select item Exit OSD m...

Page 25: ...siccant Maintaining Lens and Mirror Surface The lens and mirror surface are covered with antireflection coating which could be contaminated or damaged and result in lens scratches or haze image when b...

Reviews: