User’s Manual
36
Select
All
or the check box of any other day, and the set time period will apply
to the selected days.
You can set 6 time periods per day.
Click
Save
to return to the
Region
interface.
Configure parameters as needed. For details, see Table 4-4. For alarm rules of different
regions, see Table 4-5.
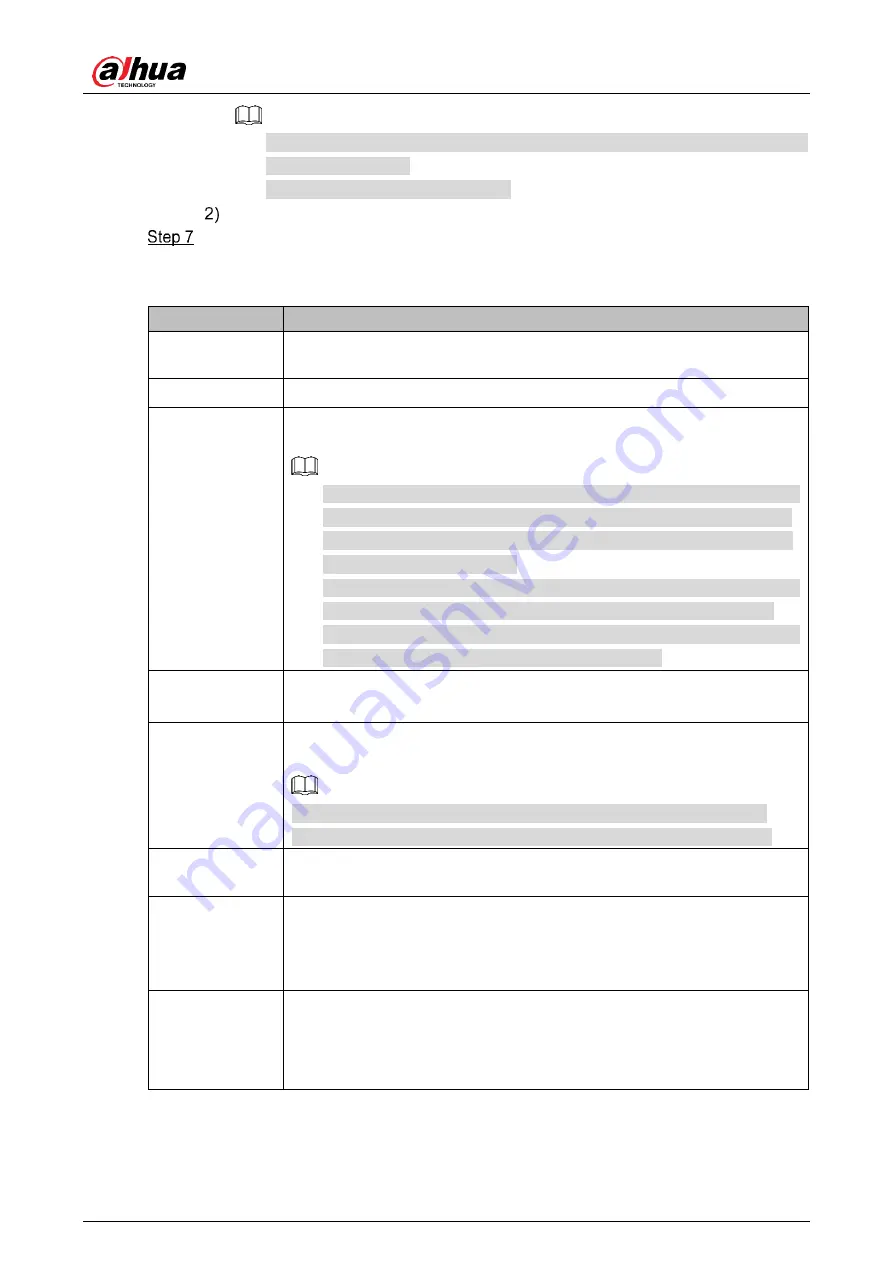
Table 4-4
Region management parameter descriptions
Name
Description
Period
Click
Setup
to set the arming period, and the alarm can only be triggered
when it occurs during the defined period.
Region Filter
Select monitoring target to be filtered from
Human
and
Vehicle
.
Record
By selecting
Record
, the system will record automatically when the alarm
is triggered.
Before enabling this function, you need to configure record period in
Setting >
Storage > Schedule > Record
. For details, see "4.4.1.1
Record Schedule." In
Setting > Storage > Record Control
, select
Auto
for the
Record Mode
.
When the alarm track is enabled, the radar will control the camera to
record, and the record rules of the camera are invalid. When the
alarm track is disabled, the radar will not control the camera, and the
camera will record under its own recording rules.
Record Delay
The alarm record keeps running for the defined time (from 10 s to 300 s)
after the alarm is ended.
Relay-out
By selecting
Relay-out
, the corresponding alarm output device will be
linked through alarm output port when the alarm is triggered.
Five alarm output ports. No.5 is connected to the high power device.
300/450 m radar does not support alarm from strong current devices.
Alarm Delay
The alarm keeps running for the defined time (from 10 s to 300 s) after
the alarm is ended.
Send Email
By selecting
Send Email
, the system automatically sends email to the
specified mailbox when the alarm is triggered. You can configure the
mailbox in
Setting > Network > SMTP (Email)
. For details, see " 4.2.5
Snapshot
By selecting
Snapshot
, the system automatically captures images when
the alarm is triggered. You can configure the snapshot taking period in
Setting > Storage > Schedule > Snapshot
. For details, see "4.4.1.2
Summary of Contents for DH-PFR4K-D300
Page 31: ...User s Manual 25 Channel title Time title...
Page 32: ...User s Manual 26 OSD information Font...
Page 101: ...User s Manual...


