4 issue 5
2. How to light and operate
2:1
Lighting the Pilot.
You will find this operation quite simple if you
Refer to Fig 2:1 showing the Buttons on the
Remote Control Handset and read this section
Before Lighting the Fire.
Open the outer door of the fire and the
control
can be
seen at the base of the fire.
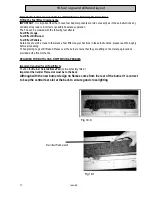
Making reference to figure 2:1a familiarise yourself with
the knobs.
First check that
Control knob ‘B’
is set at the maximum
setting.
Secondly check that
Control knob ‘A’
is set at the off
position as shown in the picture.
It will be necessary to see the pilot and it is visible at
the front left centre of the fuel bed, see
Fig 2:1b.
To light the pilot turn
Knob ‘A’
to the
Pilot Ignition
Star Setting
and keep the knob pushed in for
5
seconds
before turning the knob further to operate
the
Piezo Igniter
.
You will hear a click and see a spark at the pilot and
the pilot should light.
If it does not light turn the knob back to off setting and
repeat the operation. (This may take several attempts
on the first lighting).
Pilot position shown above at cut out on left
side Fig 2:1b
SAFETY: -
The fire is fitted with a flame supervision and atmosphere sensing device (Oxy pilot) that will shut off the gas
supply if the pilot light should go out for any reason. It will extinguish the pilot light if the oxygen content in the room falls
below a prescribed level.
If the pilot light keeps going out seek expert help.
2:0
WARNING: -
If the fire is extinguished and the control is
not
in the
off position
, the control should Be returned to the off
position and no attempt should be made to relight the fire until 3 minutes have Elapsed. If the pilot cannot be relit seek expert
help.
The batteries required to operate the control system should have been fitted by the installer
The Installer may have left the fire at the pilot setting and it is important that you read the
Section headed ‘Lighting the Pilot’ if you decide to turn off the pilot and prefer to relight it each time You use the fire.


