24 issue 5
Or
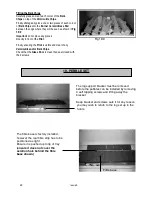
For Pebbles
For Pebbles remove and separate into the 3 different sizes.
Collect and Remove the Vermiculite Chips.
Lift the Burner Matrix Pad out of the Burner.
Note: Have you isolated the gas supply?
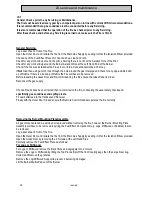
Disconnect the gas-tubing nut to the side of the Isolation Elbow and move the pipe clear of the Control.
Disconnect the Receiver:
disconnect the receiver by removing the electrical connectors from the upper Left Hand
corner of the Main Control.
remove and retain
The 6 screws securing the Burner Mounting
Plate Assembly.
Whilst lifting the Assembly at the rear, rotate it towards you and remove it from the Fire taking care not to foul the
Side Liners of the fire.
All gas carrying parts are now accessible for servicing or replacement.
For refitting follow the above Instructions in reverse order.
Ensure you replace the fuel pieces following the relevant instructions
23:2
Removing the Fire.
Note: This should only be required for removal of Debris or to check the condition of the Flue/Chimney.
The fire is installed into a special Wall Sealing Frame so that the wall fixing/cladding will not need to be disturbed
when the fire is removed.
Lay a dust sheet in front of the Fire.
Open the Outer Door and Isolate the fire from the Main Gas Supply by sealing it off at the Isolation Elbow provided.
Remove the
Outer Door
by removing the
Hinge Pins
on the Right Hand side see
Page 16
Fig 17:2
Open the
Glass Door
by removing the 2 Socket Screws at the Left Hand Side
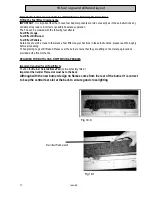
Carefully remove the fuel effect pieces as follows:
For Logs or Driftwood.
For Logs or Driftwood remove the Bark Chips and segregate into 2 colours.
Remove the Logs or Driftwood by lifting the Top Pieces first off the front locating pegs then the Large Rear Log.
Collect and Remove the granules.
Remove the Log/Driftwood Support to prevent it becoming damaged
Lift the Burner Matrix Pad out of the Burner.


