background image

Page 7 

3 Megapixel IP Camera User Manual
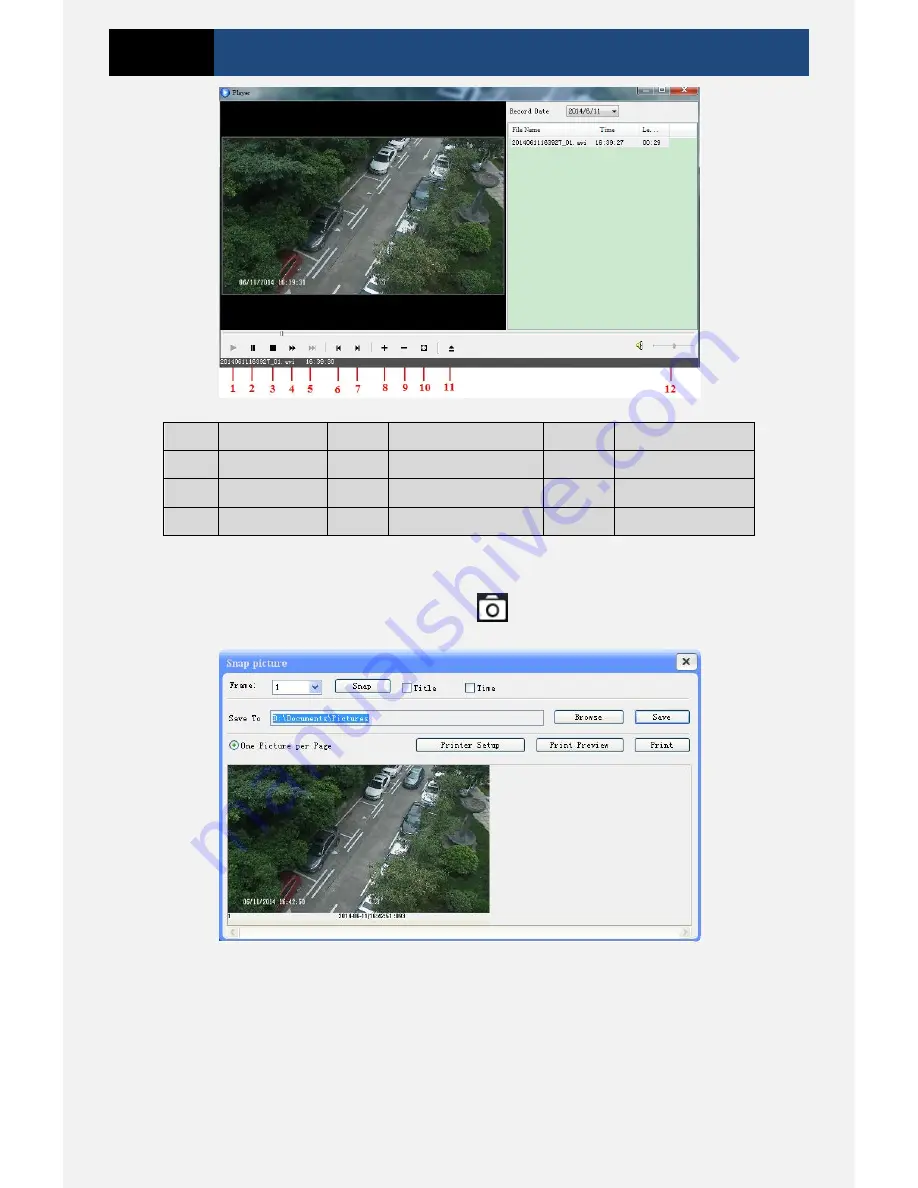


Play 

Next frame 

Zoom out 

Pause 

The previous file 

10 

Full screen 

Stop 

The next file 

11 

Path 

Forward 

Zoom in 

12 

  Volume 


3.3


Snap Pictures 

Select the picture number and then click “Snap” 

  icon as shown below. 


Single Snap 


User  can  snap  multiple  pictures.  Select  the  picture  number  from  Frame  pull  down  list  box, 
such as 2, and check “Title” and “Time” to show capture title and time on the snap pictures 
simultaneously.   


Summary of Contents for CD45IRIP-9531

Page 1: ...Water Proof Network Camera U Us se er r M Ma an nu ua al l Please read this manual carefully for correct use of the product ...

Page 2: ...received Do not operate it incase temperature humidity and power supply are beyond the limited stipulations Keep away from heat sources such as radiators heat registers stove etc Do not expose the product to the direct airflow from an air conditioner This is product instructions not quality warranty We may reserve the rights of amending the typographical errors inconsistencies with the latest vers...

Page 3: ...figuration 10 4 2 2 Video Stream 10 4 2 3 OSD Configuration 11 4 2 4 Video Mask 12 4 2 5 ROI Configuration 12 4 3 Alarm Configuration 13 4 3 1 Motion Detection Area 13 4 3 2 Motion Detection Trigger 14 4 3 3 Motion Detection Schedule 15 4 4 Network Configuration 15 4 4 1 Port 15 4 4 2 IP Address 16 4 4 3 Server Configuration 16 4 4 4 IP Notify 17 4 4 5 DDNS Configuration 17 4 4 6 RTSP 18 4 4 7 UPn...

Page 4: ...this system more stable and reliable This product is widely used in banks telecommunication systems electricity power departments law systems factories storehouses uptowns etc In addition it is also an ideal choice for surveillance sites with middle or high risks Main Features 3MP 2048 1536 coding Max resolution 2048 1536 ICR auto switch true day night 3D DNR digital WDR ROI coding 10 20m IR night...

Page 5: ...the PC from the CD Double click the IP Tool icon on the desktop to run this software as shown below Modify the IP address The default IP address of this camera is 192 168 226 201 Click the information of the camera listed in the above table to show the network information on the right hand Modify the IP address and gateway of the camera and make sure its network address is in the same local networ...

Page 6: ... and password to log in 2 1 2 Directly Access through IE The default network settings are as shown below IP address 192 168 226 201 Subnet Mask 255 255 255 0 Gateway 192 168 226 1 HTTP 80 Data port 9008 You may use the above default settings when you log in the camera for the first time Manually set the IP address of the PC and the network segment should be as the same as the default settings of t...

Page 7: ...browser and input the default address of IP CAM and confirm The IE browser will download Active X control automatically After downloading Active X control the login dialog box will pop up Input the default username and password and then enter to view 2 2 WAN Take access the camera by the router or virtual server for example Make sure the camera is well connected via LAN and then log in the camera ...

Page 8: ...number Go to Config Network Config IP Address menu to modify the IP address Go to the router s management interface through IE browser to forward the IP address and port of the camera in the Virtual Server Port Setup IP Setup Router Setup Open the IE browser and input its WAN IP and http port to access ...

Page 9: ...le click or click right mouse to return to the previous interface Online user Display the current user connecting to the device System information Display the device information device name firmware version software build date kernel version and hardware version 3 2 Record Playback Before you play the record files please make sure you have recorded You may click button to record Then click button ...

Page 10: ...xt file 11 Path 4 Forward 8 Zoom in 12 Volume 3 3 Snap Pictures Select the picture number and then click Snap icon as shown below Single Snap User can snap multiple pictures Select the picture number from Frame pull down list box such as 2 and check Title and Time to show capture title and time on the snap pictures simultaneously ...

Page 11: ... User Manual Multi picture Snap Click Browse to set saving path Click Save to save pictures to HDD on the computer Click Printer setup to set the printer and print the snap pictures drag the scroll bar to view all snapped pictures ...

Page 12: ...uration includes two submenus Basic Information and Date Time 4 1 1 Basic Information In the basic information interface user can set up the device name and also can check the relative information of the server Setting steps 1 Clicking the Config icon will appear the menu list 2 Clicking the Basic Information will pop up a window as shown below 3 Input the name of the device in the Device name tex...

Page 13: ...ing steps 1 Go to Video Configuration Camera interface as shown below 2 You may adjust frequency brightness contrast hue and saturation of the picture 3 Select white balance mode 4 Wide dynamic sharpen and denoise are adjustable 5 You can also set day night mode and enable the image mirror and image overturn function 6 Press the Save button to save the settings 4 2 2 Video Stream Go to Video confi...

Page 14: ... choose the more bitrate will be required Bitrate Please choose it according to the actual network situation I Frame interval It is recommended to use the default value If the value is over high the read speed of the group of pictures will be slow resulting in the quality loss of the video Video encoding profile Baseline main and high profile are optional Baseline profile is mainly used in interac...

Page 15: ...k color 2 Click Draw button and then drag the mouse to draw the video mask area 3 Click Save button to save the settings 4 Return to the live to see the following picture Clear the video mask Go to video mask menu and then click Clear button to delete the current video mask area 4 2 5 ROI Configuration To set up ROI 1 Go to Config ROI Config menu ...

Page 16: ...4 3 Alarm Configuration Alarm configuration includes three submenus Motion Detection Area Motion Detection Trigger and Motion Detection Schedule 4 3 1 Motion Detection Area 1 Go to Alarm configuration Motion Detection Area to see an interface as shown below 2 Move the Sensitivity scroll bar to set up the motion trace sensitivity 3 Check Add press the Ctrl button and move mouse to select the motion...

Page 17: ...e will be activated 3 Trigger Email Check Attach picture and select email addresses in the Receival email address text box Email address shall be set first in the Mail config interface Then the triggered snap pictures will be sent into those addresses User can also define the subject and content of the email 4 Trigger FTP Check Uploading picture Then the triggered snap pictures will be sent into F...

Page 18: ...e holiday schedule Day schedule User could set alarm time for alarm at a certain time of special day such as holiday 1 Select a date at the Date pull down list press Add button to add that date to the list box on the right side and then move the scroll bar to set the schedule of that day 2 Select a date in the list box on the right side and press Erase to remove the schedule on that day Press the ...

Page 19: ...llowing IP address You may choose one of options as required 3 Use the following IP address display the IP address subnet mask gateway and DNS of the device 4 PPPoE User needs to manual input the user name and password for dial up internet Firstly log in IE clients and then enter user name and password of PPPoE save the setting and exit Secondly set up IP address change notice Thirdly connect with...

Page 20: ...nd device ID in the relevant boxes 4 Click Save button to save the settings 4 4 4 IP Notify 1 Go to Network Configuration IP Notify to see a tab as shown below 2 If the Enable notifying change of IP is selected when the IP address of the device is changed a new IP address will be sent to the appointed mailbox automatically If FTP is selected when the IP address of the device is changed a new IP ad...

Page 21: ... shown below Create domain name After you successfully request your domain name you will see your domain in the list 3 Select the server type and then input the username password and domain name you apply for in the DDNS configuration interface 4 Click Save button to save the settings 4 4 6 RTSP Go to Network Configuration RTSP interface as shown below ...

Page 22: ...enable anonymous viewer login 4 4 7 UPnP Go to Network Configuration UPnP interface as shown below Select Enable UPnP and then input friendly name Then double click Network icon on the desktop of the PC to see an icon with the friendly name and IP address of the camera You may quickly access the device by double clicking this icon 4 4 8 Mail Setting Go to Network Configuration Mail Setting interfa...

Page 23: ...rk Configuration FTP interface as shown below 1 Add Click Add button to input FTP server s server name address port number user name password and upload path Then click OK to confirm the setting 2 Modify Click this button to change the information of the FTP server 3 Delete Select a FTP account and click this button to delete this account 4 Test Select a FTP account and click this button to test i...

Page 24: ...rd textbox letters or numbers 4 Input the MAC address of the PC in Binding MAC address textbox 5 Click OK button and then the new added user will display in the user list Modify user 1 Select the user you want to modify password and physical address in the user configuration list box 2 Clicking Modify button will pop up Modify user dialog box as shown below Modify User 3 Input original password of...

Page 25: ... the IP address list box and click Delete button to delete that IP address 4 Check Enable MAC address check box select Deny the following IP address input MAC address in the MAC address list box and click Add button Then this MAC address will display in the list box the operation step of Allow the following MAC address is the same as that of Deny the following IP address 5 Select the MAC address y...

Page 26: ...ore all system settings to the default status 4 5 4 Reboot Device Go to Advanced configuration Reboot device to see an interface as shown below Click Reboot device button to reboot the device 4 5 5 Upgrade Go to Advanced Configuration Upgrade interface as shown below 1 Click Browse button to select the save path of the upgrade file 2 Click Upgrade server firmware button to start upgrading the appl...

Page 27: ...Web port number has been revised contact administrator to get the correct port number D Exclude the above reasons Recover default setting by IP Tool Note Default IP 192 168 226 201 mask number 255 255 255 0 Q IP tool cannot search devices why A It may be caused by the anti virus software in your computer Please exit it and try to search device again Q IE cannot download ActiveX control How can I d...

Page 28: ...ther plug ins or anti virus blocks ActiveX Please uninstall or close them Q No sound can be heard why A Audio input device is not connected Please connect and try again B Audio function is not enabled at the corresponding channel Please check AUDIO item to enable this function ...

Page 29: ...720 1 10fps D1 1 30fps CIF 1 30fps CIF 1 30fps 480 240 1 30fps Image Settings Saturation Brightness Chroma Contrast Wide Dynamic Sharpen NR etc adjustable through client software or web browser ROI Support Interface Network RJ45 Function Remote Monitoring IE browsing CMS remote control Online Connection Support simultaneous monitoring for up to 10 users Support multi stream real time transmission ...

Reviews: