Chapter
8
Hardware RAID setup
◆Troubleshooting
●The OS does not boot.
・Check if switches 1 to 8 of S1 (DIP switches) are all OFF.
If not, after setting them all to OFF, turn on the power again.
・Check that the cables are properly connected.
・Check the LED on the mirror card.
If the status of the LED indicates normal, there may be a problem in the software,
such as the OS.
※For more on the position and status of the LED, refer to This Chapter “Internal
LED status”.
●After replacement of HDDs, rebuilding does not start.
・Check that the replacement HDD is good.
・Check the capacity of the replacement HDD.
If the capacity of the replacement HDD is smaller than that of the other HDD, it cannot
be rebuilt.
In addition, even when the capacity is the same, if the make and model are different,
rebuilding the HDD may not be possible due to differing specifications. Therefore,
a replacement HDD must be of the same make and model as the previous HDD.
・If the replacement HDD was used in another RAID system, its configuration information
may be different due when combined with the mirror card.
In that case, follows the following steps.
<Steps>
1.
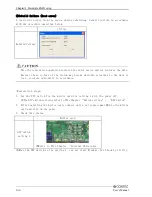
Set the DIP switch for the mirror card for setting 1 with the power off.
※The DIP switch setteing refer to This Chapter “Switch setting” – “DIP switch”.
2.
After installing the mirror card, connect only a not replacement HDD to the mirror
card and turn on the power.
3.
check that the Access LED on the mirror card flashes orange.
※Check visually the mirror card LED.
For more on the status of the mirror card LED, refer to This Chapter “Internal
LED status”.
4.
Turn off the power and set the DIP switch for the mirror card to normal status.
※How to set the DIP switch of the mirror card are the same as step 1 of this procedure.
5.
After installing the mirror card, turn on the power.
6.
Connect the replaced good HDD to an empty drive attached to the mirror card and the
rebuilding is started.
●Both HDDs are broken.
・Prepare two good HDDs and perform recovery.
User’s Manual
133

