Chapter 2 Operating Principles
2-1.
Operation of Each Mechanism
CL-E700 series
2-8
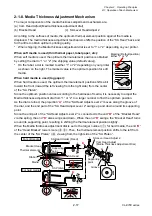
2-1-3. Label/Tag Detection Mechanism
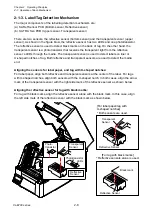
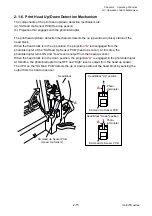
The major components of the label/tag detection mechanism are:
(a) SA Ref Sensor PCB (Bottom sensor, Reflective sensor)
(b) SA TRA Sen PCB (Upper sensor, Transparent sensor)
There are two sensors, the reflective sensor (bottom sensor) and the transparent sensor (upper
sensor). As shown in the figure blow, the reflective sensor has two LEDs and one phototransistor.
The reflective sensor is used to detect black marks on the back of tag. On the other hand, the
transparent sensor is a phototransistor that receives the transparent light from the reflective
sensor’s LEDs through the media. The transparent sensor is used to detect labels on liner or
U-shaped notches of tag. Both reflective and transparent sensors are used to detect the media
end.
Aligning the sensors for label paper, and tag with U-shaped notches:
For label paper, align both reflective and transparent sensors at the center of the label. For tags
with U-shaped notches, align both sensors with the U-shaped notch. In both cases, align the arrow
mark of the transparent sensor with the right side mark of the reflective sensor as shown below.
Aligning the reflective sensor for tag with black marks:
For tag with black marks, align the reflective sensor alone with the black mark. In this case, align
the left side mark of the reflective sensor with the black mark as shown below.
Phototransistor
LEDs
Photo-
transistor
Transparent
Sensor
Reflective
Sensor
[For label paper/tag with
U-shaped notches]
* Both sensors are used.
[For tag with black marks]
* Reflective sensors alone is used.
Transparent
Sensor
Reflective Sensor
Black mark
Reflective Sensor
Summary of Contents for CL-E700 Series
Page 1: ...Technical Manual CL E700 series Thermal Transfer Printer...
Page 5: ...Chapter 1 Specifications 1 1 CL E700 series CHAPTER 1 SPECIFICATIONS...
Page 15: ...Chapter 2 Operating Principles 2 1 CL E700 series CHAPTER 2 OPERATING PRINCIPLES...
Page 87: ...Chapter 3 Disassembly and Maintenance 3 1 CL E700 series CHAPTER 3 DISASSEMBLY AND MAINTENANCE...
Page 151: ...Chapter 4 Troubleshooting 4 1 CL E700 series CHAPTER 4 TROUBLESHOOTING...
Page 167: ...Chapter 5 Parts Lists CL E700 series CHAPTER 5 PARTS LISTS...
Page 172: ...Chapter 5 Parts Lists CL E700 series 5 6 DRAWING NO 1 General Assembly Rev 0...
Page 195: ...Chapter 5 Parts Lists 5 29 CL E700 series DRAWING NO 7 Unit Opepane Rev 0...
Page 203: ...Chapter 5 Parts Lists 5 37 CL E700 series DRAWING NO 9 SA2 Ribbon Unit Fan Rev 0...
Page 206: ...Chapter 5 Parts Lists CL E700 series 5 40 DRAWING NO 10 Accessories Rev 0 3 2 4 1 1 1 2 1 3...
Page 208: ...Chapter 6 Circuit Diagrams 6 1 CL E700 series CHAPTER 6 CIRCUIT DIAGRAMS...
Page 230: ...Appendices AP 1 CL E700 series APPENDICES...
Page 233: ...Appendices A Mounting Diagrams CL E700 series AP 4 2 Solder side...

