background image

Configuring the PVC2300 and WVC2300 Cameras

Setup > Basic Setup

Cisco PVC2300 and WVC2300 Internet Video Cameras with Audio Administration Guide

67

8


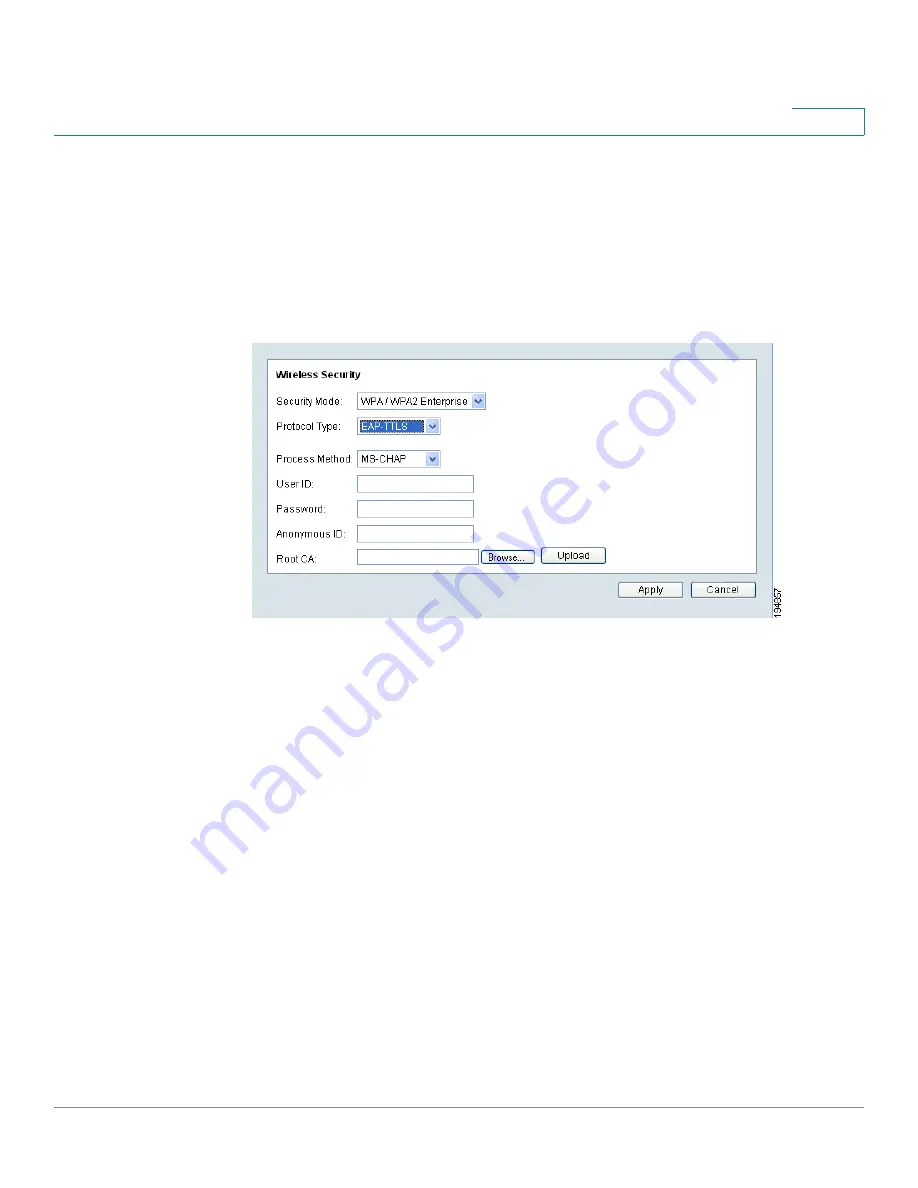
EAP-TTLS

With EAP-TTLS you choose the authentication protocol (MS-CHAP V2, MS-CHAP, 
PAP, EAP-MD5) to transfer the CA to the RADIUS server. You will also enter the 
User ID, Password, and Anonymous ID for the RADIUS server and choose where 
the camera should check for the server certificate.

WPA/WPA2 Enterprise (EAP-TTLS)

Process Method

—Choose an authentication method (MS-CHAP, MS-

CHAPv2, PAP, EAP-MD5) as required to handle the processing and 
transmitting of the CA to your RADIUS server. 

User ID

—The user ID used for login to your RADIUS server.

Password

—This camera’s client login to the RADIUS server and must 

match the key stored on the RADIUS server.

Anonymous ID

—The unsigned public ID used for login to your RADIUS 

server.

Root CA

—A root certificate is an unsigned public key certificate, or a self-

signed certificate, which implies that you trust your browser’s publisher to 
include correct root certificates, and in turn the certificate authorities it 
trusts, and anyone to whom the CA may have issued a certificate-issuing-
certificate, to faithfully authenticate the users of all their certificates. 

Summary of Contents for PVC2300 - Small Business Internet Video Camera

Page 1: ...Cisco Small Business PVC2300 and WVC2300 Internet Video Cameras with Audio ADMINISTRATION GUIDE ...

Page 2: ...ress Cisco Systems Cisco Systems Capital the Cisco Systems logo Cisco Unity Collaboration Without Limitation EtherFast EtherSwitch Event Center Fast Step Follow Me Browsing FormShare GigaDrive HomeLink Internet Quotient IOS iPhone iQuick Study IronPort the IronPort logo LightStream Linksys MediaTone MeetingPlace MeetingPlace Chime Sound MGX Networkers Networking Academy Network Registrar PCNow PIX...

Page 3: ...twork Layout 6 Additional Security Tips 6 Security Threats Facing Wireless Networks 7 Chapter 3 Getting to Know the PVC2300 and WVC2300 Cameras 9 Front Panel 9 Ready LED Amber 10 Network LED Green 10 Lens 10 Built in Microphone 10 Back Panel 11 Antenna Connectors 11 Reset 12 Ethernet 12 Activity LED 13 PVC2300 PoE LED 13 Power 14 GPIO 14 Mic In 14 Spkr Out 14 Side Panel 14 Chapter 4 Connecting the...

Page 4: ...nnection on the WVC2300 Camera 39 Wired and Wireless Modes 46 Moving the Camera to Another Network 46 Chapter 6 Upgrading the Camera Firmware 48 Chapter 7 Using the Web Based Configuration Utility 51 Launching the Web Based Configuration Utility 51 Home 52 Refresh 52 Setup 53 Connected User 53 Log Out 53 About 53 Help 54 Video Options Icons 55 Setup 57 Chapter 8 Configuring the PVC2300 and WVC2300...

Page 5: ...inistration Users 73 Administrator 73 Demo 74 User List 74 Administration Maintenance 75 Restore Factory Defaults 75 Restart 75 Configuration 75 Administration Firmware 76 Firmware Upgrade 76 Audio Video Video 77 MPEG 4 Settings 77 MJPEG Settings 78 Mobile Settings 78 Video Adjustments 78 Options 79 Day Night Switch 80 Audio Video Audio 80 Audio Settings 81 Applications Mail 83 Primary SMTP Server...

Page 6: ...etection 89 Applications Event 91 Event Schedule 92 New Schedule 92 Trigger Event 92 Event Attachment 94 Applications DDNS 95 DDNS 95 Applications I O Ports 96 Input Ports 97 Output Ports State at Power On 97 Output Ports Manual Control 97 Applications RS 485 98 Port Settings 99 Preset Position 99 Patrol Sequence 99 Applications SMB CIFS 102 Status System 103 Status Image 104 MPEG 4 104 MJPEG 104 ...

Page 7: ... Patrol Sequence 111 Configuring E Mail Alerts 113 Scheduling an Event 115 Configuring Motion Detection Area and Sensitivity 116 Configuring Port Forwarding 117 Setting Security Precautions on the Cisco WVC2300 120 Appendix A Troubleshooting 122 Questions and Answers 122 Windows Help 125 TCP IP 125 Shared Resources 125 Network Neighborhood My Network Places 125 Appendix B WVC2300 Camera Bandwidth ...

Page 8: ...Cisco PVC2300 and WVC2300 Internet Video Cameras with Audio Administration Guide vi Contents Appendix D Where to Go From Here 138 ...

Page 9: ...he cameras use removable CS mount lenses and can be customized with Zoom Wide Angled Vari focal Auto Iris DC type or other type of lenses as required for the specific application The PVC2300 provides Power over Ethernet PoE functionality that facilitates installation of the PVC2300 in places out of reach of a power outlet The cameras can be remotely controlled through an RS 485 interface and mount...

Page 10: ...IP Multicast RTSP RTP and 3GPP video can be viewed from multiple endpoints and client applications like 3G phones and Quicktime clients on PCs or Wi Fi phones Support for multiple network protocols like 802 1p priority 802 1q VLANs and Dynamic DNS make the solution ideal for multiple IP surveillance applications The cameras can also be managed securely using HTTPS NOTE Before installing a surveill...

Page 11: ...4 class 3 GHz dual core Memory 1 GB Operating System Microsoft Windows 2000 XP or Vista Hard Drive 4 GB of available space Graphics Card NVidia high performance or equivalent with a minimum 256 MB Browser Internet Explorer 6 0 or later or Mozilla Firefox Model Number Camera Lens Mount Further Information CIVS IPC VT38 Tamron 3 8 mm Varifocal Lens CS Go to www cisco com go surveillance for accessor...

Page 12: ...ecifications Cisco PVC2300 and WVC2300 Internet Video Cameras with Audio Administration Guide 4 1 For more information about camera accessories see the Cisco Small Business Camera Accessories Installation and Administration Guide ...

Page 13: ...ing to each other through an access point An ad hoc configuration is computers with wireless capabilities communicating directly with each other Choosing between these two modes depends on whether or not the wireless network needs to share data or peripherals with a wired network or not If the computers on the wireless network need to be accessed by a wired network or need to share a peripheral su...

Page 14: ...r WRVS4400N as well as 802 11g access points including model number WAP4410N The camera can also communicate with network adapters such as the Wireless G Notebook Adapter model number WPC4400N for your laptop computers Wireless G PCI Adapter model numbers WMP200 for your desktop PCs and Wireless G USB Adapter model number WUSB200 for your computers that connect to the wireless network through USB ...

Page 15: ... in its firmware Your network administrator is the only person who can change network settings If a hacker learns the administrator s password he too can change those settings So make it harder for a hacker to get that information Change the administrator s password regularly SSID There are several things to keep in mind about the SSID Do not broadcast it Make it unique Change it often Most wirele...

Page 16: ...e Enterprise refers to using RADIUS server for authentication while RADIUS stands for Remote Authentication Dial In User Service This type of authentication requires some advanced expertise because it involves setting up a RADIUS server for authentication and in some cases creation of certificates for both the RADIUS server and the camera If you are using WPA WPA2 Enterprise security you will need...

Page 17: ...and WVC2300 Cameras This chapter describes the external features of the Cisco PVC2300 and WVC2300 Internet Video Cameras and includes the following sections Front Panel page 9 Back Panel page 11 Side Panel page14 Front Panel The LEDs camera lens and built in microphone are located on the front panel of the camera ...

Page 18: ...detected On Network connection detected Flashing Sending receiving data Lens The camera includes a removable CS mount lens For specifications on the included lens refer to Appendix C Specifications For a list of recommended lenses to use with this camera see Camera Lens Specifications on page 3 Also refer to the Cisco Small Business Camera Accessories Installation and Administration Guide Built in...

Page 19: ...3 Back Panel The ports and reset button are located on the back panel of the camera The following shows the back panel of the PVC2300 The following shows the back panel of the WVC2300 Antenna Connectors Antenna connectors are only found on the WVC2300 camera The connectors are used to attach the antennas to the device for wireless connectivity ...

Page 20: ...web based configuration utility for the camera Tips when using the default IP address If the camera is connected directly to your computer then your computer needs to be on the same subnet as the default IP address in order to access the configuration utility If you are using a router you may be on a different subnet such as 192 168 2 1 Ethernet The Ethernet port supports network speeds of either ...

Page 21: ...rnet cable while the camera is powered on does NOT switch the interface between wired and wireless In order to switch from wired to wireless or vice versa the power needs to be disconnected and reconnected to change from one mode to the other Disconnecting the Ethernet while power is on will merely disconnect the camera from the network Activity LED The Activity LED flashes when activity is detect...

Page 22: ...y turned off if a PoE connection is detected on the Ethernet port GPIO This port is utilized for I O connections Detailed specifications can be found in the Specifications section of this Administration Guide Mic In This jack is used to connect an external microphone to the camera Spkr Out This jack is used to connect powered speakers to the camera Side Panel The security slot is located on a side...

Page 23: ...tallation for the Cisco PVC2300 and WVC2300 Internet Video Cameras There are procedures for installing the camera into a wired or wireless network The following sections are included Cisco Wired Network page16 Cisco Wireless Network page17 Camera Installation Guidelines page18 Camera Hardware Installation page18 Adjusting The Lens page 22 Audio Options page 23 ...

Page 24: ...g the Camera Cisco Wired Network Cisco PVC2300 and WVC2300 Internet Video Cameras with Audio Administration Guide 16 4 Cisco Wired Network The following illustration provides an example of a Cisco wired network ...

Page 25: ...e Camera Cisco Wireless Network Cisco PVC2300 and WVC2300 Internet Video Cameras with Audio Administration Guide 17 4 Cisco Wireless Network The following illustration provides an example of a Cisco wireless network ...

Page 26: ... to avoid feedback The volume of the speaker and the background noise of the environment will determine the exact distance possibly up to one yard one meter away Cameras mounted outdoors should be installed in an IP66 certified enclosure to protect the camera from the elements while maintaining acceptable operating temperatures If an enclosure is used an external microphone is required for audio I...

Page 27: ...ne of the following ways Attach the swivel head directly to the stand base If an extension is necessary attach the camera extension to the stand base and then attach the swivel head to the extension STEP 3 Connect the camera stand to the bottom of the camera STEP 4 Adjust the camera to the appropriate viewing position and secure the camera in place by tightening the locknut ...

Page 28: ...n Guide 20 4 STEP 5 Connect the included Ethernet network cable to your network router or switch STEP 6 Connect the other end of the cable to the camera Ethernet port NOTE If your network switch provides Power over Ethernet PoE proceed to step 8 If you are not sure if the switch provides PoE refer to the switch documentation ...

Page 29: ...nnect the included power adapter to the Power port of the camera and insert the other end into a standard electrical outlet STEP 8 Verify that the camera LEDs are lit LED Color Activity Action Ready Amber Off Camera is powered off On Camera is powered on Blink Camera is booting Network Green Off Network connection not detected On Network connection detected Blink Sending and receiving data ...

Page 30: ...of the camera STEP 10 Place the antennas in an upright position Congratulations You have completed the camera hardware installation Continue with Chapter 5 Installing the Camera Software Adjusting The Lens The PVC2300 and WVC2300 Internet Cameras use an adjustable CS mount lens Adjust the focus by slowly rotating the camera Lens Focus clockwise or counterclockwise NOTE The resolution and video qua...

Page 31: ...EP 1 Connect the 3 5 mm input jack of your microphone to the MIC IN port on the camera s back panel The built in microphone will automatically be disabled STEP 2 Place the external microphone in an appropriate location To use an optional external speaker with the camera follow these steps NOTE The speakers need to be powered speakers like your computer speakers STEP 1 Connect the 3 5 mm jack of yo...

Page 32: ... Network Settings The Cisco PVC2300 and WVC2300 Internet Cameras can be set up using the Setup Wizard that is included on the product CD There are two ways to use the Setup Wizard 1 Launch the Setup Wizard from the CD Launching from the CD is useful if you do not want to install the software on your computer 2 Install the software on your computer This is useful if you want to install more cameras...

Page 33: ...rnet Video Cameras with Audio Administration Guide 25 5 To configure the basic camera and network settings follow these steps STEP 1 Insert the Setup CD into your CD ROM drive If the CD doesn t run automatically go to My Computer and click on your CD ROM drive STEP 2 The Welcome window appears Click Start 233915 ...

Page 34: ...etwork Settings Cisco PVC2300 and WVC2300 Internet Video Cameras with Audio Administration Guide 26 5 STEP 3 The License Agreement window appears Click Next if you agree STEP 4 The Wizard searches your network for your camera and displays a list of all cameras found ...

Page 35: ...Video Cameras with Audio Administration Guide 27 5 STEP 5 From the Camera Discovery window highlight the camera you want to configure and click Next If the camera you want to configure is not displayed in the Selection box enable UPnP on your computer as described in Appendix A Troubleshooting and click Search Again ...

Page 36: ...o Administration Guide 28 5 STEP 6 When prompted type admin in both the Administrator Name and Administrator Password fields The default user name and password is admin Click OK NOTE For security purposes it is recommended that you change the password using the camera s web based utility at a later time See Administration Users on page 73 ...

Page 37: ...on Enter a description up to 32 characters in length with additional information such as the location of the camera Time Zone Select the time zone that corresponds with the camera s location Date Enter the current date This sets the camera s calendar date and the information is used when the date stamp is referenced in the image captures Time Enter the current time This sets the camera s clock and...

Page 38: ...300 and WVC2300 Internet Video Cameras with Audio Administration Guide 30 5 STEP 9 In the Network Settings window select Static IP address from the drop down list if you want to assign the IP address Otherwise leave the default setting as Obtain An IP Address Automatically DHCP and click Next ...

Page 39: ...ing the Basic Camera and Network Settings Cisco PVC2300 and WVC2300 Internet Video Cameras with Audio Administration Guide 31 5 STEP 10 The current settings of the camera are displayed Make any changes needed for your network and click Next ...

Page 40: ...ring the Basic Camera and Network Settings Cisco PVC2300 and WVC2300 Internet Video Cameras with Audio Administration Guide 32 5 STEP 11 From the Review Camera Settings window click Next to confirm the settings or click Back to make changes ...

Page 41: ...twork Settings Cisco PVC2300 and WVC2300 Internet Video Cameras with Audio Administration Guide 33 5 STEP 12 From the Confirm Settings window click OK to continue or Cancel to close the Confirm Settings window When Cancel is clicked you can click Back to make changes ...

Page 42: ...lling the Camera Software Configuring the Basic Camera and Network Settings Cisco PVC2300 and WVC2300 Internet Video Cameras with Audio Administration Guide 34 5 When OK is clicked the new settings are saved ...

Page 43: ...ring the Basic Camera and Network Settings Cisco PVC2300 and WVC2300 Internet Video Cameras with Audio Administration Guide 35 5 STEP 13 A dialog box appears indicating that the configuration has been saved successfully Click OK to continue ...

Page 44: ...d Network Settings Cisco PVC2300 and WVC2300 Internet Video Cameras with Audio Administration Guide 36 5 STEP 14 Congratulations Your camera is now configured Click Finish to complete the process STEP 15 The PVC2300 or WVC2300 Internet Camera Home window launches ...

Page 45: ... Internet Video Cameras with Audio Administration Guide 37 5 STEP 16 When prompted enter admin in both the User name and Password fields on the login window The default username and password is admin STEP 17 Internet Explorer prompts you to install ActiveX In order to view video you must accept the ActiveX ...

Page 46: ...he Camera Software Configuring the Basic Camera and Network Settings Cisco PVC2300 and WVC2300 Internet Video Cameras with Audio Administration Guide 38 5 STEP 18 Click Install ActiveX Control STEP 19 Click Install ...

Page 47: ...era for wireless connectivity follow these steps STEP 1 Click Setup in the toolbar to open the Setup Basic Setup window STEP 2 Enter the appropriate Wireless Settings SSID The SSID is the network name shared among all devices in a wireless network Enter the network s SSID or network name here The SSID is case sensitive Default is ciscosb Network Type Select the appropriate network mode Infrastruct...

Page 48: ...eless Security window STEP 3 From the Wireless Security window select the drop down list from Security Mode to select the appropriate option based on your wireless network configuration Disabled No security is implemented on your wireless network Data is not encrypted before transmission WEP WEP is a basic encryption method that is not as secure as later methods such as WPA Personal or WPA2 Person...

Page 49: ...ode option WEP TX Key Select the number of the key used for the wireless network WEP Encryption Select the appropriate option for key length based on your network settings Passphrase Type in the passphrase used to generate WEP keys for your network and click Generate Key 1 4 Key values can be entered in manually or generated from a passphrase Authentication Select the appropriate authentication ty...

Page 50: ...VC2300 Internet Video Cameras with Audio Administration Guide 42 5 WPA WPA2 Personal Encryption This cannot be modified Shared Key Enter the shared key used for accessing the wireless network WPA WPA2 Enterprise The options vary depending on the protocol type selected Protocol Type Select EAP TLS or EAP TTLS ...

Page 51: ...he certificate authorities it trusts and anyone to whom the CA may have issued a certificate issuing certificate to faithfully authenticate the users of all their certificates User CA A user certificate is a signed private key certificate which implies that you trust your browser s publisher to include correct user certificates and in turn the certificate authorities it trusts and anyone to whom t...

Page 52: ...he RADIUS server Anonymous ID The unsigned public ID used for login to your RADIUS server Root CA A root certificate is an unsigned public key certificate or a self signed certificate which implies that you trust your browser s publisher to include correct root certificates and in turn the certificate authorities it trusts and anyone to whom the CA may have issued a certificate issuing certificate...

Page 53: ...isco PVC2300 and WVC2300 Internet Video Cameras with Audio Administration Guide 45 5 STEP 6 Disconnect the power to the camera STEP 7 Disconnect the Ethernet cable from the camera NOTE The wireless connection will not work if an Ethernet cable is attached to the camera when it is powered on ...

Page 54: ...he camera in both modes simultaneously To switch between wired and wireless modes see Moving the Camera to Another Network on page 46 Moving the Camera to Another Network NOTE This section applies to the Cisco WVC2300 camera When you move the camera from a wired network to a wireless network or vice versa you must power off the camera before connecting to the new network To move the camera from a ...

Page 55: ...llow these steps STEP 1 Unplug the power adapter from the camera STEP 2 Connect the Ethernet network cable to your PC router or switch STEP 3 Connect the other end of the cable to the Ethernet port on the camera STEP 4 Re connect the power adapter to the Power port on the camera The camera s Ready LED flashes while the camera is initializing The camera is ready for use when the Ready and Network L...

Page 56: ...ted browser for the PVC2300 and WVC2300 cameras To access the web based configuration utility follow these steps STEP 1 Launch a web browser such as Internet Explorer STEP 2 In the Address field enter 192 168 1 99 and press Enter The web based utility login window appears STEP 3 If this is your first time accessing the web based utility follow these steps at the login window a Enter admin in the U...

Page 57: ... required STEP 2 Follow the online instructions to download the appropriate firmware to your computer STEP 3 Launch the web based configuration utility See Launching the Web Based Configuration Utility on page 51 STEP 4 Click Setup in the toolbar STEP 5 Click Administration Firmware The current version is displayed STEP 6 Click Upgrade STEP 7 From the Upgrade Firmware window click Browse to locate...

Page 58: ...n Guide 50 6 NOTE Cisco recommends that you upgrade the camera s firmware within your network In other words use a computer within the camera s local network If you attempt to upgrade the camera s firmware from a remote location using a computer outside of the camera s local network the upgrade may fail ...

Page 59: ... you can set a static IP address by pressing the Reset button on the camera for less than three seconds A default IP address of 192 168 1 99 will be assigned to the camera To determine if you have a DHCP server on your network consult your network administrator If you do not have a DHCP server access your camera using the default IP address To configure the PVC2300 or WVC2300 cameras follow these ...

Page 60: ...dmin in the Password field c Click OK For security purposes it is recommended that you later reset your password in the Administration Users window Home The Home window is the default display From this window live video can be viewed and the output can be updated The camera type is identified in the upper left You can always return to the Home window by clicking Home in the toolbar This section de...

Page 61: ... you can view or configure the PVC2300 and WVC2300 camera features Connected User Displays the number of users The maximum number of users is 10 Also there are 10 video streams available for MJPEG and MPEG 4 in any combination for example 5 5 6 4 7 3 8 2 or 9 1 Log Out Log out from viewing the camera image About Displays the camera software version ...

Page 62: ... Cameras with Audio Administration Guide 54 7 Help The camera software includes detailed Help files for all configuration tasks To view a Help page click the Help link in the top right corner of the window A new window appears with information about the task that you are currently viewing ...

Page 63: ... filter for night vision Start Instant Recording Stop Instant Recording Click the black icon to start recording and click the red icon to stop recording Consider the following The default location for saved recordings is MyDocuments Record Click Browse to choose another location to save your recordings Your folder selection is remembered in the registry If that folder no longer exists the next tim...

Page 64: ...ble after enabling RS 485 You also need to connect the camera to an external Pelco D protocol device for the Move Control to work Resolution Select the desired resolution from the drop down list The options are AUTO 640 x 480 320 x 240 160 x 120 The default is AUTO and lets the camera determine the resolution Zoom Click zoom and then drag your mouse to select the section you want to magnify Click ...

Page 65: ... in the toolbar For more information about Setup see Chapter 8 Configuring the PVC2300 and WVC2300 Cameras Speaker On Speaker Off When the speaker is enabled an icon is displayed on the Home window You can then use the icons to turn the speaker on and off To enable the speaker see Audio Video Audio on page 80 Streaming Video Format Set the video format to either MPEG 4 or MJPEG Icon Description ...

Page 66: ...g the Setup Options page 59 Setup Basic Setup page 59 Setup Advance Setup page 68 Setup IP Filter page 72 Administration Users page 73 Administration Firmware page 76 Audio Video Video page 77 Audio Video Audio page 80 Applications Mail page 83 Applications FTP page 86 Applications Instant Messaging page 88 Applications Motion Detection page 89 Applications Event page 91 Applications DDNS page 95 ...

Page 67: ...ration Utility on page 51 STEP 2 Click Setup in the toolbar STEP 3 Enter the default User name admin and the default password admin STEP 4 Click OK There are five options displayed in the left panel Setup Administration Audio Video Applications and Status Each option has windows that help you configure and manage the camera The following sections provide descriptions and configuration settings for...

Page 68: ...r a description of your camera such as the location of the camera Entering a description will help you identify the camera It must not exceed 32 alphanumeric characters Enable LED Operations Check the check box if you want to turn on the LED Current Date Time Displays the current date and time Click Change to modify the time settings NOTE To change the current date and time uncheck the check box C...

Page 69: ...ew Time Click to implement the new date or time setting Time Zone Choose the time zone for your location from the drop down list Adjust for Daylight Saving Time Select this option if your location is currently using Daylight Saving Time Uncheck the Adjust for Daylight Saving Time check box when Daylight Saving Time ends in your time zone Check here if you want to update the time automatically thro...

Page 70: ...lly The camera defaults to this option allowing a DHCP server on your network to automatically assign the camera an IP address IP Address IP address assigned to the camera Subnet Mask Subnet mask assigned to the camera Gateway IP address of the gateway router between this device and management stations that exist on other network segments Primary DNS The IP address of your ISP s primary server whi...

Page 71: ...t specify a channel setting on the camera It is automatically configured to match the device your camera is connected to Security Click Edit Security Settings to display the Wireless Security window Security Mode Select the appropriate option based on your wireless network configuration The options are Disabled WEP WPA WPA2 Personal WPA WPA2 Enterprise Disable This security mode option implements ...

Page 72: ...twork and click Generate Key 1 4 Key values can be entered in manually or generated from a passphrase Authentication Select the appropriate authentication type used on the wireless network WPA WPA2 Personal This security mode option offers two encryption methods TKIP and AES with dynamic encryption keys Enter the Shared Key which can have 8 to 63 characters Then enter the Key Renewal Timeout which...

Page 73: ...e camera If you are using WPA WPA2 Enterprise security you will need to upload security certificates to the camera Certificates must be in the following format Root certificate DER encoded binary x 509 CER PEM User certificate Personal Information Exchange PKCS 12 PFX The configuration options for this security mode vary depending upon the protocol type selected Protocol Type Select EAP TLS or EAP...

Page 74: ...in turn the certificate authorities it trusts and anyone to whom the CA may have issued a certificate issuing certificate to faithfully authenticate the users of all their certificates User CA A user certificate is a signed private key certificate which implies that you trust your browser s publisher to include correct user certificates and in turn the certificate authorities it trusts and only us...

Page 75: ... CHAPv2 PAP EAP MD5 as required to handle the processing and transmitting of the CA to your RADIUS server User ID The user ID used for login to your RADIUS server Password This camera s client login to the RADIUS server and must match the key stored on the RADIUS server Anonymous ID The unsigned public ID used for login to your RADIUS server Root CA A root certificate is an unsigned public key cer...

Page 76: ...h the camera using an HTTP connection The default value is 1024 A value in the range of 1024 65535 can be defined The port number must be specified in the URL when accessing the camera s web based utility via the LAN or Internet For example if the camera s IP address is 192 168 1 99 and the port is defined as 1028 you would specify the following address http 192 168 1 99 1028 Enable HTTPS Alternat...

Page 77: ...udio and video to a select group of connected clients RTSP uses RTP to format packets of multimedia content RTSP Port Enter the RTSP Port number between 1024 to 65535 in the field provided The default RTSP port is 554 RTP Data Port The camera s data port number has been pre configured and can be used for multicasting It does not normally need to be re configured If a port number does need to be ch...

Page 78: ...vided Video Port Audio Port The camera s Video and Audio Port number has been pre configured and can be used for multicasting This does not normally need to be re configured If a port number does need to be changed please contact your network administrator To change enter the Video Port Audio Port number between 1024 to 65534 in the field provided The Video Port Audio Port number you entered must ...

Page 79: ...lug in or the Apple Mac Safari browser By using Bonjour you can easily find and click on Bonjour enabled items on your network QoS Enable QoS Mode Quality of Service QoS mode is disabled by default To enable the QoS mode select this option and select either audio video or both for its guaranteed throughput level Enable QoS mode will automatically enable WMM 802 11e QoS when in wireless mode WMM Wi...

Page 80: ...Service at Layer 2 and is implemented in network adapters and switches without involving any reservation setup 802 1p traffic is simply classified and sent to the destination no bandwidth reservations are established Setup IP Filter From the Setup IP Filter window you can configure IP Filter Settings to deny or allow camera access to a specific IP address or range of IP addresses IP Filter Setting...

Page 81: ...p to 10 values can be configured Filtering List The IP filter setting allows up to maximum of 10 single IP address or 10 ranges of IP addresses Administration Users From the Administration Users window you can change the administrator password modify demo account settings and create or modify a user list Administrator Admin The default administrator name cannot be changed but the password can and ...

Page 82: ...l characters are not supported The name is case sensitive User name cannot exceed 32 characters Password Enter the desired password in this field Password cannot exceed 64 characters Confirm Password Retype the password in this field Privilege Level Select the appropriate privilege level from the drop down list Choose from one of the following options Administrator Provides the specified user full...

Page 83: ...actory defaults restart the camera save the configuration settings or upload a configuration file Restore Factory Defaults Restore Restores the camera to the factory default settings Restart Restart Restarts the camera Configuration Save Save a configuration file containing all of the current camera management settings Browse Locate a previously saved configuration file Upload Upload a previously ...

Page 84: ...and WVC2300 Internet Video Cameras with Audio Administration Guide 76 8 Administration Firmware The Administration Firmware window allows you to upgrade the firmware Firmware Upgrade Upgrade Update the camera s firmware For more information see Chapter 6 Upgrading the Camera Firmware ...

Page 85: ...est for additional details MPEG 4 Settings MPEG is the designation for a group of audio and video coding standards and related technology agreed upon by the ISO IEC The primary uses for the MPEG 4 standard are web streaming media CD distribution and broadcast television Resolution Select the desired video resolution setting The default resolution is 320x240 Video Quality Control Choose one of the ...

Page 86: ...fps Mobile Settings Enable Mobile Streaming Check the check box to enable streaming video for the mobile devices Resolution The default resolution is 160x120 Video Quality Control Choose from one of the following options Constant Bit Rate Select the desired constant bit rate The default value is 32 Kbps Fixed Quality Select the desired fixed quality The default is Normal Max Frame Rate Select the ...

Page 87: ...characters in length This feature is often used to identify the camera location when multiple cameras are installed Enable Image Overlay To display an image on the video enable this feature by checking the check box CIsco Logo When selected a Cisco logo will display at the top of the video Positioning of the logo is determined by the x and y coordinates defined in the Image Position fields User De...

Page 88: ... turn off the filter at a set time An infrared lamp can be used to improve illumination in night surveillance applications without producing any extra visible light This is all done by using the IR filter switcher that is built in to the camera Enable Night Vision Schedule Enable Day Night switch schedule by checking this check box Start Time Select the evening start time by selecting the hour and...

Page 89: ...n the Home window You can use the icons to turn the speaker on and off The check box is auto checked depending on the audio mode you set If you set the audio mode to Simplex Listen Only then the check box is auto checked If you set the audio mode to Simplex Talk Only then the check box is automatically unchecked Mode Function Simplex Talk Only Enables the speaker jack Simplex Listen Only Enables t...

Page 90: ... depending on the audio mode you set If you set the audio mode to Simplex Listen Only then the check box is auto checked If you set the audio mode to Simplex Talk Only then the check box is automatically unchecked Speaker On Speaker Off Setting Description G 726 Default audio compression algorithm uses 32 Kbps of bandwidth with quality similar to G 711 but using only half of the bandwidth G 711 A ...

Page 91: ...server is used even if both the primary and secondary SMTP servers are enabled The secondary SMTP server is used if the camera cannot connect to the primary server Configuring a secondary SMTP server is optional Primary SMTP Server Primary SMTP Check the check box to upload to the primary SMTP server SMTP Mail Server Enter the address of the Simple Mail Transport Protocol SMTP server to be used to...

Page 92: ...does not complete For example test fails due to a wrong username or password Requires SSL Encryption Check the check box if your mail server requires SSL encryption This option supports cryptographic protocols that provide security and data integrity for communications over TCP IP networks such as the Internet Secondary SMTP Secondary SMTP Optional Check the box to upload to the secondary SMTP ser...

Page 93: ...ssword Requires SSL Encryption Check the check box if your mail server requires SSL encryption This option supports cryptographic protocols that provide security and data integrity for communications over TCP IP networks such as the Internet E mail Setup Send To Enter at least one e mail address The second and third addresses are optional The e mail alert is sent to the e mail address or addresses...

Page 94: ...d even if both the primary and secondary FTP servers are enabled The secondary FTP server is used if the camera cannot connect to the primary server Primary FTP Primary FTP Check the check box to upload to the primary FTP server FTP Server Enter the address of the primary FTP server You can use the IP address or the domain name Port Enter the port number for the primary FTP server The default is 2...

Page 95: ...TP Check the check box to enable When enabled the camera will connect to a secondary FTP server if the primary FTP server is not available FTP Server Enter the address of the secondary FTP server Port Enter the port number for the secondary FTP server The default is 21 Login Name Enter the login name associated with the secondary FTP server Password Enter the password associated with the login nam...

Page 96: ...saging and Presence Protocol XMPP and geared to provide message exchange in real time between two points on the Internet Jabber is similar to IM systems such as AIM ICQ and MSN but is open source extensible through XML and decentralized allowing anyone to run a Jabber server The following are the Jabber settings Jabber Server Enter the address of your Jabber server Login ID Enter the login name fo...

Page 97: ...t the sensitivity of detection for each area NOTE Motion detection cannot be configured using the Firefox browser Internet Explorer must be used to configure motion detection NOTE Motion detection can be triggered by rapid changes in lighting conditions as well as by moving objects For this reason it should only be used indoors When you first select the Motion Detection option you are prompted to ...

Page 98: ...Threshold Adjusts the motion sensitivity Setting Custom Area Enable this option to capture motion within defined areas of the video screen Multiple windows with varied threshold settings may be used Window 2 4 Enable one or more of these options to detect motion in specific areas of the video screen Windows can be defined by simply extending the window with the cursor More than one window can be u...

Page 99: ...rs describing how and when the camera will perform certain triggered actions according to requirements The most common kind of event type will upload video or snapshot files to a specified destination E mail account or FTP server Other actions performed by event types can include the activation of an output port NOTE It is important to note that adding a new event will stop any event that is curre...

Page 100: ...e the 24 hour time format End Time Select the event end time in hours and minutes Use the 24 hour time format Click Add to add a new schedule or Clear to clear options and enter a new schedule Trigger Event A triggered event type is activated when a specific internal or external trigger condition is met These triggers are A signal from a device connected to an input on the camera For example a sig...

Page 101: ...specified if required This will be used if the primary server is unavailable FTP alerts require pre configured FTP settings in the Applications FTP window See Applications FTP on page 86 SMB CIFS If checked attachments image or video are uploaded to the NAS device defined in the Applications SMB CIFS window when an alert is detected See Applications SMB CIFS on page 102 The following SMB CIFS sett...

Page 102: ...eplace the oldest video clip with the current recording when detecting device s SDRAM is full Attachment Type From the drop down list select the type of attachment JPEG Image Select to send image captures Frame Rate Select the desired capture rate for the JPEG image s Pre Post Capture Select the desired length The snapshot s of the JPEG image depends on this setting and also the file size and degr...

Page 103: ...ervice DDNS Use this feature to access the camera from a remote location DDNS Enable DDNS Check the box to enable DDNS When used with a DDNS service provider you can access your camera over the Internet using a domain name instead of an IP address Service Provider Select the service provider that you have an account with The choices are DynDNS TZO and 3322 If you do not have an account you can sel...

Page 104: ...net IP address has changed If the IP address has changed the DDNS server will be notified Starting at Allows you to set when to start checking if the IP address has changed NOTE To complete the DDNS service setup port forwarding needs to be configured on your router See Configuring Port Forwarding on page 117 Applications I O Ports From the Applications I O Ports window you can configure the Input...

Page 105: ...g When the current State changes to Low or Low Pulse the output will be activated Displays the port number Current State Displays the current state of the port Default State The default setting for the Default State option is High While the camera is restarting the output will be in the Default State i e High for at least as long as it takes for the camera to fully initialize Please consider this ...

Page 106: ...ications RS 485 From the Applications RS 485 window you can define port settings such as the baud rate data bits and parity type You can also define the camera preset point position and configure how the camera will move when set to rotate Enable RS485 If the RS485 feature is enabled valid command s must be provided as requested by the connected device s ...

Page 107: ...t Home to define the home position Preset List Select the desired preset position and the screen will update with the current data for the selected preset If you don t need the desired preset position click Remove Preset Name Enter a suitable name for the current desired position and then click Add to add to the preset list Pan Speed Select the desired speed for camera panning Default value is 5 T...

Page 108: ...the camera stay longer at one position To delete a position from the sequence select the desired position and click Remove Preset Displays a list of available presets to choose from Sequence Displays the order of presets in the sequence Add Adds a preset to the sequence Remove Removes a preset from the sequence To set the camera to rotate follow these steps STEP 1 From the Applications RS 485 wind...

Page 109: ...2300 and WVC2300 Internet Video Cameras with Audio Administration Guide 101 8 STEP 2 Click Preset Position The Set Pan Tilt window displays STEP 3 From the Set Pan Tilt window configure the following options Preset Name Enter a suitable name for the current desired position ...

Page 110: ...mless file recording and uploading to a NAS device The TCP IP protocol installed on the NAS device is used for file transfer SMB CIFS Server Enter the server hostname or IP address of your NAS device SMB CIFS server Upload Path Enter the folder name to upload video to the NAS device SMB CIFS server Login Name Enter user s login name for the NAS device SMB CIFS server Password Enter user s password...

Page 111: ...upgraded from the Administration Firmware window You must be logged in with administrator privileges to upgrade the firmware IP Address Displays the IP address of the camera MAC Address Displays the MAC address of the camera Camera Name Displays the name of the camera as defined in the Setup Basic Setup window By default the last six digits of the camera name come from the last three bytes of the ...

Page 112: ...ays MPEG 4 and MJPEG image status MPEG 4 Resolution Displays the image size of the video stream Image Quality Displays the image quality of the video stream Frame Rate Displays the frame rate of the video stream MJPEG Resolution Displays the image size of the video stream Image Quality Displays the image quality of the video stream Frame Rate Displays the frame rate of the video stream ...

Page 113: ...ry DNS used by the camera Network Network Type Displays the type of network the camera is connected to IP Address Displays the IP address assigned to the camera Subnet Mask Displays the subnet mask assigned to the camera Gateway Displays the IP address of the gateway used by the camera Primary DNS Displays the IP address of the primary Domain Name Server used by the camera Secondary DNS Displays t...

Page 114: ...eless information is only found on the WVC2300 camera SSID Displays the wireless network name SSID used by the camera The default is ciscosb Channel Displays the wireless channel used by the camera Security Indicates which wireless security is being used by the camera Status Syslog Log The Status Syslog Log window has options for Log Type Syslog Server and Log List ...

Page 115: ...ou want to view on the Log List System Log FTP Log SMTP Log IM Log Syslog Server Enable Syslog Server Check the check box to enable the Syslog server feature Syslog Server Address Enter the IP address of your Syslog server Syslog Port Enter the Syslog port number between 1024 to 65535 in the field provided The default syslog port is 514 Log List Clear Log Click to erase all the entries in the Syst...

Page 116: ...Guide 108 8 Status Video Log From the Status Video Log window you can erase a single entry or all entries in the video log Video Log This displays all video log s Click on each individual log to playback the video recorded when alerts were detected Click Delete to either erase a single video log or erase all the entries in the Video Log ...

Page 117: ...Configuring E Mail Alerts page113 Scheduling an Event page115 Configuring Motion Detection Area and Sensitivity page 116 Configuring Port Forwarding page117 Setting Security Precautions on the Cisco WVC2300 page120 Configuring Instant Recording To configure instant recording follow these steps STEP 1 From the Home window click Start Instant Recording in the Video Options Icons See Video Options Ic...

Page 118: ...n Guide 110 9 Defining Preset Positions for Patrol Sequence NOTE You can only use this feature if you have an external PTZ base that supports Pelco D Protocol To define preset positions for the camera patrol sequence follow these steps STEP 1 Click Setup in the toolbar STEP 2 Click Applications RS 485 The Applications RS 485 window displays ...

Page 119: ... for the current desired position and then click Add button to add to the preset list Pan Speed Select the desired speed for camera panning Default value is 5 Tilt Speed Select the desired speed for camera tilting Default value is 5 STEP 6 Click Save You are returned to the Applications RS 485 window STEP 7 Your preset position is listed in the Patrol Sequence Repeat the steps to define additional...

Page 120: ...s RS 485 The Applications RS 485 window displays STEP 3 To enable RS485 check the Enable RS485 check box STEP 4 In Patrol Sequence select the desired Preset in the left column and click the Add Repeat until the desired sequence is complete You can add the same preset position more than once to make the camera stay longer in one position STEP 5 Click Save ...

Page 121: ...Area and Sensitivity on page 116 To configure e mail alerts follow these steps STEP 1 Click Setup in the toolbar STEP 2 Click Applications Mail The Applications Mail window displays STEP 3 In Primary SMTP configure the following Check the check box Primary SMTP to upload to the primary SMTP SMTP Mail Server Enter the address of the Simple Mail Transport Protocol SMTP server to be used to send e ma...

Page 122: ... Requires SSL Encryption Check the check box to enable This option supports cryptographic protocols that provide security and data integrity for communications over TCP IP networks such as the Internet STEP 4 In Secondary SMTP Server repeat the above steps if you are configuring a secondary SMTP server NOTE Only one SMTP server is used even if both the primary and secondary SMTP servers are enable...

Page 123: ...pplications Event The Applications Event window displays STEP 3 In Trigger Event configure the following Enable Check the box to enable the configured trigger events Motion Detection Check the box so that movement in a motion detection window can be used to trigger events E mail Check the check box so that an e mail will be delivered to the account configured in the Applications Mail window when a...

Page 124: ...ned and adjust the sensitivity of detection follow these steps STEP 1 Click Setup in the toolbar STEP 2 Click Applications Motion Detection The Applications Motion Detection window displays STEP 3 Check the check box for either Full Screen or Setting Custom Area Full Screen Detects motion events within the full view of the screen Setting Custom Area Captures motion within defined areas of the vide...

Page 125: ...llows Internet access to multiple cameras that are located inside a private network For example you have two cameras behind a NAT router one is on alternate port 1024 and the second one is on port 1028 To access each camera individually setup two port forwarding rules to access the web interface of the camera You can then go to http x x x x where x x x x is the WAN IP of the router and is the defi...

Page 126: ... in the HTTP Port field In the example port 1028 has been configured Valid port settings are 1024 65535 When you open the URL to the camera you now must specify the port number For example http 192 168 1 99 1028 STEP 3 Click Save and close the window STEP 4 Enter the IP address of your router in your web browser s Address field and press Enter In this example the default IP address of the router i...

Page 127: ...the Application name such as Camera b Enter the Start and End port In this example 1028 is used and this should match the alternate HTTP port configured on the camera in Step 2 on page 118 c Ensure that Protocol is set to Both TCP and UDP d Enter the IP address of the camera in the IP Address field e Check the Enable box to enable forwarding STEP 7 Click Save to save the configuration to the route...

Page 128: ...following format http router s WAN IP address port For example http 12 19 89 212 1028 Setting Security Precautions on the Cisco WVC2300 The following is a complete list of security precautions to take at least steps 1 through 4 should be followed NOTE These steps apply to the Cisco WVC2300 camera STEP 1 Change the default SSID from the Setup Basic window in the Wireless settings Change the SSID pe...

Page 129: ...A if it is available From the Setup Basic window scroll to Wireless settings Please note that this may reduce your network performance If using WEP change the WEP encryption keys periodically From the Setup Basic window scroll to Wireless settings NOTE Some of these security features are available only through the network router or access point Refer to the router or access point s documentation f...

Page 130: ...a Enter the username and password set in the Administration Users window The Username Password prompt indicates that the administrator has restricted access to specified users Ask the administrator for your username and password If this has not been set you can use the default username admin and the default password admin Q I cannot connect to the WVC2300 Internet Camera using a wireless connectio...

Page 131: ... be that the SMTP Simple Mail Transport Protocol server used by the camera to send the e mail will not accept mail This is to prevent Spam being sent from the server Try using a different SMTP server or contact your ISP to see if SMTP access is being blocked You must use a static IP address you can copy the DHCP Address but the DNS server must be that of the ISP and not of the router You can find ...

Page 132: ...s offered by networking devices such as printing and file sharing are available among each other without a lot of network configuration UPnP Is automatically enabled on the cameras In a Windows environment it may or may not be enabled With Windows XP you must log on to the computer as a system administrator to install the UPnP components If using Windows Vista UPnP Is enabled by default However if...

Page 133: ...ess point or router TCP IP must be enabled TCP IP is a set of instructions or protocol all PCs follow to communicate over a network Your PCs will not be able to use networking without having TCP IP enabled Windows Help provides complete instructions for enabling TCP IP Shared Resources If you want to share printers folders or files over your network Windows Help provides complete instructions abou...

Page 134: ... viewing video Actual bandwidth will vary based on the image complexity Number of colors brightness amount of motion and other factors will determine the actual bandwidth The values provided in the following table are provided for reference only Resolution Quality Frame Rate Bandwidth k bps MPEG 4 MJPEG 640 x 480 Very High 30 2320 3040 15 1840 2800 6 880 1840 Normal 30 2240 2800 15 1680 2640 6 640...

Page 135: ...0 x 240 Very High 30 1600 2000 15 1200 1600 6 600 800 Normal 30 1440 1840 15 800 1440 6 360 640 Very Low 30 760 1600 15 480 1200 6 200 480 160 x 120 Very High 30 1600 1440 15 1120 800 6 560 320 Normal 30 560 1200 15 320 640 6 160 280 Very Low 30 320 1040 15 200 560 6 120 240 Resolution Quality Frame Rate Bandwidth k bps ...

Page 136: ...fications page 135 PVC2300 Specifications Resource Description Model PVC2300 Standards IEEE802 3 IEEE802 3u IEEE802 1p QoS Priority IEEE802 1q VLAN Protocols Supported TCP IP HTTP DHCP SMTP FTP NTP DNS UPnP RTP RTSP and DDNS Ports Ethernet with POE Microphone IN Speaker OUT Power 12V 1A GPIO 4 pin IRIS port Buttons Reset Cabling Type UTP CAT 5 LEDs Power Network Camera Type Box IO Ports RS 485 x 1...

Page 137: ...ached Setup Config Web UI Built in web UI for easy browser based configuration HTTP Management Web Browser Internet Explorer 6 0 or above with ActiveX support for viewing recording playback and setting motion detection limited support for Safari and Mozilla Firefox no motion detection Event Logging Event Logging SYSLOG Web F W Upgrade Firmware upgradable through web browser Video Compression Dual ...

Page 138: ...Audio Built in Microphone 6mm 40db 3db Microphone Input 3 5 mm Phone jack Speaker Output 3 5 mm Phone jack Compression G 726 16K G 711 A law and μ law Sampling Rate 8 KHz Default Bit Rate 16 Kbps Video Monitoring System Monitoring and Recording Software Monitoring and recording for up to 16 cameras Advanced search histogram or by time and date Recording set up to record by motion trigger manual or...

Page 139: ... 3322 Dynamic DNS Samba Client Samba Client for recording files directly to a NAS device without having to leave a PC running UPnP Allows autodiscovery of the camera by other UPnP devices IP Filtering Allow or disallow access by IP address Power Power Options IEEE 802 3af Power over Ethernet PoE 48V 0 3A External Power Adaptor 12V 1A 110 120V AC 60Hz Switching Power Consumption 10W Environmental D...

Page 140: ... Type UTP CAT 5 LEDs Power Network Camera Type Box IO Ports RS 485 x 1 2 pins Supports Pelco D Protocol commands Input control x 2 2 pins Output control x 2 2 pins Lens Sensor 1 4 inch Progressive CCD Sensor Illumination 0 4LUX F1 4 Lens Type CS mount lens fixed focus Adapter also included for lenses that require more distance between sensor and lens Focal Length 500mm Infinity for included lens F...

Page 141: ...Snapshot JPEG Image Settings Brightness and Contrast Zoom 4x Digital Zoom Night Vision IR cut filter for low light Video Controls Auto White Balance AWB Auto Exposure AES Image Control Select video by Quality Bandwidth and Frame Rate Format 3GPP for use with 3G phones Alerts Motion Detection 4 Detection areas with individual sensitivity E mail Alert 3 E mail addresses FTP Uploading FTP server addr...

Page 142: ...rd Kensington Lock Physical security option Network RTP RTSP Real Time Protocol Real Time Streaming Protocol allow for viewing from any client supporting these protocols like 3G phones or Quicktime client NTP Network Time Protocol keeps time of camera in sync with your network SMTP Simple Mail Transfer Protocol Client allows video clips to be e mailed FTP Client FTP Client facilitates scheduling t...

Page 143: ...Power Consumption 10W Environmental Dimensions W x H x D 4 72 in x 2 99 in x 1 81 in 120 mm x 76 mm x 46 mm Unit Weight 1 15 lb 0 52 kg Power External power adapter 12 VDC 1A 110 120VAC 60Hz switching Certification FCC part 15C class B CE UL EMC EMI part 15B class B for US Operating Temp 32 to 122ºF 0 to 50ºC Storage Temp 4 to 158ºF 20 to 70ºC Operating Humidity 10 80 Non condensing Storage Humidi...

Page 144: ...al Input 1 Connect to high to activate 5V 12V 4 Digital Output 1 With a maximum load of 100mA and maximum voltage of 12VDC this output has an open collector NPN transistor with the emitter connected to GND 5 Digital Input 2 Connect to high to activate 5V 12V 6 Digital Output 2 With a maximum load of 100mA and maximum voltage of 12VDC this output has an open collector NPN transistor with the emitte...

Page 145: ...camera s Home window See Video Options Icons on page 55 10 9 8 7 6 5 4 3 2 1 NOTE Sensor needs attention of polarity To work properly the siren should be supplied by extenal power if the current exceeds 100 mA PIR Motion Sensor 12VDC battery included Siren Zoom or rear panel Optional power supply Power supply is not required when internal power is supplied from pins 1 and 2 10 9 8 7 6 5 4 3 2 1 To...

Page 146: ...d www cisco com support Phone Support Contacts www cisco com en US support tsd_cisco_small_ business_support_center_contacts html Software Downloads Login Required Go to tools cisco com support downloads and enter the model number in the Software Search box Product Documentation Cisco Small Business PVC2300 and WVC2300 Internet Video Camera with Audio Quick Start Guide http www cisco com en US pro...

Page 147: ...ty Information for the Wired and Wireless Internet Cameras http www cisco com en US products ps9944 prod_installation_guides_list html Cisco Small Business Cisco Partner Central for Small Business Partner Login Required www cisco com web partners sell smb Cisco Small Business Home www cisco com smb Marketplace www cisco com go marketplace ...

Reviews: