Removing Cable Guides
To gain additional space for accessing the hook-and-loop straps in the cable tray, you may remove the middle
cable guides from the left and right side of the tray.
You will need a Phillips #1 screwdriver for this procedure.
To remove a cable guide:
Step 1
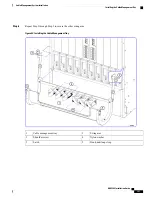
Locate the middle guide in the group of three as shown in the figure below.
Step 2
Insert the screwdriver in the top slot of the cable guide.
Step 3
Turn the screw that secures the guide to the back of the tray counterclockwise until it drops free of the guide.
Step 4
Insert the screwdriver in the bottom slot of the guide.
Step 5
Turn the screw that secures the guide to the back of the tray counterclockwise until it drops free of the guide.
Step 6
Remove the guide.
Step 7
Locate and remove the screws and washers.
Step 8
Repeat Step 1 through Step 7 for the middle guide of the other group of three guides.
Figure 34: Removing Cable Guides
Cable guide
2
Cable management tray
1
Phillips #1 screwdriver
3
ASR 5500 Installation Guide
159
Cable Management System Installation
Removing Cable Guides
Summary of Contents for ASR 5500
Page 12: ...ASR 5500 Installation Guide xii Contents ...
Page 16: ...ASR 5500 Installation Guide xvi About this Guide Contacting Customer Support ...
Page 40: ...ASR 5500 Installation Guide 24 Technical Specifications Chassis Grounding ...
Page 74: ...ASR 5500 Installation Guide 58 Card Installation Save Shipping Cartons ...
Page 88: ...ASR 5500 Installation Guide 72 MIO Port Cabling Cleaning Fiber Optic Connectors ...
Page 112: ...ASR 5500 Installation Guide 96 System Power up show leds Command ...
Page 130: ...ASR 5500 Installation Guide 114 Initial System Configuration Additional Configuration Tasks ...
Page 164: ...ASR 5500 Installation Guide 148 Replaceable Components Returning Failed Components ...
Page 186: ...ASR 5500 Installation Guide 170 Console Port to Cisco Server Cabling Configuration ...
Page 192: ...ASR 5500 Installation Guide 176 RMA Shipping Procedures Rear Cards ...


