


53
12.4 Starting a New Route
In the Routes Menu select the menu option START NEW
ROUTE from the Side Menu.
Move the map cursor to the desired start point on the chart
and press the
SELECT
key. This becomes the first Waypoint on
your new Route.
The Chartnav automatically highlights ADD TO ROUTE in the
Side Menu. To continue the Route position the map cursor at
the required Waypoints (turning points) and press the
SELECT
key.
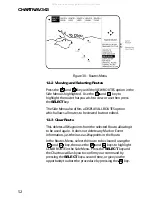
The Chartnav will number each point in ascending order and
will draw a line between each Waypoint. Continue adding
Waypoints in this manner until you have placed the last
Waypoint.
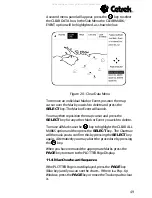
To use an existing Mark or Event as a Waypoint in your Route
place the map cursor over the relevant symbol, so that the
Pop-Up Window is displayed. You must then press the
PAGE
key to remove the window before you press the
SELECT
key
which makes the Mark or Event a Waypoint.
A Multiple User Point symbol will be displayed and will show
both Waypoint and Mark/Event identification numbers.
You could now select one of the Waypoints and make it the
Target, or you can leave this route until you wish to use it.
Details on creating a Target are given in section 13.
Press the
PAGE
key to clear the menus and return to the
PLOTTER Page.
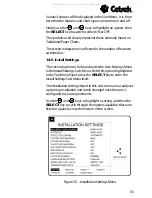
12.5 Add to Route
This option allows new Waypoints to be added to the end of
an existing Route. Check that the correct Route is being
viewed, then highlight ADD TO ROUTE on the Side Menu,
position the map cursor in the desired position and press
SELECT
.
All manuals and user guides at all-guides.com


