background image

60

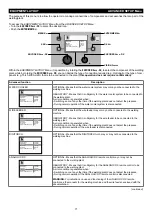
FACTORY RESET 

SETUP Menu

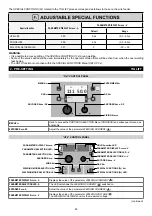
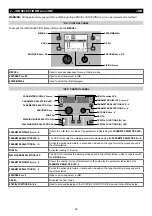
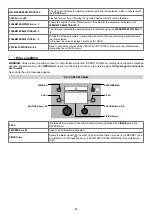
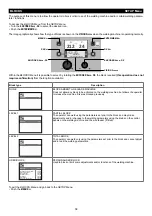
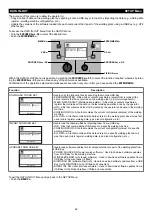
The purpose of this menu is to allow the operator to return the welding machine partially or totally to the factory settings.

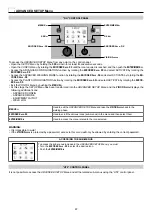
To access the 

FACTORY RESET Menu

 from the 

SETUP Menu

:

• Turn the 

ENCODER K

NOB

 - SX

 to select the desired icon.

• Push the 

ENTER/MEM K

EY

.

MENU K

EY

ENTER/MEM K

EY

ENCODER K

NOB

 - SX

ENCODER K

NOB

 - DX

VISION S

CREEN

SX K

EY

DX K

EY

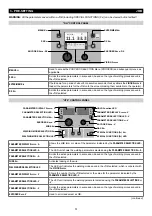
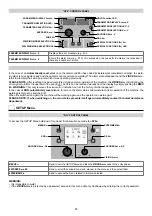
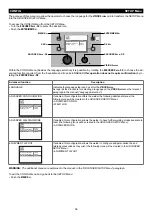
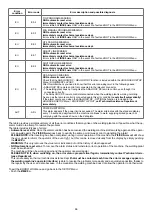
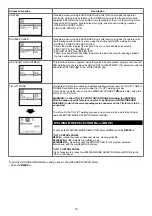
RESET PROGRAM
RESET PROCESS DATA
DELETE ALL JOBS
COUNTER ALARMS RESET
TOTAL RESET

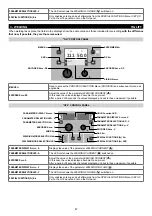
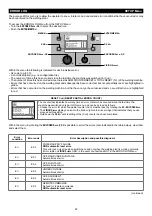
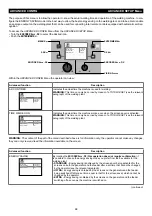
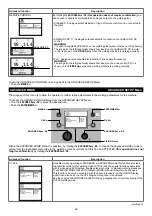
Within the 

FACTORY RESET Menu

 it is possible, by rotating the 

ENCODER K

NOB

 - SX

, to select the individual 

RESET

 required, 

from the 

5

 functions available:

Function

Description

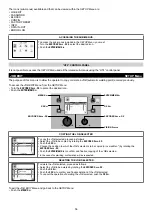
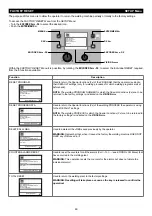
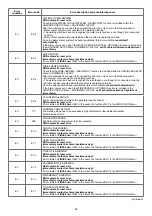
RESET PROGRAM

RESET PROGRAM (0011)

RESET PROCESS DATA MIG/MAG SYNERGIC
DELETE ALL JOBS
COUNTER ALARMS RESET
TOTAL RESET

EXECUTE PROGRAM RESET?

Used to return the 

Special functions (Fx)

 of the PROGRAM that the operator is using to 

their DEFAULT settings (only for welding processes for which welding programs are set 

beforehand).

NOTE:


The welding PROGRAM NUMBER for which the Special Functions (Fx) are to be 

returned to the factory settings is indicated on the 

VISION S

CREEN

.

RESET PROCESS DATA

RESET PROGRAM (0011)

RESET PROCESS DATA MIG/MAG SYNERGIC

DELETE ALL JOBS
COUNTER ALARMS RESET
TOTAL RESET

EXECUTE DATA PROCESS RESET?

Used to return the 

Special functions (Fx)

 of the welding PROCESS the operator is using 

to their DEFAULT settings.

NOTE:


The welding PROCESS for which the Special Functions (Fx) are to be returned to 

the factory settings, is indicated on the 

VISION S

CREEN

.

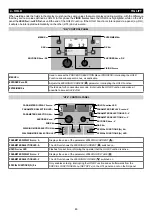
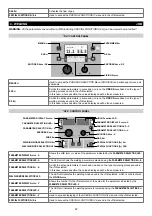
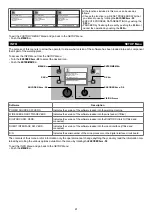
DELETE ALL JOBS

RESET PROGRAM (0011)
RESET PROCESS DATA MIG/MAG SYNERGIC

DELETE ALL JOBS

COUNTER ALARMS RESET
TOTAL RESET

CONFIRM DELETE ALL JOB?

Used to delete all the 

JOBS

 saved previously by the operator.

WARNING:


Remember that, when it leaves the factory the welding machine DOES NOT 

HAVE any JOB saved in it!

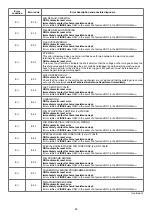
COUNTER ALARMS RESET

RESET PROGRAM (0011)
RESET PROCESS DATA MIG/MAG SYNERGIC
DELETE ALL JOBS

COUNTER ALARMS RESET

TOTAL RESET

EXECUTE COUNTER ALARMS RESET?

Used to reset the counters for all the alarms (Curr. - Tot. ---- see 

ERROR LOG Menu

) that 

have occurred in the welding plant.

WARNING:


This operation resets the counters for the alarms but does not delete the 

individual alarms!

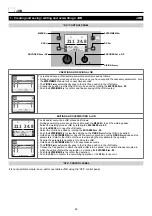
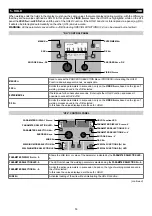
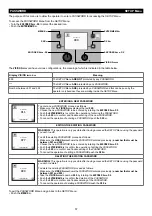
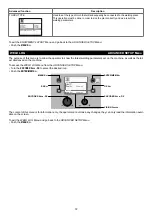
TOTAL RESET

RESET PROGRAM (0011)
RESET PROCESS DATA MIG/MAG SYNERGIC
DELETE ALL JOBS
COUNTER ALARMS RESET

TOTAL RESET

EXECUTE TOTAL RESET?

Used to return the welding plant to the factory settings.

WARNING:


Resetting will take place as soon as the key is released to confirm the 

operation!

Summary of Contents for DIGITECH vision PULSE 3000

Page 1: ...0H991F EN 12 2013 CEA COSTRUZIONI ELETTROMECCANICHE ANNETTONI S p A C so E Filiberto 27 23900 Lecco Italy Tel 39 0341 22322 Fax 39 0341 422646 Cas Post P O BOX 205 E mail cea ceaweld com web www ceaweld com EN Operator s manual READ CAREFULLY ...

Page 2: ...all welding parameters They come in a version with a separate feeder HT4 These are systems open to the future evolution of technology the control software can be kept up to date with the latest ver sions with the help of a personal computer Operating features The main feature of the welding unit DIGITECH vision PULSE 3300 4000 5000 are Metallic main structure with shockproof plastic front frames C...

Page 3: ...l manual which protects the components inside the welding machine against dangerous overheating After several minutes the overheat cut off rearms automatically and the welder is ready for use again Table 1 Model DIGITECH vision PULSE 3300 DIGITECH vision PULSE 4000 DIGITECH vision PULSE 5000 MIG MAG welding Three phase input 50 60 Hz V 400 20 400 20 400 20 Mains supply Zmax Ω 0 037 0 028 0 017 Inp...

Page 4: ...the forced circulation of air and must therefore be placed in such a way that the air may be easily sucked in and expelled through the apertures made in the frame Assemble the system in the following way Assemble the trolley Fixing the cooling unit to the trolley Fixing of the welding machine to the trolley and the cooling unit electrical and plumbing connections Fitting the feeder unit to the gen...

Page 5: ...blue and red rapid couplings on the front panel of the feeder 2A Connecting the cables Welding with a POSITIVE POLE TORCH Fig B1 1 The feeder generator connecting cable is used to connect the welding machine to the feeder WARNING Do not disconnect the wire feeder until the ma chine has been switched off Connect up the interconnection cables power cable an cillary wiring and gas tube to the special...

Page 6: ... the coolant system Wire feeder side connecting cable connect the red and blue pipes to their respective bulkhead grommets on the rear panel of the feeder 2 Connect up the earthing system cable to the rapid cou pling marked by a positive symbol and then the relevant ground clamps to the piece being welded or to its support in an area free from rust paint and grease Using particularly long earthing...

Page 7: ... PULSE 3300 4000 5000 machine electrode welding is used to weld most metals different types of steel etc using coated rutilic and basic electrodes with di ameters ranging from Ø 1 6 mm to Ø 6 mm and devices that the user can adjust for Arc Force Hot Start and Anti stick ing functions to avoid the electrodes sticking 1 Connecting the welding cables Fig D Disconnect the machine from the mains power ...

Page 8: ...ing the power sup ply switch to I Pos 3 Fig A 3 Make the adjustments and do the parameter settings on the control panel for further information see the DH con trol panel manual 4 Open the gas cylinder and regulate the flow by adjusting the valve on the TIG torch by hand 5 Ignite the electric arc by contact using a decisive quick movement without dragging the tungsten electrode on the piece to be w...

Page 9: ...es for the synergic welding parameters The ENCODER V knob on the HT4 feeder s front panel In the JOB welding process by pressing the two right and left buttons you can scroll the welding points set previ ously The pointing out of any difficulties and their elimination The supply line is attributed with the cause of the most com mon difficulties In the case of breakdown proceed as follows 1 Check t...

Page 10: ...10 2101EA86 Wiring diagram ...

Page 11: ...ctifier 17 Digital interface PCB 18 Inverter PCB 19 Capacitors PCB 20 Power Source PCB 21 Hall effect transformer 22 Secondary thermostat 23 Main transformer 24 Output diodes snubber varistor Colour key Ar Orange Az Sky Blue Bc White Bl Blue Gg Grey Gl Yellow GV Yellow Green Mr Brown NA Black Sky Blue Nr Black RN Red Black Ro Pink Rs Red Vd Green Vl Violet Meaning of graphic symbols on machine 9 8...

Page 12: ......

Page 13: ...EA COSTRUZIONI ELETTROMECCANICHE ANNETTONI S p A C so E Filiberto 27 23900 Lecco Italy Tel 39 0341 22322 Fax 39 0341 422646 Cas Post P O BOX 205 e mail cea ceaweld com web www ceaweld com IT Lista ricambi LEGGERE ATTENTAMENTE EN Spare parts list READ CAREFULLY ...

Page 14: ...t display 4 378020 Display Display 5 438849 Manopola senza indice Ø22mm Ø22mm knob without index 6 438888 Manopola senza indice Ø29mm Ø29mm knob without index 7 468725 Adesivo logo CEA Ø30mm CEA logo sticker Ø30mm 8 352458 Pannello frontale senza adesivo logo CEA Ø30mm Front panel without CEA logo sticker Ø30mm 9 403611 Attacco rapido Quick connection 10 420685 Coperchio lato sinistro con adesivo ...

Page 15: ...lamp with lock ring 15 235948 Cavo alimentazione Mains cable 16 352459 Pannello posteriore senza adesivo logo CEA Ø30mm Rear panel without CEA logo sticker Ø30mm 17 453145 Connettore cavo interconnessione Interconnection cable connector 18 403611 Attacco rapido Quick connection 19 419049 Connettore alimentazione impianto di raffreddamento Cooling system power connector 20 420686 Coperchio lato des...

Page 16: ...e ad effetto di Hall Hall effect transformer 31 418874 Condensatore di protezione attacco rapido Quick connection protection capacitor 32 247493 Induttore secondario Secondary inductor 33 404931 Basamento Base 34 478846 Termostato primario Primary thermostat 35 286019 IGBT primario Primary IGBT 36 240474 Complessivo inverter primario Primary inverter assembly 37 455512 Raddrizzatore primario Prima...

Page 17: ... display 4 378020 378020 Display Display 5 438849 438849 Manopola senza indice Ø22mm Ø22mm Knob without index 6 438888 438888 Manopola senza indice Ø29mm Ø29mm Knob without index 7 468725 468725 Adesivo logo CEA Ø30mm CEA logo sticker Ø30mm 8 352458 352458 Pannello frontale senza adesivo logo CEA Ø30mm Front panel without CEA logo sticker Ø30mm 9 403617 403617 Attacco rapido Quick connection 10 42...

Page 18: ...508 Raddrizzatore primario Primary rectifier 24 240466 240468 Complessivo inverter primario Primary inverter assembly 25 377133 377133 Scheda condensatori Capacitors PCB 26 449578 449578 Pianale superiore Upper plate 27 427667 427667 Filtro EMC EMC Filter 28 435760 435760 Interruttore alimentazione Mains switch 29 486379 486379 Motore ventilatore Fan motor 30 377105 377105 Scheda di snubber second...

Page 19: ...7 21 22 23 24 26 25 27 28 30 41 40 29 30 31 32 33 34 35 36 37 38 39 40 ...

Page 20: ...i posta sull impianto 4 Il numero di matricola ESEMPIO N 2 pezzi codice n 420577 per l impianto DIGITECH 5000 PULSE 400 V 50 60 Hz Matricola n EN Ordering spare parts To ask for spare parts clearly state 1 The code number of the piece 2 The type of device 3 The voltage and frequency read on the rating plate 4 The serial number of the same EXAMPLE N 2 pieces code n 420577 for DIGITECH 5000 PULSE 40...

Page 21: ...9 ...

Page 22: ...10 ...

Page 23: ...11 ...

Page 24: ......

Page 25: ...nual READ CAREFULLY 1020HA08C EN 12 2013 CEA COSTRUZIONI ELETTROMECCANICHE ANNETTONI S p A C so E Filiberto 27 23900 Lecco Italy Tel 39 0341 22322 Fax 39 0341 422646 Cas Post P O BOX 205 e mail cea ceaweld com web www ceaweld com ...

Page 26: ...UNCTIONS Menu SET UP Fx 9 4 PRE SETTING 11 5 WELDING 12 6 HOLD 14 MIG dual pulse 16 1 PROGRAM SELECTION Menu PROGRAM 16 2 WELDING MODE SELECTION Menu MODE 16 3 SPECIAL FUNCTIONS Menu SET UP Fx 17 4 PRE SETTING 20 5 WELDING 21 6 HOLD 23 MIG MAG synergic 24 1 PROGRAM SELECTION Menu PROGRAM 24 2 WELDING MODE SELECTION Menu MODE 25 3 SPECIAL FUNCTIONS Menu SET UP Fx 26 4 PRE SETTING 28 5 WELDING 29 6 ...

Page 27: ...P Fx 45 2 PRE SETTING 46 3 WELDING 47 4 HOLD 48 JOB 49 1 Creating and saving editing and overwriting a JOB 49 2 JOB SELECTION Menu JOB 50 3 PRE SETTING 51 4 WELDING 52 5 HOLD 53 Error condition 54 SETUP Menu 55 JOB EDIT 56 PASSWORD 57 BLOCKS 58 CONFIG 59 FACTORY RESET 60 INFO 61 DATA IN OUT 62 ERROR LOG 63 ADVANCED SETUP Menu 67 ADVANCED CONFIG 68 ADVANCED MODE 69 EQUIPMENT LAYOUT 71 WELD LOG 72 ...

Page 28: ...ely available to the operator unless indicated otherwise in the manual Welding machine control panel The panel on the DIGITECH generator has four keys two encoders and a colour display The figure below shows the panel The figure below shows the image of the panel MENU KEY ENTER MEM KEY ENCODER KNOB SX ENCODER KNOB DX VISION SCREEN SX KEY DX KEY DH CONTROL PANEL Wire feeder control panel The HT4 wi...

Page 29: ...r values for a time defined using the FINAL SLOPE F12 function 4 Releasing the TORCH TRIGGER will end the welding cycle SPOT WELDING 2T LED switched on SPOT LED switched on This is used so that on pressing the TORCH TRIGGER spot welding is done for a time period set beforehand in seconds after which the arc switches off automatically STITCH WELDING 2T LED switched on SPOT LED flashing To begin sti...

Page 30: ...t icon is reached Push the ENTER MEM KEY to open the CONFIG Menu Select the LANGUAGE Sub menu by rotating the ENCODER KNOB SX Select the language required by rotating the ENCODER KNOB DX Push the MENU KEY to close the CONFIG Menu Push the MENU KEY to close the SETUP Menu Once this has closed the VISION SCREEN will show the various text screens in the language selected Screen saver After a pause or...

Page 31: ... PROCESS via the HT4 control panel MIG pulse 1 PROGRAM SELECTION Menu PROGRAM MIG pulse DH CONTROL PANEL To access the PROGRAM SELECTION Menu PROGRAM push the MENU KEY MENU KEY ENTER MEM KEY ENCODER KNOB SX ENCODER KNOB DX VISION SCREEN SX KEY DX KEY PRG MATERIAL Ø GAS 1011 Fe G3 SI 1 0 8 Ar 16 20 CO2 1012 Fe G3 SI 1 1 0 Ar 16 20 CO2 1013 Fe G3 SI 1 1 2 Ar 16 20 CO2 1014 Fe G3 SI 1 1 6 Ar 16 20 CO...

Page 32: ...ess the PRE SETTING for the program selected beforehand in the MODE chosen HT4 CONTROL PANEL To access the WELDING MODE SELECTION Menu MODE push the WELDING MODE SELECTION KEY WELDING MODE SELECTION LED WELDING MODE SELECTION KEY WIRE KEY ENCODER KNOB A PARAMETER SELECTION KEY A PARAMETER SELECTION LED A PARAMETER DISPLAY SCREEN A SPECIAL FUNCTIONS FX LED SPECIAL FUNCTIONS FX KEY GAS KEY ENCODER K...

Page 33: ...ECIAL FUNCTIONS Menu SET UP Fx push the SPECIAL FUNCTIONS FX KEY WELDING MODE SELECTION LED WELDING MODE SELECTION KEY WIRE KEY ENCODER KNOB A PARAMETER SELECTION KEY A PARAMETER SELECTION LED A PARAMETER DISPLAY SCREEN A SPECIAL FUNCTIONS FX LED SPECIAL FUNCTIONS FX KEY GAS KEY ENCODER KNOB V PARAMETER SELECTION KEY V PARAMETER SELECTION LED V PARAMETER DISPLAY SCREEN V HOLD Function LED PARAMETE...

Page 34: ... 0 0s 0 0 5 0 s BURN BACK bub 0 30 30 POST GAS PoG 1 0s 0 0 10 0 s FIRST SLOPE I1 TO I2 F18 0 05s 0 0 1 0 s CYCLE CURRENT F19 20 99 100 CYCLE ARC LENGTH F20 0 30 30 SECOND SLOPE I2 TO I1 F21 0 05s 0 0 1 0 s ACS ENCODER SPEED F28 100A s 5 500 A s WARNING The STANDARD or ADVANCED welding CYCLE mode can only be activated by opening the ADVANCED SETUP Menu AD VANCED MODE CYCLE for further explanations...

Page 35: ...PECIAL FUNCTIONS FX LED SPECIAL FUNCTIONS FX KEY GAS KEY ENCODER KNOB V PARAMETER SELECTION KEY V PARAMETER SELECTION LED V PARAMETER DISPLAY SCREEN V HOLD Function LED PARAMETER DISPLAY SCREEN A Shows the value for the parameter indicated by the PARAMETER SELECTION LED A PARAMETER SELECTION LED A The LED unit shows the welding parameter selected using the PARAMETER SELECTION KEY A PARAMETER SELEC...

Page 36: ...as applicable SX KEY Scrolls in succession THICKNESS OF WELDED ITEM WELDING CURRENT WIRE SPEED only on the VISION SCREEN this operation is activated when the key is released In this case where possible the values displayed will be those measured ENCODER KNOB SX Adjusts the parameter selected using the SX KEY In this case the values displayed become those pre set After a period of 3 seconds the val...

Page 37: ...n this case the values displayed become those pre set After a period of 3 seconds the values displayed go back to those measured if possible WELDING MODE SELECTION LED The LED unit indicates the welding mode selected according to the VISION SCREEN PARAMETER DISPLAY SCREEN V Shows the value measured if possible for the parameter indicated by the PARAMETER SELECTION LED V PARAMETER SELECTION LED V T...

Page 38: ...he PROCESS SELECTION Menu PROCESS interrupting the HOLD Function and subsequent menus as applicable SX KEY Scrolls in succession THICKNESS OF WELDED ITEM WELDING CURRENT WIRE SPEED only on the VISION SCREEN this operation is activated when the key is released In this case the values displayed are those for HOLD ENCODER KNOB SX Adjusts the parameter selected using the SX KEY interrupting the HOLD F...

Page 39: ...rupting the HOLD Function WELDING MODE SELECTION KEY Scrolls the various welding modes in succession interrupting the HOLD Function WELDING MODE SELECTION LED The LED unit indicates the welding mode selected according to the VISION SCREEN HOLD FUNCTION LED Flashes for a set time informing the operator that the HOLD Function is active PARAMETER DISPLAY SCREEN V Shows the parameter indicated by the ...

Page 40: ...the welding program ENTER MEM KEY Used to access PRE SETTING of the program selected HT4 CONTROL PANEL It is not possible to access the PROGRAM SELECTION Menu PROGRAM via the HT4 control panel 2 WELDING MODE SELECTION Menu MODE MIG dual pulse DH CONTROL PANEL To access the WELDING MODE SELECTION Menu MODE push the MENU KEY MENU KEY ENTER MEM KEY ENCODER KNOB SX ENCODER KNOB DX VISION SCREEN SX KEY...

Page 41: ...mode selected 3 SPECIAL FUNCTIONS Menu SET UP Fx MIG dual pulse DH CONTROL PANEL To access the SPECIAL FUNCTIONS Menu SET UP Fx push the MENU KEY MENU KEY ENTER MEM KEY ENCODER KNOB SX ENCODER KNOB DX VISION SCREEN SX KEY DX KEY 2011 Fe G3 SI 1 Ø 0 8 Ar 16 20 CO2 DEFAULT POST GAS 1 0 s MENU KEY Used to access subsequent menus if there are any ENCODER KNOB SX Used to select the various SPECIAL FUNC...

Page 42: ... afterwards from the SPECIAL FUNCTIONS Menu SET UP Fx on the HT4 panel and not on the DH panel SPECIAL FUNCTIONS FX LED The operator must press the SPECIAL FUNCTIONS SET UP FX KEY for it to light up and be included in the SPECIAL FUNCTIONS Menu SET UP Fx The SPECIAL FUNCTIONS Fx related to the MIG dual pulse process correspond as follows to those on the wire feeder Special function PARAMETER DISPL...

Page 43: ... WARNING The STANDARD or ADVANCED welding CYCLE mode can only be activated by opening the ADVANCED SETUP Menu AD VANCED MODE CYCLE for further explanations see the relevant paragraph This SPECIAL FUNCTION is only to be found if the ADVANCED CRATER function has been activated by accessing the AD VANCED SETUP Menu ADVANCED MODE CRATER ADVANCED for further explanations see the relevant paragraph Thes...

Page 44: ...A SPECIAL FUNCTIONS FX LED SPECIAL FUNCTIONS FX KEY GAS KEY ENCODER KNOB V PARAMETER SELECTION KEY V PARAMETER SELECTION LED V PARAMETER DISPLAY SCREEN V HOLD Function LED PARAMETER DISPLAY SCREEN A Shows the value for the parameter indicated by the PARAMETER SELECTION LED A PARAMETER SELECTION LED A The LED unit shows the welding parameter selected using the PARAMETER SELECTION KEY A PARAMETER SE...

Page 45: ...us as applicable SX KEY Scrolls in succession THICKNESS OF WELDED ITEM WELDING CURRENT WIRE SPEED only on the VISION SCREEN this operation is activated when the key is released In this case where possible the values displayed will be those measured ENCODER KNOB SX Adjusts the parameter selected using the SX KEY In this case the values displayed become those pre set After a period of 3 seconds the ...

Page 46: ...n this case the values displayed become those pre set After a period of 3 seconds the values displayed go back to those measured if possible WELDING MODE SELECTION LED The LED unit indicates the welding mode selected according to the VISION SCREEN PARAMETER DISPLAY SCREEN V Shows the value measured if possible for the parameter indicated by the PARAMETER SELECTION LED V PARAMETER SELECTION LED V T...

Page 47: ...nds it interrupts the HOLD Function and makes it possible to access SAVE JOB DX KEY Scrolls in succession ARC LENGTH ADJUSTMENT WELDING VOLTAGE ELECTRONIC INDUCTANCE only on the VISION SCREEN this operation is activated when the key is released In this case the values displayed are those for HOLD ENCODER KNOB DX Adjusts the parameter selected using the DX KEY interrupting the HOLD Function HT4 CON...

Page 48: ...e HOLD Function GAS KEY Activates the flow of gas without interrupting the HOLD Function SPECIAL FUNCTIONS FX KEY Only enables entering interrupting the HOLD Function and exit afterwards from the SPECIAL FUNCTIONS Menu SET UP Fx on the HT4 panel and not on the DH panel MIG MAG synergic 1 PROGRAM SELECTION Menu PROGRAM MIG MAG synergic DH CONTROL PANEL To access the PROGRAM SELECTION Menu PROGRAM p...

Page 49: ... access the PRE SETTING for the program selected beforehand in the MODE chosen HT4 CONTROL PANEL To access the WELDING MODE SELECTION Menu MODE push the WELDING MODE SELECTION KEY WELDING MODE SELECTION LED WELDING MODE SELECTION KEY WIRE KEY ENCODER KNOB A PARAMETER SELECTION KEY A PARAMETER SELECTION LED A PARAMETER DISPLAY SCREEN A SPECIAL FUNCTIONS FX LED SPECIAL FUNCTIONS FX KEY GAS KEY ENCOD...

Page 50: ...IAL FUNCTIONS Menu SET UP Fx push the SPECIAL FUNCTIONS FX KEY WELDING MODE SELECTION LED WELDING MODE SELECTION KEY WIRE KEY ENCODER KNOB A PARAMETER SELECTION KEY A PARAMETER SELECTION LED A PARAMETER DISPLAY SCREEN A SPECIAL FUNCTIONS FX LED SPECIAL FUNCTIONS FX KEY GAS KEY ENCODER KNOB V PARAMETER SELECTION KEY V PARAMETER SELECTION LED V PARAMETER DISPLAY SCREEN V HOLD Function LED PARAMETER ...

Page 51: ... F15 0 0s 0 0 5 0 s BURN BACK bub 0 30 30 POST GAS PoG 1 0s 0 0 10 0 s FIRST SLOPE I1 TO I2 F18 0 05s 0 0 1 0 s CYCLE CURRENT F19 20 99 100 CYCLE ARC LENGTH F20 0 30 30 SECOND SLOPE I2 TO I1 F21 0 05s 0 0 1 0 s ACS ENCODER SPEED F28 100A s 5 500 A s WARNING The STANDARD or ADVANCED welding CYCLE mode can only be activated by opening the ADVANCED SETUP Menu AD VANCED MODE CYCLE for further explanat...

Page 52: ... A SPECIAL FUNCTIONS FX LED SPECIAL FUNCTIONS FX KEY GAS KEY ENCODER KNOB V PARAMETER SELECTION KEY V PARAMETER SELECTION LED V PARAMETER DISPLAY SCREEN V HOLD Function LED PARAMETER DISPLAY SCREEN A Shows the value for the parameter indicated by the PARAMETER SELECTION LED A PARAMETER SELECTION LED A The LED unit shows the welding parameter selected using the PARAMETER SELECTION KEY A PARAMETER S...

Page 53: ...nus as applicable SX KEY Scrolls in succession THICKNESS OF WELDED ITEM WELDING CURRENT WIRE SPEED only on the VISION SCREEN this operation is activated when the key is released In this case where possible the values displayed will be those measured ENCODER KNOB SX Adjusts the parameter selected using the SX KEY In this case the values displayed become those pre set After a period of 3 seconds the...

Page 54: ...n this case the values displayed become those pre set After a period of 3 seconds the values displayed go back to those measured if possible WELDING MODE SELECTION LED The LED unit indicates the welding mode selected according to the VISION SCREEN PARAMETER DISPLAY SCREEN V Shows the value measured if possible for the parameter indicated by the PARAMETER SELECTION LED V PARAMETER SELECTION LED V T...

Page 55: ...it interrupts the HOLD Function and makes it possible to access SAVE JOB DX KEY Scrolls in succession ARC LENGTH ADJUSTMENT WELDING VOLTAGE ELECTRONIC INDUCTANCE only on the VISION SCREEN this operation is activated when the key is released In this case the values displayed are those for HOLD ENCODER KNOB DX Adjusts the parameter selected using the DX KEY interrupting the HOLD Function HT4 CONTROL...

Page 56: ...re those for HOLD ENCODER KNOB V Adjusts the parameter displayed by the PARAMETER DISPLAY SCREEN V interrupting the HOLD Function GAS KEY Activates the flow of gas without interrupting the HOLD Function SPECIAL FUNCTIONS FX KEY Only enables entering interrupting the HOLD Function and exit afterwards from the SPECIAL FUNCTIONS Menu SET UP Fx on the HT4 panel and not on the DH panel MIG MAG manual 1...

Page 57: ...ys the welding mode selected 2 SPECIAL FUNCTIONS Menu SET UP Fx MIG MAG manual DH CONTROL PANEL To access the SPECIAL FUNCTIONS Menu SET UP Fx push the SPECIAL FUNCTIONS FX KEY MENU KEY ENTER MEM KEY ENCODER KNOB SX ENCODER KNOB DX VISION SCREEN SX KEY DX KEY DEFAULT PRE GAS 0 5 s MENU KEY Used to access subsequent menus if there are any ENCODER KNOB SX Used to select the various SPECIAL FUNCTIONS...

Page 58: ...UNCTIONS Menu SET UP Fx on the HT4 panel and not on the DH panel SPECIAL FUNCTIONS FX LED The operator must press the SPECIAL FUNCTIONS SET UP FX KEY for it to light up and be included in the SPECIAL FUNCTIONS Menu SET UP Fx The SPECIAL FUNCTIONS Fx related to the Manual MIG MAG process correspond as follows to those on the wire feeder Special function PARAMETER DISPLAY Screen A PARAMETER DISPLAY ...

Page 59: ...r explanations see the relevant paragraph It is possible to access editing of the SPECIAL FUNCTIONS Fx during welding Some of the values edited will be used immediately by the operator while others will be active from when the next welding task begins The HOLD function is not active within the SPECIAL FUNCTIONS Menu SET UP Fx 3 PRE SETTING MIG MAG manual DH CONTROL PANEL MENU KEY ENTER MEM KEY ENC...

Page 60: ...dicated by the PARAMETER SELECTION LED V PARAMETER SELECTION LED V The LED unit indicates the welding parameter selected using the PARAMETER SELECTION KEY V PARAMETER SELECTION KEY V Scrolls in succession WELDING VOLTAGE ELECTRONIC INDUCTANCE ENCODER KNOB V Adjusts the parameter displayed by the PARAMETER DISPLAY SCREEN V GAS KEY Activates the flow of gas SPECIAL FUNCTIONS FX KEY Only enables ente...

Page 61: ...KEY A PARAMETER SELECTION KEY A Scrolls in succession WELDING CURRENT WIRE SPEED only on the HT4 panel In this case where possible the values displayed will be those measured When welding is in progress the WELDING CURRENT is displayed continuously until this key is pushed ENCODER KNOB A Adjusts the WIRE SPEED parameter the WELDING CURRENT cannot be adjusted In this case the values displayed becom...

Page 62: ...TAGE ELECTRONIC INDUCTANCE only on the VISION SCREEN In this case the values displayed are those for HOLD ENCODER KNOB DX Adjusts the parameter selected using the DX KEY interrupting the HOLD Function HT4 CONTROL PANEL WELDING MODE SELECTION LED WELDING MODE SELECTION KEY WIRE KEY ENCODER KNOB A PARAMETER SELECTION KEY A PARAMETER SELECTION LED A PARAMETER DISPLAY SCREEN A SPECIAL FUNCTIONS FX LED...

Page 63: ...ivates the flow of gas without interrupting the HOLD Function SPECIAL FUNCTIONS FX KEY Only enables entering interrupting the HOLD Function and exit afterwards from the SPECIAL FUNCTIONS Menu SET UP Fx on the HT4 panel and not on the DH panel MMA 1 PROGRAM SELECTION Menu PROGRAM MMA DH CONTROL PANEL To access the PROGRAM SELECTION Menu PROGRAM push the MENU KEY MENU KEY ENTER MEM KEY ENCODER KNOB ...

Page 64: ... Fx push the MENU KEY WELDING MODE SELECTION LED WELDING MODE SELECTION KEY WIRE KEY ENCODER KNOB A PARAMETER SELECTION KEY A PARAMETER SELECTION LED A PARAMETER DISPLAY SCREEN A SPECIAL FUNCTIONS FX LED SPECIAL FUNCTIONS FX KEY GAS KEY ENCODER KNOB V PARAMETER SELECTION KEY V PARAMETER SELECTION LED V PARAMETER DISPLAY SCREEN V HOLD Function LED PARAMETER DISPLAY SCREEN A Displays the selected SP...

Page 65: ...SELECTION Menu PROCESS and subsequent menus as applicable ENCODER KNOB SX Adjust the value of the parameter WELDING CURRENT DX KEY Scrolls in succession WELDING VOLTAGE HOT START ARC FORCE only on the VISION SCREEN the operation is activated when the key is released ENCODER KNOB DX Adjusts the parameter selected using the DX KEY only HOT START ARC FORCE HT4 CONTROL PANEL WELDING MODE SELECTION LED...

Page 66: ... 3200 MENU KEY Used to access the PROCESS SELECTION Menu PROCESS and subsequent menus as applicable ENCODER KNOB SX Adjust the value of the parameter WELDING CURRENT In this case the values displayed become those pre set After a period of 3 seconds the values displayed go back to those measured if possible DX KEY Scrolls in succession WELDING VOLTAGE HOT START ARC FORCE only on the VISION SCREEN t...

Page 67: ...ence that they are now values defined as HOLD In this phase the VISION SCREEN shows the HOLD box highlighted while on the HT4 panel the HOLD FUNCTION LED flashes until the end of the HOLD Function If the HOLD Function is Interrupted via a panel e g DH it will also be interrupted automatically on the other HT4 and vice versa DH CONTROL PANEL A V 68 7 2 MMA Cr Ni PROGRAM 3200 VRD ACTIVE MENU KEY ENT...

Page 68: ...nterrupting the HOLD Function and exit afterwards from the SPECIAL FUNCTIONS Menu SET UP Fx on the HT4 panel and not on the DH panel 6 ACTIVATING THE VRD DEVICE MMA The Voltage Reduction Device VRD is a safety device that reduces voltage It prevents voltages forming on the output termi nals that may pose a danger to people The standard settings and those defined beforehand by do not provide for th...

Page 69: ... Fx push the MENU KEY WELDING MODE SELECTION LED WELDING MODE SELECTION KEY WIRE KEY ENCODER KNOB A PARAMETER SELECTION KEY A PARAMETER SELECTION LED A PARAMETER DISPLAY SCREEN A SPECIAL FUNCTIONS FX LED SPECIAL FUNCTIONS FX KEY GAS KEY ENCODER KNOB V PARAMETER SELECTION KEY V PARAMETER SELECTION LED V PARAMETER DISPLAY SCREEN V HOLD Function LED PARAMETER DISPLAY SCREEN A Displays the selected SP...

Page 70: ...SX KEY DX KEY A V 111 50 0 MENU KEY Used to access the PROCESS SELECTION Menu PROCESS and subsequent menus as applicable ENCODER KNOB SX Adjust the value of the parameter WELDING CURRENT HT4 CONTROL PANEL WELDING MODE SELECTION LED WELDING MODE SELECTION KEY WIRE KEY ENCODER KNOB A PARAMETER SELECTION KEY A PARAMETER SELECTION LED A PARAMETER DISPLAY SCREEN A SPECIAL FUNCTIONS FX LED SPECIAL FUNCT...

Page 71: ...if possible HT4 CONTROL PANEL WELDING MODE SELECTION LED WELDING MODE SELECTION KEY WIRE KEY ENCODER KNOB A PARAMETER SELECTION KEY A PARAMETER SELECTION LED A PARAMETER DISPLAY SCREEN A SPECIAL FUNCTIONS FX LED SPECIAL FUNCTIONS FX KEY GAS KEY ENCODER KNOB V PARAMETER SELECTION KEY V PARAMETER SELECTION LED V PARAMETER DISPLAY SCREEN V HOLD Function LED PARAMETER DISPLAY SCREEN A Displays the val...

Page 72: ...secutive seconds it interrupts the HOLD Function and makes it possible to access SAVE JOB HT4 CONTROL PANEL WELDING MODE SELECTION LED WELDING MODE SELECTION KEY WIRE KEY ENCODER KNOB A PARAMETER SELECTION KEY A PARAMETER SELECTION LED A PARAMETER DISPLAY SCREEN A SPECIAL FUNCTIONS FX LED SPECIAL FUNCTIONS FX KEY GAS KEY ENCODER KNOB V PARAMETER SELECTION KEY V PARAMETER SELECTION LED V PARAMETER ...

Page 73: ...G MAG SYNERGIC 211 003 004 005 OVERWRITE JOB 002 To edit and or overwrite a JOB proceed as follows During any welding process and at any time push the MENU KEY to exit the welding phase Select the welding process JOB by rotating the ENCODER KNOB SX Push the MENU KEY to open the JOB table Select the JOB to be edited by rotating the ENCODER KNOB SX Push the ENTER MEM KEY to view the settings on the ...

Page 74: ...SCREEN V HOLD Function LED PARAMETER DISPLAY SCREEN A Shows the JOB term or value of the parameter indicated by the PARAMETER SELECTION LED A PARAMETER SELECTION LED A The LED unit shows the welding parameter selected using the PARAMETER SELECTION KEY A PARAMETER SELECTION KEY A Scrolls the active parameters in succession based on the type of welding process saved in the JOB selected WIRE KEY Acti...

Page 75: ...PECIAL FUNCTIONS FX LED SPECIAL FUNCTIONS FX KEY GAS KEY ENCODER KNOB V PARAMETER SELECTION KEY V PARAMETER SELECTION LED V PARAMETER DISPLAY SCREEN V HOLD Function LED PARAMETER DISPLAY SCREEN A Shows the JOB term or value of the parameter indicated by the PARAMETER SELECTION LED A PARAMETER SELECTION LED A The LED unit shows the welding parameter selected using the PARAMETER SELECTION KEY A PARA...

Page 76: ...CTION LED A PARAMETER DISPLAY SCREEN A SPECIAL FUNCTIONS FX LED SPECIAL FUNCTIONS FX KEY GAS KEY ENCODER KNOB V PARAMETER SELECTION KEY V PARAMETER SELECTION LED V PARAMETER DISPLAY SCREEN V HOLD Function LED PARAMETER DISPLAY SCREEN A Shows the JOB term or value of the parameter indicated by the PARAMETER SELECTION LED A PARAMETER SELECTION LED A The LED unit shows the welding parameter selected ...

Page 77: ... MEM KEY If held down for 3 consecutive seconds it interrupts the HOLD Function and makes it possible to access SAVE JOB DX KEY Scrolls the active parameters in succession only on the VISION SCREEN based on the type of welding process saved in the JOB selected In this case the values displayed are those for HOLD HT4 CONTROL PANEL WELDING MODE SELECTION LED WELDING MODE SELECTION KEY WIRE KEY ENCOD...

Page 78: ...KEY Used to access the display of the SPECIAL FUNCTIONS Fx saved in the JOB selected interrupting the HOLD Function Error condition WARNING Under normal conditions of use it is not possible to open the ERROR LOG Menu display since the alarm message appears instantaneously on the VISION SCREEN as soon as the problem arises on the welding plant At this stage it is not possi ble to weld As soon as th...

Page 79: ...rror signal to inform the operator of the event but this can be removed visually from the display by simply pushing the MENU KEY WARNING This only removes the visual error indication but not the history of what happened In the case of NON automatically reset errors to remove the alarm status and reinstate correct operation of the machine the welding plant must be switched off When it is switched o...

Page 80: ...011 MIG MAG SYNERGIC 211 003 MMA 97 004 005 006 COPYING THE JOB SELECTED PRG JOB PROCESS I 001 MMA 97 002 0011 MIG MAG SYNERGIC 211 003 MMA 97 004 005 006 COPY JOB 002 To copy the JOB selected proceed as follows Select the JOB to be copied by rotating the ENCODER KNOB SX Push the SX KEY Choose the position to which the JOB selected is to be copied or overwritten by rotating the ENCODER KNOB SX Pus...

Page 81: ... operation of entering a PASSWORD push the DX KEY EDITING THE EXISTING PASSWORD STORE PASSWORD SET PASSWORD 077 WARNING This operation is only possible after having accessed the SETUP Menu using the password you wish to edit To edit the existing PASSWORD proceed as follows Make sure the VISION SCREEN shows the PASSWORD entered previously a number that must be between 001 and 999 Choose the new PAS...

Page 82: ...MACHINE Does not allow any block to be activated on the welding machine but allows the operator to release the machine if its was blocked previously LEVEL 1 BLOCK TYPE LEVEL 1 PARTIAL BLOCK The operator can weld using the parameters set prior to the block and may make adjustments and or changes to the welding parameters using the knobs on the control panels on the welding machine and the wire feed...

Page 83: ...relevant paragraph in the manual Language Selection ADVANCED CONFIGURATION LANGUAGE ENGLISH ADVANCED CONFIGURATION ENABLED ADVANCED WELDING MODE DISABLED EQUIPMENT LAYOUT DISABLED If enabled this configuration offers the welder the following additional menus the following icons will be created in the ADVANCED SETUP Menu ADVANCED CONFIG WELD LOG ADVANCED WELDING MODE LANGUAGE ENGLISH ADVANCED CONFI...

Page 84: ... RESET PROCESS DATA MIG MAG SYNERGIC DELETE ALL JOBS COUNTER ALARMS RESET TOTAL RESET EXECUTE DATA PROCESS RESET Used to return the Special functions Fx of the welding PROCESS the operator is using to their DEFAULT settings NOTE The welding PROCESS for which the Special Functions Fx are to be returned to the factory settings is indicated on the VISION SCREEN DELETE ALL JOBS RESET PROGRAM 0011 RESE...

Page 85: ...o access the INFO Menu from the SETUP Menu Turn the ENCODER KNOB SX to select the desired icon Push the ENTER MEM KEY MENU KEY ENTER MEM KEY ENCODER KNOB SX ENCODER KNOB DX VISION SCREEN SX KEY DX KEY POWER SOURCE SW VERS WIRE FEEDER SOFTWARE VER DIGITORCH SW VERS ROBOT INTERFACE SW VERS S N 12345678 12345678 1234 1234 Software Description POWER SOURCE SW VERS Indicates the version of the software...

Page 86: ...ration done by the operator JOB A file that contains all the JOBS created by the operator and saved in the welding machine CONFIGURATION A file that contains the current configuration status of the welding machine ALL DATA A file that contains all the data entered in the welding plant since it was first used errors register welding data jobs plant configuration etc IMPORT FROM USB KEY DOWNLOAD TO ...

Page 87: ...SET PARTIAL ERROR COUNT ERRORS Curr Tot E0 1 OVER AND UNDER VOLTAGE 0 0 E0 2 OVER VOLTAGE 0 0 E0 3 UNDER VOLTAGE 0 0 E0 4 OVER CURRENT 0 0 E0 5 REMOTE COMMANDS 0 0 E0 6 WATER COOLER MISSING 1 6 The counter that indicates how many times a error or alarm has occurred since the last time the machine was switched on is part of this menu and can be zeroed as follows Choose the error for which the parti...

Page 88: ...utomatically If the alarm occurs even when the WIRE FEEDER OPTIONAL function is included in the ADVANCED SETUP Menu EQUIPMENT LAYOUT call Technical Assistance Department immediately Err E0 9 CAN INTERNAL ERROR Faulty communication between the generator and the feeder NON automatic reset error Error visible on VISION SCREEN ONLY in the event of a fault and NOT in the ERROR LOG Menu Err T C THERMAL ...

Page 89: ...VISION SCREEN ONLY in the event of a fault and NOT in the ERROR LOG Menu Err E4 1 JOBS WRONG NON automatic reset error Immediately contact technical assistance dept Error visible on VISION SCREEN ONLY in the event of a fault and NOT in the ERROR LOG Menu Err E4 2 MIG SYN SPECIAL FUNCTION Fx WRONG NON automatic reset error Immediately contact technical assistance dept Error visible on VISION SCREEN...

Page 90: ...AYOUT call Technical Assistance Department immediately AUT ADJ POWER LIMITATION This alarm appears if the power limit is exceeded The alarm alternates with the standard display every 1 5 seconds despite which the machine continues to weld supplying limited power but complying with the values shown on the data plate The table provides a simple summary of all the error conditions that may arise on t...

Page 91: ...COD ER KNOB DX Exit the CONFIG Menu by pushing the MENU KEY At this stage the SETUP Menu has been transformed into the ADVANCED SETUP Menu and the VISION SCREEN displays the following additional icons ADVANCED CONFIG ADVANCED MODE EQUIPMENT LAYOUT WELD LOG MENU KEY Used to exit the ADVANCED SETUP Menu and take the VISION SCREEN back to the welding phase ENCODER KNOB SX Used to scroll the various i...

Page 92: ...RC ON TIMER 0 gg 0 00 00 TIMER WELDER ON 0 gg 0 12 35 ENERGY SAVING STANDARD REMOTE CONTROL PLC Indicates the actual time the machine works even when the screen saver is activated WARNING This time can only be zeroed by means of a TOTAL RESET see the relevant paragraph of the welding plant WARNING The content of the part of the menu described above is for information only the operator cannot make ...

Page 93: ...o the welding parameters for the machine To access the ADVANCED MODE Menu from the ADVANCED SETUP Menu Turn the ENCODER KNOB SX to select the desired icon Push the ENTER MEM KEY MENU KEY ENTER MEM KEY ENCODER KNOB SX ENCODER KNOB DX VISION SCREEN SX KEY DX KEY CYCLE DISABLED CRATER STANDARD DUAL PULSE STANDARD ARC LENGTH ADJUSTMENT VOLTAGE TIG LIFT MODE DISABLED Within the ADVANCED MODE Menu it is...

Page 94: ...ator using the pulsed double pulsed synergic and manual MIG welding process to adjust the ARC LENGTH ADJUSTMENT parameter with the WELDING VOLTAGE or the WIRE SPEED TIG LIFT MODE CYCLE DISABLED CRATER STANDARD DUAL PULSE STANDARD ARC LENGTH ADJUSTMENT VOLTAGE TIG LIFT MODE ENABLED TIG LIFT TIG LIFT TORCH TRIGGER If activated this function makes an additional welding mode known as TIG LIFT TORCH TR...

Page 95: ... detect the presence During normal operation if the water cooler system is disconnected WIRE FEEDER WATER COOLER OPTIONAL WIRE FEEDER OPTIONAL DIGITORCH OPTIONAL ANALOGIC RC OPTIONAL TORCH TYPE 400A H2O SAFETY CALIBRATION CODE 013 OPTIONAL Means that the wire feeder may or may not be connected to the welding machine OBLIGATORY Means that it is obligatory for the wire feeder to be connected to the ...

Page 96: ...P Menu The purpose of this menu is to allow the operator to know the latest welding parameters set on the machine as well as the lat est data saved on the machine To access the WELD LOG Menu from the ADVANCED SETUP Menu Turn the ENCODER KNOB SX to select the desired icon Push the ENTER MEM KEY MENU KEY ENTER MEM KEY ENCODER KNOB SX ENCODER KNOB DX VISION SCREEN SX KEY DX KEY HOLD DATA CURRENT 39 A...

Page 97: ...73 ...

Page 98: ...74 ...

Page 99: ...75 ...

Page 100: ......

Reviews: