16
17
rewind and fast forward are achieved while the
DV source is in stop mode, viewable slow rewind
and slow forward in playback mode, and frame-
by-frame backward and forward in pause mode.
The color box
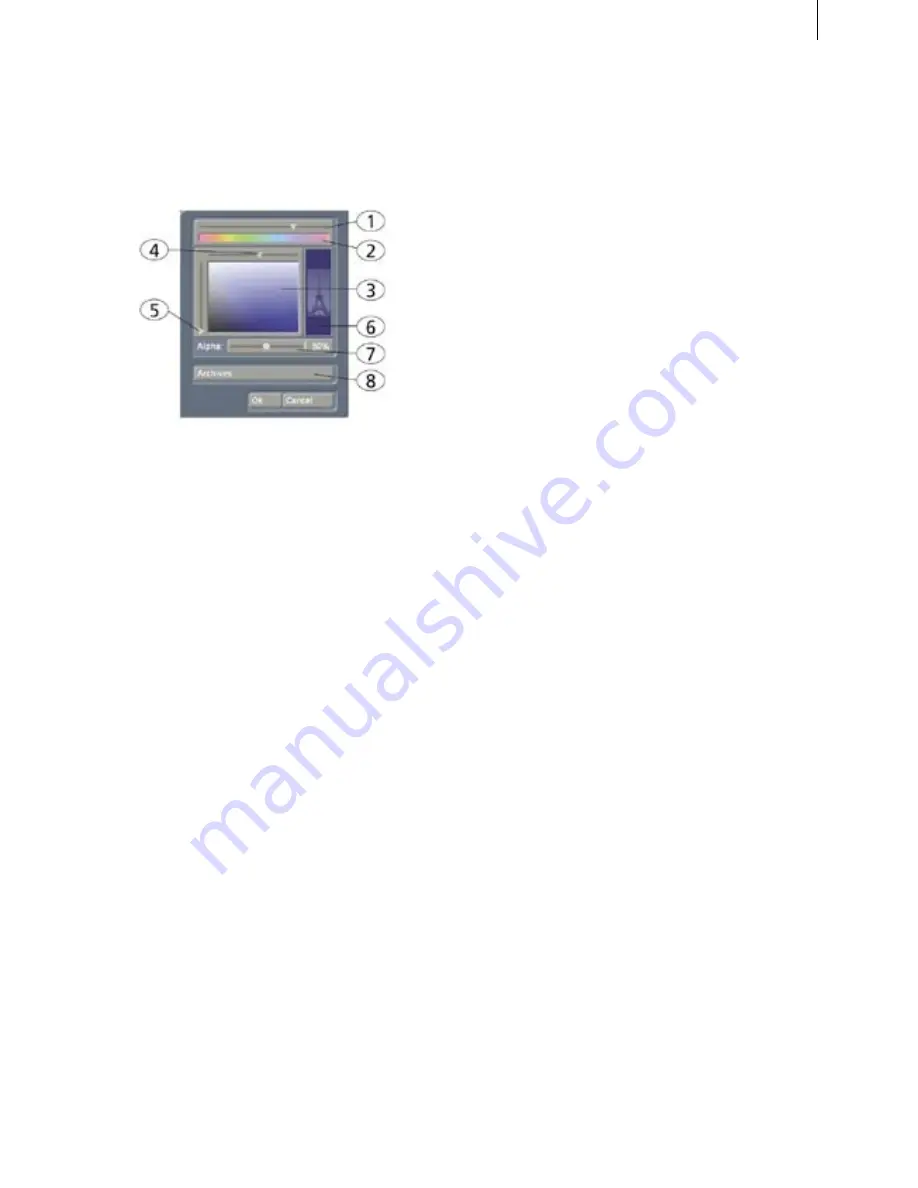
The color box enables you to select a color.
Clicking on the palette arrow (
1
) enables you to
choose a specific color. Scroll through the color
palette (
2
) until your desired color is displayed
in the color window below (
3
). After confirming
this color by clicking the left trackball button you
can define the color more precisely. Click in the
large color window and use the upper arrow (
4
)
to scroll left or right in order to attain the desi-
red saturation. Use the left arrow (
5
) to scroll up
or down to set the color brightness. With a little
practice you can specify your desired color by
simultaneous use of both arrows. The intersec-
tion point of both arrows (if you imagine them
extending until they touch within the box) indi-
cates the selected color, which is always displayed
to the right in the rectangle (
6
). Clicking on the
left trackball button confirms the setting. You can
also click directly on the color you wish without
having to use the arrow keys, by simply clicking
on the desired color within the color window (
3
).
In many cases (e.g. when titling) the color box
provides the
Alpha
option (
7
). Here you let the
desired color shine through your motif displayed
on the right (
6
), (the Eiffel tower is shown here as
an example). You can specify the alpha value in
percent by moving the scroll bar. The lower the
percent value the more transparent your selected
color and the more clearly your motif shines
through.
You can use the
Archive
function (
8
) to save the
colors you specify for later use.
When you have finished making all the settings
you want, click on "
OK
" to confirm and to exit the
color box.
Note:
If you are not using a professional video
system (e.g. Betacom SP), avoid using high
saturation values. Otherwise "color drain" or
"jaggedness" might occur that is only visible after
recording out to tape. A simultaneous reduction of
color saturation and brightness results in a similar
color with a better recording quality for VHS, SVHS
and DV.
Tip:
If you would also like to use a color in
titling that has already been used for an effect
(e.g. picture-in-picture), archive the effect color,
change to Titling and reload the color. You can
access archived colors from all ten projects!
The symbols for direct menu change
Most of the Casablanca Prestige screens are
represented by symbols.
You will find these symbols on small buttons at
many places and they serve to directly switch
from one menu to another. It is always possible to
return to the Main menu and go from there to the
individual menus, but the experienced user will
save time by using the symbols to access menus
directly. You will become used to the symbols
while doing some editing. Instant memorization
of their uses is not necessary.
Wave form and audio scrubbing
The menus
Insert
,
Range
,
Split
, and
Trim
(video
and audio) contain a
loudspeaker symbol
in the
operating panel. When this symbol is active (blue)
a small box containing the
Audio Wave Form
is
displayed at the other side of the operating panel.
The wave form graphically displays the volume
over time. The height of the curve represents
loudness (the higher, the louder) and the width is
a measure of time.
In the wave form you see a vertical, black position
marker indicating your current picture position.
This position marker is also shown when you
scroll through the scene or the audio segment.
The
Audio Wave Form
is automatically played
Summary of Contents for Prestige
Page 1: ...Casablanca Prestige User manual ...
Page 20: ...20 ...
Page 40: ...40 ...
Page 88: ......


