background image


9

WARNING:

 If the information in this manual

is not followed exactly, a fire or explosion may 

result  causing  property  damage,  personal 

injury or loss of life.

Do not store or use gasoline or other flammable 

vapors and liquids or other combustible materials 

in the vicinity of this or any other appliance. To 

do so may result in an explosion or fire.

WHAT TO DO IF YOU SMELL GAS:

• Do not try to light any appliance.

• Do not touch any electrical switch; do not use

any phone in your building.

• Immediately  call  your  gas  supplier  from  a

neighbor’s  phone.  Follow  the  gas  supplier’s

instructions.

• If you cannot reach your gas supplier, call the

fire department.

Installation  and  service  must  be  performed  by 

a  qualified  installer,  service  agency  or  the  gas 

supplier.

This manual should be maintained in legible 

condition and kept adjacent to the boiler or 

in a safe place for future reference.

CAC/BDP 

7310 West Morris St

Indianapolis - IN 46231 

USA 

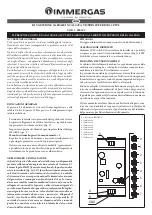
BWCAAG000120 - BWCAAG000150 

BWHAAG000120 - BWHAAG000150

INSTALLATION & OPERATING INSTRUCTIONS FOR CONTRACTORS

BWC-H-01SI

   07/2020

Summary of Contents for BWCAAG000120

Page 1: ... electrical switch do not use any phone in your building Immediately call your gas supplier from a neighbor s phone Follow the gas supplier s instructions If you cannot reach your gas supplier call the fire department Installation and service must be performed by a qualified installer service agency or the gas supplier This manual should be maintained in legible condition and kept adjacent to the ...

Page 2: ...onnecting flue gas accessories 33 8 6 1 Installing of the exhaust and air intake system 33 8 7 Vent and combustion air pipe length 33 8 8 Approved configurations of horizontal and vertical venting installation 33 8 9 Multi Family boiler installation 38 9 WIRING DIAGRAM 39 9 1 Electrical diagram 39 9 2 Ladder diagram 41 10 LIGHTING INSTRUCTIONS 43 11 COMMISSIONING 44 11 1 Preliminary checks 44 11 2...

Page 3: ...ess than 50 ppm 9WARNING Automatic filling systems are not recommended with this product as they will continually add fresh water to the system if there is a leak resulting in the addition of new contaminants that could reduce the lifespan of the boiler 9WARNING To minimize the possibility of improper operation serious personal injury fire or damage to the boiler Always keep the area around the bo...

Page 4: ...cause internal corrosion in system components Leaks in the boiler or piping must be repaired at once to prevent make up water We recommend the use of water treatment additives to prolong the life of the boiler and prevent against corrosion and contaminant build ups in the heating system Ensure piping in the heating system has an oxygen barrier Observe these instructions for space heating water Tho...

Page 5: ... condensing boilers The BWC combi is a direct vent CAT IV wall mounted boiler for heating and prodution domestic hot water The BWH heating only is a direct vent CAT IV wall mounted boiler that is able to operate as follows CASE A heating only with tank thermostat in this condition the boiler delivers hot water to the water tank whenever a demand is made by the relative thermostat CASE B heating on...

Page 6: ... hose 16 Manual upper air vent valve 17 Flue temperature sensor 18 Positive air pressure tube 19 Flue outlet 20 Air intake 21 Negative air pressure tube 22 Air pressure switch 23 Thermal fuse 24 Ignition transformer 25 Expansion tank 26 Burner 27 Ignition electrode 28 Water discharge hose 29 Clapet 30 Fan 31 Mixer 32 Lower air vent valve 33 Pump 34 Flow sensor 35 Three way valve 36 DHW heat exchan...

Page 7: ... 14 Flame sensor 15 Manual air vent hose 16 Manual upper air vent valve 17 Flue temperature sensor 18 Positive air pressure tube 19 Flue outlet 20 Air intake 21 Negative air pressure tube 22 Air pressure switch 23 Thermal fuse 24 Ignition transformer 25 Expansion tank 26 Burner 27 Ignition electrode 28 Water discharge hose 29 Clapet 30 Fan 31 Mixer 32 Lower air vent valve 33 Pump 35 Three way valv...

Page 8: ... LED GREEN LED RED AND GREEN Definitive alarm see 11 16 Lights and faults Reset procedure Transitional alarm see 11 16 Lights and faults Reset procedure Initial automatic air purge cycle flashing 0 5 sec on 1 0 sec off Stand by flashing 0 5 sec on 3 5 sec off Flame presence ON Call for Service Service expire flashing 0 1 sec on 0 1 sec off Reset flue hour counter flashing 0 5 sec on 1 0 sec off Co...

Page 9: ... ft 1 524 2 286 m Btu hr 15 500 15 500 17 500 17 500 kW 4 54 4 54 5 13 5 13 Minimum input rate 7 501 10 000 ft 2 286 3 048 m Btu hr 14 000 14 000 15 500 15 500 kW 4 10 4 10 4 54 4 54 CH output rating 0 2 000 ft 0 610 m Btu hr 80 000 80 000 111 000 111 000 kW 23 45 23 45 32 53 32 53 CH output rating 2 001 5 000 ft 610 1 524 m Btu hr 80 000 80 000 111 000 111 000 kW 23 45 23 45 32 53 32 53 CH output...

Page 10: ... 19 0 23 0 23 2 001 5 000 ft 610 1 524m ft3 hr 6 60 6 60 7 60 7 60 m3 hr 0 19 0 19 0 22 0 22 5 001 7 500 ft 1 524 2 286 m ft3 hr 7 04 7 04 7 20 7 20 m3 hr 0 20 0 20 0 20 0 20 7 501 10 000 ft 2 286 3 048 m ft3 hr 6 00 6 00 6 60 6 60 m3 hr 0 17 0 17 0 19 0 19 Number of fan rotations with Start up Ignition RPM A 0 2 000 ft 0 610 m rpm 5 000 5 000 4 000 4 000 2 001 5 000 ft 610 1 524m rpm 5 000 5 000 ...

Page 11: ...68 113 C 20 45 20 45 20 45 20 45 Expansion tank charge and initial system pressure psi 14 5 14 5 14 5 14 5 bar 1 1 1 1 Total water content of system using 2 3 gal 9 0 l capacity expansion tank supplied with appliance gal 29 1 29 1 31 7 31 7 l 110 110 120 120 DHW system data Maximum operating pressure p s i 116 116 bar 8 8 Minimum operating pressure p s i 2 9 2 9 bar 0 2 0 2 Selection field of dome...

Page 12: ...140 F 60 C F 144 144 157 157 C 62 62 69 69 Max CH rate flue temperature E at boiler return temp 140 F 60 C F 144 144 158 158 C 62 62 70 70 Min CH rate flue temperature A at boiler return temp 140 F 60 C F 151 151 133 133 C 66 66 56 56 Min CH rate flue temperature E at boiler return temp 140 F 60 C F 141 141 140 140 C 61 61 60 60 Boiler dimensions and weight Boiler dimensions heigh width depht in 2...

Page 13: ...ter temperature sensor DHW heat exchanger flow restrictor flowmeter HOT WATER OUTLET COLD WATER INLET BWCAAG000120 BWCAAG000150 BWHAAG000120 BWHAAG000150 pressure relief valve drain valve SUPPLY automatic bypass check valve low water cutoff water temperature high limit supply temperature sensor pump three way valve automatic air vent RETURN HOT WATER OUTLET COLD WATER INLET main heat exchanger ret...

Page 14: ...heck valve 3 4 NPT 3 4 NPT 3 4 NPT 3 4 NPT 3 4 NPT Gas 3 4 NPT Heating return 3 4 NPT 3 4 NPT FEMALE 3 4 NPT 3 4 NPT Indirect water tank supply 3 4 NPT Water tank return 3 4 NPT condensate check valve Heating supply Pressure relief valve E D C B A Legend A Heating return 3 4 NPT B Water tank return 3 4 NPT C Gas 3 4 NPT D Indirect tank supply 3 4 NPT E Heating supply 3 4 NPT Pressure relief valve ...

Page 15: ...7 7 8 200 mm 1 25 mm 6 150 mm 18 in Recommended Minimum service clearances 13 3 4 5 7 8 29 1 8 2 5 16 6 15 16 Top view Front and side view Service clearances on the right side of the boiler can be decreased up to 1 25 mm if the provided Warning Label and Lighting Instructions are applied to the front of the boiler casing ...

Page 16: ...sible for the appliance in an Alcove or Closet Residential Garage Installation When installed in a residential garage mount the boiler a minimum of 18 in 457 mm above the floor Locate or protect the boiler so it cannot be damaged by a moving vehicle Check with your local authorities for other possible regulations pertaining to the installation of a boiler in a garage 6 2 Before locating the boiler...

Page 17: ...s such as range hoods and bathroom exhausts so they will operate at maximum speed Do not operate a summer exhaust fan Close fireplace dampers D Place in operation the appliance being inspected Follow the lighting instructions Adjust thermostat so the appliance will operate continuously E Test for spillage at the draft hood relief opening after 5 minutes of main burner operation Use the flame of a ...

Page 18: ...by the installer Do not mount the boiler to a hollow wall Be sure to mount the boiler to the studs only Mount the wall bracket using 4 5 16 lag screws Ensure the bracket is level when mounted Extreme care is needed to ensure the bolts are secured in the studs This boiler is heavy and awkward to lift It is recommended and safer to install the boiler with two people Use caution as to not drop this b...

Page 19: ...e rendering the valve inoperative Such conditions are not detectable unless the valve and its components are physically removed and inspected Do not attempt to conduct this inspection on your own Contact your plumbing contractor for a reinspection to assure continuing safety 9WARNING Failure to reinspect this valve as directed could result in unsafe pressure buildup which can result in serious inj...

Page 20: ...c low water cutoff located internally in the boiler is below the lowest safe permissible water level established by the boiler manufacturer 7 6 2 Backflow preventer heating only model Use a backflow preventer specifically designed for hydronic boiler installations This valve should be installed on the cold water fill supply line per local codes 7 6 3 Fitting the heating circuit supply and return p...

Page 21: ...LPG boilers only Your propane supplier mixes an odorant with the gas to make its presence detectable In some instances the odorant can fade and the gas may no longer have an odor Before start up and periodically thereafter have the LPG supplier verify the correct odorant level in the gas 9WARNING Cover control board section Cover cables plugs and electrical connections Cover endangered positions b...

Page 22: ...contact with surfaces up to 194 F 90 C 9WARNING If an external electrical source is utilized the boiler when installed must be electrically bonded to ground in accordance with the requirements of the authority having jurisdiction or in the absence of such requirements with the National Electrical Code ANSI NFPA 70 and or the Canadian Electrical Code Part 1 CSA C22 1 Electrical Code 9WARNING ELECTR...

Page 23: ...tion The included outdoor temperature sensor provides an automatic means to regulate supply temperature based on outdoor temperature Installation of this sensor is a Department of Energy requirement for space heating 7 10 Outdoor temperature sensor The outdoor temperature sensor supplied as standard inside the boiler box must be connected at terminals SE G terminals of CE8 Once the sensor is conne...

Page 24: ...ach the door to the casing push the two tabs in the lower corners C to disengage the door from the casing lift the door upwards to remove it from the top tabs B set door aside Removal of the side panels Locate and remove the 2 screws D that secure the side panel to the appliance Gently prise the side panel forward to release it from the securing tabs on the appliance rear NOTICE If the side panels...

Page 25: ...s to be refilled and an air purge is not needed perform the steps below Put the boiler in OFF mode Make sure the cold water inlet tap is open Open the filling tap B for combi boiler external for heating only boiler model Check the pressure value on the screen when the pressure indicated by the sensor is between 15 21 psi 1 1 5 bar close the filling tap To get the display screen to show the pressur...

Page 26: ...er chlorination chemicals chloride fluoride Swimming pools hot tubs Solvents cutting oils fiberglass cleaning solvents Auto body or metal working shops Refrigerant charge with CFC or HCFC Refrigerant repair shops Permanent wave solutions Beauty shops Fixer hydrochloric acid muriatic acid bromide iodine Photo labs chemical plastics processing plants Cement powder crack fill dust cellulose fiber bas...

Page 27: ...t piping MUST be secured to the side of the building above grade as shown to provide rigidity 4 Only use wall brackets approved for outdoor use and by the vent manufacturer for securing the air inlet and vent exhaust pipes to the wall 9WARNING Failure to properly support the air inlet and vent may result in substantial property damage severe personal injury or death 5 Ensure that the Vent Air inle...

Page 28: ...ir must be made in accordance with section 5 3 Air for Combustion and Ventilation of the National Flue Gas Code ANSI Z223 1 NFPA 54 or Sections 7 2 7 3 or 7 4 of CAN CGA B149 1 Installation Codes or applicable provisions of the local building codes 9CAUTION BOILER DAMAGE AND OPERATIONAL FAILURES Provisions for combustion air and ventilation are always requi red through a grille regardless whether ...

Page 29: ...e intake air stream and contaminate the incoming combustion air for the boilers Refer to figure below for terminations approved for use in Alberta and Saskatchewan Alberta and Saskatchewan Vent Terminations CRAWL SPACE For vent and combustion air pipe length refer to the approved configu ration of horizontal and vertical vent installation Section 8 8 fig 7 for 2 and fig 20 for 3 9WARNING When usin...

Page 30: ...esult in fire property damage serious injury or death Vent Termination Minimum Clearances US Installations 2 Canadian Installations 1 A Clearance above grade veranda porch deck or balcony 12 305mm 12 305mm B Clearance to window or door that may be opened 12 305mm 3 ft 0 9m C Clearance to permanently closed window 12 305mm 12 305mm D Vertical clearance to ventilated soffit located above the termina...

Page 31: ...mended snow level allowance above grade roofline or any surface that will support snow debris or ice i e for roof venting clearances roofline and snow level If living in a snowfall region consult your local weather office for the maximum typical snowfall for your area 5 Above public walkways driveways or parking lots if adjacent to it and condensate cannot drip freeze or create a hazard 6 The term...

Page 32: ... M G Duravent PolyPro 2PPS VKL 2PPS VKL TC Ø 3 5 Ø 80 125 mm Concentric PP M G Duravent PolyPro 3PPS VKL 3PPS VKL 3 Ø 80 mm PP Centrotherm InnoFlue ISTT03 Tab 2 Roof terminals approved Wall Terminal horizontal Material Supplier Part Number Ø 3 5 Ø 80 125 mm Concentric CPVC IPEX System 636 Type IIa IIb 197117 CPVC 197107 CPVC 197109 CPVC Ø 2 4 Ø 60 100 mm Concentric PP M G Duravent PolyPro 2PPS HKL...

Page 33: ...o not use any DWV plumbing pipes to vent this boiler 9Do not use inlet Indoor Air for combustion 9WARNING ABS PVC venting is not approved for use as an exhaust vent material Failure to comply could result in personal injury death or property damage and could void the boiler warranty 9WARNING Use of cellular core PVC ASTM F891 or Radel polyphenolsulfone in venting systems is strictly prohibited 9WA...

Page 34: ...53 m Terminal length L1 4 17 ft 1 27 m 4 17 ft 1 27 m Vent adaptor Ø 60 mm factory supplied fig 2 Fig 3 Vertical flue terminal 2 4 in Ø 60 100 mm PP flue gases air for flat roof BWCAAG000120 BWHAAG000120 BWCAAG000150 BWHAAG000150 Max length L 35 ft 10 67 m 28 ft 8 53 m Terminal length L1 4 17 ft 1 27 m 4 17 ft 1 27 m fig 3 Vent adaptor Ø 60 mm factory supplied Fig 4 Horizontal flue terminal 3 5 in...

Page 35: ...1 4 42 ft 1 35 m 4 42 ft 1 35 m fig 6 Vent adaptor Ø 80 mm factory supplied increaser 2 3 Fig 7 Twin flue system 2 in PP Ø 60 mm BWCAAG000120 BWHAAG000120 BWCAAG000150 BWHAAG000150 Max length L 30 5 30 5 ft 9 30 9 30 m 28 28 ft 8 53 8 53 m Max length L1 25 5 25 5 ft 7 77 7 77 m 23 23 ft 7 01 7 01 m 90 bend 5 ft 1 52m 5 ft 1 52m the expressed lengths are without the terminations fig 7 Fig 8 Twin fl...

Page 36: ... Twin flue system 2 in Ø 50 8 mm with horizontal terminal 3 in Ø 72 6 mm CPVC BWCAAG000120 BWHAAG000120 BWCAAG000150 BWHAAG000150 Max length L 25 5 25 5 ft 7 77 7 77m 23 23 ft 7 01 7 01 m Terminal length L1 part no 197009 1 67 ft 0 5 m 1 67 ft 0 5 m part no 197107 2 67 ft 0 8 m 2 67 ft 0 8 m part no 197117 3 67 ft 1 1 m 3 67 ft 1 1 m fig 11 Fig 12 Twin flue system 2 in Ø 50 8 mm with vertical term...

Page 37: ...f BWCAAG000120 BWHAAG000120 BWCAAG000150 BWHAAG000150 Max length L 30 5 30 5 ft 9 30 9 30 m 28 28 ft 8 53 8 53 m 90 bend 5 ft 1 52m 5 ft 1 52m the expressed lengths are without the terminations fig 14 Fig 15 Horizontal twin flue system 3 in Ø 76 2 mm with terminal bend CPVC BWCAAG000120 BWHAAG000120 BWCAAG000150 BWHAAG000150 Max length L 76 76 ft 23 16 23 16m 76 76 ft 23 16 23 16 m 90 bend 6 ft 1 ...

Page 38: ...6 ft 1 83m 6 ft 1 83m the expressed lengths are without the terminations fig 18 increaser 2 3 Fig 19 Vertical twin flue system 3 in Ø 76 2 mm with terminal bend CPVC for flat roof L BWCAAG000120 BWHAAG000120 BWCAAG000150 BWHAAG000150 Max length L 82 82 ft 24 99 24 99m 82 82 ft 24 99 24 99 m 90 bend 6 ft 1 83m 6 ft 1 83m the expressed lengths are without the terminations fig 19 increaser 2 3 Fig 20...

Page 39: ... A9 SW1 white black green X6 3 1 2 a b N L S E black white ZAG 2 black X15 white F Hv 1 2 red blue HS pink PWM grey X13 F Lv 1 4 red red S S t t R S blue t F S grey grey W H L white white blue A P S 1 2 brown black T F black T H E 12 1 X9 4 3 2 1 5 red blue yellow white 3W X12 grey grey red red black alim blue sign brown D H W T MOD P T 1 3 1 X19 10 F M 1 3 orange blue sign violet alim t 1 4 2 3 1...

Page 40: ...d orange SE W R C red R 24Vac white W black C CE4 A B Bus 485 CE8 TBT Low Temperature Thermostat SE G Outdoor Temperature Sensor OT G Open therm OTBus R Room thermostat 24V W Room Thermostat Heating C Room Thermostat Common M4a T BOLL DHW Aquastat S BOLL DHW 10kOhm NTC G 6 1 red 24Vdc black violet A grey B violet A black red 24Vdc grey B X17 SC07 grey grey red red black alim blue sign brown MOD P ...

Page 41: ... gr r bl y w X12 4 X12 3 X12 2 X12 1 3W FPWM X13 4 X13 3 X13 2 X13 1 X19 5 X19 4 X19 3 PT br bl bk X19 2 X19 1 gr gr MOD M P W M 1 0 wire color code bk black w white bl blue br brown r red g green y yellow p pink v violet o orange gr grey w w X25 1 X25 2 CN2 1 CN2 2 CN2 2 CN2 1 bk X10 4 o r X10 3 X10 2 w g X10 1 J1 4 J1 3 J1 2 J1 1 BE20 X17 4 X17 5 X17 3 X17 1 B A v bk gr r SC07 DISPLAY BE20 Light...

Page 42: ... X19 8 X19 7 X19 6 X19 9 v r r SBOLL r p bl gr r bl y w X12 4 X12 3 X12 2 X12 1 3W FPWM X13 4 X13 3 X13 2 X13 1 X19 5 X19 4 X19 3 PT br bl bk X19 2 X19 1 gr gr MOD M P W M 1 0 X9 10 X9 9 wire color code bk black w white bl blue br brown r red g green y yellow p pink v violet o orange gr grey w w X25 1 X25 2 CN2 1 CN2 2 CN2 2 CN2 1 bk v X10 4 o r X10 3 X10 2 w g X10 1 J1 4 J1 3 J1 2 J1 1 BE20 X17 4...

Page 43: ...e 10 Si l appareil ne se met pas en marche suivez les instructions intitulées Comment couper l admission de gaz de l appareil et appelez un technicien qualifié ou le fourmisseur de gaz pour ouvrir pour fermer 1 Réglez le thermostat à la température la plus basse 2 Coupez l alimentation électrique de l appareil s il faut procéder à l entretien 3 Tournez le bouton de commande de gaz dans le sens hor...

Page 44: ...ctly Show the user the location of any isolating valves and the location of all manual vent points Explain to the user how to turn off the appliance for both long and short periods and advise on the necessary precautions to prevent freeze damage Explain the user not to try to repair the boiler personally Call a qualified technician Explain to the user that for continued safe and efficient operatio...

Page 45: ...n 11 11 Access to the PARAMETER menu page 47 navigate through the menu by rotating one of the two knobs clockwise or counter clockwise CAL Select the FORCE AUTO CAL parameter and confirm by pressing the MODE OK button CAL The display shows the current value to modify it rotate one of the knobs and set the value to 2 enabled with offset resetted FORCE AUTO CAL function starts and the display shows ...

Page 46: ... Adjusting the heating water temperature with an outdoor temperature sensor connected When an outdoor temperature sensor is installed the outlet temperature is automatically selected by the system which quickly adjusts the ambient temperature according to the variations in the outdoor temperature If you want to change the temperature raising it or lowering it with respect to that automatically cal...

Page 47: ...r temperature sensor e value e g xx x F Fan speed f value e g xxxx rpm Flue hour counter g value h CH Water Pressure h value psi Domestic Flow Rate i value gpm Boiler firmware version j version Past days since service required k number of days days 11 11 Access to the PARAMETER menu NOTICE Make sure you are in the Operation mode backlight ON see section 11 6 Access to the PROGRAMMING menu by press...

Page 48: ...p 68 113 Low Temp INSTALLER MINCHSET Maximum CH Setpoint 180 F 82 C High Temp 113 F 45 C Low Temp 180 F 68 180 High Temp 68 113 Low Temp INSTALLER MAXCHSET Reset flue hour counter 0 disabled 1 enable reset 0 0 1 INSTALLER HOUR COUNT Auxiliary output 0 jumper X21 1 2 presence W R input active when OT presence jumper not present second pump handling enable 1 zone valve handling is enabled 2 secondar...

Page 49: ... 1 11 11 4 Domestic hot water thermostat combi boiler only This parameter allows you to set the type of DOMESTIC HOT WATER THERMOSTAT differential The factory setting for this parameter is CORRELATED THERMOSTAT i e for domestic hot water the boiler switches off at the setpoint 9 F 5 C and restarts at the setpoint 7 F 4 C To select the ABSOLUTE THERMOSTAT value where the boiler for domestic hot wat...

Page 50: ... is independent from the outdoor air sensor Selecting the offset heating curve The offset heating curve maintains a theoretical ambient temperature of 68 F 20 C at outdoor temperatures ranging from 68 F to 4 F 20 C to 20 C The choice of the curve depends on the rated minimum outdoor temperature of the geographical area and the rated delivery temperature on the type of system and must be carefully ...

Page 51: ...mperature of the system 0 68 F 20 C for DAY level 61 F 16 C for NIGHT level NIGHT SETBACK NIGHT SETBACK Riduzione notturna PARALLELA 10 20 30 40 50 60 70 80 90 20 15 10 5 0 5 10 15 20 Temperatura Esterna Temperatura di Curva climatica GIORNO Curva climatica NOTTE Outdoor reset DAY Outdoor reset NIGHT OUTDOOR TEMPERATURE 68 59 50 41 32 23 14 5 4 194 176 158 140 122 104 86 68 50 FLOW TEMPERATURE C F...

Page 52: ... A A Perform the combustion check verifying that the CO2 values correspond to those indicated in the technical data table Once checks are completed remove the analyzer probe and close the combustion analysis sockets with appropriate caps and screw 9WARNING If the value displayed is different from the one shown in the technical data table DO NOT MAKE ANY ADJUSTMENTS ON THE GAS VALVE please contact ...

Page 53: ... and is followed by post purging for 45 seconds at the fan s maximum speed It is not possible to release the error before the end of the post purging unless the boiler s power supply is switched off 9WARNING first action verify the condensate check valve and if the condensate trap drains correctly see section 7 4 E022 iono error ON E023 iono error ON E024 iono error ON E067 iono error ON E088 iono...

Page 54: ... maintained until the outlet water temperature reaches 131 F 55 C domestic hot water anti freeze only an indirect water tank is connected heating only boiler model the function starts if the temperature measured by the indirect tank sensor falls below 41 F 5 C A heat request is generated in this phase with the ignition of the burner at minimum output which is maintained until the outlet water temp...

Page 55: ...s Laws require that any service work is carried out by a competent person such as a qualified technician an approved service agent or other suitably qualified personnel Tools for maintenance operations A dynamometer device A combustion analyser A vacuum cleaner White vinegar in a spray bottle A nylon hand brush A nylon mechanic brush with a portative drill Mains water 12 3 Maintenance program To e...

Page 56: ...tem follow the vent manufacturer s instructions in their entirety 9WARNING After carrying out the maintenance operations a combustion analysis needs to be carried out to make sure the boiler is operating correctly 9WARNING After the replacement of the electronic board or the maintenance of the flame sensor or the burner the combustion analysis it may be necessary to proceed with combustion analysi...

Page 57: ...e and clean the residues of the insulation and silicone glue Put two points of glue silicone temperature resistant Loctite 5366 or Ottoseal S17 on the plate of the door Engage the insulation and place it in contact with the two points of glue silicone Make sure that the burner is in proper condition remove any possible insulation residues on the burner blowing them out with compressed air MANDATOR...

Page 58: ...oils of the heat exchanger to avoid that dust and parts of the insulation panel fall off within them To replace the insulation Use a blade to cut the insulation panel approximately 2 63 60 mm from the circumference Lift and remove the 2 panel pieces from the seat NOTICE The insulation panel is fixed by a central clip and six radial clips if during removal operations the clips detach remove them fr...

Page 59: ...askets O rings and washers that are disturbed during maintenance must be replaced If any portion of venting system is disturbed it must be re installed in accordance to the vent manufacturer s instructions the BWH BWC Installation Operation Instructions For Contractors and any applicable provisions of local building codes as well as the National Fuel Gas Code ANSI Z223 1 NFPA 54 and or CAN CSA B14...

Page 60: ...ion screens Visually check top of vent for soot Call service person to clean Some sediment at bottom of vent is normal Clean the screens in the vent terminal Visually inspect all flue product carrying areas of the boiler including the venting system and main burner for proper functioning deterioration or leakage Verify that the vent is not obstructed Check for and remove any obstruction to the flo...

Page 61: ... petroleum based stopleak Inspection of the low water cutoffs in the boiler and system Also it needs to specify that float type low water cutoffs must be periodically flushed Power boiler back on Verify the polarity and ground of the power supply L N 120v L G 0v N G 0v Check incoming power to spark generator minimum 120VAC Verify the unit is set for the proper gas by accessing the Gas Type paramet...

Page 62: ...rking to perfect all of its production processes therefore the aesthetics and size technical data equipment and accessories of the products may be subject to change CAC BDP 7310 West Morris St Indianapolis IN 46231 USA BWC H 01SI ...

Reviews: