background image

29

13 - STANDARD MAINTENANCE

Air conditioning equipment must be maintained by professional 
technicians, whilst routine checks can be carried out locally by 
specialised technicians. See the standard EN 378-4.
Simple preventive maintenance will allow you to get the best 
performance from your HVAC unit:


-

improved cooling performance


-

reduced power consumption


-

prevention of accidental component failure


-

prevention of major time-consuming and costly interventions


-

protection of the environment

There are five maintenance levels for HVAC units, as defined by 

the AFNOR X60-010 standard.

13.1 - Level 1 maintenance

See note below. 
Simple procedure can be carried out by the user:


-

Air heat exchanger (condenser) cleaning - see chapter 
“Condenser coil - level 1”


-

Check for removed protection devices, and badly closed 
doors/covers


-

Check the unit alarm report when the unit does not work (see 
report in the 19PV Touch'Pilot Control instruction manual ).

General visual inspection for any signs of deterioration.

13.2 - Level 2 maintenance

See note below.

This level requires specific know-how in the electrical, hydraulic 
and mechanical fields. It is possible that these skills are available 

locally: existence of a maintenance service, industrial site, 
specialised subcontractor.
In these cases, the following maintenance operations are 
recommended.
Carry out all level 1 operations, then:  


-

At least once a year tighten the power circuit electrical 
connections (see tightening torques table).


-

Check and re-tighten all control/command connections, if 
required (see tightening torques table).


-

Check the differential switches for correct operation every 6 
months.


-

Remove the dust and clean the interior of the control boxes, 

if required. Check the filter condition.


-

Check the presence and the condition of the electrical 
protection devices.


-

Replace the fuses every 3 years or every 15000 hours (age-
hardening).


-

Replace the control box cooling fans (if used) every five years.


-

Check the water connections.


-

Purge the water circuit (see chapter 7 “Water connections”).


-

Clean the water filter (see chapter 7 “Water connections”).


-

Check the unit operating parameters and compare them with 
previous values.


-

Replace compressor capacitors every 10 years (if energized) 
or 5 years (if de-energized).


-

Replace compressor soft start fan every 5 years.


-

Keep and maintain a maintenance sheet, attached to each 
HVAC unit.

All these operations require strict observation of adequate safety 
measures: individual protection garments, compliance with all 
industry regulations, compliance with applicable local regulations 
and using common sense. 

13.3 - Level 3 (or higher) maintenance

See note below.

The  maintenance  at  this  level  requires  specific  skills/approval/

tools and know-how and only the manufacturer, his representative 
or authorised agent are permitted to carry out these operations. 
These maintenance operations concern for example:


-

A major component replacement (compressor, evaporator)


-

Any intervention on the refrigerant circuit (handling refrigerant)


-

Changing of parameters set at the factory (application 
change)


-

Removal or dismantling of the HVAC unit


-

Any intervention due to a missed established maintenance 
operation


-

Any intervention covered by the warranty

NOTE: Any deviation or non-observation of these maintenance 

criteria will render the guarantee conditions for the HVAC unit 

nul and void, and the manufacturer, will no longer be held 

responsible.

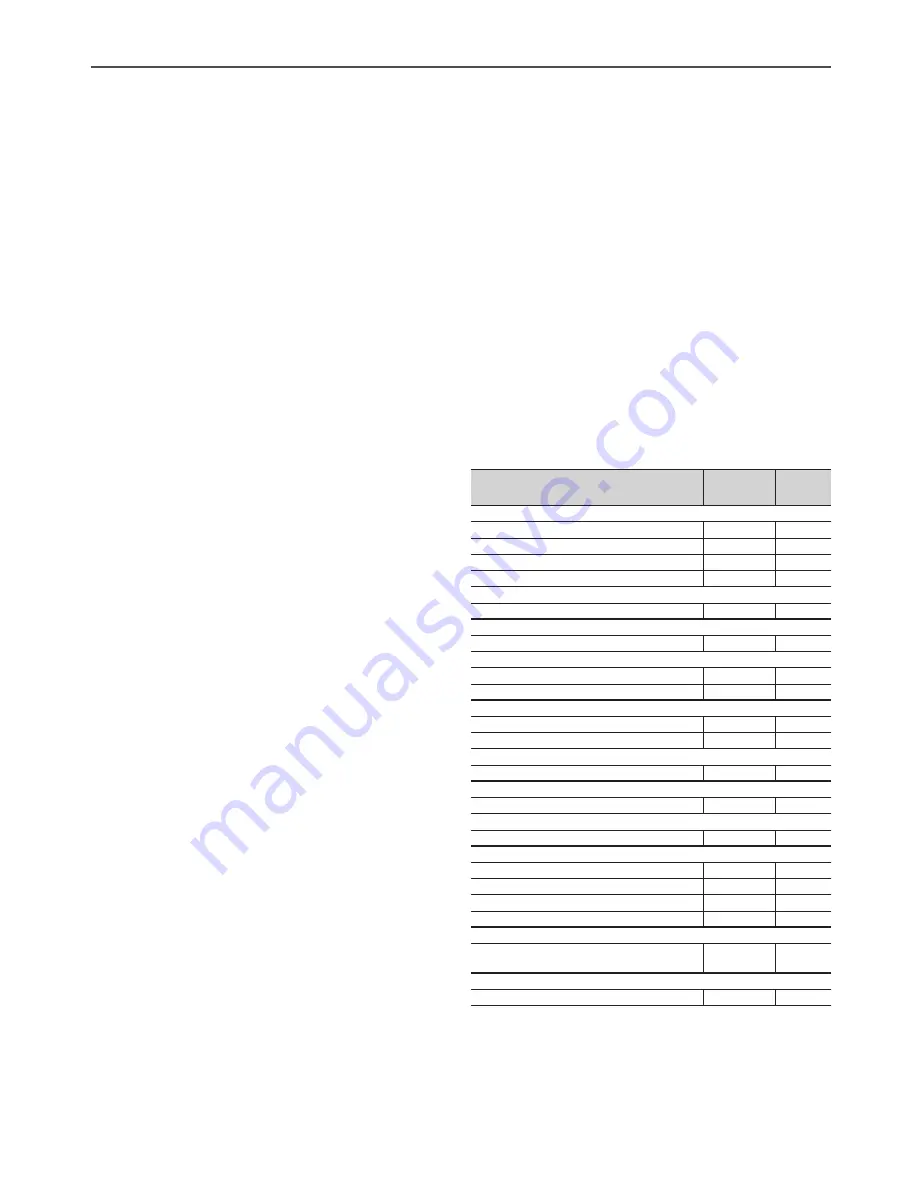
13.4 - Tightening of the electrical connections

13.4.1 - Tightening torques for the main electrical 

connections

Component

Designation 

in the unit

value 

(N·m)

Screw on bus bar and PE, customer connection

M6

L1/L2/L3

9,6

M8

L1/L2/L3

24

M10

L1/L2/L3

49

M12

L1/L2/L3

79,4 

Screw on Main supply disconnect switch 

QS10*

28

Screw on Control supply disconnect switch 

QS10*A

1,7

Screw on Line reactor 

Line reactor for TT300 -  M8

Z*

24

Line reactor for TT350 - M10

Z*

49

Screw on EMC Filter 

PE

ZC*

16 (+/- 1)

Phases

ZC*

15

Screw on Fast acting fuse connection

FU*

38

Screw on  TT300 bar connection

L1/L2/L3

25

Screw on PE panels

M8

PE

24

Screw on Compressor connection

TT300 - Cap

L1/L2/L3

31

TT300 - M8

PE

21,7

TT350 - M10

L1/L2/L3

21,7

TT350 - M8

PE

21,7

Control disconnect switch connection 

Upstream and downstream screws at terminals

QF10* &  

QM10**

2

Power supply 24VDC unit

Upstream and downstream screws at terminals

VC*

0,5

Summary of Contents for 19PV550

Page 1: ...INSTALLATION OPERATION AND M A I N T E N A N C E I N S T R U C T I O N S Original document Original document 19PV Nominal cooling capacity 550 1600 kW 50Hz...

Page 2: ...mber of water passes 18 6 6 Min water volume and evaporator condenser water flow rates 18 6 7 Variable flow evaporator 18 6 8 Evaporator pressure drop curves 19 7 WATER CONNECTIONS 20 7 1 Operating pr...

Page 3: ...fer to the 19PV Touch Pilot Control manual CONTENT 12 OPTIONS 28 13 STANDARD MAINTENANCE 29 13 1 Level 1 maintenance 29 13 2 Level 2 maintenance 29 13 3 Level 3 or higher maintenance 29 13 4 Tightenin...

Page 4: ...ressure switches Ensure that the valves are correctly installed before operating the unit Classification and control In accordance with the Pressure Equipment Directive and national usage monitoring r...

Page 5: ...own with the liquid line valve closed as liquid refrigerant can be trapped between this valve and the expansion device This valve is situated on the liquid line before the filter drier box Equip the e...

Page 6: ...ser water flow Check the cut off value Reactivate manually HP switch and reactivate HP soft value Repeat the procedure for each unit compressor CAUTION If the test leads to replacing the pressure swit...

Page 7: ...sfer station The units must never be modified to add refrigerant removal and purging devices All these devices are provided with the units Please refer to the certified dimensional drawings for the un...

Page 8: ...or air flow and to ensure access to the components the number of support points is adequate and that they are in the right places the location is not subject to flooding CAUTION Lift and set down the...

Page 9: ...positioning of the fixing points weight distribution and centre of gravity coordinates please refer to the dimensional drawings Dimension mm A B C D 19PV 550 3045 1120 1745 2800 720 3070 1155 1846 28...

Page 10: ...positioning of the fixing points weight distribution and centre of gravity coordinates please refer to the dimensional drawings Dimension mm A B C D 19PV 900 4257 1290 1955 3950 1010 4257 1290 1955 3...

Page 11: ...positioning of the fixing points weight distribution and centre of gravity coordinates please refer to the dimensional drawings Dimension mm A B C D 19PV 1300 4705 1290 1955 4400 1450 4740 1290 2011...

Page 12: ...on valves EXV Minimum capacity 15 15 15 10 10 10 10 10 10 Evaporator Flooded multi pipe type Water volume l 115 165 180 285 285 285 330 330 365 Water connections Victaulic in 6 6 8 8 8 8 8 8 8 Drain a...

Page 13: ...with option 81 A 387 456 565 570 635 753 Maximum start up current Un Standard unit 3 Lower than max current Dissipated power of electrical equipment 1 W 782 1249 1249 1144 1347 1814 1884 2351 2351 1 V...

Page 14: ...power supply conductors is not provided with the unit 5 The factory installed disconnect switch es circuit breaker s are of a type suitable for power interruption in accordance with EN 60947 3 corres...

Page 15: ...This is less than the permissible 2 and is therefore acceptable 5 3 Power connection disconnect switch Units Connection points 19PV550 to 800 1 per unit 19PV900 to 1600 1 for circuit A 1 for circuit...

Page 16: ...selection Note Option 84 and 84R are not included in these values 5 5 Power cable entry The power cables can enter the 19PV control box from above the unit A removable aluminium plate on the upper par...

Page 17: ...er temperature C Condenser leaving water temperature C 10 20 30 40 50 0 5 10 15 20 6 2 Minimum chilled water flow The minimum chilled water flow is shown in the table in chapter 6 7 If the system flow...

Page 18: ...ndenser water flow rate m3 h Minimum 2 21 21 36 36 36 36 36 36 36 Maximum 3 245 299 346 486 457 454 428 594 526 1 Minimum evaporator flow rate based on a water velocity of 0 5 m s 2 Minimum condenser...

Page 19: ...FG H I J Legend 1 19PV550 6 19PV1180 2 19PV720 7 19PV1300 3 19PV800 8 19PV1450 4 19PV900 9 19PV1600 5 19PV1010 6 9 Condensor pressure drop curves Units with two condenser passes standard Pressure dro...

Page 20: ...the design operating pressures Before any start up verify that the heat exchange fluid is compatible with the materials and the water circuit coating The use of different metals on hydraulic piping co...

Page 21: ...1 219 1 219 1 219 1 219 1 219 1 7 3 Flow control Evaporator flow switch and chilled water pump interlock IMPORTANT On 19PV units the unit water flow switch must be energised Failure to follow this in...

Page 22: ...its own water pump If there is only one common pump in cases with variable flow isolation valves must be installed on each unit They will be activated at the opening and closing by the control of eac...

Page 23: ...mensions clearances are the same as standard 19PV units Unlike in the cooling mode the unit uses the heating setpoint in this configuration The evaporator leaving water control lowest setpoint taken i...

Page 24: ...ital outputs permitting control of up to eight fan stages 9 3 Configuration of the number of fan stages and the automatic changeover of the fan stages Please refer to the instructions in the Touch Pil...

Page 25: ...o communicate and control the drycooler The drycooler with option 313 AUX board with the I O OAT sensor to be place in outdoor zone Dry Cooler Leaving Water Temperature factory mounted Water loop Temp...

Page 26: ...compressor to reduce broadcasting of the noise radiated emissions from the power lines themselves 11 1 6 Fast acting fuses All compressors are fitted with class T fast acting fuses to protect the soli...

Page 27: ...sm module and an under voltage protection circuit are mounted on the main supply disconnect switch Note The following procedure must be done to lock the main supply disconnect switch Set the motor mec...

Page 28: ...management system Allows access to multiple unit parameters 0550 1600 Control for low cond temperature 152 Output signal 0 10 V to control the condenser water inlet valve Simple installation for appli...

Page 29: ...r see chapter 7 Water connections Check the unit operating parameters and compare them with previous values Replace compressor capacitors every 10 years if energized or 5 years if de energized Replace...

Page 30: ...e flanges 22 Brass fitting TT300 Motor cooling brass fitting 40 Brass fitting TT350 Motor cooling brass fitting 50 Phillips head screw Compressor cover plate 13 H M8 Screw Drier cover 35 H M10 Screw C...

Page 31: ...Electrical circuit wiring has been sized and installed properly Unit ground wire has been connected Electrical circuit protection has been sized and installed properly All terminals are tight All chil...

Page 32: ...l kW capacity for air conditioning 6 5 litres nominal kW capacity for process cooling Proper loop volume established Proper loop corrosion inhibitor included litres of Proper loop freeze protection in...

Page 33: ...33...

Page 34: ...Carrier SCS Montluel France Manufacturer reserves the right to change any product specifications without notice Printed in the European Union CARRIER participates in the ECP programme for LCP HP Check...

Reviews: