TRITON SYSTEMS, INC.
4-5
O
PERATION
M
ANUAL
- M
ODEL
97XX-Series
SECTION 4 - CURRENCY HANDLING
6.
Pull the packer plate to the rear of the cassette
(away from the shutter) until it locks to the white
packer plate latch. It will be necessary to push
down on the packer plate latch to lock the packer
plate in place. The packer plate will be held in
this position until the lid is closed or the latch is
released by pushing it down. Be careful not to
release the packer plate onto your fingers.
7.
Place the currency into the cassette. Allow at least
one inch of clearance between the packer plate
when it is fully retracted and the currency. This
will allow the packer plate to compress the cur-
rency.
•
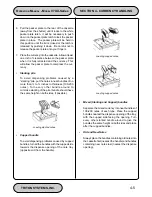
Slanting pile
To avoid dispensing problems caused by a
“slanting” pile, put the notes in neat bundles of no
more than ½ to ¾ inches in thickness (100-200
notes). Turn every other bundle around to
minimize slanting of the pile (bundle should have
the same height on both sides, if possible).
•
Cupped bundle
To avoid dispensing problems caused by cupped
bundles, turn all the bundles with the cupped side
towards the dispense opening of the note tray
(opposite end from the handle).
•
Mixed (Slanting and Cupped) bundles
Separate the mixed currency into neat bundles of
100-200 notes of each type. Place the cupped
bundles nearest the dispense opening of the tray,
with the cupped side facing the opening. Turn
every other slanted bundle around to give the
bundles the same height on both sides and place
after the cupped bundles.
•
Old and New Notes
Always place the bundles containing old notes into
the cassette first (nearest the handle) and bundles
containing new notes last (nearest the dispense
opening).
Loading slanted notes.
Loading cupped notes.
Loading cupped notes.
Summary of Contents for Triton 9700
Page 1: ...Owner s manual Triton Owner s Manual 9700...
Page 12: ...SECTION 1 INTRODUCTION...
Page 22: ...SECTION 2 BASIC OPERATION...
Page 28: ...SECTION 3 INITIAL SETUP...
Page 36: ...SECTION 4 CURRENCY HANDLING...
Page 55: ......
Page 56: ...SECTION 5 MANAGEMENT FUNCTIONS...
Page 213: ......
Page 214: ...SECTION 6 MAINTENANCE...
Page 220: ...SECTION 7 JOURNAL ENTRIES...
Page 223: ......
Page 224: ...SECTION 8 ERROR RECOVERY...
Page 246: ...SECTION 9 CUSTOMER TRANSACTIONS...
Page 251: ......
Page 252: ...APPENDIX A MECHANICAL LOCK...
Page 255: ......
Page 256: ...APPENDIX B ELECTRONIC LOCK...
Page 259: ......
Page 260: ...APPENDIX C WARRANTY POLICY...

