E4-10
4. Menu screen – User
IMPORTANT: Prior to operation, select the user for whom the settings will be made.
(For details on how to select the user, refer to page E3-4 or E4-4.)
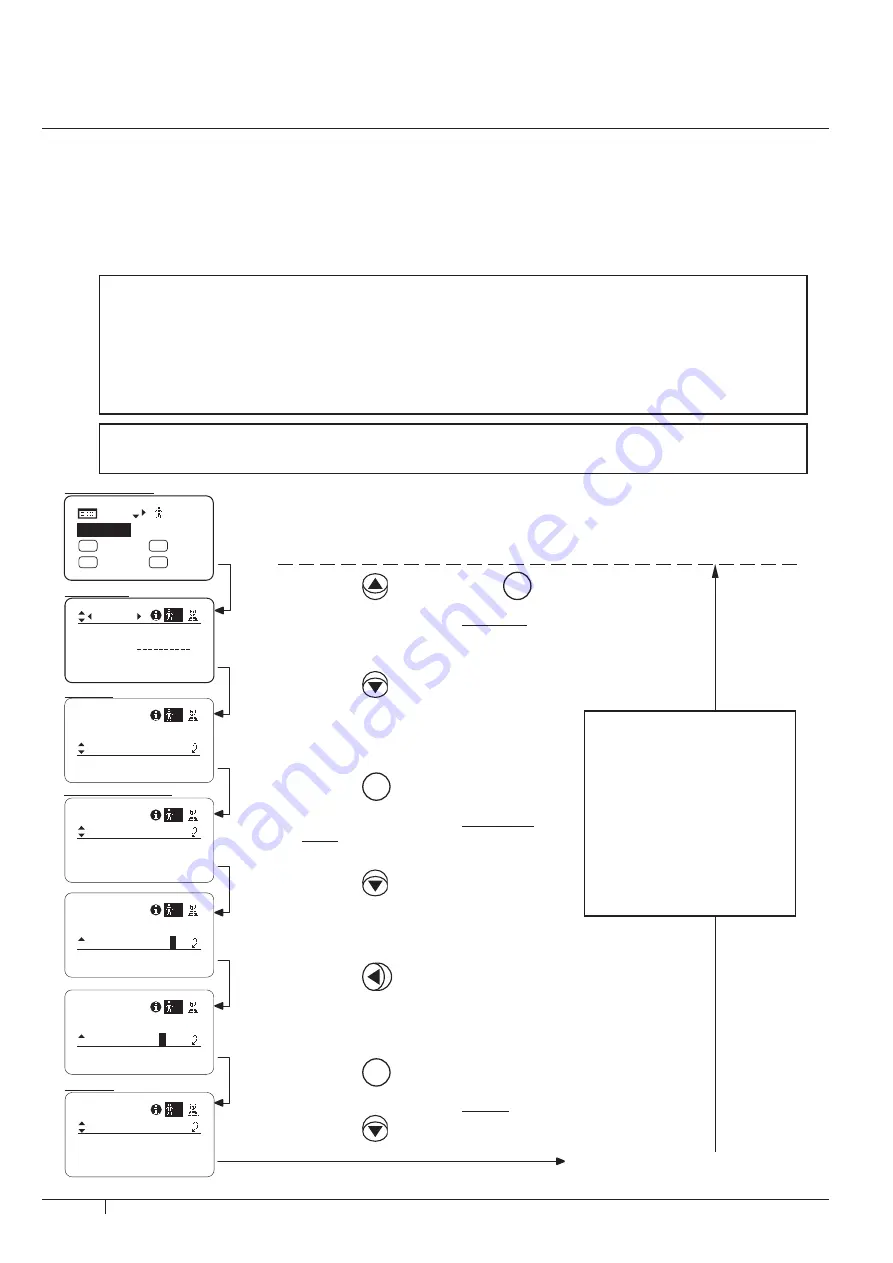
The operating steps taken be-
tween steps 1 to 12 (within the
two dotted parallel lines) can be
undone without copying the set-
tings. To return to the original
screen, push the up key. To
turn off the display without
copying the settings, push the
DISPLAY switch.
Top initial screen
User screen
Screen A
ToOtherLens screen
Copying data between lenses
The setting established on the information display can be copied into another information display drive unit.
There are two copy types.1:Copying the data settings established for one user ( See this page). 2:Copying the data
settings established for all the users ( See the page E4-12).A dedicated cable purchased separately is required for this
operation. For further details,consult a Canon sales representative or your Canon dealer.
(1) Copying the data settings established for one user into another lens
User – Copying data between lenses
Preparations prior to operation (Be absolutely sure to undertake these preparations.)
1. Plug one end of the dedicated cable (20P-20P) into the zoom remote & focus remote connector (20-pin) of
the copy source lens and the other end into the corresponding connector of the copy destination lens.
2. Turn on the power of the copy source lens and copy destination lens.
3. Push the DISPLAY switch on the copy source lens to turn on the display. (Do not turn on the display of the
copy destination lens.)
ToOtherLens
User
Connect:
1
y/n
ToOtherLens
User
Connect:
1
y/
n
ToOtherLens
User
Connect:
1
y
/n
VTR
A 1
FRM1
A 2
V
RET
R
[ ] 1
Menu
[ IND ]
EXT
I G : 5 0
No. :
User
1
Name:
ResetAll
1
User
Copy
ToOtherLens
1
ToOtherLens
User
UserCopy :
AllCopy :
1
y/n
y/n
Access:
Unlock
1. Push the
key, and push the
Set
key.
The display is switched to the User screen.
2. Push the
key five times.
An underline appears below [ToOtherLens].
3. Push the
Set
key.
The display is switched to the ToOtherLens
screen.
4. Push the
key.
An underline appears below [Connect], and
either {y} (YES) or {n} (NO) can now been
selected.
5. Push the
key, and select {y}.
Continued on next page
6. Push the
Set
key.
The display is switched to the screen B.
Screen B
7. Push the
key.
Summary of Contents for XJ22 7.3B Series
Page 2: ......
Page 3: ...ENGLISH VERSION See Page E1 中文版 请参阅第 C1 页 日 本 語 版 ...
Page 4: ......
Page 16: ...12 ...
Page 17: ...1 1 ...
Page 21: ...2 1 ...
Page 25: ...3 1 ...
Page 44: ...3 20 ...
Page 45: ...4 1 ...
Page 64: ...4 20 ...
Page 70: ...4 26 ...
Page 86: ...4 42 ...
Page 95: ...4 51 4 Menu 画面 Focus CAFS 設定 4 52 フォーカスデマンドのカーブ特性 4 53 Focus 画面 4 Menu 画面 Focus Top ...
Page 98: ...4 54 ...
Page 105: ...5 1 ...
Page 108: ...5 4 ...
Page 109: ...ENGLISH VERSION ...
Page 110: ......
Page 124: ...E12 ...
Page 125: ...E1 1 1 Screen configuration ...
Page 129: ...E2 1 2 IND Screen ...
Page 133: ...E3 1 3 Top screen ...
Page 152: ...E3 20 ...
Page 153: ...E4 1 4 Menu screen ...
Page 172: ...E4 20 ...
Page 178: ...E4 26 ...
Page 194: ...E4 42 ...
Page 206: ...E4 54 ...
Page 213: ...E5 1 5 List of setting ...
Page 216: ...E5 4 ...
Page 217: ...中 文 版 ...
Page 218: ......
Page 230: ...C12 ...
Page 231: ...C1 1 1 关于画面构成 ...
Page 235: ...C2 1 2 IND 画面 ...
Page 239: ...C3 1 3 Top 画面 ...
Page 258: ...C3 20 ...
Page 259: ...C4 1 4 Menu 画面 ...
Page 278: ...C4 20 ...
Page 284: ...C4 26 ...
Page 300: ...C4 42 ...
Page 309: ...C4 51 4 Menu 画面 Focus CAFS 设定 C4 52 聚焦电动控制器曲线特性 C4 53 Focus 画面 4 Menu 画面 Focus Top ...
Page 312: ...C4 54 ...
Page 319: ...C5 1 5 设定一览 ...
Page 322: ...C5 4 ...
Page 324: ...I2 ...