background image

123

4

Registering

Camera

Ser

ver

and

S

etting

Recor

ding

Sc
hedule

Setting Motion Detection Recording

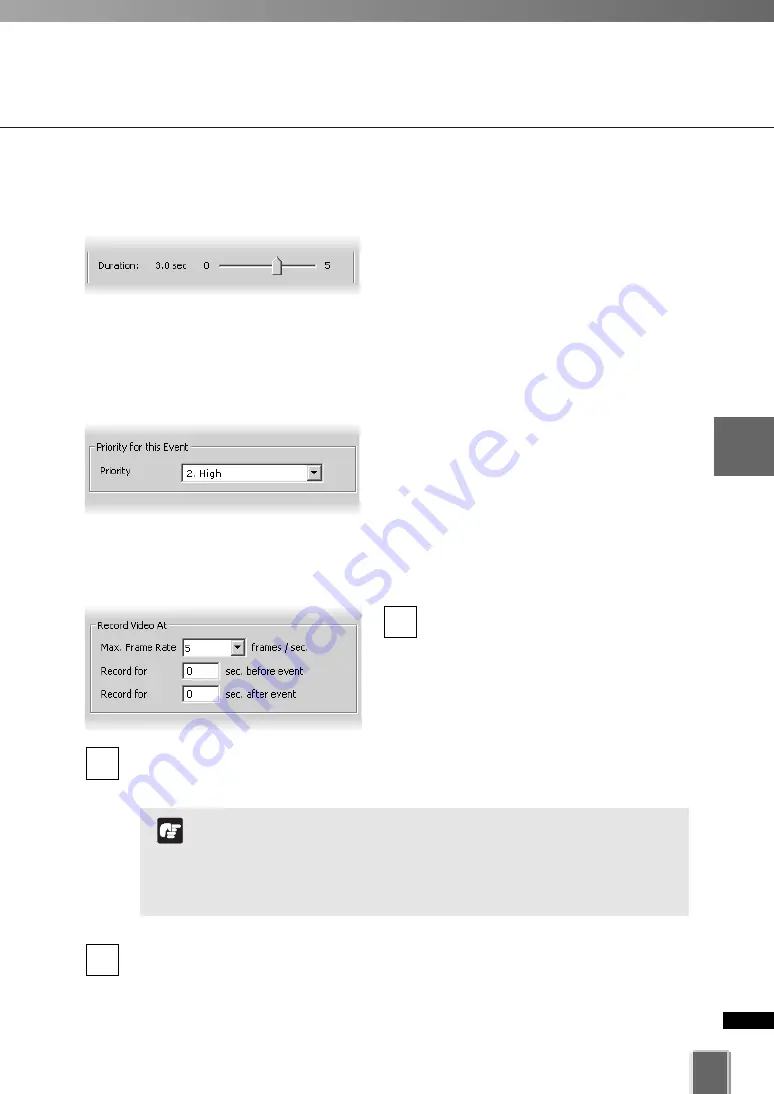
Step 5: Set frame rate and pre and post event recording duration

Max. Frame Rate

- select a maximum

frame rate for recorded video from the
drop-down menu. Choose from 0.1
frames per second to 30 frames per
second (5 is the default).

Record for before event

- enter a number of seconds for the amount of recording

time before the event occurs (up to 30 seconds).

2

1

Record for after event

- enter a number of seconds for the amount of recording

time after the event occurs (up to 999 seconds).

3

If Continuous is also set, Record for before event is not
available.

If Record for before event is set to one second or longer, it will
take approximately 10 seconds after event occurrence until its
display.

Note

Set the Duration

Duration is the length of time necessary for the change to be recognized as motion.

Click and drag the 

Duration

slide bar to any

position between 0.0 and 5.0 seconds. This
establishes the duration of motion allowed
before an event is triggered. It also
establishes the period where there is no
motion in order for the event to be completed.

Step 4: Set the event priority status

In the 

Priority

field, select the priority for the

event to be generated for this motion from a
menu of five options, ranging from 

1. Highest

to 

5. Lowest

. Priorities are color-coded in the

Timeline in the Viewing Screen.

Summary of Contents for VK-64

Page 1: ...Ver 1 3 Ver 1 3 Network Video Recorder VK K K 64 4 4 VK K K 16 Network Camera Recording and Monitoring System Administrator s Manual ...

Page 2: ... using the product Introduction Trademarks Canon and the Canon logo are registered trademarks of Canon Inc Microsoft Windows is a trademark of Microsoft Corporation in the United States and other countries Windows is legally recognized as Microsoft Windows Operating System QuickTime is a trademark of Apple Computer Inc Apache is a trademark of the Apache Software Foundation Pentium is a trademark ...

Page 3: ...for the System Administrator deploying the VK 64 VK 16 system It explains the functions of VK 64 VK 16 and introduces more appropriate system deployment methods Use this manual as a reference when making a backup of data or troubleshooting a problem ...

Page 4: ...cept 26 System Configuration 26 About the Master Storage Server 28 When using multiple Storage Servers 28 When using Viewer alone 28 Server Sizing Concept 29 Approximate Video Data Quantity for 1 Second 29 Required Hard Disk Capacity 29 Sensor Event Recording and Motion Detection Recording Concept 32 Storage Server Performance 33 Notes on Viewer Sizing 34 Network Bandwidth Concept 35 Chapter 2 Ins...

Page 5: ...et the User Management Tab 67 Changing User to Administrator 67 Delete a User 68 Request User Authentication at Tool Startup 68 Chapter 4 Registering Camera Server and Setting Recording Schedule Chapter Overview 70 Launching the VK Viewer and Displaying the Configuration and Preferences Screen 71 Launching Procedure 71 Launching by Connecting to the Localhost 72 Specify the IP address of Storage S...

Page 6: ... a Special Day Schedule 136 About Special Day Recording 136 Adding Editing and Deleting a Schedule Type 137 Adding and Deleting a Day 139 Displaying the Recording Setting Summary 142 Chapter 5 Viewer Reference Chapter Overview 146 Viewer Operation Flow 148 Starting the Viewer 150 Launching Procedure 150 Connect to the localhost 151 Specify the IP address of Storage Server to connect Viewer 152 Use...

Page 7: ...Creating scaling and moving Video Windows 178 Arranging Video Windows 181 Selecting Multiple Video Windows 181 Video Window States 182 Video Window Properties include 182 About Video Window states 182 Adjust Pan Tilt and Zoom 184 Other Video Window Functions 188 Change the size of a Video Window 188 Change the size of a Received Video VB C50i VB C50iR VB C50FSi VB C50Fi only 188 Enabling Backlight...

Page 8: ...Overview 214 Purpose of Backup 215 Preparation for Backup 216 About Backup Device 216 About Backup Tool 216 About Restore Server for Archiving 216 Files to Make a Backup 217 Storing Location of Recorded Data and Event data 217 Backup for Data Protection 219 About Backup 219 Backup for Archiving Long Term Storage of Data 220 Backup Procedure for Video Data and Event Data 221 Restore Procedure 222 R...

Page 9: ...reen and Video Windows 238 Timeline 241 Extracting Video 241 Scheduling and Recording 241 Connection Issues 242 Configuration Issues 243 List of Messages 244 Operation Messages and Error Messages 244 VK 64 VK 16 Recording Engine Logs 258 Access Engine Log 262 VK 64 VK 16 Viewer Logs 262 Log Storage Destination 263 A List of Error Codes in Log File 263 VK Event Information 268 Appendix Control of t...

Page 10: ...anual when setting the Storage Server Viewer Manual Read this manual when using the VK Viewer functions Administrator s Manual this document pdf file This manual is intended for the System Administrator for deploying and operating this software Be sure to read this manual to ensure proper system deployment ...

Page 11: ...u use a proxy server recording frame rate may not be achieved as specified or live video monitoring may be interrupted Also communication between the Storage Server and Viewer may occasionally be disconnected If you are using Windows XP SP2 or Windows Server 2003 you need to change Windows settings Make sure to change the settings Refer to Notes on Operating Environment P 24 When recording to a NA...

Page 12: ...12 ...

Page 13: ...Chapter 1 System Overview ...

Page 14: ...tion Overview Explains the system operating environment including the number of Camera Servers available for the Storage Server product types and the number of licenses for each product Communication Mechanism of VK 64 VK 16 Explains the communication mechanism of the VK 64 VK 16 using a typical system configuration Operating Environment Explains the operating environment of the VK 64 VK 16 and po...

Page 15: ...Chapter Overview 15 1 System Overview ...

Page 16: ...rver and Viewer 2 The Storage Server and Viewer can be installed on one PC Alternatively the Viewer can be installed on other computers on the network that will access recorded video from the Storage Server Configure the Storage Server via the Storage Server Configuration utility to set server settings event notification and configure user privileges VC C50i VB150 VB C50FSi Camera Servers P 22 VB ...

Page 17: ...e Viewer application From the Viewer you can customize the Viewing Area and save Layouts Configure Recording Settings 3 Create and save Viewer Layouts 4 Register Camera Servers and Storage Servers and set up recording schedules Recorded video from Storage Server Live video from Camera Servers ...

Page 18: ...elf without connecting to the Storage Server Some functions such as video recording sensor events and motion detection Capture Still Frame are not available Video resolution can be as high as 640 x 480 pixels 30 fps for NTSC and 25 fps for PAL depending on Camera Servers installed The following table shows each product and license number Product Name Storage Server Viewer Network Video Recorder VK...

Page 19: ...19 1 System Overview ...

Page 20: ... a LAN Since VK 64 VK 16 makes use of IP networks installations of cameras can be performed easily In addition it is possible to flexibly install new cameras and change installation locations of cameras VC C50i VC C50iR VB150 VB101 VB C300 VB C50iR P l a y b a c k P l a y b a c k Playback Monitor View live and recorded video Viewer Operator Capabilities Viewing Live Video Viewing Events Viewing re...

Page 21: ...ayback Record Record Monitor Record video to the Storage Server 1 Storage Server Administrator Capabilities Configuring Storage Server Configuring Event Notification Configuring Users View live and recorded video Viewer Administrator Capabilities Configure recording settings Configure event alerts Viewing Live Video Viewing Events Viewing recorded video Configuring Camera Servers Configuring Stora...

Page 22: ... canon com webview Camera Server Firmware Versions VB C300 Ver 1 0 VB C50FSi Ver 1 0 Rev 68 or later VB C50FSi Ver 1 0 Rev 68 or later Ver 1 0 Rev 26 or later VB150 Ver 1 1 Rev 39 or later VB101 Ver 3 0 Rev 69 or later VB C50iR VB C50i VB C10R VB C10 Ver 1 1 Rev 33 or later Ver 1 2 Rev 76 or later If using a VB101 you can make use of a single camera connected with VK 64 VK 16 at a time If using a ...

Page 23: ...lso dependent on pre event recording settings Please contact dealers that handle Canon products for further information If using Windows XP Professional SP2 or Windows Server 2003 follow the procedures as described in Notes on Operating Environment P 24 If using Windows XP Professional SP2 or Windows Server 2003 follow the procedures as described in Note on Operating Environment for changing your ...

Page 24: ...ect Windows Firewall If Windows Firewall is not shown select Security Center and then select Windows Firewall 3 In the Windows Firewall dialog select the Exception tab and then click Add Port 4 In the Add a Port dialog enter a name for the Storage Server e g VK 64 VK 16 Storage Server Enter the Port number as 80 Make sure the TCP protocol is selected and click OK 5 In the Windows Firewall dialog y...

Page 25: ...ou access the camera s top page Register the site to ensure normal functioning 1 When you access the Camera Server top page etc in Internet Explorer the dialog box shown at right appears 2 Click Add The dialog box for adding Trusted sites then appears 3 Check the IP address of your camera server displayed in the Add this Web site to the zone box and then click Add to register the camera as a trust...

Page 26: ...er Storage Server Viewing Live and Recorded Video Viewer Viewing Live and Recorded Video Viewer Receiving and Recording Video Receiving Video and Controlling Camera Having many Viewers accessing the same Camera Servers and Storage Servers will affect system performance Installation of both Storage Server and Viewer on a single PC may cause a heavy load on your PC depending on the number of camera ...

Page 27: ...k recorded video View live and recorded events Viewer Record video to the Storage Server 3 Storage Server View playback video from Storage Server 1 Plays back recorded video Receive and Record video Record video to the Storage Server 2 Storage Server More than one Storage Server can be added to a network Viewers can receive playback video from more than one Storage Server View playback video from ...

Page 28: ...rage Server is the Storage Server which a Viewer will connect to in the first place Information about Camera Servers Locations and Zones and Viewer Layouts are stored on the Master Storage Server The Viewer extracts the information from the Master Storage Server It is recommended that all Viewers within a system use the same Storage Server as a Master Storage Server This ensures that all Viewers u...

Page 29: ...te Video Data Quantity for 1 Second The recording performance of the VK 64 VK 16 v1 3 is as follows For dedicated Storage Server Maximum amount of recorded data per server 5 5 MB sec or less VGA 110 fps QVGA 360 fps For Storage and Playback Server Maximum amount of recorded data per server 3 MB sec or less VGA 60 fps QVGA 200 fps Required Hard Disk Capacity The VK 64 VK 16 receives each image from...

Page 30: ...le of Frame Sizes with VB C50i P 31 Example Recording continuously at 2 fps Using 16 Camera Servers VB C50i for recording With each camera set to Medium Size for video capture and Quality set to 50 and Frame size per single frame is approximately 15 KB Although actual data size depends on objects shot by each Camera Server this calculation assumes the typical size shown above For the above configu...

Page 31: ... an empty corridor would typically be smaller than these values and images of a very intricate pattern such as a crowded shopping mall would typically be larger than these Resolution Quality Small 160x120 Medium 320x240 High 640x480 1 4 0 12 5 36 0 2 4 6 14 8 42 4 3 5 2 16 8 47 5 4 6 8 22 3 62 9 5 18 9 65 5 206 0 values are in KB Example of frame sizes with VB C300 The data size mentioned above is...

Page 32: ... number of stored operation records increased the operation and search speed at event detection may be affected Notes on Motion Detection Recording The Motion Detection function detects motion which occurs where no motion is usually occurring Do not use this function where the motion detection operates too frequently e g where many people pass Refer to Operation Guideline for Sensor Event Recordin...

Page 33: ...ions CPU Pentium 4 3GHz Memory 1GB HDD Please refer to Disk Space Management Important P 58 Sample specifications for 14 day storage about 900 GB One Storage Server with the above PC specifications Live View Recorded Video Playback Example of Viewer PC specifications CPU Pentium 4 3 0GHz Memory 1GB Video Graphics Board On chip board For the latest information on performance please refer to our Web...

Page 34: ...se Server e g SQL Server Oracle If the hard disk is heavily loaded e g executing a distributed database application which transfers several hundred GB of data between databases recording may be interrupted Conversely the database server may be affected by the VK 64 VK 16 when it tries to a demanding task Using the Storage Server with a File Server Accesses to the hard disk may be too frequent and ...

Page 35: ...dth when recording video or viewing live video from the network camera The network bandwidths must be calculated separately for recording and live viewing Example With one recording server QVGA 1 fps and two live viewing servers QVGA 5 fps Bandwidth for recording 15 KB frame x 1 frame sec x 8 bits 120 Kbps Bandwidth for live viewing per server 15 KB frame x 5 frame sec x 8 bits 600 Kbps Therefore ...

Page 36: ...36 ...

Page 37: ...Chapter 2 Installation ...

Page 38: ...composing VK 64 VK 16 will be created on the desktop Setting up the Camera Servers 1 Install the Storage Server and Viewer 2 Before beginning installation read Chapter 1 and Preparation and Precautions P 41 carefully Note Refer to Chapter 3 for how to use the Storage Server Refer to Chapter 4 for how to use the VK Viewer Tip ...

Page 39: ...ent and then click Next to continue 2 Enter your License Key s and click Next Your License Key is indicated on the About License Key included in the package 3 2 Installation Types and number of licenses you can install vary according to the product you have purchased If additional Storage Server and Viewer installations are required you will need to purchase the necessary software P 18 The hard di...

Page 40: ...displayed When the InstallShield Wizard Completed screen displays click Finish Installation is now finished 5 Click Help to obtain details on the type of installation The type is indicated by the icon next to the application to be installed Click Space to view the amount of disk space required in order to install VK 64 VK 16 A list of drives is shown In either dialog click OK to return to the inst...

Page 41: ...er you cannot use the recording functions added in v1 3 e g preset tour If the Storage Servers v1 2 and v1 3 coexist either Storage Server can be specified as the Master Storage Server The Viewer v1 3 cannot connect to the Storage Server v1 0 or v1 1 The Viewer v1 0 v1 1 or v1 2 cannot connect to the Storage Server v1 3 The VB C300 cannot be registered on an v1 0 v1 1 or v1 2 Storage Server When u...

Page 42: ...42 Installation Procedures Stop other applications You must stop other applications including anti virus program before starting installation ...

Page 43: ...Chapter 3 Storage Server Configuration Reference ...

Page 44: ...r disk management event management event notification and user management Settings Tab In the Settings tab specify the Storage Server name Proxy Server and recording options Event Tab You can set the Storage Server to send an e mail to the user when an event has occurred In the Event tab specify the priority for each event type Event Notification Tab In the Event Notification tab configure the set...

Page 45: ...o configure the Storage Server you must log into Windows with the Windows Administrator privilege Note Double click the Storage Server Configuration desktop icon Alternatively from the Windows Start menu select All Programs WebView Livescope Network Video Recorder VK Series v1 3 Storage Server Configuration If the Authentication is required when starting this tool is checked P 49 the Login dialog ...

Page 46: ...ove network drives Enter a proxy address for connecting to Camera Servers Storage Server status indicator Start Storage Server and Stop Storage Server start and stop the Storage Server Use an account other than the Local System account to log onto the Storage Server to enable connection to the network drive you cannot use the network drive on Windows 2000 Click Apply to save changes when you modif...

Page 47: ...ccording to the priorities set in the Events tab Select a suitable event priority from the drop down menu for each event type listed Events associated with Storage Server started stopped User log in and Network drive assignment error do not appear in a Viewer s Timeline P 192 Live Events Log P 199 or Event Search Dialog P 201 The priority of an event created by a manual recording using Record Now ...

Page 48: ...lead to notification e mails Enter the e mail subject line for example Immediate Action Required Enter the address of the recipient and enter your from address Enter a Host Name or IP address and Port Number of mail server for outgoing mail Enable authentication POP before SMTP for connection and enter User Name Password and POP Server details If this is enabled the Storage Server will attempt to ...

Page 49: ...t configure register and change Camera Servers or configure and change recording schedules By default a user called admin is created The password is NVR It is strongly recommended that this is changed after installation It is necessary to set up users on all Storage Servers A particular user should be set up to have the same password on each Storage Server Check to enable user to have Administrato...

Page 50: ...ver Displaying Settings Tab Double click the Storage Server Configuration desktop icon The Storage Server Configuration dialog opens and the Settings tab is displayed How to configure the Settings Tab Changing the Storage Server name Enter a new name in Storage Server Name to change the Storage Server name You can use up to 20 characters It is recommended to use an easy to understand name if you a...

Page 51: ...tion option enter a value e g 100 or 24 and select MB or Hours You can enter 32 1024 for MB and 1 24 for Hours This will establish the maximum size used for each file of recorded video If you do not enter a value 1024 MB or 24 hours is used for the Maximum file size duration value Low disk space warning level Enter a percent value When the remaining space falls below the specified value the event ...

Page 52: ... Space Warning Level field an event occurs and an event notification mail is sent Also if the used disk space exceeds the value specified in the Maximum disk space used field recorded video will not be saved until the required free disk space is secured Refer to P 58 for the disk space management Note Adding Removing a Network Drive By adding a network drive you can save recorded video data on a n...

Page 53: ...t to save recorded video data in the Browse for Folder dialog Click OK to enter the path of the selected folder in the path field Enter the user name and password to access the network drive in the respective fields and click OK Be sure to use different user name and password from the logon user name and password for the local system account If addition is successful the added drive appears on the...

Page 54: ...ttings and switch to an account which is allowed to use the network drive i e account with Windows Administrator and Logon As Service privileges Refer to P 57 for the Logon As Service privilege You cannot use a UNC path or removable disk when adding a network drive If you add or delete a network drive the Storage Server program will reboot Multiple Storage Servers cannot use the same network drive...

Page 55: ...ive click Stop Storage Server After the Storage Server stops click Logon Settings The Log on as dialog appears If you are logging onto the Storage Server with a Local System account select Local System Account If you are logging onto the Storage Server with another account enter the account in Account and password in Password Click OK Click Start Storage Server to start the Storage Server with the...

Page 56: ... the Recording Schedules window of the Viewer When you have changed the Maximum retained history setting When you click Apply or End the following message will appear Changing the maximum retained history may delete recorded video Are you sure to continue When you have added or deleted a network drive When you click Apply or End the following message will appear Drive configuration has been change...

Page 57: ...e Local Security Settings dialog appears Select Local Policy and User Privilege Assignment from the tree to the left Double click Logon as Service from the list to the right The Logon as Service Properties dialog opens Click Add User or Group The Select User or Group dialog opens Enter the Windows account in the Enter object name to select field Enter or change the object name location and details...

Page 58: ...n the disk space available for recording i e free space from the Maximum disk space used value has fallen down to a certain level If the Maximum disk space used field is blank the entire drive capacity of the drive specified in the Drive field is considered to be the maximum disk space used Maximum disk space used Warning Level Event Notification Drive Low disk warning This allows early interventi...

Page 59: ...shold Level Delete from the oldest file Event Notification Low disc Drive deletion start Maximum disk space used Limit Level Stop Recording Maximum disk space used Delete from the oldest file Event Notification Low disc Drive rec stop âfëúÉtÉ ÉCÉãÇÕÅAÅuï ë ä ä Åvì ÇÃÉtÉ ÉCÉãÇ Ç Ç ÇƒÇ çÌè úÇ ÇÍÇ Ç ÅB ÇΩÇæǵÅAç Ç å Ç ÉtÉ ÉCÉãÇ ÉrÉÖÅ ÉèÅ ì Ç égópíÜÅiò â Tip Old video files may be deleted even if thes...

Page 60: ... the value for disk capacity is 80 GB and the value for Low disk space warning level is 10 the Storage Server reaches the Low Disk Space Warning Level when the remaining free disk space becomes 8 GB or less Threshold Level Calculation Method The Low Disk Space Warning Level occurs when the Storage Server satisfies the condition 1 or 2 below 1 When the Storage Server disk space used exceeds the fol...

Page 61: ...0 20GB 1 200GB 96MB 199 904GB 2 19 1 x 32MB 96MB 736MB 1 200GB 2 19 1 x 32MB 640MB Threshold Level can be used as a protective level so that the Limit Level is not achieved It is recommended that you take measures when Low Disk Space Warning Level event notification is generated such as deleting unnecessary video files Storing video data above the Threshold Level increases load over the Storage Se...

Page 62: ... have configured the event notification e mail settings e mails are sent according to the priorities set in the Events tab How to Display the Events Tab Double click the Storage Server Configuration desktop icon The Storage Server Configuration dialog opens and the Settings tab is displayed Click the Events tab to open it ...

Page 63: ...ium 4 Low 5 Lowest Low disk space rec suspended 1 Highest 2 High 3 Medium 4 Low 5 Lowest Camera Server Connection error 1 Highest 2 High 3 Medium 4 Low 5 Lowest Change recording frame rate 1 Highest 2 High 3 Medium 4 Low 5 Lowest Filed to map a network drive 1 Highest 2 High 3 Medium 4 Low 5 Lowest Values shown in bold are the defaults Remote Trigger function starts recording by passing a certain ...

Page 64: ...onfiguration dialog opens and the Settings tab is displayed Click the Event Notification tab to open it How to Set the Event Notification Tab Set the Event Notification Priority Check the Send E mail when event occurs option and select the priority level for sending e mails from the Priority drop down menu Events of that priority and above will lead to notification e mails Enter a subject in the E...

Page 65: ...cation e mail An event of priority 3 occurred on 12 05 2006 at 15 15 17 1000 Parking Lot 1 Sensor on You can enter each of the subject recipient s address and sender s address in up to 100 characters Note Enter the host name in up to 255 characters Note Enter the user name in up to 100 characters Enter the password in up to 20 characters Enter the host name in up to 255 characters Note You can onl...

Page 66: ...erver setup recording schedules and Viewer setup Operator Status Users can only access the Viewer windows P 162 created by Administrator Also they only have access to live video and recorded video on Storage Servers they have permission to access Users who have Operator Status cannot configure register and change Camera Servers or configure and change recording schedules By default a user called a...

Page 67: ...ing User to Administrator Check the Administrator option of a user in the User List to enable the user to have the Administrator privileges Do not check the option if you do not want to enable the user to have the Administrator privileges Click Apply to save changes Change User Password Click to select a user to change the password in the User List Click Edit below the user list to bring up the Ed...

Page 68: ...ick Remove The user is deleted Request User Authentication at Tool Startup Check the Authentication is required when starting this tool if user authentication is required when launching the tool If this option is checked the Login dialog appears before the Storage Server Configuration dialog opens 2 1 ...

Page 69: ...Chapter 4 Registering Camera Server and Setting Recording Schedule ...

Page 70: ...ing recording schedules on the Storage Server as well as the procedure to create recoding schedules To store the Camera Servers and create recording schedules launch the VK Viewer and use the Camera Summary window and Recording Schedules window under the Configuration and Preferences screen ...

Page 71: ...Viewer only without connecting to a Storage Server If you want to add a Storage Server to the connect option menu login the desired Storage Server by specifying its IP address and click Add Storage Server in the Viewer Settings window P 157 Note If multiple Storage Servers are being used you should decide which one is the Master Storage Server If the Storage Servers v1 2 and v1 3 coexist either St...

Page 72: ...er select localhost to start the Viewer Select localhost from the drop down menu Click Connect Enter your User Name and Password and click Login 3 2 1 The default user name and password are as follows User name admin Password NVR It is strongly recommended to change the user name and password after installation The Viewer can be launched directly without displaying Start up Screen and Login dialog...

Page 73: ... 3 2 1 The dialog for entering the IP address will also be shown even when connection to the Storage Server failed Tip If you need to use a proxy server you need to change the Internet option settings in the following procedure 1 Select Start Control Panel Internet Option 2 Select the Connection tab 3 Click LAN settings Change the proxy server settings If using a proxy server between a Viewer and ...

Page 74: ...aster Storage Server which has not been set up with camera information the entire Viewing Screen is initially blank as shown below You will need to configure the Viewer using the Configuration and Preferences screen It is strongly recommended that only one Administrator perform configuration on each network Note ...

Page 75: ...tting Recording Schedule Accessing the Configuration and Preferences screen To open the Configuration and Preferences screen In the Menu Bar select View Configuration The menu bar is located at the top left of the Viewing Screen In the Menu Bar select View Configuration The Configuration and Preferences screen appears ...

Page 76: ...r and display the Configuration and Preferences screen Click the Camera Summary tab The Storage and Camera Server Summary windows appear The window consists of two sub windows which are opened by their respective tabs Storage Servers and Locations Zones 2 1 When the Storage Servers tab is selected When the Locations Zones tab is selected Click and drag scrollbar s to view any portions of the Summa...

Page 77: ...are available via the Locations Zones tab Add Location Allows you to add a new location to the system Add Zone Allows you to add zones to locations When you select a zone within a location in the left panel a list of cameras in that zone is displayed in the right panel Other Functions in Both Tabs Camera server functions are located on the right hand panel regardless of which tab is selected Find ...

Page 78: ...reas in a shop such as a cash register area The diagram below illustrates an example of physical Locations and Zones on a VK 64 VK 16 network Viewer access is via the Location and Zone drop down menus Zones are different areas of the one Location Location 2 Zone 4 Zone 5 Zone 6 Location 3 Zone 7 Zone 8 Location 1 Shopping Mall Zone 1 Zone 3 Once configured Locations and Zones are selected from the...

Page 79: ... the Zone The Location Zone hierarchy is independent of the grouping of cameras into Storage Servers For example a single Storage Server may record video from multiple Locations and cameras from a single Location can be recorded to multiple Storage Servers When more than one Storage Servers are used and a Storage Server which already has registered Camera Servers is changed to the Master Storage S...

Page 80: ...ow select the Locations Zones tab if it is not already selected Click Add Zone to bring up the Add Zone dialog Enter the name of the new zone up to 20 characters Select a location from the drop down menu in the Location field then click OK The selected zone will now appear in the specified Location folder 4 3 2 1 If you want to add a Zone to another location not listed you must first create the Lo...

Page 81: ... or Edit Zone dialog opens Enter connection settings and click OK 2 1 Deleting a Location or Zone Click a location or zone in the list to highlight it and select Delete from the Edit menu Alternatively click a location or zone to select it then press the Delete key on your keyboard A confirmation dialog will appear Click Yes Click No to cancel deletion 2 1 ...

Page 82: ...torage Server 82 If you are using multiple Storage Servers add each Storage Server as directed below You need not perform these steps if you are using only one Storage Server and that Storage Server has already been added By adding the Storage Server you can select the Camera Servers managed by the Storage Server from the Viewer screen You can operate VK 64 with up to ten Storage Servers using any...

Page 83: ... the bottom right hand corner of the Camera Summary window Click Discard Changes to cancel any changes you have made 4 Do not add the same Storage Server more than once If you add a Storage Server with a different configuration such as one managed by another Master Storage Server your original Locations and Zones will be lost If you are using Windows XP SP2 or Windows Server 2003 you need to chang...

Page 84: ...torage Server to select it then press the Delete key on your keyboard A confirmation dialog will appear Click Yes Click No to cancel deletion To save changes click Save Changes at the bottom right hand corner of the Camera Summary window Click Discard Changes to cancel any changes you have made 4 3 2 1 If a Storage Server is deleted all Location Zone thumbnail and Layout information for cameras as...

Page 85: ...g the Camera Server by Search After registering the Camera Server you can select the Camera Server from the Viewer screen Displaying the Storage and Camera Server Summary Windows Launch the VK Viewer and display the Storage and Camera Server Summary window Finding the Camera Server In the Camera Summary window click Find Camera Servers which is located above the right hand panel Up to 192 Camera S...

Page 86: ...ervers P 87 The camera names listed are those specified by the Camera Server Refer to the Camera Server s User s Manual for more information on setting the name Camera Name for VB C50i VB C50iR VB C50FSi VB C50Fi VB C10 VB C10R Device Name for VB150 and VB101 and VB C300NA or VB C300PA for VB C300 Note If you cannot find the Camera Server click Add Camera Server to add it For the Camera Servers wh...

Page 87: ... Click Add Camera Server The Add Camera Server dialog appears Alternatively double click an item to bring up the Add Camera Server dialog Continue settings on the Add Camera Server dialog 2 1 Recording schedules must be set in order to record video Clicking OK does not immediately start recording video Note The Add Camera Server dialog s appearance will depend on the type of Camera Server connecte...

Page 88: ... for the System Administrator of the Camera Server Note You must click Connect before clicking OK to close the dialog the OK button is disabled until you do so When two or more cameras are used with VB150 when Video Input is set to Single two through four tabs are added The number of tabs shown for a VB150 does not indicate the physical number of cameras connected but indicates the number of camer...

Page 89: ...of the following external option One or more inputs may show depending on the type of the Camera Server It is not necessary to change this setting if it is not required If you have a Multi Terminal Module VB EX50 unit plugged into a VB C50i VB C50iR VB C50FSi VB C50Fi and have configured the Use External Video Input video seen in the Viewer may be taken from cameras connected to the Multi Terminal...

Page 90: ... select a zone for the Camera Server from the drop down menu If necessary click Add to add another Location or Zone The Add Location or Add Zone dialog opens Enter the Location Name or Zone Name and click OK When you add a Zone in the Add Zone dialog you must also add it to a Location in the same dialog Select a location from the drop down menu Refer to P 80 for how to add locations and zones 4 3 ...

Page 91: ...Choose a pre defined camera position if already configured from the Preset Angle drop down menu 3 2 1 If you want to change the thumbnail and the preview area is blank and the Update and Start Control buttons are disabled click Connect located in the Connection Settings field Tip For a VB C50FSi and VB C50Fi only zoom is available If a fixed camera or an external camera such as VC C50i is connecte...

Page 92: ... Search Results screen you will return to the Search Results screen Click Cancel to return to the Camera Summary window If you clicked Add Camera Server to invoke the Add Camera Server dialog you will return to the Camera Summary window Network drives registered via Storage Server Configuration are also shown on the Drive drop down menu Refer to Selecting Disk Drive Settings P 52 for the details I...

Page 93: ... at the bottom right hand corner of the Camera Summary window Click Discard Changes to cancel any changes you have made Returning to the Viewer Screen If you wish to return to the Viewer Screen select Viewer Screen from the View menu bar The bottom right hand corner of the Camera Summary window consists of two buttons Save Changes and Discard Changes ...

Page 94: ...s Change the Camera Server settings as directed in P 88 through P 93 2 Editing the Camera Server The right hand portion of the Camera Summary window features Edit Camera Server for Editing the Camera Server s on your system regardless of which tab you have selected Storage Servers or Locations Zones The same dialog as Add Camera Server P 87 opens Start Editing Camera Server In the Camera Server li...

Page 95: ... Server Finish Editing Click OK when finished The Camera Summary window reappears Save Edit Contents To save edited Camera Server settings click Save Changes at the bottom right hand corner of the Camera Summary window Click Discard Changes to cancel any modifications you have made ...

Page 96: ...ou have selected Storage Servers or Locations Zones Deleting the Camera Server In the Camera Server list click a Camera Server to highlight it 1 Click Remove Camera Server you can also press the Delete key on your keyboard A confirmation dialog will appear Click Yes Click No to cancel deletion 3 2 If a Camera Server is deleted all the settings for VK 64 VK 16 associated with this Camera Server wil...

Page 97: ...ng Recording Schedule Registering Camera Server Reflect Deletion To reflect Camera Server deletion click Save Changes at the bottom right hand corner of the Camera Summary window Click Discard Changes to cancel any modifications you have made ...

Page 98: ...for details The Sensor Event recording starts recording video when a sensor input has occurred Refer to Setting Sensor Event Recording P 125 for details 98 Overview of Setting Recording Schedules If you are using the Viewer only you cannot set recording schedules Note Use a Normal Schedule for normal recording operation Refer to P 103 for how to use the Normal Schedule dialog Example of Normal Sch...

Page 99: ...you must set the recording schedule for each Camera Server in the Recording Schedules screen Display the Recording Schedules screen Launch the VK Viewer and in the Menu Bar select View Configuration The Configuration and Preferences screen appears Click the Recording Schedules tab to display the Recording Schedules screen Click the Normal Schedule tab to display the Normal Schedules screen 3 2 1 ...

Page 100: ...g camera areas in the Location Zone Camera schedule time bars Day of the week Location Click and drag the vertical scroll bar downward to view any other zones Click and drag the horizontal scroll bar to the right to view other schedule days ...

Page 101: ...101 4 Registering Camera Server and Setting Recording Schedule Recording Schedule Click the Special Day Schedule tab to display the Special Day Schedule screen 4 ...

Page 102: ...he same as the Normal Recording Schedule but only covers a single day from 00 00 hrs to 24 00 hrs To have a special day schedule run over a long weekend Fri Sat Sun all dates of three days must be added to the list of days to use the schedule When Special Day Schedules are running Normal Schedules are disabled If an invalid schedule exists the following warning message will be displayed There is a...

Page 103: ...ge Server list Select the Storage Server to edit the recording schedule When the Recording Schedules window is first opened the first Storage Server in the list is shown with its associated schedule to the right Schedule Area Used to set up standard day to day recording settings of the system Storage Server selector Schedule Area ...

Page 104: ...If you wish to display another Storage Server s schedule click the Storage Server menu otherwise proceed to the next step The menu may list more assigned Storage Servers If you select another Storage Server the Schedule Area will refresh and associated schedule zones will be shown Creating a Normal Schedule Click and drag a time period for a camera name and release the mouse button The Add Schedul...

Page 105: ...gle Camera Sever Note Configuration is discussed on the following pages Set start and end times and the day of the week P 106 Set frame rate enable Motion Detection and sensor event recording P 107 Move the mouse cursor in the Preview area to change the camera angle P 91 Set the preset camera angle and backlight compensation P 108 Set the external device output P 111 The number of external devices...

Page 106: ...hedule times for the whole day Times are given in 24 hours for example 18 00 is 6 00 pm If a Camera Server has been configured with Restrict Service Time VK 64 VK 16 will not be able to record from the Camera Server during restricted times The time zone used for the recording schedule will be the time of PC where the Storage Server is running The Storage Server will adjust for Daylight Savings if ...

Page 107: ...g this time period Click Settings to change the details Refer to P 118 and P 125 for details of Motion Detection and Sensor Event recordings 3 2 1 Set Continuous Recording Click the Continuously at Max box if you want to set continuous recording for the duration of the time period Select a frame rate for recorded video from the drop down menu or input a value from the keyboard You can set the fram...

Page 108: ...s whatever backlighting the Camera Server offers 3 2 1 Preview area Camera angle can be changed by moving your mouse pointer in the Preview area to display controls Click the controls to pan tilt and zoom P 91 After the camera has been controlled the preset will be set to Custom The value this is set to will be the value used for recording and the position set will be the position recorded If you ...

Page 109: ...er User s Manual for details on making camera presets Although the VB C300 does not allow Preset Tour on the Camera Server the Preset Tour is available via this setting If you are using a preset on the Camera Server the Camera Server s preset takes precedence and the current position is changed to the preset position If Continuous is set the pre event recording is not available If Exposure is set ...

Page 110: ...4 PAL_ VB C50i series 320 x 240 NTSC 192 x 144 PAL_ VB C50i series 640 x 240 NTSC_ VB101 VB150 640 x 480 NTSC_VB C10 VB C50i series VB C300 768 x 576 PAL_ VB C50i series The additonal option is only allows to use with VB C300 Other models cannot use these options If the Exposure box is checked the Backlight compensation option will be disabled If the Preset Tour is enabled you cannot use additiona...

Page 111: ...d If Setup is clicked click the drop down menu for the target external device and set External Outputs to On or Not specified on the External Outputs Setting dialog 3 2 1 Finish Setting Click OK to save the new settings and close the dialog Click Cancel to discard the new settings When you click OK the Preset and Backlight settings are effective on Video Windows in the Viewer Control the camera as...

Page 112: ...iewer Screen from the View menu bar 2 1 Camera Servers have certain features to allow image capture operations based on sensor input or schedule If settings are enabled on the Camera Server they take precedence over any settings made in VK 64 VK 16 This may cause some confusion if your VK 64 VK 16 recording schedules fail to record with the correct camera preset You should disable such Camera Serv...

Page 113: ... 113 4 Registering Camera Server and Setting Recording Schedule The Top page of the Camera Server is displayed after Internet Explorer launches VB C50i Click Setting Page to display the Settings Page to change the Camera Server settings ...

Page 114: ...rding schedule to execute the specified Motion Detection recording using the Schedule Setting Tool For a VB150 Video Input must be set to Single the Motion Detection settings are configured using the normal VK 64 VK 16 Motion Detection Settings dialog P 119 If the Motion Detection settings are configured on the Storage Server the load on the CPU may go high depending on the detection settings and ...

Page 115: ...btain camera control then configure the settings again Restrict Service Time If a Camera Server has been configured with Restrict Service Time VK 64 VK 16 will not be able to record from the Camera Server during restricted times External Device Specify the name of the external device such as sensor name You cannot set it with the VK 64 VK 16 If the external device is not set on the Camera Server t...

Page 116: ... you to easily set recording schedules for multiple cameras Once created settings for each camera can be customized Example Drag over the Schedule area covering three Camera Servers to set the same schedule for the three Camera Servers Change or Move Multiple Camera Server Schedules While holding down the Ctrl key click on individual schedule items to select them and drag the mouse to change or mo...

Page 117: ...eo from the drop down menu or input a value from the keyboard You can set the frame rate from 0 1 frames per second to 30 frames per second The default is 5 seconds 2 1 When the load on Storage Server CPU and hard disk is high recording at the specified frame rate may not be available or the video recording may be interrupted Higher frame rates for result in larger disk usage Make sure you have en...

Page 118: ...g of the Camera Server After configuring the Motion Detection settings do not change the video quality on the Camera Server Motion detection is done by the Storage Server or Camera Server whichever selected in the Motion Detection Settings window If the Camera Server executes motion detection motion detection is not available while the Camera Server is performing the pan tilt or zoom operation mot...

Page 119: ...0i VB C50iR VB C50FSi and VB C50Fi Activate external device output If the Sensor Event recording is also enabled and motion detection and sensor input occur simultaneously the Sensor Event recording takes precedence Refer to Priorities of Motion Detection and Sensor Event Recording P 131 for details You cannot use the Preset Tour and the Motion Detection recording together Certain Camera Servers h...

Page 120: ...Storage Server Camera Server Uses the Motion Detection function of the Camera Server to detect motion This menu is only active for VB150 servers with the Video Input set to Single or VB C50i VB C50iR VB C50FSi VB C50Fi In the Analysis Frame Rate menu select from 0 1 to 30 frames per second If you select the Camera Sever to detect motion Settings becomes available Settings is now enabled Click to l...

Page 121: ... level for the defined duration a red color bar is displayed and an event is triggered The behavior of the Detection Indicator is described as follows Green color bar The area of change that is less than the specified Area Ratio i e activity remains at the left of the Area Ratio marker Yellow color bar The area of change that is equal to or greater than the specified Area Ratio activity peaks on o...

Page 122: ... the degree of change of area ratio against the defined detection area detected as motion Click and drag the Area Ratio slide bar to any position from 0 to 100 This establishes the proportion of image inside the Active Region dotted frame allowed before motion is detected When you drag the slide bar the black vertical line in the Detection Indicator will move to reflect the change in specified Are...

Page 123: ...so set Record for before event is not available If Record for before event is set to one second or longer it will take approximately 10 seconds after event occurrence until its display Note Set the Duration Duration is the length of time necessary for the change to be recognized as motion Click and drag the Duration slide bar to any position between 0 0 and 5 0 seconds This establishes the duratio...

Page 124: ... Step 6 Set the External Outputs Click the drop down menu for the target external device and set On or Not specified Available external outputs depend on the Camera Server If the Picture Recording feature of a Camera Server is used and its configuration includes a preset position then this preset position will override camera positions set by VK 64 VK 16 including those in recording schedules and ...

Page 125: ...click Settings Some items in the Sensor Event Settings window overlap with the items in the Add Edit Schedule Item dialog When the Sensor Event recording is executed the settings in the Sensor Event Settings window take precedence If using a VB150 with multiple cameras and Video Input is also specified you can configure different Sensor Event recording settings for each camera or you can specify D...

Page 126: ... exposure white balance and focus Night Mode is available for VB C300 VB C50i VB C50iR VB C50FSi and VB C50Fi Camera Servers or VC C50i VC C50iR cameras connected to Camera Server VB150s Click Night mode and select Disabled Enabled IR light off or Enabled IR light on from the sub menu You can set External Outputs to On or Not specified when a sensor event occurs Control the camera via the Camera C...

Page 127: ...s been controlled the Preset will be set to Custom Click the Backlight drop down menu and select On to compensate for camera views with strong backlighting The setting will be used when the sensor is triggered This is useful for example if a camera angle would change from an indoor view to an outdoor view when the sensor is triggered If you set the Preset option in the Sensor Event Settings window...

Page 128: ... field Max Frame Rate select a maximum frame rate for recorded video from the drop down menu or enter a value from the keyboard Choose from 0 1 to 30 frames per second 5 is the default 1 The frame rate specified is the frame rate that the Storage Server will attempt to record and may not be the actual frame rate used for recording video Factors such as the number of Viewers the number of Camera Se...

Page 129: ...the last frame is recorded and thus the full requested duration of post event recording may not be available Note Record for before event enter a number of seconds for the amount of recording time before the event occurs up to a maximum of 30 seconds Record for after event enter a number of seconds for the amount of recording time after the event has transpired up to a maximum of 999 seconds Click...

Page 130: ...t settings will be used 2 1 Available external outputs depend on the Camera Server Higher frame rates for Record Video At result in larger disk usage Make sure you have enough disk space Camera Servers have certain features to allow image capture operations based on sensor input or schedule If settings are enabled on the Camera Server they take precedence over any settings made in VK 64 VK 16 This...

Page 131: ...he Sensor Event recording takes precedence If two events with the same priority occur the later event takes precedence When the later event terminates and the former event still remains the former event will be handled Example When Event A occurs with Sensor 1 and Event B occurs with Sensor 2 1 If the former event terminates before the later event 1 Assuming that the time for both events is two un...

Page 132: ...or the selected preset configure the Speed PT Speed Z and Pause sec settings Drag the slide bar for each item to set the value 4 3 2 1 The durability of camera Pan Tilt mechanism may be affected depending on the Preset Tour setting P 135 In the Preset Tour the camera position returns to the first preset after the last preset When the Preset Tour is used the Motion Detection recording backlight com...

Page 133: ...tion Change the Preset Settings Check the Preset Tour box and click Settings The Preset Tour Settings dialog is displayed Select a preset to change from the list and click Edit The Preset Tour Edit dialog appears For the selected preset change the Speed PT Speed Z or Pause sec settings Drag the slide bar for each item to set the value Check the settings and click OK This returns to the Preset Tour...

Page 134: ...log is displayed Select a preset to change the order from the list and click Move Up or Move Down Delete a Preset Check the Preset Tour box and click Settings The Preset Tour Settings dialog is displayed Select a preset to delete from the list and click Remove Click OK This returns to the Preset Tour Settings dialog 3 2 1 2 1 ...

Page 135: ...n the combination of the movement rate movement range and still time Refer to the following tables Total tour time for 100 000 round trips in the pan direction estimated Example If the movement rate PT is 1 still time is 30 seconds and movement range angle in the pan direction is 50 degrees it takes approximately 9 444 hours for 100 000 round trips in the pan direction Note Movement rate PT is 1 S...

Page 136: ...ing Schedules tab and ensure the Special Day Schedule is selected The Special Day Schedule consists of Storage Server Select a Storage Server from the list to add edit schedules for that server Associated Locations and Zones are displayed in the Schedule Area Schedule Type selector Allows you to select a schedule type These are user defined schedules such as Public Holidays and Long Weekends Days ...

Page 137: ...h it There is no limit to the number of schedule type that can be added To launch the dialog and add a Special Day Schedule Add a Schedule Type Click Add The Add Schedule Type dialog is displayed 1 The scheduling area functions the same as the Normal Recording Schedule but only covers a single day from 00 00 hrs to 24 00 hrs To have a special day schedule run over a long weekend Fri Sat Sun all da...

Page 138: ... a schedule type in the Schedule Type list to select it Click Edit This will bring up the Edit Schedule Type dialog Overwrite the existing name For example you may wish to change the name Company Holidays to Company Special Days Click OK The new settings are saved and the dialog closes 3 2 1 If you delete a schedule type where there are dates associated with that schedule a warning will appear Del...

Page 139: ...any Holidays created on P 137 and then in the Days list click Add This will bring up the Select Date calendar see below Click to select a day in the calendar then click OK Click Add again to add another day to the same schedule type if you wish Added days are shown in the Days list see example on next page Other calendar selection methods are shown on the next page 2 1 Click to scroll back through...

Page 140: ...Delete below the Days list The day is deleted from the schedule type 2 1 Alternatively click the current month and a month selector will appear To select another year click the current year and scroll down or back up using the up down arrows If you attempt to associate the same day with different special day schedules you will be given a warning and asked to delete the other entry before creating ...

Page 141: ...ep all your settings The settings are then saved to the Storage Server Click Discard Changes to cancel any changes you have made If you wish to return to the Viewer select View Viewing Screen from the menu bar 2 1 The bottom right hand corner of the Recording Schedule window consists of two buttons Save Schedule and Discard Changes ...

Page 142: ...e highest load is expected when the schedule is performed Number of Camera Servers Number of Camera Servers with Motion Detection Total Recording Frame Rate Total Recording Frame Rate Continuous Recording Total Recording Frame Rate Sensor Motion Detection Recording Maximum Retained History Maximum File Size Duration Disk Space Used Click OK to close the Record Setup Summary dialog Display Record S...

Page 143: ...r and Setting Recording Schedule Displaying the Recording Setting Summary Click Copy to copy the contents of the Recording Setting Summary dialog to the Clipboard Tip If the load is too high adjust the recording schedule again Note ...

Page 144: ...144 ...

Page 145: ...Chapter 5 Viewer Reference ...

Page 146: ...he Viewer Arranging and Saving Layouts Explains how to arrange layouts and set layout sequences Video Window Operation Explains how to create a video window and display it in the Viewing Area and control the Camera Server Using the Timeline and Viewing Events Explains how to use the Timeline for live and recorded viewing as well as view and search events ...

Page 147: ...147 5 Viewer Reference ...

Page 148: ... enabled Viewing Area for Video Windows P 154 The Video Windows are arranged here Video Windows can be re sized They can also be arranged into a uniform grid Playback controls P 194 Click the VCR like controls to play rewind fast forward or jump to previous and next events Timeline P 194 Paste date and time as well as events which occurred are displayed here Events are displayed as bars colored ac...

Page 149: ... a segment of video to save as another file Zoom In Zoom Out buttons P 197 Click to zoom in or out of the Timeline Live Events Log list P 199 Indicates events that have been logged on Storage Servers after the Viewer was launched Video window menu icon P 188 Select preset camera angles custom pan tilt and zoom and select a Video Window size Camera Selection Area P 176 Thumbnails of Camera Servers ...

Page 150: ...rk Video Recorder VK Series v1 3 VK Viewer The connect option menu for Storage Server is displayed Select the Master Storage Server option and click Connect Start up Screen Use IP address Connects to Storage Server and starts the Viewer by specifying its IP address Select this option when the Storage Server and the Viewer are installed on separate PCs Not use Storage Server Select this option to u...

Page 151: ...t to start the Viewer Select localhost from the drop down menu Click Connect Enter your User Name and Password and click Login 3 2 1 The user name and password for the VK 64 VK 16 entered in this step are defined by your System Administrator on the he Storage Server Configuration dialog They can be different from the user name and password used to log into Windows Note ...

Page 152: ...Server to the Viewer The Apache proxy server does perform response buffering so is not recommended You cannot transmit or receive audio when using a proxy server Note Specify the IP address of Storage Server to connect Viewer If you installed the Viewer and Storage Server on separate PCs specify an IP address of Storage Server and connect Viewer to the Storage Server Select Use IP address from the...

Page 153: ...is fixed to Personal Layout Sequence Configuration and Preference Screen Recording Schedules tab is not displayed P 99 Some functions such as video recording sensor events and motion detection are not available In the Storage and Camera Server Summary Storage Servers tab is not displayed P 76 In the Storage and Camera Server Summary the Camera Server list shows only Camera Server Locations Zones a...

Page 154: ... in the Camera Selection Area on the top of the screen These can be dragged onto the Viewing Area for monitoring If your Administrator has already created a Layout for you then the Viewing Area will display the first Personal Layout or first Shared Layout if there are no Personal Layouts as shown in the example on the previous pages Viewing Area Click to maximize the Viewing Screen You can hide th...

Page 155: ...roperties from the menu Example C Program Files Canon WebView NVR NVR_Viewer exe h 192 168 100 1 p 80 u admin pw NVR Make sure to enter a space after C Program Files Canon WebView NVR NVR_Viewer exe 2 Specify Target as follows using alphanumeric characters h IP address of the Storage Server This specification is mandatory P 73 P 152 p port number It can be omitted When omitted 80 is specified P 73...

Page 156: ... Server into from the connect menu Proxy Setting Use this option to make an access to Storage Server via proxy server Layout setting Confirm if the layout was preserved when quitting or when the screen changes Event Notification Settings Set operator notification and adjust duration in seconds set operator acknowledgement recognition of an event set an audio alert and suppress event display Audio ...

Page 157: ...um frame rate is specified the load on the computer CPU will be high and Viewer operations may take longer When Auto Adjust Frame Rate is ticked frame rate is automatically reduced when CPU load becomes high Note Maximum frame rate for live viewing Select a frame rate from the drop down list Adjust frame rates automatically Enable larger Video Window captions in the Viewer The current Master Stora...

Page 158: ...s indicated in the Viewer Settings window Viewer Settings window Configure the proxy server When you wish to access the Storage Server Using the proxy server set in the Internet Option tick Use internet proxy settings and restart the Viewer Viewer Settings window Configure layout in the Viewing Screen If you wish to confirm whether the layout information has already been saved when finishing the V...

Page 159: ...s 10 minutes When the specified period of time passes during audio transmission it will be terminated automatically Viewer Settings window Configure Focus Settings You can set the camera to return its focus mode to the default setting when the camera orientation is changed The focus mode returns to default if it has been changed to Manual after any focus operation using a preset with focus setting...

Page 160: ...ond an event which has occurred will not flash and a color bar will light for one minute Tick the Requires operator acknowledgement box for the event When an event occurs it will flash in the Live Events Log and the audio alert will sound if specified until the operator double clicks on the event that is the notification time will not apply to the event in the event log That is the notification ti...

Page 161: ...he Viewer settings are then saved to the local disk Click Discard Changes to cancel any modifications you have made If you wish to return to the Viewer select View Viewing Screen from the menu bar The bottom right hand corner of the Viewer Settings window consists of two buttons Save Changes and Discard Changes ...

Page 162: ...ayout menu options existing Layouts are displayed and divided into two sections Shared Layouts All the users can available these layouts You need Administrator privilege to create a layout P 66 Normal users cannot modify these layouts Personal Layouts Lists layouts created by the current user These are shown under the Shared Layouts list to distinguish the different types of layouts Other users ca...

Page 163: ...ct New Layout The Viewing Area will become blank and the default layout name Untitled will be displayed The process of creating folders and saving a layout could be done in the following order 1 Organize and create Layout folders 2 Arranging Video Windows in Layout 3 Save Layout to a folder Drag the Camera Server s thumbnails onto the Viewing Area to create the layout ...

Page 164: ...equences dialog allows you to create folders and sub folders in which to save item layouts and layout sequences P 166 To display the dialog Open the Layout menu and select Organize The Organize Layouts Layout Sequences dialog opens Administrator version shown The Shared Layouts folder will not display if you have logged in as an Operator Create a new folder Move an item to another folder Move an i...

Page 165: ...n the same manner 2 1 Move an entry up or down Click an item or folder to highlight it then click Move Up or Move Down The item will move up or down within a folder Edit or delete a layout or folder Click an item or folder to highlight it then click Edit The respective Layout Name or Folder Name dialog will appear for you to overwrite a new name Click an item or folder to highlight it then click D...

Page 166: ...yout to a personal folder Once you have saved an item the name will appear next to the Layout button in the Viewing Area 2 1 Arranging and Saving Layouts Saving a Layout or Layout Sequence Administrators and Operators can save layouts and layout sequences to an existing folder or a new folder via the Save Layout dialog Step 1 Open the Layout menu and select Save or Save As The Save Layout dialog o...

Page 167: ...youts Use the Add Layout button to add layouts to the new sequence Click Up and Down to change the display sequence of layouts Click Delete to delete the layout In the Duration menu select a set duration of display time for each layout or enter a custom time overwriting the existing time 4 3 2 1 Opening a previously saved layout Click the Layout button to open the menu and then click a layout or l...

Page 168: ...ick OK to bring up the Select destination folder dialog Select or enter the time You can set the time within the range from 1 to 9999 Click Add Layout to add a selected layout from the left hand column Click on a layout to select it Enter a new name Select a layout sequence type Layout Sequence All the users can share these layouts You need Administrator privilege to create a layout sequence Norma...

Page 169: ...ds None You can arrange Video Windows freely Alignment Grid creates a grid of dots in the Viewing Area You can re size Video Windows using the grid Small Grid Medium Grid and Large Grid creates a small 160x120 medium 320x240 or large 640x480 grid where you can place Video Windows in a tile like manner Custom Grid You can set the grid size P 174 ...

Page 170: ...d drag the image outwards to snap to a larger grid area Release the mouse button The selection boundary will become a Video Window and snap into alignment along the grid closest to it 2 1 Working with the Alignment Grid Select the Alignment Grid from the Layout Grids sub menu The Viewing Area displays a grid of dots When you place a Video Window it snaps to the grid boundaries Create and align mor...

Page 171: ...y onto the Viewing Area grid The boundary will re size Release the mouse button The selection boundary will become a Video Window and snap into alignment along the grid closest to it To re size the Video Window click any corner and drag the image outwards to snap to a larger grid area Release the mouse button The selection boundary will become a Video Window and snap into alignment along the grid ...

Page 172: ... can add more the number of Video Windows you can display simultaneously will depend on your video card the speed of your computer the maximum frame rate P 157 configured with Viewer setting the video size and video quality coming from the Camera Server and the size of each Video Window displayed A maximum of 16 cameras is recommended in the Layout Area Note ...

Page 173: ...173 5 Viewer Reference Arranging and Saving Layouts The Viewing Area with a Large Grid could look like this In this example the Camera Selection Area and Timeline are hidden P 173 ...

Page 174: ...pixels In the Horizontal or Vertical field overwrite the existing value with a custom value or use the up down arrows to select a value When you adjust the value in one field you ll notice the value change in the other field This is because the proportions of the re sized Video Window are constrained and the dimensions are scaled accordingly Click OK to close the dialog The grid will re size to yo...

Page 175: ...ying more Video Windows as shown below in the Large Grid example Pressing the Esc key returns the menu bar You can also select to hide Video Window Captions the Camera Control and Live Events The number of Video Windows in the display achieved is dependent on the display resolution A higher resolution will result in more Video Windows displayed View Camera Selector View Timeline View Full Screen L...

Page 176: ... areas within each location About Camera Thumbnails When a Location is selected the thumbnail images of the Camera Servers registered in that Location will appear Depending on the number of cameras in the selected Location a scrollbar at the base of the Camera Selection Area can be used to scroll the display of thumbnails Each Zone is grouped into camera thumbnail images and these can be dragged o...

Page 177: ...tively click the scrollbar located under the Camera Selection Area Drag it to the right until the desired Zone is displayed Selecting Locations and their Zones Selection is performed in the following order Step 1 Select a Location from the drop down menu Click the Location drop down menu or on the down arrow A list of pre configured locations appears Click a location in the list Zones for that lis...

Page 178: ...o create Video Windows in the Viewing Area The Viewing Area can support multiple Video Windows for live monitoring and viewing recorded video simultaneously Click and drag a camera thumbnail onto the Viewing Area Click the thumbnail image and while holding down the mouse button drag its boundary anywhere onto the Viewing Area Release the mouse button The re sized outline becomes a live Video Windo...

Page 179: ...ize Select Video Receive Size from the menu and then select Small Medium Large or Default from the sub menu A right click action on the Video Window will also bring up the same menu Move a Video Window Click anywhere on a Video Window and drag it to any position in the Viewing Area 2 1 For best performance on the Viewer such as to view as many Video Windows as possible re size 160x120 320x240 640x...

Page 180: ...180 Basic Video Window Functions Add more Video Windows Click and drag other camera thumbnails onto the Viewing Area to create Video Windows for monitoring Your Viewing Screen could look like this ...

Page 181: ...ity settings of the camera and the Live Video Viewing Settings frame rate set in the Viewer Settings window of the Configuration and Preferences screen If the load on the computer CPU is high Viewer operations may take longer Note Video Windows from different zones and locations can be displayed in the same Layout You can copy and paste a multiple selection of Video Windows t one time which can be...

Page 182: ... information Recorded video indicator displays a time date stamp in the title bar for recorded footage Event indicator displays a colored bar across the top of the Video Window Pan tilt and zoom controls when the Video Window is double clicked or the Video Window menu item Get Camera Control is selected controls appear to enable pan tilt and zoom About Video Window states Video Windows can be disp...

Page 183: ...eo is shown the title bar on a Video Window will change from black to gray Video display conditions For recorded video the time date indicator may not fully display if the Video Window size has been reduced Event Indicator If the option for Operator Notification has been set a color bar will flash on top of a live Video Window when an event occurs The color indicates the event priority The bar wil...

Page 184: ...ra control message will appear You may have to wait a few moments and attempt to get control later Arrows will appear in the cursor position when you have gained control of the camera When you move the mouse cursor over a Video Window the mouse cursor changes its shape Click and drag the cursor in the direction of the arrow for pan and tilt When you move the mouse cursor to the center of the image...

Page 185: ... or right click in the Video Window to bring up a context menu and select Camera Control If a Video Window is not selected the preview window will be blank Click on a Video Window to control the camera Pan Tilt controls Click to nudge or click and hold for continuous movement Click this button to display exposure control P 186 Click this button to display white balance control P 186 If preset came...

Page 186: ...under a day light or white fluorescent lamp fluorescent H Select this option when using the camera under a day light fluorescent lamp Mercury lamp Select this option when using the camera under a mercury lamp Sodium lamp Select this option when using the camera under orange light of a sodium vapor lamp Halogen lamp Select this option when using the camera under a halogen or incandescent lamp Manua...

Page 187: ...ntrol from the active Video Window menu Panorama picture needs to be set on the Camera Server in advance VB C50FSi VB C50Fi cannot display panorama picture Exposure can be adjusted for VB C300 only White balance can be adjusted for VB C300 only Note Switch between Auto Focus and Manual Focus Auto Adjust the focus automatically Auto for dome housing When the optional dome housing is used select thi...

Page 188: ...rom the menu and then select Small Medium Large or Raw from the sub menu A Raw selection displays the Video Window selected at the Video Receive Size 2 1 Change the size of a Received Video VB C50i VB C50iR VB C50FSi VB C50Fi only You can select a video size received by the Viewer To change the size of received video via the menu Open the Video Window menu and select Video Receive Size Click the V...

Page 189: ...menu Select Backlight Compensation from the menu and select Off or On from the sub menu 2 1 You can set the backlight compensation to Off Low Medium or High for VB C300 VB C50i VB C50iR VB C50FSi and VB C50Fi When multiple Video Windows from a single Camera Server are displayed and the Video Receive Size is changed from one of them the change will apply to all Video Windows Selected video receive ...

Page 190: ... both installed For the VB C300 the NC Viewer is activated Refer to your Camera Server User s Manual for more information on the Admin Viewer or NC Viewer When the audio function of the VB C300 VB C50i VB C50iR or VB C50FSi is enabled you can transmit and receive audio To use audio click this menu to display the Audio Panel P 191 Refer to your VB C300 VB C50i VB C50iR or VB C50FSi User s Manual fo...

Page 191: ...k Clicking this button after selecting a Video Window or selecting a Video Window after clicking this button starts audio transmission When ticked audio is played back even when a microphone is used Click this button to display silent detection control You cannot transmit and receive audio when using a proxy server Note When ticked silent interval is detected while transmitting audio For a silent ...

Page 192: ...n more or less detail Events for non selected cameras Video Windows in the Viewing Area are called secondary event They are displayed in weaker colors than primary events Click in this area of the Playhead shaft and drag to positions on the Timeline Previous Event Rewind Nudge Back Play Pause Nudge Forward Fast Forward Next Event Playback controls Playback controls Buttons for playback rewind etc ...

Page 193: ...e Extract recorded video to save as another file Event display area Day indicator Click to return the Playhead to the Live position if it has been moved Events associated with selected cameras Video Windows in the Viewing Area are indicated in stronger colors as primary events If no cameras are selected all events are shown as primary events Note Click the time bar and drag to scroll through the T...

Page 194: ...Windows that have been selected Click in the Event Display Area of the Timeline Click in the Event Display Area of the Timeline The Playhead will move to that location and playback of recorded video commences from that time When you choose to play back video the video is played over a network Therefore the response and smoothness of the play back will depend on network traffic and other properties...

Page 195: ... your mouse pointer over the time bar and it becomes a hand Click and drag to the left or right to move back or forward in time You can only scroll right to the current time or live time Click to scroll back through the months Click to scroll forward through the months Click a day to highlight it then click OK to bring up that day in the Timeline Click up down arrows to select a time or click each...

Page 196: ...cord Now 2 1 Shooting a Snapshot Click Capture Still Frame to keep the current image on a Video Window Select a Video Window to capture a still image Click Capture Still Frame 2 1 The Record Now function records at the maximum frame rate Extended recording time will use additional disk space on the Storage Server The Record Now function is only enabled if a Storage Server is configured for the cam...

Page 197: ...the Timeline as missing When gaining time rewinding the clock back from 02 00 to 01 00 the extra time is duplicated Zooming In and Out of the Timeline Click Zoom In to zoom into a time period in the Event Display Area Click Zoom Out to zoom out a time period in the Event Display Area Where Daylight Saving changes have occurred the Timeline display is still continuous Only the labels are affected N...

Page 198: ...hlight it then click and drag a time period for it in the Timeline Click Extract Video The Extract Video dialog opens In the Date field click each segment and overwrite with desired date Alternatively click the down arrow to use the calendar Click up down arrows to select a time or click each time segment and overwrite existing value Click OK to display the Save As dialog The Save As dialog opens ...

Page 199: ...unch the Viewer if left open in a previous session of VK 64 VK 16 Re sizing the window to a custom size Click the corners or edges and drag the window out to a new size Release the mouse button When you launch the Viewer again the Live Events Log will retain the size you selected Click and drag scroll bar to view events The bell icon is displayed when the event is acknowledged by double clicking D...

Page 200: ...riod if configured If Operator Acknowledgement is required the event will flash indefinitely if not acknowledged In the Live Events Log double click on the event to acknowledge it and a recorded video at that time is displayed in its associated Video Window In the bottom right corner of the Viewer click Return to Live when you have finished viewing the event The Video Window will return to live vi...

Page 201: ...Search On the Timeline click Event Search The Event Search dialog opens Select a Location and Zone Enter a keyword for particular events Enter a search end date and time Enter a search start date and time Select a Priority Select a state of event Select a type of event Search Result Display Area Double click an event to view it in the Video Window or click an event to highlight it and then click V...

Page 202: ...th day year and time Alternatively click the down arrow next to each date panel to bring up the calendar Click off the calendar to close it again In the Event Search dialog you can also scroll through time using the up down arrows Click an hours minutes or seconds segment to highlight it and then click the up or down arrow Step 2 Select an event keyword In the Description field enter a keyword suc...

Page 203: ...te Select a State for the event whether it was On or Off during the period Alternatively select All States Step 6 Select a Priority Select a Priority from the drop down list Viewing found events To view an event in a Video Window click the event to highlight it and click View Event in Camera to view it in a Video Window You can also double click an event to view it in a Video Window Clicking Cance...

Page 204: ...204 ...

Page 205: ...Chapter 6 Operation and Management ...

Page 206: ... counteractions Operation Guideline for Recording and Viewing Explains frame rates for recording and live viewing via the Viewer Operation Guideline for Sensor Event Recording Explains operation tips concerning the sensor event recording including points to notice and counteractions against troubles Optimization of Motion Detection Recording Index Explains operation tips concerning the Motion Dete...

Page 207: ...occurs when the disk free space has run under the specified value or the used disk space has exceeded the specified valued In this case data may be deleted before the designated storage time elapses Disk capacity indication is only effective when it is on This event occurs when the disk free space has run under the threshold value or the used disk space has exceeded the threshold valued This event...

Page 208: ...option is enabled by default recommended When displaying live video the Viewer requests the camera to send the video at the specified frame rate Max Live Frame Rate on P 157 If you use this function you can maintain a stable display of live video with a temporarily lowered frame rate even if your PC temporarily becomes highly loaded for some reasons If you do not use this function menu operation o...

Page 209: ...eases for a certain period of time the Storage Server considers the PC to be highly loaded When this happens the Storage Server stores images at intervals rather than storing all of the images the Storage Server received in order to reduce the PC load If you use this function you can avoid recording failure as much as possible even if your PC temporarily becomes highly loaded for some reasons Note...

Page 210: ...he recording frame rate may be reduced or recording may be interrupted If you have 10 or more sensor events per minute continuously we recommend continuous recording For each Storage Server it is recommended to lower the sensor sensitivity or use continuous recording 20 000 or more sensor events occur a day 10 or more sensor events occur every minute Check the number of sensor events with the stat...

Page 211: ...otion Detection recording Lowering this value mitigates load on the Storage Sever Motion Detection Setting for Each Camera Model VB C50i VB C50iR VB C50FSi VB C50Fi VB150 Configure the Motion Detection settings on the Camera Server Please refer to the Camera Server User s Manual for details For the VB150 Video Input must be set to Single VB C300 Configure the Motion Detection settings on the Stora...

Page 212: ...212 ...

Page 213: ...Chapter 7 Backup Scheme ...

Page 214: ...4 This chapter explains how to make backups for each purpose Since the volume of video data the largest among various data types requiring backup you must carefully choose backup equipment and learn the backup techniques ...

Page 215: ...p include Backup for Data Protection Prevents data from system crush or hard disk failure This type of back up targets video data event data and configuration files Backup for Archive Stores video data and event data on other media for a long period of time ...

Page 216: ...specifications mention that the transfer speed will be doubled by compressing data the expected compression ratio depends on data formats Therefore it is dangerous to think so The time required for making backup of data for a week 70GB is approximately 2 800 seconds i e a little longer than 46 minutes The time required for making backup of data for one day 10GB is approximately 400 seconds i e 6 m...

Page 217: ...ime File name NVR_MEDIA_xxxxxxxxxxxxxxxx_yyyymmdd_hhmmss_yyyymmdd_hhmmss avi About Temporary File File name NVR_STANDBY_MEDIA_xxxxxxxxxxxxxxxx_yyyymmdd_hhmmss avi File name NVR_STANDBY_MEDIA_xxxxxxxxxxxxxxxx_yyyymmdd_hhmmss avi tmp File name NVR_STANDBY_MEDIA_xxxxxxxxxxxxxxxx_yyyymmdd_hhmmss mov These three files are not yet settled by the system Recorded Data Concept Video data being recorded is ...

Page 218: ...contents of this folder NVR_STANDBY_MEDIA_xxxxxxxxxxxxxxxx_yyyymmdd_hhmmss avi NVR_STANDBY_MEDIA_xxxxxxxxxxxxxxxx_yyyymmdd_hhmmss avi tmp NVR_STANDBY_MEDIA_xxxxxxxxxxxxxxxx_yyyymmdd_hhmmss mov NVR_EVENT_xxxxxxxxxxxxxxxx_yyyymmdd_hhmmss evt NVR_INDEX_xxxxxxxxxxxxxxxx_yyyymmdd_hhmmss_yyyymmdd_hhmmss mov NVR_MEDIA_xxxxxxxxxxxxxxxx_yyyymmdd_hhmmss_yyyymmdd_hhmmss avi NVR_EVENT_xxxxxxxxxxxxxxxx_yyyymmd...

Page 219: ...p Recorded Video Data Video data being recorded is saved in a temporary file The temporary file cannot be backed up in the normal procedure Refer to Recorded Video Data P 217 for details The temporary file cannot be backed up until it is converted into video data You should choose the backup hardware best suited for the backup data quantity Basically you should use the DDS type device if a single ...

Page 220: ...ttings of the VK 64 VK 16 However if doing so makes management complicated you can perform a full backup every day Refer to P 218 for the storage location Notes on Backing Up Recorded Video Data Video data being recorded is saved in a temporary file and the file is settled and saved as video data when its size reaches 1 GB by default to the storage drive The temporary file cannot be backed up in t...

Page 221: ...he backup target 3 2 1 If the VK 64 VK 16 continues recording video while making a backup you must take into account the increased I O load on the hard disk due to data transfer to the backup device If the recording frame rate of the Storage Server is reduced by performing the backup consider the following Lower the recording frame rate during backup in the Recording Schedule Setting window Establ...

Page 222: ...rive Documents and Settings All Users Application Data Canon WebView NVR Restore the recorded video data file to the former location The default location is as follows Save video in WebView NVR videofiles Restore the event data file to the former location The default location is as follows Save video in WebView NVR eventfiles Start the Storage Server from the Storage Server Configuration window Ch...

Page 223: ...WebView NVR Uncheck the Maximum retained history option in the Storage Server Configuration window Launch the Viewer and delete all the schedules for all the Camera Servers in the Recording Schedule tab under the Settings screen After deleting schedules stop the Storage Server from the Storage Server Configuration window Restore video data files matching the date and time you want to play back to ...

Page 224: ...ing setting information After restoration the PC may start recording video according to the old recording schedule If you do not want to record video delete the recording schedules after restoration If the Maximum retained history setting is used on the Storage Server uncheck this option If this option is enabled the past data may be lost ...

Page 225: ...B Hard disk capacity of around 240 GB is required If the storage period of video data on the Storage Server is 30 days an archive backup for 1 week data can be saved on 50 GB tape with an AIT drive To save 30 day data on a single cassette of tape a 200 GB LTO drive is necessary Configuration 2 Backup for Data Protection 2 Premise 10 VB C50i Recording condition Frame rate is 1 fps one frame per sec...

Page 226: ...size for one image data is 15 KB The Maximum file size duration option in the Storage Server Configuration window is set to six hours Under this condition the video file size per Camera Server per day is 310 MB x 4 files Therefore the video data quantity per Camera Server per day is 1 25 GB and 6 25 GB for five Camera Servers Hardware requirement 6 25 GB per day x 30 days 190 GB Hard disk capacity...

Page 227: ...ration window is set to six hours Under this condition the video file size per Camera Server per day is 310 MB x 4 files Therefore the video data quantity per Camera Server per day is 1 25 GB and 25 GB for twenty Camera Servers Hardware requirement 25 GB per day x 30 days 750 GB Ten servers is required for each Hard disk capacity of 900 GB or more In this case it is ideal to prepare one backup dev...

Page 228: ...228 ...

Page 229: ...Chapter 8 System Maintenance ...

Page 230: ... of This Chapter 230 This chapter describes upgrading and reinstalling of VK 64 VK 16 as well as how to restore previous versions of these software components It also describes how to update the Camera Firmware ...

Page 231: ...nstall the new version If a failure occurs restore the previous version by following Procedure for Restoring Previous Version p 233 Upgrading from Version 1 1 and 1 2 Obtains the v1 3 upgrade program free program Available from canon com webview Back up the following folders that are in the Storage Servers of v1 1 and v1 2 Startup drive for OS Documents and Settings All Users Application Data Cano...

Page 232: ...estore the previous version by following Procedure for Restoring Previous Version p 233 When You Do Not Have the Released Version 1 3 Uninstall v1 3 Install the previous version Execute the v1 3 upgrade program 3 2 1 4 3 2 1 When You Want to Perform the Full New Installation If you have removed the application from Add or Remove Programs in the Control Panel the application folder including its se...

Page 233: ...cation Data Canon Webview NVR All drives WebView NVR Install the previous version by using the installation CD and patch installer for the previous version Stop the Storage Server in the Storage Server configuration Quit the Viewer Replace the existing folders with the following backed up data Restoring Version 1 1 and 1 2 Startup drive for OS Documents and Settings All Users Application Data Cano...

Page 234: ...rmware Obtain the latest firmware including the firmware update tool as well as backup and restore tools for configured values Save the values configured in the Camera Server by using the backup tool for configured values Perform the Firmware update by using the firmware update tool If a failure occurs in step 3 restore the settings by using the restore tool for configured values canon com webview...

Page 235: ...Chapter 9 Troubleshooting ...

Page 236: ...Overview of This Chapter 236 This chapter explains the chart of countermeasures against failures measures to be taken when a trouble occurs troubleshooting error messages and log files ...

Page 237: ...ecording rate is too low below 50 Sensor and motion detection events occur too frequently exceeding the standard given by the guideline CPU load of the Storage Server PC may be high Load due to writing recorded video data onto HDD may be too high CPU load of the Storage Server PC may be too high The specified drive may be unable to be written The time setting of the VK 64 VK 16 Storage Server PC m...

Page 238: ...et Camera Control from the Video Window menu P 184 Alternatively check whether recorded video is not being played If video is being played the title bar of the Video Window will be gray not black P 183 The Record Now feature is gray and disabled in one Video Window menu however it is enabled in other Video Window menus Situation You have clicked a Video Window to display a Video Window menu and Re...

Page 239: ...eras Situation2 Recording cannot be performed by a certain network camera Solution In the case of 1 check the following The network cable of the server is plugged in The power has not gone down Do not Record is not specified in the Special Day Schedule settings and others Link lamps on the hub switch and on the network connector for the server are on If the lamps are off there may be defects in th...

Page 240: ...er IP Address Error Occurred is displayed check whether the power source of the Camera Server and the network have no problem The screen goes black when layout is switched but video is displayed after a few seconds Too many Camera Servers that exceed the performance of your PC are displayed in the Viewer or a live frame rate that exceeds the performance of your PC is set Reduce the number of Camer...

Page 241: ...s but nothing happens Solution Move the Playhead away from the Live position Playback controls will then be active A Video Window needs to be selected for playback Also the nudge buttons P 194 and the Extract Video button P 198 are enabled only when one Video Window is selected Extracting Video Cannot save video as no data could be found Situation You have attempted to extract video but an error m...

Page 242: ...Camera Server video quality is set high there is a large amount of data per frame Also if you are using anti virus software communication between Storage Servers and Camera Servers is being recorded and that file may be several gigabytes in size Please alter the anti virus software settings to eliminate Storage Servers from virus scanning targets Connection Issues Cannot connect to a Camera Server...

Page 243: ... Storage Server name although it can still connect to the Master Storage Server Solution Check whether the specified Storage Server works properly A network error may have caused this situation Configuration Issues Cannot switch to the Configuration and Preferences screen Situation You have attempted to switch from the Viewing Screen to the Configuration and Preferences screen and an error message...

Page 244: ...y the password using 1 20 characters The password contains an invalid character A character other than alphanumeric characters and underscore _ was entered in the address of the recipient The address of the recipient was not entered A character other than alphanumeric characters and underscore _ was entered in the address of the sender The address of the sender was not entered The host name of the...

Page 245: ...o 65535 An invalid character was entered in the host name of the POP server The host name of the POP server was not entered The port number of an invalid POP server was used An attempt was made to add a user in the Storage Server by using a user name that is already registered An attempt was made to add a user by entering a user name that contains a character other than alphanumeric characters and...

Page 246: ... want to continue The value of the maximum retention period was not entered An attempt was made to configure the maximum retention period using a value of less than 1 day The value of the maximum file size duration was not entered An attempt was made to configure the maximum file size using a value larger than 1024MB An attempt was made to configure the maximum file size using a value less than 32...

Page 247: ...ettings it was detected that the camera configuration has been changed on the VB150 side and the camera for which the schedule was configured no longer exists An attempt was made to save the current layout using the same name as a layout that already exists An attempt was made to delete the layout An attempt was made to delete the layout folder Messages Cause Confirmation Messages of Viewer The pa...

Page 248: ... was made to add a Storage Server that has been already registered An attempt was made to edit the Master Storage Server Connection to the Master Storage Server failed Check the settings and try again The configuration window can only be used by administrators The recording settings of the camera server cannot be configured for this Storage Server Storage Server name Cause of the error The changes...

Page 249: ...t has been already registered An attempt was made to register a zone without entering the name An attempt was made to delete the zone for which a camera server has been added The camera server settings have not been saved Save or delete the settings before changing the Storage Server settings The Master Storage Server cannot be deleted The host name of the Storage Server is invalid Check the host ...

Page 250: ... for the camera camera name registered in the Storage Server Storage Server name This change will not be reflected on the Storage Server side Even though video of a camera server is configured to be recorded in the Storage Server the IP address and port used are the same as the camera server that has been configured in the Storage Server An attempt was made to add a camera server without selecting...

Page 251: ...e An error occurred relating to the schedule deletion of schedule name for the camera camera name registered in the Storage Server Storage Server name This change will not be reflected on the Storage Server side An error occurred when you obtained the schedule setting information of the Storage Server Storage Server name This change will not be reflected on the Storage Server side This schedule ov...

Page 252: ...ayout registered in this layout sequence cannot be found Press OK to edit this layout sequence or press Cancel to return to the previous layout An attempt was made to use the data for which another special day schedule is already configured An attempt was made to register a schedule that passes 24 00 An attempt was made to add a special day schedule with a name that is already registered When disp...

Page 253: ...t specified Check the settings and try again The image could not be saved Viewing Screen Saving Managing Video Layouts Menu Buttons List of Messages An attempt was made by a user other than an administrator to switch to the Configuration window An attempt was made to close a layout that has been changed A still image was captured using snapshot but it could not be saved There are no recorded video...

Page 254: ...er Add Edit Camera Server dialog Add Edit Recording Schedule dialog Motion Detection Settings dialog Sensor Event Settings dialog Add Edit Recording Schedule dialog Add Edit Recording Schedule dialog Motion Detection Settings dialog Camera Summary window List of Messages There are no recorded videos for the selected segment thus they could not be saved When a camera server configured as Do not rec...

Page 255: ...settings and try again Camera Summary window Connect to Master Storage Server dialog Connection Error dialog Edit Camera Server dialog Event Search dialog Extract Video dialog Folder Name dialog List of Messages An attempt was made to delete a Storage Server other than the Master Storage Server An attempt was made to delete the location An attempt was made to delete the zone An attempt was made to...

Page 256: ...hedule window and Add Edit Camera Server dialog Organize Layouts Layout Sequences dialog List of Messages An attempt was made to change the layout sequence that contains a personal layout sequence to a shared layout sequence An invalid value was selected for the motion detection frame rate An invalid value was selected for the motion detection recording frame rate An error occurred while connectin...

Page 257: ...r settings An attempt was made to change or overwrite the layout that is being used in the currently active layout sequence An attempt was made to create a new folder with a name that is already being used An attempt was made to change the name of a layout or layout sequence to a name that is already being used An attempt was made to change the name of a folder to a name that is already being used...

Page 258: ...he same speed rate as the data reception This message is recorded when recording failure occurs due to motion detection or too many event occurrences When sending E mail the recording engine could not resolve the host name of the POP server When sending E mail the recording engine could not connect to the POP server When sending E mail an error occurred in the first response sent after connecting ...

Page 259: ... engine stops This is always displayed when the recording engine starts The value in Log Level indicates the log level that is currently being configured The default is 1 The storage destination drive configured for this camera server has been deleted Check the Storage Server configuration to see if the entered password is correct Refer to the corresponding Winsock error code in A List of Error Co...

Page 260: ...ror occurred when connecting to the specified camera server IMAGE Get image process EVENT Get camera server status process implemented by GetNotice COMMAND Camera server operation configuration change command process same applies for ERROR WSAConnect There is no necessary action Check to ensure that the specified drive is not configured as read only In addition ensure that all directories in this ...

Page 261: ...from y to z because the load of the recording engine continued to increase decrease An HTTP 400 error occurred when getting the image Refer to the corresponding HTTP error code in A List of Error Codes in Log File P 263 Check to ensure that you have the write privilege for the LocalSystem account in the VK 64 VK 16 configuration directory Reduce the system load using the following methods 1 Reduce...

Page 262: ...ere is no necessary action There is no necessary action Messages Cause Action CHttpVbSetngThread inet error wininet error code winsock error Winsock error code count Number of occurrences vbc_HttpCommand inet error wininet error code winsock error Winsock error code count Number of occurrences A network error occurred while communicating with the camera server This is recorded when a problem occur...

Page 263: ...pted on something that is not a socket Only one usage of each socket address protocol network address port is normally permitted A socket operation encountered a dead network A socket operation was attempted to an unreachable network This may be recorded in Version 1 1 however there is no necessary action All resources for communication are being used This frequently occurs when a black screen pro...

Page 264: ...uested type was found The connection is disconnected by the camera server due to camera server restart or other cause This may occur when the camera server is restarted using the restart button on the configuration page on the software side However this rarely occurs A timeout occurred in the TCP connection with the camera server This occurs when the camera server is down The camera server rejecte...

Page 265: ...ted action not taken mailbox unavailable The communication is terminated because the mail server stopped The requested mail process was not executed because the mailbox is not available The requested execution was canceled because an error occurred in the mail server The mail server does not support the command that was sent The request was not executed because the mailbox is not available Codes E...

Page 266: ...t may also be returned by the proxy server This occurs when the webview server is not running even when the HTTP server is running This may also be recorded even during normal operation if the camera server is restarted This is recorded when the proxy server returned an HTTP 502 error which occurs when the proxy server receives an error from the upper proxy This is recorded when the proxy server r...

Page 267: ...ver The host name could not be resolved This error indicates when a host name that is not registered in DNS is specified or that a problem occurred in communication with DNS The communication was canceled This error is not a problem it may be recording during normal operation The connection to the camera server failed Normally 12002 is recorded The connection to the camera server has been disconne...

Page 268: ... The sensor sensor name is status on off The motion detection is status Start on Stop off Stop recording or Start recording Pre event Recording configured duration sec Create on Close off Recording setting number status Start on Stop off For manual recording The user user name set the manual recording to status For custom recording Custom text provided by the triggered client Warning on recovered ...

Page 269: ...wn Empty character string A socket for the communication could not be generated because a large number of TCP connections are used in the PC The network is down when a failure occurs in a HUB or router located near the PC A failure occurred in a HUB or router near the camera server The TCP connection is disconnected because the camera server was restarted or another cause A timeout occurred in the...

Page 270: ...eck to ensure that it is not an on off event Cannot connect due to the IP address restriction on the camera server side The proxy server returns an HTTP 502 error which occurs when the proxy server receives an error from the upper proxy The proxy server returned an HTTP 503 error which occurs when the proxy server failed to connect to the camera server The proxy server returned an HTTP 504 error w...

Page 271: ...Appendix ...

Page 272: ...r Administrator Motion Detection Settings Tool VB C50i Series VB Administration Tool VK 64 VK 16 Storage Server when a preset is specified for sensor recording Motion Detection Module VB C50 Series Operating the Camera Server in the VK 64 VK 16 settings window VK 64 VK 16 Viewer when the Camera Server is operated in the Viewer VK 64 VK 16 Storage Server when a recording position is specified VK Pr...

Page 273: ...s referred to as rebuilding During RAID rebuilding a recording error may occur because disk system performance deteriorates RAID Rebuilding Time When a failure occurs in a hard disk in a RAID system and you want to replace it with a hot spare or new one the rebuilding time is to be considered as follows Rebuilding takes about one minute per 1GB when no I O is performed in a SCSI RAID card When a R...

Page 274: ...s also advisable to implement the following measures Stop the Storage Server program before rebuilding Temporarily reduce the recording frame rate during rebuilding Notes on Consistency Check of RAID Configuration Information For stable operation of hard disks you need to regularly perform consistency check of RAID configuration information This is especially effective for preventing data inconsis...

Page 275: ...t The operating environment of the Tool is as follows OS Windows 2000 Professional with SP4 Windows XP Home Edition Professional with SP1a SP2 Windows Server 2003 with SP1 Web Browser Internet Explorer 6 0 Build Number 6 0 2800 1106 and later Hardware PC recommended for the above OS Target Camera Server VB C50i VB C50iR VB C50Fi VB C50FSi Installation Download the necessary files from the followin...

Page 276: ... have audio input or not correspond to the network camera to which you want to restore the files You cannot restore backup files created by a new version of firmware to a network camera of which the firmware is of an older version For backup files specify the files created by Setting Values Backup Tool You cannot restore backup files that have been edited or converted Do not change the administrat...

Page 277: ...ting Operations 11 C Camera Control Panel 185 Exposure Mode 186 Focus 187 Pan Tilt and Zoom 187 Camera Server 22 85 Changing Settings 113 Delete 96 Edit 94 Register 85 Search 85 Cameras for Viewing 176 Camera Thumbnails 176 Locations Zone drop down 177 Selecting Locations and their Zones 177 Communication Mechanism 20 Configuration and Preferences screen 75 Configuration Files 218 Continuous Recor...

Page 278: ...er Storage Server 28 Motion Detection Recording 118 Optimization 211 N Normal Schedule 103 Create 104 O Operating Environment 22 Notes 24 Storage Server 23 Supported Camera Servers 22 System Environment 23 Operation and Management 205 Operation Guideline 208 Event Recording 210 Live View Frame Rate Adjustment 208 Recording Frame Rate Adjustment 209 P Pan Tilt and Zoom 184 Preparation Flow 16 Prese...

Page 279: ...n Overview 18 T Task Areas 175 Timeline 192 Capture Still Frame 192 196 Extract Video 193 198 Jump to Time 193 195 Overview 192 Playback controls 192 194 Playhead region 192 194 Record Now 192 196 Return to Live 193 198 Zoom In or Out 193 197 Troubleshooting 238 U Updating 234 Camera Firmware 234 Upgrade 231 Previous Versions 231 User Management 66 Administrator 66 67 User Authentication 68 V Vide...

Page 280: ...Index 280 Viewing and Searching Events 199 Live Events Log list 199 Searching Events 201 VK Event Information 268 VK Events 207 ...

Page 281: ...281 10 Appendix ...

Page 282: ... the CANON CANADA Customer Information Centre toll free at 1 800 OK CANON 652 2666 Canada only MEXICO CANON MEXICANA S DE R L DE C V Boulevard Manuel Avila Camacho No 138 PB Pisos 15 16 y 17 Col Lomas de Chapultepec C P 11000 México D F México ASIA CANON SINGAPORE PTE LTD 1 HarbourFront Avenue 04 01 Keppel Bay Tower Singapore 098632 CANON HONGKONG CO LTD 19 F The Metropolis Tower 10 Metropolis Dri...

Reviews: