
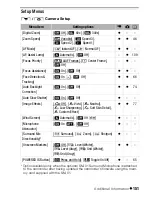


Additional Information
161
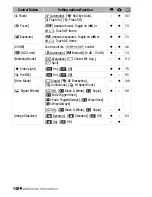
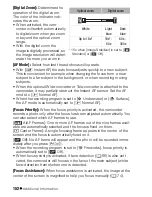
• You can set Quick Start to [
B
Off], for example, if the camcorder is
set on a fixed position and you want to keep recording video with the
LCD panel closed in order to conserve the battery's power.
[Calendar Start Day]:
Select the day on which the week in the calendar
screen (
0
55).
[Battery Info]:
Displays a screen where you can verify the battery charge
(as a percentage) and the remaining recording time (
,
mode) or
playback time (
,
mode).
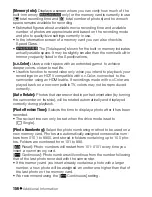
[Control for HDMI]:
Activates the HDMI-CEC (Consumer Electronics Con-
trol) function. When you connect the camcorder to an HDTV compatible
with HDMI-CEC using an HDMI cable, you can control the camcorder’s
playback using the remote control of the TV.
• If set to [
A
On], when the camcorder is connected to a compatible
HDTV using an HDMI cable, the video input on the TV will automatically
be set to the camcorder’s video input. Then, you can use the up/down/
left/right buttons and the OK or SET button on the TV’s remote control
to play back your recordings.
• Depending on the TV set, additional settings may be required on the TV
itself to activate the HDMI-CEC function. Refer to the TV’s instruction
manual.
• Correct operation of the HDMI-CEC function cannot be guaranteed
even when connecting the camcorder to compatible TV sets. If you
cannot use the remote control of the TV, set [Control for HDMI] to
[
B
Off] and operate the camcorder directly or use the camcorder’s
wireless controller.
• The remote control of the TV can only be used to play back movies or
photos (
or
mode only). If the camcorder is connected to the
TV while it is set to a recording mode, depending on the TV used, turn-
ing off the TV will automatically turn off the camcorder even if it is
recording at the time.
• We recommend not connecting more than 3 HDMI-CEC compatible
devices at a time.
[HDMI Status]:
Displays a screen where you can verify the standard of the
output signal from the HDMI OUT terminal.
[Distance Units]:
Selects the units to use for the focusing distance display
during manual focus.
Summary of Contents for VIXIA HF M30
Page 1: ...canon VIXIA HFM30 VIXIA HFM31 VIXIA HFM32 VIXIA HFM300 NTSC ...
Page 55: ......
Page 56: ...PUB DIE 0367 000 HD Camcorder Instruction Manual Y ...
Page 66: ...11 ...
Page 266: ......
Page 278: ...English Photo Application Version 34 Instruction Manual ...
Page 363: ...20 Simple operation Video file import 21 Web upload 24 ...
Page 370: ...27 Other operations Music file export 28 Video file export 31 ...
Page 386: ...43 Useful information Function list 44 Frequently asked questions 45 Inquiries 49 ...
Page 426: ...34 Select the drive to write and set a disc Click Write Writing will start ...
Page 429: ...37 Other operations Music file export 38 Video file export 41 Edited video file export 45 ...
Page 445: ...53 Click individual video files Browser pane P 118 ...
Page 447: ...55 Drag the header to change the thumbnail size ...
Page 473: ...81 Drag and drop a clip into the Working area Delete clips Select a clip Click ...
Page 489: ...97 Write a disc Write video files onto a disc 98 Play back a written disc 106 ...
Page 500: ...108 ImageMixer 3 SE Player Ver 6 Play back with ImageMixer 3 SE Player Ver 6 109 ...
Page 533: ...141 Mute button Mutes restores the volume Volume level Adjusts the volume ...
Page 541: ...149 Useful information Function list 150 Frequently asked questions 151 Inquiries 161 ...
Page 554: ......
Page 555: ......
Page 556: ...canon VIXIA HFM32 089 2172 _l 1l ...