


1
-
1
B
2
A
B
Windows Vista
1. Dari menu
Mulai(Start)
dari sisi Windows, pilih
Jaringan(Network)
, kemudian
klik
Tambah peranti nirkabel(Add a wireless device)
pada menu.
2. Klik
Saya ingin menambahkan perangkat nirkabel atau komputer
yang tak ada pada daftar, dengan menggunakan kandar kilat USB(I
want to add a wireless device or computer that is not on the list,
using a USB flash drive)
.
3. Klik
Tambahkan perangkat atau komputer dengan menggunakan
kandar kilat USB(Add the device or computer using a USB flash drive)
.
4. Pilih nama jaringan (SSID), kemudian klik
Berikutnya(Next)
.
Ikuti instruksi pada layar untuk menyelesaikan setelan pada komputer.
5. Pergi ke .
1. Gunakan tombol
Menu
(A) untuk memilih
Device
settings
.
2. Pilih
LAN settings
, kemudian tekan tombol
OK
.
3. Pilih
Wireless LAN setup
, kemudian tekan tombol
OK
.
4. Pilih
WCN
, kemudian tekan tombol
OK
.
Berikutnya, baca "Instalasi Perangkat Lunak (2)" pada halaman 74!
5. Sambungkan kandar flash USB ke Port Cetak
Langsung (penghubung USB) (B) di kanan depan
mesin, kemudian tekan tombol
OK
.
6. Ketika layar
Setting completed
ditampilkan, tekan
tombol
OK
dan keluarkan kandar flash USB.
1. จากเมนู
เริ่ม(Start)ของ
Windows เลือก
เครือข่าย(Network)จากนั้นคลิกเพิ่มอุปกรณ์
แบบไร้สาย(Addawirelessdevice)ในเมนู
2.
คลิก
ฉันต้องการเพิ่มอุปกรณ์แบบไร้สายหรือคอมพิวเตอร์ที่ไม่แสดงอยู่ในรายการโดย
ใช้USBแฟลชไดรฟ์(Iwanttoaddawirelessdeviceorcomputerthatisnotonthe
listusingaUSBflashdrive)
3. คลิก
เพิ่มอุปกรณ์หรือคอมพิวเตอร์โดยใช้USBแฟลชไดรฟ์(Addthedeviceor
computerusingaUSBflashdrive)
4. เลือกชื่อเครือข่าย (SSID) จากนั้นคลิก
ถัดไป(Next)
ปฏิบัติตามคำแนะนำบนหน้าจอเพื่อเสร็จสมบูรณ์การตั้งค่าในคอมพิวเตอร์
5. ไปที่
1. ใช้ปุ่ม
Menu
(A) เลือก
Devicesettings
2. เลือก
LANsettings
จากนั้นกดปุ่ม
OK
3. เลือก
WirelessLANsetup
จากนั้นกดปุ่ม
OK
4. เลือก
WCN
จากนั้นกดปุ่ม
OK
ต่อไป อ่าน 'การติดตั้งซอฟต์แวร์ (2)' ในหน้า 74!
5. เชื่อมต่อ USB แฟลชไดรฟ์เข้ากับ พอร์ตการพิมพ์แบบตรง (ตัวเชื่อม
ต่อ USB) (B) ที่ด้านหน้าขวาของเครื่อง จากนั้นกดปุ่ม
OK
6. เมื่อหน้าจอ
Settingcompleted
แสดงขึ้น กดปุ่ม
OK
และผลักออก
USB แฟลชไดรฟ์
1.
從
Windows
的
開始
(Start)
功能表,選擇
網路
(Network)
,然後按一下功能
表上的
新增無線裝置
(Add a wireless device)
。
2.
按一下
我想要以
USB
快閃磁碟機新增清單上沒有的無線裝置或電腦
(I want
to add a wireless device or computer that is not on the list, using a
USB flash drive)
。
3.
按一下
以
USB
快閃磁碟機新增這個裝置或電腦
(Add the device or
computer using a USB flash drive)
。
4.
選擇網路名稱
(SSID)
,然後按一下
下一步
(Next)
。
按照螢幕上的說明完成電腦上的設定。
5.
轉至 。
1.
使用
功能表
按鈕
(A)
選擇
設備設定
(Device settings)
。
2.
選擇
LAN
設定
(LAN settings)
,然後按
OK
按鈕。
3.
選擇
無線
LAN
設定
(Wireless LAN setup)
,然後按
OK
按鈕。
4.
選擇
WCN
,然後按
OK
按鈕。
下一步,閱讀第
74
頁的「軟體安裝
(2)
」!
5.
將
USB
快閃磁碟機連接至本機前部右側的直接列印連接
埠
(USB
連接器
)(B)
,然後按
OK
按鈕。
6.
顯示
設定已完成
(Setting completed)
螢幕時,按
OK
按
鈕並退出
USB
快閃磁碟機。
1. From the
Start
menu of the Windows side, select
Network
, then click
Add a wireless device
on the menu.
2. Click
I want to add a wireless device or computer that is not on the
list, using a USB flash drive
.
3. Click
Add the device or computer using a USB flash drive
.
4. Select the network name (SSID), then click
Next
.
Follow the on-screen instructions to complete the settings on the computer.
5. Go to .
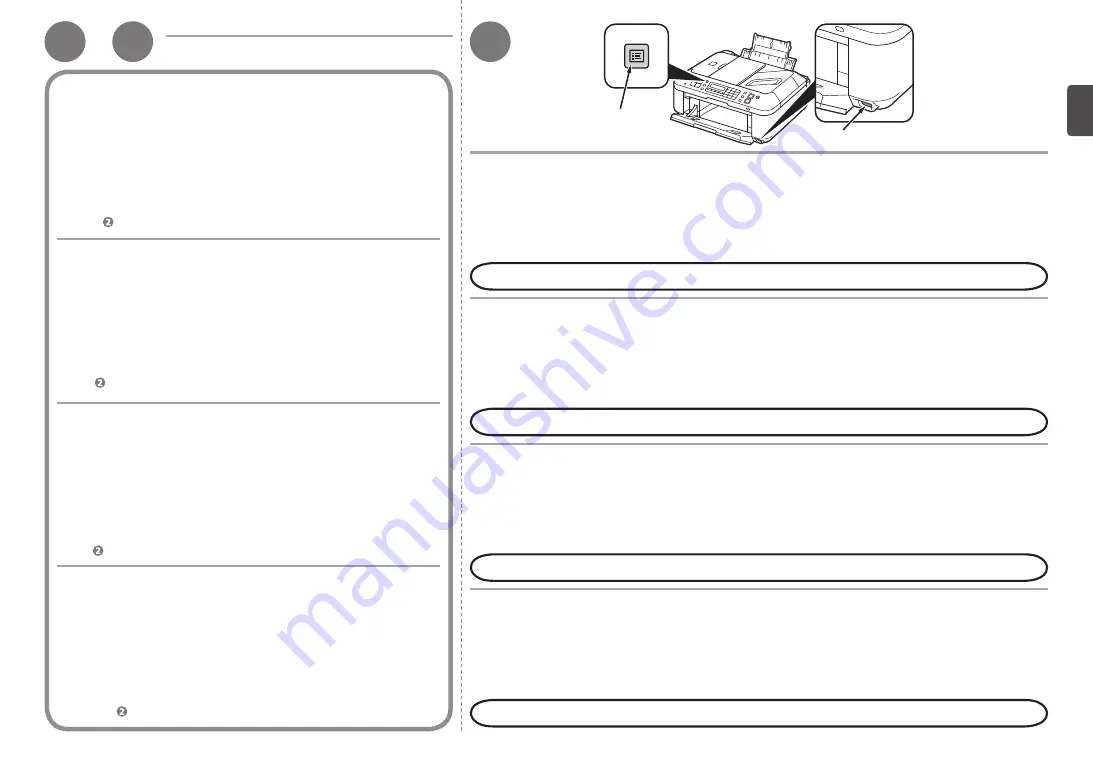
1. Use the
Menu
button (A) to select
Device settings
.
2. Select
LAN settings
, then press the
OK
button.
3. Select
Wireless LAN setup
, then press the
OK
button.
4. Select
WCN
, then press the
OK
button.
Next, read "Software Installation (2)" on page 74!
5. Connect the USB flash drive to the Direct Print Port
(USB connector) (B) on the front right of the machine,
then press the
OK
button.
6. When
Setting completed
screen is displayed, press
the
OK
button and eject the USB flash drive.


