


Specifying Common Settings
4-42
4
C
u
s
to
m
iz
in
g S
e
tt
ing
s
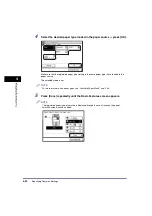
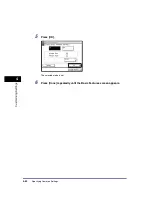
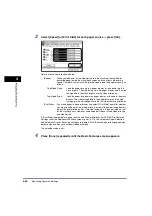
NOTE
•
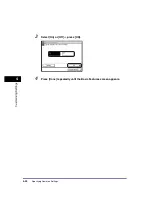
If you make a mistake when entering values, press [C] on the touch panel display
➞
enter the
correct values.
•
To enter values in inches, press [Inch]. (See “Values in Inches,” on p. 2-24.)
•
When entering the value in millimeters, you can also use
-
(numeric keys), and
(Clear)
to clear your entry.
•
You can change the value by pressing [-] or [+] in increments of 1.0 mm, even if you have entered
the value.
•
If you enter a value outside the setting range, [OK] is grayed out and cannot be selected. Enter
an appropriate value.
•
You can use values for [X] between 148 mm and 432 mm, and for [Y] between 95 mm and 297
mm.
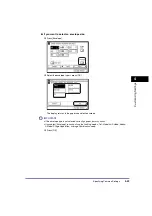
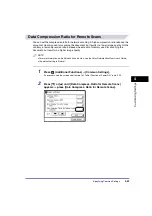
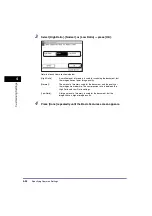
❑
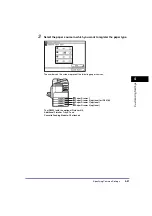
Press [Next]
❑
Select the desired paper type
➞
press [OK].
IMPORTANT
•
When printing on special types of paper, such as heavyweight paper, be sure to correctly set the
paper type, especially if you are using heavyweight paper. If the type of paper is not set correctly,
it could adversely affect the quality of the image. Moreover, the fixing unit may become dirty and
require a service repair, or the paper could jam.
•
If you select [Irreg. Size], you cannot use the Rotate Collate, Rotate Group, Offset Collate, Offset
Group, Staple, 1 2-Sided, 2 2-Sided, Book 2-Sided, 2-Page Separation, or Image
Combination mode.
NOTE
•
For more information on paper types, see “Available Paper Stock,” on p. 2-56.
Summary of Contents for iR2018i
Page 2: ...iR2030 iR2025 iR2022i iR2018i Reference Guide 0 Ot ...
Page 115: ...Available Paper Stock 2 58 2 Basic Operations ...
Page 144: ...Card Reader E1 3 29 3 Optional Equipment 11 Press OK ...
Page 151: ...Card Reader E1 3 36 3 Optional Equipment 4 Press Done 5 Press OK ...
Page 154: ...Card Reader E1 3 39 3 Optional Equipment 5 Press Done 6 Press OK ...
Page 241: ...Cleaning and Adjusting the Machine 4 86 4 Customizing Settings ...
Page 443: ...Index 9 16 9 Appendix ...