Chapter 7
7-29
The server address settings are activated only after you restart the printer. Make sure you always restart the printer after changing server address settings.
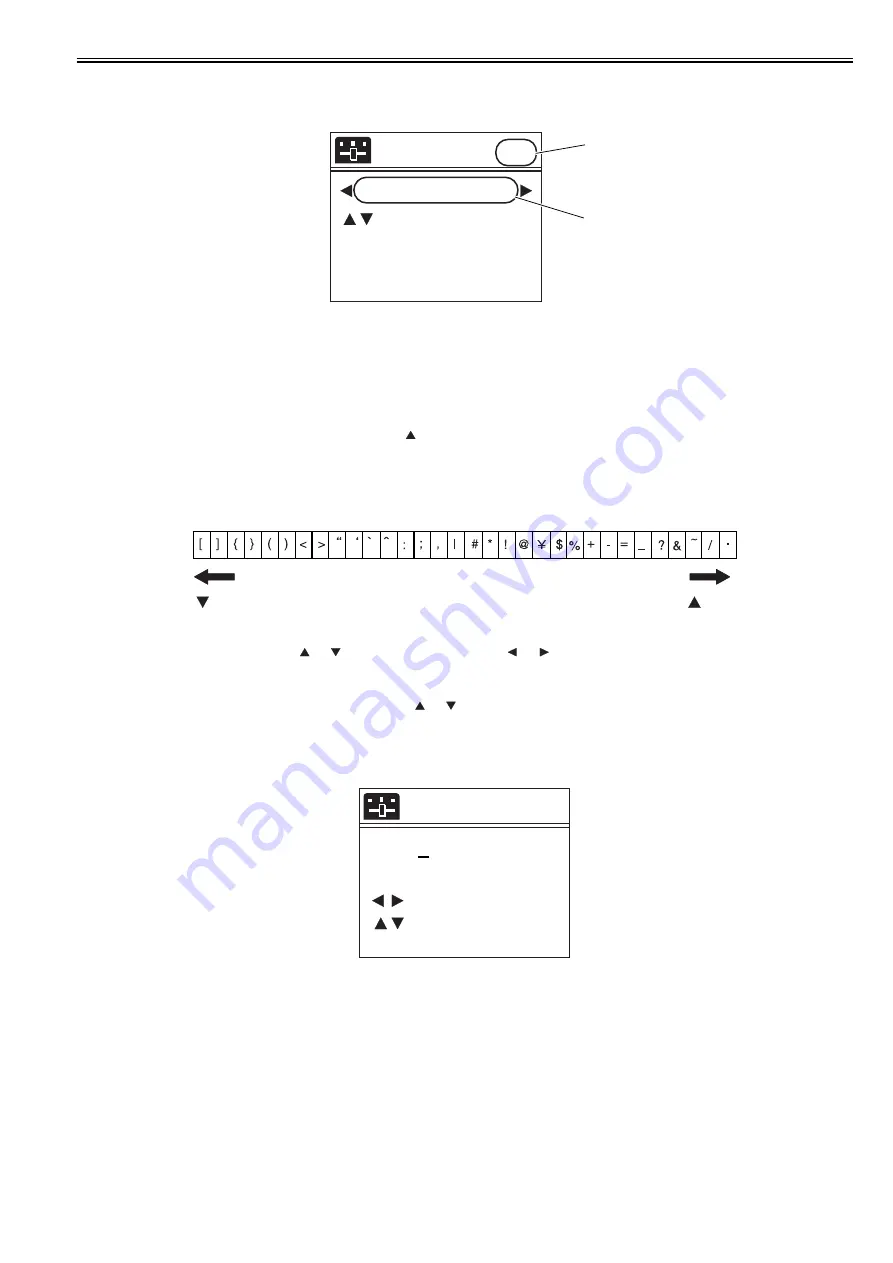
(1) How to enter Proxy server address
F-7-24
- Following symbols exist in each enter mode. (When you press the
key, characters on the right hand side will appear.)
[a] Small alphabet letter mode: [Symbol] abcdefghijklmnopqrstuvwxyz
[A] Capital alphabet letter mode: [Symbol] ABCDEFGHIJKLMNOPQRSTUVWXYZ
[1] Numerical character mode: [Symbol] 1234567890
- [Symbol] appears in the following order.
F-7-25
- Within the URL entry field, you can use the
or
key to select a character, and the
or
key to move the cursor.
- The Stop key has the Delete function when there is a character at the cursor position. (The character at the position of the cursor is deleted, moving all following
characters one position toward freed place.)
If there is no character at the cursor position, it has the Backspace function. (The character at the left of the cursor is deleted, moving the cursor.)
- When you move the cursor to a position of a character and press the
or
key, you can insert characters.
(The character at the cursor position is moved to the right, and a new character is inserted.
- You can select the enter mode with the Navi key. (The default setting is small alphabet letter.)
(2) How to enter port number
F-7-26
- Possible to set between 1 and 65535 (The default display is 1).
- The top digit can be selected between 0 and 6. Other digits can be selected between 0 and 9.
- When OK key is pressed, and the value is over 65535, it is fixed on 65535.
- When OK key is pressed, and the value is 0, it is fixed on 1.
[1] Display to show enter mode
a: Small alphabet letter
A: Capital alphabet letter
1: Numerical character
[2] URL entry field (128 one-byte characters)
Server Address
h t t p : / / _
[a]
: S e l e c t
S t o p
: D e l e t e
N a v i
: a -> A -> 1
[ O K : S e t ]
[1]
[2]
key
key
Port Number
0 0 0 0 1
( 1 - 6 5 5 3 5 )
L / R
U P / D O W N
[ OK : S e t ]
Summary of Contents for iPF8400S Series
Page 1: ...Feb 27 2017 Service Manual iPF8000 series iPF8400S ...
Page 2: ......
Page 6: ......
Page 11: ...Chapter 1 PRODUCT DESCRIPTION ...
Page 12: ......
Page 14: ......
Page 63: ...Chapter 2 TECHNICAL REFERENCE ...
Page 64: ......
Page 106: ......
Page 107: ...Chapter 3 INSTALLATION ...
Page 108: ......
Page 110: ......
Page 123: ...Chapter 3 3 13 F 3 22 6 FAN UNIT A ...
Page 125: ...Chapter 3 3 15 ...
Page 126: ......
Page 127: ...Chapter 4 DISASSEMBLY REASSEMBLY ...
Page 128: ......
Page 130: ......
Page 167: ...Chapter 4 4 37 ...
Page 168: ......
Page 169: ...Chapter 5 MAINTENANCE ...
Page 170: ......
Page 172: ......
Page 177: ...Chapter 6 TROUBLESHOOTING ...
Page 178: ......
Page 180: ......
Page 215: ...Chapter 7 SERVICE MODE ...
Page 216: ......
Page 218: ......
Page 272: ...Chapter 7 7 54 ...
Page 273: ...Chapter 8 ERROR CODE ...
Page 274: ......
Page 276: ......
Page 311: ...Feb 27 2017 ...
Page 312: ......


