background image

E143

4. Operation in Full Mode

[ I-Gain ]

Iris

[ ]

Torque:

Comp:

OFF

High

[ I-Gain ]

Iris

[ ]

Torque:

Comp:

OFF

Low

Iris

[ ]

[ I-Gain ]

Torque:

High

Comp:

OFF

[ I-Gain ]

[Trk]OFF

[ ]

MENU

1

A

Fr1P

[ Basic ]

IS


STD

IS


STD

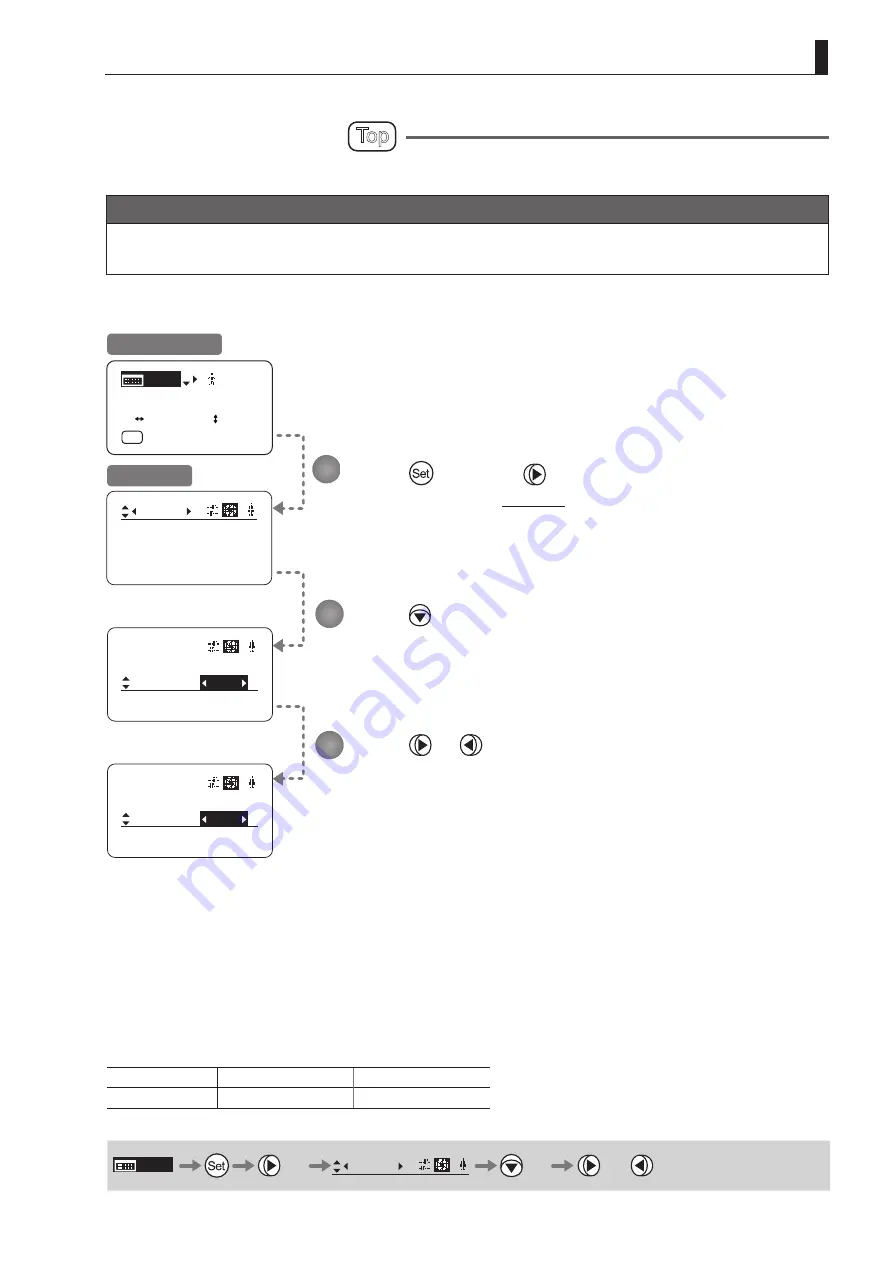
Specifying Iris Torque   

Top


Specify the desired level of torque in manual control of the iris ring.

Important

First, switch to the user for whom the settings apply.  
(For instructions, see 

4.1.3 Switching Users

 or 

4.2.1 User Screen Settings: Switching Users.

)

Press   once and   four times.

The display switches to the 

Iris screen.

Press   twice.

[Torque] is underlined.
The previous or default function is highlighted.

Press   or 

.

Press left or right to switch the function to {High} or {Low}.

Initial Top Screen

Iris Screen

Options

(D) 

High

Low

Description

High torque

Low torque

(D): Default value

MENU


×

4

Iris

[ ]


×

2

or

1

2

3

Summary of Contents for HJ40E

Page 1: ...よう大切に保管してください Read this operation manual before using the product Keep the manual in place for future reference 在使用本产品之前 请务必先仔细阅读本使用说明书 请务必妥善保管好本书 以便日后能随时查阅 保留备用 请在充分理解内容的基 础上 正确使用 J E C 取扱説明書 情報ディスプレイ編 OPERATION MANUAL DISPLAY 使用说明书 信息显示屏汇编 INFORMATION DISPLAY ...

Page 2: ......

Page 3: ...ENGLISH ...

Page 4: ......

Page 5: ...urchasing a Canon BCTV zoom lens This documentation includes the Lens Manual and Information Display CD ROM This Information Display Manual describes operating instructions and procedures for the information display Refer to the manual as needed ...

Page 6: ... Layout E11 Manual Conventions E12 Part Names E13 Part Names and Functions E13 Using the Control Keys E13 Basic Sequence of Operations E14 Screen Organization E15 1 1 Top Screen E16 1 2 Menu Screen E18 Mode Selection E21 2 1 Modes E22 Operation in Basic Mode E23 3 1 Configuration from the Top Screen E24 3 1 1 Selecting Basic Mode E25 3 1 2 Top Screen E26 3 1 3 Specifying Auto Iris Gain E28 ...

Page 7: ...ings E65 3 2 7 Focus Screen Settings E69 3 2 8 Info Screen Settings E71 3 2 9 Fol Screen Settings E74 3 3 List of Settings E76 Operation in Full Mode E79 4 1 Configuration from the Top Screen E80 4 1 1 Selecting Full Mode E81 4 1 2 Top Screen E82 4 1 3 Switching Users E84 4 1 4 Switching to Basic Mode E85 4 1 5 Zoom Tracking ON OFF E86 4 1 6 Switching the IS Compensation Mode of the Horizontal Dire...

Page 8: ...134 4 2 5 Iris Screen Settings E140 4 2 6 Zoom Screen Settings E146 4 2 7 Focus Screen Settings E157 4 2 8 Info Screen Settings E159 4 2 9 Fol Screen Settings E162 4 3 List of Settings E164 Operation in Analog Mode E167 5 1 Configuration from the Top Screen E168 5 1 1 Selecting Analog Mode E169 5 1 2 Top Screen E170 5 1 3 Specifying Auto Iris Gain E171 5 1 4 Switching to Basic Mode E172 5 2 Configur...

Page 9: ...tion notices for preventing accidents and protecting the safety of the customer and others Warning This indicates a potentially hazardous situation which if not heeded may result in death or serious injury to you or others Be sure to heed all warning notices to ensure safe operation at all times Caution This indicates a potentially hazardous situation which if not heeded may result in a minor inju...

Page 10: ...ts may fall off and cause injury 4 When this product is used under a blazing sun the inside of the unit may be heated to high temperature When it is expected that the unit is exposed to elevated temperature take measures against heat as appropriate on the customer s side Note 1 When service is required contact your dealer or Canon s representative 2 Striking or dropping the lens may cause the malf...

Page 11: ...of getting fingerprints or stains on the lens use a clean cotton cloth moistened with commercial lens cleaning fluid or use lens cleaning paper Gently wipe in a spiral pattern from the center of the lens Be careful not to rub dust across the lens which may scratch the lens surface 2 Routine inspection about once a year is recommended depending on the conditions and environment of use Request overha...

Page 12: ... this product 4 The product specifications configuration and appearance are subject to change without prior notice 5 For further information on repairs maintenance or adjustments not mentioned in this operation manual contact your Canon dealer or your Canon sales representative 6 Note that Canon may be unable to undertake servicing or repair of a product if it is modified without consulting Canon ...

Page 13: ...eft or right to switch the function to Zoom or Iris Press The display changes from blinking to highlighted indicating confirmation Options D Zoom Iris Description Zoom operation Iris operation D Default value MENU 7 Zoom or 1 2 3 4 Initial Top Screen Note Note on Iris Assignment 1 The seesaw switch will no longer control zooming 2 To control the iris with the rocker switch you must set the iris mod...

Page 14: ...ns are used in this manual Convention Description Example screen Names of screens are underlined The Top screen is displayed Names of setting items are enclosed in square brackets Frame 1 is underlined Names of options are enclosed in curly brackets Select Sped ...

Page 15: ...o configure all settings shown on the display Identified with five key names depending on how this interface is used See the following table Using the Control Keys Using the Control Keys Key Operation Details Manual Convention Set key Press Pressed when is displayed or when entering a selection Right key Move right Can be used when is displayed Left key Move left Can be used when is displayed Up k...

Page 16: ...etails see Resetting Values in 3 Operation in Basic Mode or 4 Operation in Full Mode Basic Mode ResetAll User User B y n Full Mode ResetAll User User AllUser 1 y n y n Note For instructions on turning the lens on refer to the camera manual Note The display turns off automatically after two minutes if no control keys are pressed Auto Off However the display remains active as long as the Fol screen ...

Page 17: ...Screen Organization 1 INFORMATION DISPLAY ...

Page 18: ... instructions on configuring the settings see Configuration from the Top Screen in each mode The Top screen contains 10 setting items in Basic mode 16 in Full mode and 3 in Analog mode Initial Top Screen in Basic Mode Trk OFF Shtl A 1 A 2 MENU IG 50 A Fr1P Fr1P IS STD IS STD Top Screen in Basic Mode 1 Go to Menu screen 2 Auto iris gain settings 3 IS compensation mode switching horizontal direction...

Page 19: ... Go to Menu screen 2 Switch users 3 Switch to Basic mode 4 Zoom TrackingON OFF 5 IS compensation mode switching horizontal direction 6 IS compensation mode switching vertical direction 7 AUX switch assignment 8 Iris gain settings 9 AUX1 switch assignment 10 VTR switch assignment 11 AUX2 switch assignment 12 RET switch assignment 13 Iris torque settings 14 Zoom curve mode settings 15 Iris A M switc...

Page 20: ...itch screen 3 IS screen 4 Preset screen 5 Iris screen 6 Zoom screen 7 Focus screen 8 Info screen 9 Fol screen 1 There is no single Menu screen Instead these 9 screens are collectively referred to as the Menu screen To access these screens select MENU on the Top screen and press the Set key Initially the User screen is displayed To access other screens press left or right Mode User Basic Access Res...

Page 21: ... Instead these 8 screens are collectively referred to as the Menu screen To access these screens select MENU on the Top screen and press the Set key Initially the User screen is displayed To access other screens press left or right Menu Screen in Full Mode User screen Zoom screen Switch screen Focus screen Preset screen Info screen Iris screen Fol screen No User 1 Name Mode Full 1 Switch 1 AUX2 A ...

Page 22: ...cted screen is highlighted Mode User Analog Access A Unlock 1 User Screen A 1 There is no single Menu screen Instead these screens displayed by selecting Menu are collectively referred to as the Menu screen To access this screen select MENU on the Top screen and press the Set key The User screen is now displayed User screen Mode User Analog Access A Unlock ...

Page 23: ...Mode Selection 2 INFORMATION DISPLAY ...

Page 24: ...ricted settings and information Recommended for users who do not require sophisticated settings This is the default mode 2 Full Mode All settings and information are available 3 Analog Mode This mode is selected when the digital functions are not used at all For details see 3 Operation in Basic Mode 4 Operation in Full Mode or 5 Operation in Analog Mode ...

Page 25: ...Operation in Basic Mode 3 INFORMATION DISPLAY ...

Page 26: ...y switch is referred to as the Top screen A total of 10 items can be configured on the Top screen in Basic mode The first screen displayed is referred to as the Initial Top screen Status of some items can be checked simply by accessing this screen Initial Top Screen in Basic Mode Trk OFF Shtl A 1 A 2 MENU IG 50 A Fr1P Fr1P IS STD IS STD ...

Page 27: ... from Full to Basic Mode I Gain Trk OFF MENU 1 A Fr1P Basic IS STD IS STD I Gain Trk OFF MENU 1 A Fr1P IS STD IS STD Basic Basic MENU Trk OFF Shtl A 1 A 2 MENU IG 50 A Fr1P Fr1P IS STD IS STD Initial Top Screen in Full Mode Initial Top Screen in Basic Mode MENU Basic Press Basic is highlighted Press The Initial Top screen in Basic mode is displayed 1 2 ...

Page 28: ...figure Status of some items can be checked simply by accessing this screen Shown in the figure below 1 1 Inside Items that show the current setting status Example Shtl A 1 indicates that the AUX1 switch is assigned to the Shuttle function 5 White numbers against a black background indicate the number of the switch on a drive unit to which the function is assigned Trk OFF Shtl A 1 A 2 IG 50 A Fr1P ...

Page 29: ... 2 AUX2 switch By default the AUX2 switch for a zoom demand is assigned to the Frame Preset 1 function but it can be reassigned as needed See 3 1 9 Assigning Functions to the AUX2 Switch 4 IS Switch the IS compensation mode of the vertical direction See 3 1 5 Switching the IS Compensation Mode of the Vertical Direction 9 I Tq Iris torque Adjust the level of torque in manual control of the iris rin...

Page 30: ...A Fr1P Fr1P IS STD IS STD MENU IG 51 Trk OFF Shtl A 1 A 2 A Fr1P Fr1P IS STD IS STD Note Do the following when adjusting gain while checking iris operation Confirm that the drive unit A M switch is set to Auto mode Set the camera iris mode to Auto Note As you look at the lens iris ring set it to the position of maximum gain at which focus hunting does not occur Note The current iris gain value is ...

Page 31: ...IG 50 A Fr1P Fr1P IS STD MENU IS HIGH Trk OFF Press The display starts blinking Press or Press left or right until you reach the desired mode Press The display changes from blinking to highlighted indicating confirmation 1 2 3 4 Initial Top Screen Press The previous or default value is highlighted 3 1 4 Switching the IS Compensation Mode of the Horizontal Direction IS Switch the IS compensation mo...

Page 32: ...2 MENU IG 50 A Fr1P Fr1P IS STD IS STD Shtl A 1 A 2 IG 50 A Fr1P Fr1P MENU IS STD Trk OFF IS STD IS HIGH IS STD Shtl A 1 A 2 IG 50 A Fr1P Fr1P MENU IS STD Trk OFF IS HIGH Press The display starts blinking Press or Press left or right until you reach the desired mode Press The display changes from blinking to highlighted indicating confirmation 1 2 3 4 Initial Top Screen Press and then The previous...

Page 33: ... value is restored on startup Trk OFF Trk ON MENU Trk OFF Shtl A 1 A 2 MENU IG 50 A Fr1P Fr1P IS STD IS STD Shtl A 1 A 2 IG 50 A Fr1P Fr1P IS STD IS STD Shtl A 1 A 2 IG 50 A Fr1P Fr1P IS STD IS STD Trk OFF MENU Trk ON Press The display starts blinking Press or Press left or right to switch the function ON or OFF Press The display changes from blinking to highlighted indicating confirmation 1 2 3 4...

Page 34: ...ON VTR RET IS Description Framing Preset1 switch preset speed Framing Preset1 switch max speed Framing Preset2 switch preset speed Framing Preset2 switch max speed Speed Preset switch Shuttle Shot switch No function VTR switch RET switch IS ON OFF selection switch D Default value MENU 2 Shtl A or Press twice The default function is highlighted Press The display starts blinking Press or Press left ...

Page 35: ...e Shot switch No function VTR switch RET switch IS ON OFF selection switch D Default value MENU 3 Shtl A or Press three times The default function is highlighted Press The display starts blinking Press or Press left or right until you reach the desired function Press The display changes from blinking to highlighted indicating confirmation Shtl A 1 NON Shtl A Fr1P A 1 A 1 Trk OFF Shtl A 1 A 2 MENU ...

Page 36: ...1P A 2 RET A 2 Fr1P A 2 Trk OFF Shtl A 1 A 2 MENU IG 50 A Fr1P Fr1P IS STD IS STD Shtl A 1 IG 50 A Fr1P MENU IS STD Trk OFF IS STD IS STD A 2 RET Shtl A 1 IG 50 A Fr1P MENU IS STD Trk OFF IS STD IS STD Options D Fr1P Fr1F Fr2P Fr2F Sped Shtl NON VTR RET IS Description Framing Preset1 switch preset speed Framing Preset1 switch max speed Framing Preset2 switch preset speed Framing Preset2 switch max...

Page 37: ...ss or Press left or right to switch the function to H or L Press The display changes from blinking to highlighted indicating confirmation I Tq H I Tq L Shtl A 1 A 2 IG 50 A Fr1P Fr1P I Tq H Z M MENU Trk OFF Shtl A 1 A 2 IG 50 A Fr1P Fr1P I Tq L Z M MENU Trk OFF Trk OFF Shtl A 1 A 2 MENU IG 50 A Fr1P Fr1P IS STD IS STD Options D H L Description High torque Low torque D Default value MENU 4 I Tq H o...

Page 38: ...om seesaw switch Note Another screen is displayed when this setting is configured Press four times and once Your selection is now highlighted Press The display switches to the CurveMode screen Press Seesaw is underlined The default value is highlighted Press or Press left or right until you reach the desired value Press The display reverts to Screen A 1 9 Responsiveness to zoom mode adjustment Max...

Page 39: ... default value is highlighted Press or Press left or right until you reach the desired value Press The display reverts to Screen A Options 1 2 3 4 D 5 6 7 8 9 D Default value MENU 4 Z M 2 or Specifying Analog Demand Responsiveness Configure the responsiveness of zoom speed adjustment in response to pressing the analog demand thumb ring Note Another screen is displayed when this setting is configur...

Page 40: ...ed into 9 screens by function User screen Switch screen IS screen Preset screen Iris screen Zoom screen Focus screen Info screen and Fol screen Select MENU on the Top screen and press the Set key to access the User screen initially Press left or right to access the 8 other screens There is no single Menu screen Instead these 9 screens are collectively referred to as Menu screen Setting items label...

Page 41: ... User Screen Settings User B is the user in Basic mode The following setting items can be configured on the User screen Switching Modes Resetting Values Locking Functions Mode User Basic Access ResetAll B Unlock User Screen in Basic Mode ...

Page 42: ...h to Full or Analog mode as needed Important The new mode setting is retained even after the lens is turned off Press The display switches to the User screen Press Mode is underlined The previous mode is highlighted Press or Press left or right until you reach the desired mode Options D Basic Full Analog Save Settings Basic Mode Full Mode Analog Mode D Default value MENU User B or 1 2 3 Initial To...

Page 43: ...Press The display switches to the User screen Press twice ResetAll is underlined Press The display switches to the Reset screen Press A confirmation message is displayed about resetting information for the selected user Note You can cancel resetting and restore the original values at any time before pressing in step 5 To return to the previous screen press up To cancel resetting and turn off the d...

Page 44: ...ettings of certain functions Mode User Basic Access ResetAll B Unlock Mode User Basic Access ResetAll B Lock Unlocked Locked Note In lock mode only the following items can still be configured and other settings are locked Preset data Shuttle shot position Frame preset position Preset speed Auto iris gain setting Press The display switches to the User screen Press three times The previous or defaul...

Page 45: ...ious page Note Passwords No master password is used on this model The password you enter each time to lock settings is the password used to unlock them For this reason we recommend making a note of the password each time If you forget the password contact Canon or your dealer Passwords can be blank or up to 8 digits Characters supported in passwords Options D A B C D E F G H I J K L M N O P Q R S ...

Page 46: ...htl A 1 A 2 MENU IG 50 A Fr1P Fr1P IS STD IS STD 2 Unlocking Settings Press The display switches to the User screen Press three times The previous or default value is highlighted Enter the password and press The password you entered to lock settings is the password used to unlock them Press Press and then The settings are now unlocked MENU 3 Password DISPLAY Initial Top Screen User Screen 1 2 3 4 ...

Page 47: ...ngs The following setting items can be configured on the Switch screen Assigning Functions to the AUX Switch Top Assigning Functions to the AUX1 Switch Top Assigning Functions to the AUX2 Switch Top Items labeled Top can also be modified from the Top screen ...

Page 48: ...ed Press or Press left or right until you reach the desired function Assigning Functions to the AUX Switch Top The AUX switch can be programmed to activate a function of your choice Initial Top Screen Switch Screen Options D Fr1P Fr1F Fr2P Fr2F Sped Shtl NON VTR RET IS Description Framing Preset1 switch preset speed Framing Preset1 switch max speed Framing Preset2 switch preset speed Framing Prese...

Page 49: ...d then The display switches to the Switch screen Press twice AUX1 is underlined The previous or default function is highlighted Press or Press left or right until you reach the desired function Initial Top Screen Switch Screen Options Fr1P Fr1F Fr2P Fr2F Sped D Shtl NON VTR RET IS Description Framing Preset1 switch preset speed Framing Preset1 switch max speed Framing Preset2 switch preset speed F...

Page 50: ...en The display switches to the Switch screen Press three times AUX2 is underlined The previous or default function is highlighted Press or Press left or right until you reach the desired function Initial Top Screen Switch Screen Options D Fr1P Fr1F Fr2P Fr2F Sped Shtl NON VTR RET IS Description Framing Preset1 switch preset speed Framing Preset1 switch max speed Framing Preset2 switch preset speed...

Page 51: ... Switching the IS Compensation Mode of the Horizontal Direction Top 2 Switching the IS Compensation Mode of the Vertical Direction Top Specifying the Mode of when IS is OFF Specifying IS Switch Functions 1 Specifying the Method of IS ON OFF Selection 2 Switching the Polarity of the IS Switch Items labeled Top can also be modified from the Top screen ...

Page 52: ...n as needed Press once and twice The display switches to the IS screen Press Mode is underlined Press The display switches to the Mode screen Press The display reverts to Screen A Press IS is underlined The previous or default value is highlighted Press or Press left or right until you reach the desired function Initial Top Screen IS Screen Screen A Mode screen Options STD HIGH OFF Default value S...

Page 53: ...twice The display switches to the IS screen Press Mode is underlined Press The display switches to the Mode screen Press The display reverts to Screen A Press twice IS is underlined The previous or default value is highlighted Press or Press left or right until you reach the desired function Initial Top Screen IS Screen Screen A Mode screen Options STD HIGH OFF Default value STD Description Mode t...

Page 54: ...IS screen Press twice OffState is underlined Press and then or Press left or right to switch the function OFF or STD Options STD OFF Default value OFF Description Mode that provides good panning operability Disabled MENU 2 IS 2 or 1 2 3 Trk OFF Shtl A 1 A 2 MENU IG 50 A Fr1P Fr1P IS STD IS STD Mode Offstate OFF SwSetting IS Mode Offstate SwSetting IS OFF Mode Offstate SwSetting IS STD Initial Top ...

Page 55: ...ng IS SwSetting IS M A Alt SwSetting IS M A Alt Mode Offstate OFF SwSetting IS Press three times SwSetting is underlined Press The display switches to the SwSetting screen 1 2 3 4 5 Press once and twice The display switches to the IS screen Press M A is underlined The previous or default value is highlighted Press The display reverts to Screen A SwSetting Screen Initial Top Screen IS Screen Screen...

Page 56: ...unctions are assigned For instructions see Specifying the Method of IS ON OFF Selection on the previous page Press or Press left or right until you reach the desired function Trk OFF Shtl A 1 A 2 MENU IG 50 A Fr1P Fr1P IS STD IS STD Mode Offstate OFF SwSetting IS Mode Offstate OFF SwSetting IS SwSetting IS M A Mom N R Normal SwSetting IS M A Mom Normal N R SwSetting IS M A Mom Reverse N R Press th...

Page 57: ...asic Mode 3 2 4 Preset Screen Settings The following setting items can be configured on the Preset screen Switching What Frame Preset 1 Controls Switching What Frame Preset 2 Controls Specifying the Preset Mode Zoom Speed ...

Page 58: ...lt value is highlighted Press or Zoom is always specified for R type lenses Switching What Frame Preset 1 Controls Switch what frame preset 1 controls as needed Zoom Move the zoom position to the position in memory Focus Move the focus position to the position in memory Z F Move the zoom and focus position to the position in memory Initial Top Screen Preset Screen Screen A Frame1 Screen Options D ...

Page 59: ...ault value is highlighted Press or Zoom is always specified for R type lenses Switching What Frame Preset 2 Controls Switch what frame preset 2 controls as needed Zoom Move the zoom position to the position in memory Focus Move the focus position to the position in memory Z F Move the zoom and focus position to the position in memory Initial Top Screen Preset Screen Screen A Frame2 Screen Options ...

Page 60: ...s highlighted Press or Press left or right until you reach the desired value Specifying the Preset Mode Zoom Speed Configure the zoom speed from any position to the position in memory as needed To adjust the value use either the Memo button refer to the Lens Manual or display operations Regardless of the method of adjustment used the most recent setting takes precedence Initial Top Screen Preset S...

Page 61: ...setting items can be configured on the Iris screen Specifying Iris Gain 1 Specifying Auto Iris Gain Top 2 Specifying Remote Iris Gain Specifying Iris Torque Top Iris Compensation ON OFF Iris Close Detection ON OFF Items labeled Top can also be modified from the Top screen ...

Page 62: ...e to Auto Note As you look at the lens iris ring set it to the position of maximum gain at which focus hunting does not occur Note The current iris gain value is retained even if you reset other settings as described in 3 2 1 Resetting Values For this reason you will no longer be able to view the default setting If necessary make a note of the default setting before adjusting this value Press once...

Page 63: ...to Remote Note The current iris gain value is retained even if you reset other settings as described in 3 2 1 Resetting Values For this reason you will no longer be able to view the default setting If necessary make a note of the default setting before adjusting this value Press once and three times The display switches to the Iris screen Press I Gain is underlined Press The display switches to th...

Page 64: ...op Specify the desired level of torque in manual control of the iris ring Press once and three times The display switches to the Iris screen Press twice Torque is underlined The previous or default function is highlighted Press or Press left or right to switch the function to High or Low Initial Top Screen Iris Screen Options D High Low Description High torque Low torque D Default value MENU 3 Iri...

Page 65: ...s once and three times The display switches to the Iris screen Press three times Comp is underlined The previous or default function is highlighted Press or Press left or right to switch the function ON or OFF Initial Top Screen Iris Screen Options ON D OFF Description Iris compensation No iris compensation D Default value MENU 3 Iris 3 or Note The iris may not fully close in some cases when the i...

Page 66: ... Press once and three times The display switches to the Iris screen Press four times Close is underlined The previous or default function is highlighted Press or Press left or right to switch the function ON or OFF Initial Top Screen Iris Screen Options D OFF ON Description No close detection Close detection D Default value MENU 3 Iris 4 or Note With some cameras iris compensation may conflict with...

Page 67: ...c Mode 3 2 6 Zoom Screen Settings The following setting items can be configured on the Zoom screen Specifying Seesaw Curve Responsiveness Specifying Analog Demand Curve Responsiveness Demand Based Zoom Speed Adjustment ON OFF ...

Page 68: ...en this setting is configured Press once and four times The display switches to the Zoom screen Press or Press left or right until you reach the desired function Press CurveMode is underlined Press Seesaw is underlined The previous or default value is highlighted Press The display switches to the CurveMode screen Press The display reverts to Screen A Initial Top Screen Zoom Screen Screen A CurveMo...

Page 69: ...when this setting is configured Press once and four times The display switches to the Zoom screen Press or Press left or right until you reach the desired function Press CurveMode is underlined Press twice Demand is underlined The previous or default value is highlighted Press The display switches to the CurveMode screen Press The display reverts to Screen A Initial Top Screen Zoom Screen Screen A...

Page 70: ...le or disable adjustment of the maximum drive unit zoom speed based on the zoom demand Press once and four times The display switches to the Zoom screen Press twice VR Dem is underlined The previous or default function is highlighted Press or Press left or right to switch the function ON or OFF Initial Top Screen Zoom Screen Options D ON OFF Description Enabled Disabled D Default value MENU 4 Zoom...

Page 71: ...E69 3 Operation in Basic Mode 3 2 7 Focus Screen Settings The following setting items can be configured on the Focus screen Specifying Focus Demand Curve Responsiveness ...

Page 72: ...s or Press left or right until you reach the desired function Press CurveMode is underlined Press ADemand is underlined The previous or default value is highlighted Press The display switches to the CurveMode screen Press The display reverts to Screen A Initial Top Screen Focus Screen Screen A CurveMode Screen Options 1 to 9 Description Large curve Small curve Default value 5 MENU 3 Focus or Note ...

Page 73: ...gs The following setting items can be configured on the Info screen Specifying the 3D Function For information on specifying the 3D function see the instruction manual of the BC 100 3D cable Specifying Encoder Output Serial Communication with Camera ON OFF ...

Page 74: ...Enable or disable encoder output as needed Enabling output enables virtual connector output For details contact Canon or your dealer Press once and twice The display switches to the Info screen Press twice Encoder is underlined Press or Press left or right to switch the function ON or OFF Initial Top Screen Info Screen Options D OFF ON Description Output disabled Output enabled D Default value MEN...

Page 75: ...switch between auto control detection and analog control By default this setting is ON enabling auto detection of whether serial or analog control is used To restrict the interface to analog control set it to OFF Press once and twice The display switches to the Info screen Press three times CamSeri is underlined Press or Press left or right to switch the function ON or OFF Initial Top Screen Info ...

Page 76: ...E74 3 Operation in Basic Mode 3 2 9 Fol Screen Settings The following setting items can be configured on the Fol screen Viewing Lens Follow Settings Iris Zoom Focus ...

Page 77: ...chanical iris zoom and focus operations expressed as relative values in the range of 0 1000 Press and then The display switches to the Fol screen showing relative follow iris zoom and focus values Initial Top Screen Fol Screen MENU Fol B Note As long as the Fol screen is shown the display will not turn off automatically after 2 minutes even if it is left idle To turn off the display press the Disp...

Page 78: ...D STD HIGH OFF A Fr1P VTR RET Fr1P Fr1F Fr2P Fr2F Sped Shtl IS NON Trk OFF OFF ON A 1 Shtl VTR RET Fr1P Fr1F Fr2P Fr2F Sped Shtl IS NON A 2 Fr1P VTR RET Fr1P Fr1F Fr2P Fr2F Sped Shtl IS NON I Tq H H L Z M To 2 on the next page Escape Operation Jump to user 0 setting status Hold down both the Display switch and Set key for at least 2 seconds ...

Page 79: ...rmal Reverse Preset Frame1 Zoom Zoom Focus Z F Frame2 Zoom Zoom Focus Z F ZSpeed 800 1 800 Iris Go Top I Gain Auto 50 01 99 Remote 90 01 99 Torque High High Low Comp OFF OFF ON Close OFF OFF ON Zoom CurveMode Seesaw 5 1 9 2 Demand 5 1 9 VR Dem ON ON OFF Focus CurveMode ADemand 5 1 9 Info 3D 1 OFF OFF ON Encoder OFF OFF ON CamSeri ON OFF ON Fol 3 Iris 0000 1000 Zoom 0000 1000 Focus 0000 1000 To 1 F...

Page 80: ...Memo ...

Page 81: ...Operation in Full Mode 4 INFORMATION DISPLAY ...

Page 82: ... can be configured on the Top screen in Full mode The first screen displayed is referred to as the Initial Top screen Status of some items can be checked simply by accessing this screen Items not scrolled Items displayed by scrolling MENU 1 Z M I Tq H RET R A 2 Fr1P Shtl VTR A 1 V Initial Top Screen in Full Mode I Gain Trk OFF MENU 1 A Fr1P Basic IS STD IS STD ...

Page 83: ...F Shtl A 1 A 2 MENU IG 50 A Fr1P Fr1P IS STD IS STD 4 1 1 Selecting Full Mode Basic mode is the default mode but Full mode can be accessed as follows Switching from Basic to Full Mode Initial Top Screen in Basic Mode User Screen in Basic Mode MENU Full Press Press Basic is highlighted Press Full is now highlighted indicating confirmation 1 2 3 ...

Page 84: ... as the Initial Top screen which displays 8 items The other 8 can be accessed by pressing down to scroll down the screen See the following figure Status of some items can be checked simply by accessing this screen Shown in the figure below 1 1 Inside Items that show the current setting status Example Shtl A 1 indicates that the AUX1 switch is assigned to the Shuttle function 9 11 14 15 16 13 10 1 ...

Page 85: ...d to the Return function but it can be reassigned as needed See 4 1 13 Assigning Functions to the RET Switch 9 11 14 15 16 13 10 1 3 12 4 7 2 5 6 8 IS Switch the IS compensation mode of the horizontal direction See 4 1 6 Switching the IS Compensation Mode of the Horizontal Direction 9 11 14 15 16 13 10 1 3 12 4 7 2 5 6 8 I Tq Iris torque Adjust the level of torque in manual control of the iris rin...

Page 86: ...r details see 4 1 16 Escape Operation Selecting user 0 restores the default settings except for the auto and remote iris gain values and encoder output setting Switch to the desired user 0 9 from the Top screen Configure advanced settings for these users from the Menu screen See 4 2 Configuration from the Menu Screen Press The previous or default value is highlighted Press The display starts blink...

Page 87: ... A 1 A 2 MENU IG 50 A Fr1P Fr1P IS STD IS STD 4 1 4 Switching to Basic Mode Basic Switch to Basic mode from the Top screen as needed Switching from Full to Basic Mode Initial Top Screen in Full Mode Initial Top Screen in Basic Mode Press Basic is highlighted Press The mode switches and the Initial Top screen in Basic mode is displayed 1 2 MENU Basic ...

Page 88: ...ded Important First switch to the user for whom the settings apply For instructions see 4 1 3 Switching Users or 4 2 1 User Screen Settings Switching Users Press and then The previous or default value is highlighted Press The display starts blinking Press or Press left or right to switch the function ON or OFF Press The display changes from blinking to highlighted indicating confirmation 1 2 3 4 I...

Page 89: ... Basic IS STD IS HIGH Trk OFF Press The display starts blinking Press or Press left or right until you reach the desired mode Press The display changes from blinking to highlighted indicating confirmation 1 2 3 4 Initial Top Screen Press twice The previous or default value is highlighted 4 1 6 Switching the IS Compensation Mode of the Horizontal Direction IS Switch the IS compensation mode of the ...

Page 90: ... HIGH MENU I Gain Trk OFF MENU 1 A Fr1P Basic IS STD IS STD I Gain 1 A Fr1P Basic IS STD Trk OFF IS STD MENU I Gain 1 A Fr1P Basic IS STD Trk OFF IS HIGH Press The display starts blinking Press or Press left or right until you reach the desired mode Press The display changes from blinking to highlighted indicating confirmation 1 2 3 4 Initial Top Screen Press twice and once The previous or default...

Page 91: ...witching Users Options D Fr1P Fr1F Fr2P Fr2F Sped Shtl NON VTR RET IS Description Framing Preset1 switch preset speed Framing Preset1 switch max speed Framing Preset2 switch preset speed Framing Preset2 switch max speed Speed Preset switch Shuttle Shot switch No function VTR switch RET switch IS ON OFF selection switch D Default value MENU 3 A Fr1P or Press twice The previous or default function i...

Page 92: ...efault Varies depending on the factory set value but corresponds to the value determined with the iris gain adjustment trimmer MENU 3 I Gain or Note Do the following when adjusting gain while checking iris operation Confirm that the drive unit A M switch is set to Auto mode Set the camera iris mode to Auto Note As you look at the lens iris ring set it to the position of maximum gain at which focus...

Page 93: ...alue 90 MENU 3 I Gain 2 or Note Do the following when adjusting gain while checking iris operation Confirm that the drive unit A M switch is set to Auto mode Set the camera iris mode to Remote Note The current iris gain value is retained even if you reset other settings as described in 4 2 1 Resetting Values For this reason you will no longer be able to view the default setting If necessary make a...

Page 94: ...Switching Users Initial Top Screen Press three times The previous or default function is highlighted Press The display starts blinking Press or Press left or right until you reach the desired function Press The display changes from blinking to highlighted indicating confirmation 1 2 3 4 Options Fr1P Fr1F Fr2P Fr2F Sped D Shtl NON VTR RET IS Description Framing Preset1 switch preset speed Framing P...

Page 95: ...gs Switching Users Initial Top Screen Press four times and once The previous or default function is highlighted Press The display starts blinking Press or Press left or right until you reach the desired function Press The display changes from blinking to highlighted indicating confirmation 1 2 3 4 Options D VTR RET Fr1P Fr1F Fr2P Fr2F Sped Shtl IS Description VTR switch RET switch Framing Preset1 ...

Page 96: ...itching Users Initial Top Screen Press five times The previous or default function is highlighted Press The display starts blinking Press or Press left or right until you reach the desired function Press The display changes from blinking to highlighted indicating confirmation 1 2 3 4 Options D Fr1P Fr1F Fr2P Fr2F Sped Shtl NON VTR RET IS Description Framing Preset1 switch preset speed Framing Prese...

Page 97: ... Switching Users Initial Top Screen Press five times and once The previous or default function is highlighted Press The display starts blinking Press or Press left or right until you reach the desired function Press The display changes from blinking to highlighted indicating confirmation 1 2 3 4 Options VTR D RET Fr1P Fr1F Fr2P Fr2F Sped Shtl IS Description VTR switch RET switch Framing Preset1 swi...

Page 98: ...rtant First switch to the user for whom the settings apply For instructions see 4 1 3 Switching Users or 4 2 1 User Screen Settings Switching Users Press six times The previous or default function is highlighted Press The display starts blinking Press or Press left or right to switch the function to H or L Press The display changes from blinking to highlighted indicating confirmation Options D H L...

Page 99: ... First switch to the user for whom the settings apply For instructions see 4 1 3 Switching Users or 4 2 1 User Screen Settings Switching Users Press six times and once Your selection is now highlighted Press The display switches to the CurveMode screen Press Seesaw is underlined The previous or default value is highlighted Press or Press left or right until you reach the desired value Press The di...

Page 100: ...to the user for whom the settings apply For instructions see 4 1 3 Switching Users or 4 2 1 User Screen Settings Switching Users Press six times and once Your selection is now highlighted Press The display switches to the CurveMode screen Press Demand is underlined The previous or default value is highlighted Press or Press left or right until you reach the desired value Press The display reverts ...

Page 101: ... settings apply For instructions see 4 1 3 Switching Users or 4 2 1 User Screen Settings Switching Users Press seven times The previous or default function is highlighted Press The display starts blinking Press or Press left or right until you reach the desired function Press The display changes from blinking to highlighted indicating confirmation Options D Norm Reve Auto Manu Description Normal o...

Page 102: ...Press The display starts blinking Press or Press left or right to switch the function to Zoom or Iris Press The display changes from blinking to highlighted indicating confirmation Options D Zoom Iris Description Zoom operation Iris operation D Default value MENU 7 Zoom or 1 2 3 4 Initial Top Screen Note Note on Iris Assignment 1 The seesaw switch will no longer control zooming 2 To control the ir...

Page 103: ...to user 0 Auto and remote iris gain values encoder output setting and camera follow voltage adjustments Hold down both the Display switch and for at least 2 seconds The following messages is displayed depending on the current user before the operation User0 User 0 Reset Now From Users 1 9 Escape To User 0 The Initial Top screen is displayed 1 2 Desired screen Initial Top Screen From User 0 From Us...

Page 104: ...eens by function User screen Switch screen IS screen Preset screen Iris screen Zoom screen Focus screen Info screen and Fol screen Select MENU on the Top screen and press the Set key to access the User screen initially Press left or right to access the 8 other screens See the following figure There is no single Menu screen Instead these 9 screens are collectively referred to as Menu screen Setting...

Page 105: ...sers Top Naming Users Resetting Values 1 Resetting One Userʼs Settings 2 Resetting All Usersʼ Settings Copying Settings Between Individual Users Copying Settings Between Lenses 1 Copying One Userʼs Settings to Another Lens 2 Copying All Usersʼ Settings to Another Lens 3 Responding to Errors Locking Functions Items labeled Top can also be modified from the Top screen User Screen in Full Mode Mode U...

Page 106: ...creen Press Mode is underlined The previous mode is highlighted Press or Press left or right until you reach the desired mode Switching Modes Switch to Basic or Analog mode as needed Important The new mode setting is retained even after the lens is turned off Initial Top Screen User Screen Options D Basic Full Analog Save Settings Basic Mode Full Mode Analog Mode D Default value MENU User 1 or 1 2...

Page 107: ...ber Press The display switches to the User screen Press twice No is underlined The previous or default value is highlighted Press or Press left or right until you reach the desired mode Initial Top Screen User Screen Options 0 D 1 2 3 4 5 6 7 8 9 Save Settings Not supported Although settings cannot be saved they can be changed temporarily Switching users or turning the lens off will restore defaul...

Page 108: ...r 4 2 1 User Screen Settings Switching Users Press The display switches to the User screen Press three times Name is underlined Press The first dash is highlighted indicating that you can edit it Press or Press left or right until you reach the desired value Press the to confirm the name The display reverts to Title Name 1 2 3 4 5 Initial Top Screen User Screen Title Name Title Name Options D AB C ...

Page 109: ...ress four times ResetAll is underlined Press The display switches to the Reset screen Press A confirmation message is displayed about resetting information for the selected user Note You can cancel resetting and restore the original values at any time before pressing in step 5 To return to the previous screen press up To cancel resetting and turn off the display press the Display switch User Scree...

Page 110: ...n step 5 To return to the previous screen press up To cancel resetting and turn off the display press the Display switch Note Iris gain values encoder output setting and camera follow voltage adjustments are not reset The current value is retained Note There is no need to switch users Press and then Press The display switches to the User screen Press four times ResetAll is underlined Press The dis...

Page 111: ...he Display switch Press or Press left or right until you reach the user to copy settings to Press Copy is underlined and you can select y yes or n no Press The display switches to the User screen Press five times Copy is underlined Press The display switches to the Copy screen Press To No is underlined 1 2 3 4 5 6 Initial Top Screen User Screen Screen A Copy Screen Continued on next page Copying Se...

Page 112: ...eration in Full Mode ResetAll User Copy ToOtherLens 1 Press and then Settings are copied to the specified user number and the display reverts to Screen A Continued from previous page 7 MENU User 1 5 or Screen A ...

Page 113: ...pin connector of the zoom focus remote of the target lens 2 Turn on the source and target lenses 3 Press the Display switch on the source lens to turn on the display Leave the source lens display off Note You can cancel copying and restore the original values at any time before pressing in step 11 To return to the previous screen press up To cancel copying and turn off the display press the Displa...

Page 114: ...original settings 2 To avoid problems during copying do not operate controls or press the Display switch on the source or target lenses Do not perform other operations MENU User 1 6 or Press and then Press The display switches to the Target user selection screen The display switches to the Copy selection screen Press To No is underlined Press or Press left or right until you reach the number of th...

Page 115: ...zoom focus remote of the target lens 2 Turn on the source and target lenses 3 Press the Display switch on the source lens to turn on the display Leave the source lens display off Note You can cancel copying and restore the original values at any time before pressing in step 9 To return to the previous screen press up To cancel copying and turn off the display press the Display switch Press and the...

Page 116: ...you cannot restore the original settings 2 To avoid problems during copying do not operate controls or press the Display switch on the source or target lenses Do not perform other operations MENU User 1 6 2 Press and then The display switches to Screen B Press twice AllCopy is underlined and you can select y yes or n no Press The display switches to the AllCopy screen Press Copy is underlined and ...

Page 117: ...nfirm that the drive unit of the target lens is the same model Settings cannot be copied between lenses of different generations of drive units Contact Canon or your dealer for details on models of drive unit that can be used to copy settings Copy Error Confirm that the dedicated cable 20 pin 20 pin is connected The message at left is displayed if the lenses are disconnected during copying if a po...

Page 118: ...S STD IS STD I Gain Trk OFF MENU A Fr1P Basic IS STD IS STD Unlocked Locked Note User numbers 0 9 in the user number field indicate users that are unlocked Lock in the user number field indicate users that are locked Note In lock mode only the following items can still be configured and other settings are locked Preset data Shuttle shot position Frame preset position Preset speed Zoom tracking pos...

Page 119: ...ous page Note Passwords No master password is used on this model The password you enter each time to lock settings is the password used to unlock them For this reason we recommend making a note of the password each time If you forget the password contact Canon or your dealer Passwords can be blank or up to 8 digits Characters supported in passwords Options D A B C D E F G H I J K L M N O P Q R S T...

Page 120: ...TD 2 Unlocking Settings Settings can be unlocked in two ways as follows Unlocking Setting 1 Press Press The display starts blinking Enter the password and press The password you entered to lock settings is the password used to unlock them Press or Press and then Lock changes to the user number The previously locked user number is displayed Options D Unlock Lock D Default value MENU Lock or Passwor...

Page 121: ...Name No 1 1 I Gain Trk OFF MENU Lock A Fr1P Basic IS STD IS STD Unlocking Setting 2 Press The display switches to the User screen Press seven times Enter the password and press The password you entered to lock settings is the password used to unlock them Press Press and then The settings are now unlocked MENU 7 Password Initial Top Screen User Screen 1 2 3 4 5 ...

Page 122: ...ing Functions to the AUX Switch Top Assigning Functions to the AUX1 Switch Top Assigning Functions to the AUX2 Switch Top Assigning Functions to the VTR Switch Top Assigning Functions to the RET Switch Top Specifying Iris A M Switch Top Assigning Functions to the Seesaw Top Items labeled Top can also be modified from the Top screen ...

Page 123: ...nctions to the AUX Switch Top The AUX switch can be programmed to activate a function of your choice Important First switch to the user for whom the settings apply For instructions see 4 1 3 Switching Users or 4 2 1 User Screen Settings Switching Users Initial Top Screen Switch Screen Options D Fr1P Fr1F Fr2P Fr2F Sped Shtl NON VTR RET IS Description Framing Preset1 switch preset speed Framing Pre...

Page 124: ...3 Switching Users or 4 2 1 User Screen Settings Switching Users Press and then The display switches to the Switch screen Press twice AUX1 is underlined The previous or default function is highlighted Press or Press left or right until you reach the desired function Initial Top Screen Switch Screen Options Fr1P Fr1F Fr2P Fr2F Sped D Shtl NON VTR RET IS Description Framing Preset1 switch preset spee...

Page 125: ...witching Users or 4 2 1 User Screen Settings Switching Users Press and then The display switches to the Switch screen Press three times AUX2 is underlined The previous or default function is highlighted Press or Press left or right until you reach the desired function Initial Top Screen Switch Screen Options D Fr1P Fr1F Fr2P Fr2F Sped Shtl NON VTR RET IS Description Framing Preset1 switch preset s...

Page 126: ...ng Users or 4 2 1 User Screen Settings Switching Users Press and then The display switches to the Switch screen Press four times VTR is underlined The previous or default function is highlighted Press or Press left or right until you reach the desired function Initial Top Screen Switch Screen Options Fr1P Fr1F Fr2P Fr2F Sped Shtl D VTR RET IS Description Framing Preset1 switch preset speed Framing...

Page 127: ...g Users or 4 2 1 User Screen Settings Switching Users Press and then The display switches to the Switch screen Press five times RET is underlined The previous or default function is highlighted Press or Press left or right until you reach the desired function Initial Top Screen Switch Screen Options Fr1P Fr1F Fr2P Fr2F Sped Shtl VTR D RET IS Description Framing Preset1 switch preset speed Framing P...

Page 128: ... whom the settings apply For instructions see 4 1 3 Switching Users or 4 2 1 User Screen Settings Switching Users Press and then The display switches to the Switch screen Press six times A M is underlined The previous or default function is highlighted Press or Press left or right until you reach the desired function Initial Top Screen Switch Screen Options D Norm Reve Auto Manu Description Normal...

Page 129: ...even times SSaw is underlined The previous or default function is highlighted Press or Press left or right until you reach the desired function Initial Top Screen Switch Screen Options D Zoom Iris Description Zoom operation Iris operation D Default value MENU Switch 1 7 or 1 2 3 Note Note on Iris Assignment 1 The seesaw switch will no longer control zooming 2 To control the iris with the rocker sw...

Page 130: ... Switching the IS Compensation Mode of the Horizontal Direction Top 2 Switching the IS Compensation Mode of the Vertical Direction Top Specifying the Mode of when IS is OFF Specifying IS Switch Functions 1 Specifying the Method of IS ON OFF Selection 2 Switching the Polarity of the IS Switch Items labeled Top can also be modified from the Top screen ...

Page 131: ... is underlined Press The display switches to the Mode screen Press The display reverts to Screen A Press IS is underlined The previous or default value is highlighted Press or Press left or right until you reach the desired function Initial Top Screen IS Screen Screen A Mode screen Options STD HIGH OFF Default value STD Description Mode that provides good panning operability Mode that provides hig...

Page 132: ...isplay switches to the Mode screen Press The display reverts to Screen A Press twice IS is underlined The previous or default value is highlighted Press or Press left or right until you reach the desired function Initial Top Screen IS Screen Screen A Mode screen Options STD HIGH OFF Default value STD Description Mode that provides good panning operability Mode that provides high vibration control ...

Page 133: ...ft or right to switch the function OFF or STD Options STD OFF Default value OFF Description Mode that provides good panning operability Disabled MENU 2 IS 2 or 1 2 3 Mode Offstate OFF SwSetting IS Mode Offstate SwSetting IS OFF Mode Offstate SwSetting IS STD I Gain Trk OFF MENU 1 A Fr1P Basic IS STD IS STD Initial Top Screen IS Screen Important First switch to the user for whom the settings apply ...

Page 134: ... IS STD Press three times SwSetting is underlined Press The display switches to the SwSetting screen 1 2 3 4 5 Press once and twice The display switches to the IS screen Press M A is underlined The previous or default value is highlighted Press The display reverts to Screen A SwSetting Screen Initial Top Screen IS Screen Screen A 6 Screen A Options Alt Mom Default value Alt Description Alternate a...

Page 135: ...are assigned For instructions see Specifying the Method of IS ON OFF Selection on the previous page Press or Press left or right until you reach the desired function Trk OFF Shtl A 1 A 2 MENU IG 50 A Fr1P Fr1P IS STD IS STD Mode Offstate OFF SwSetting IS Mode Offstate OFF SwSetting IS SwSetting IS M A Mom N R Normal SwSetting IS M A Mom Normal N R SwSetting IS M A Mom Reverse N R Press three times...

Page 136: ...wing setting items can be configured on the Preset screen Switching What Frame Preset 1 Controls Switching What Frame Preset 2 Controls Specifying the Preset Mode Zoom Speed Specifying Zoom Start Responsiveness for Presets Specifying Zoom Stop Responsiveness for Presets ...

Page 137: ...reset 1 Controls Switch what frame preset 1 controls as needed Zoom Move the zoom position to the position in memory Focus Move the focus position to the position in memory Z F Move the zoom and focus position to the position in memory Important First switch to the user for whom the settings apply For instructions see 4 1 3 Switching Users or 4 2 1 User Screen Settings Switching Users Initial Top ...

Page 138: ...Preset 2 Controls Switch what frame preset 2 controls as needed Zoom Move the zoom position to the position in memory Focus Move the focus position to the position in memory Z F Move the zoom and focus position to the position in memory Important First switch to the user for whom the settings apply For instructions see 4 1 3 Switching Users or 4 2 1 User Screen Settings Switching Users Initial Top...

Page 139: ...Specifying the Preset Mode Zoom Speed Configure the zoom speed from any position to the position in memory as needed To adjust the value use either the Memo button refer to the Lens Manual or display operations Regardless of the method of adjustment used the most recent setting takes precedence Important First switch to the user for whom the settings apply For instructions see 4 1 3 Switching User...

Page 140: ...ment screen Press Start is underlined The previous or default value is highlighted Press or Press left or right until you reach the desired value Press The display reverts to Screen A Specifying Zoom Start Responsiveness for Presets Specify initial responsiveness in zooming for preset operations Initial Top Screen Preset Screen Screen A ZMovement Screen Options 00 to D 99 Description Start gradual...

Page 141: ...ent screen Press twice Stop is underlined The previous or default value is highlighted Press or Press left or right until you reach the desired value Press The display reverts to Screen A Specifying Zoom Stop Responsiveness for Presets Specify final responsiveness in zooming for preset operations Initial Top Screen Preset Screen Screen A ZMovement Screen Options 00 to 99 Description Stop gradually...

Page 142: ...tting items can be configured on the Iris screen Specifying Iris Gain 1 Specifying Auto Iris Gain Top 2 Specifying Remote Iris Gain Top Specifying Iris Torque Top Iris Compensation ON OFF Iris Close Detection ON OFF Items labeled Top can also be modified from the Top screen ...

Page 143: ...firm that the drive unit A M switch is set to Auto mode Set the camera iris mode to Auto Note As you look at the lens iris ring set it to the position of maximum gain at which focus hunting does not occur Note The current iris gain value is retained even if you reset other settings as described in 4 2 1 Resetting Values For this reason you will no longer be able to view the default setting If nece...

Page 144: ...firm that the drive unit A M switch is set to Auto mode Set the camera iris mode to Remote Note The current iris gain value is retained even if you reset other settings as described in 4 2 1 Resetting Values For this reason you will no longer be able to view the default setting If necessary make a note of the default setting before adjusting this value Press once and four times The display switche...

Page 145: ...ant First switch to the user for whom the settings apply For instructions see 4 1 3 Switching Users or 4 2 1 User Screen Settings Switching Users Press once and four times The display switches to the Iris screen Press twice Torque is underlined The previous or default function is highlighted Press or Press left or right to switch the function to High or Low Initial Top Screen Iris Screen Options D...

Page 146: ...4 1 3 Switching Users or 4 2 1 User Screen Settings Switching Users Press once and four times The display switches to the Iris screen Press three times Comp is underlined The previous or default function is highlighted Press or Press left or right to switch the function ON or OFF Initial Top Screen Iris Screen Options ON D OFF Description Iris compensation No iris compensation D Default value MENU...

Page 147: ... see 4 1 3 Switching Users or 4 2 1 User Screen Settings Switching Users Press once and four times The display switches to the Iris screen Press four times Close is underlined The previous or default function is highlighted Press or Press left or right to switch the function ON or OFF Initial Top Screen Iris Screen Options D OFF ON Description No close detection Close detection D Default value MEN...

Page 148: ... Stop Responsiveness Specifying Zoom Mechanical End Stop Responsiveness Specifying Seesaw Switch Responsiveness Top Specifying Analog Demand Responsiveness Top Specifying Maximum Zoom Speed Control Specifying Minimum Zoom Speed Control Specifying Servo Type from Zoom Demand Demand Based Zoom Speed Adjustment ON OFF Specifying Zoom Demand Specifications Items labeled Top can also be modified from t...

Page 149: ...om CurveMode Tracking Zoom OFF Movement CurveMode Tracking Zoom ON Movement CurveMode I Gain Trk OFF MENU 1 A Fr1P Basic IS STD IS STD Press once and five times The display switches to the Zoom screen Press Tracking is underlined The previous or default function is highlighted Press or Press left or right to switch the function ON or OFF Initial Top Screen Zoom Screen Options D OFF ON Description Z...

Page 150: ...Start D99 91 Movement Zoom Stop Start 97 91 OFF Movement CurveMode Zoom I Gain Trk OFF MENU 1 A Fr1P Basic IS STD IS STD Press once and five times The display switches to the Zoom screen Press twice Movement is underlined Press The display switches to the Movement screen Press The display reverts to Screen A Press Start is underlined The previous or default value is highlighted Press or Press left ...

Page 151: ... OFF Movement Zoom CurveMode Tracking OFF Movement CurveMode Zoom I Gain Trk OFF MENU 1 A Fr1P Basic IS STD IS STD Press once and five times The display switches to the Zoom screen Press twice Movement is underlined Press The display switches to the Movement screen Press The display reverts to Screen A Press twice Start is underlined The previous or default value is highlighted Press or Press left ...

Page 152: ...Zoom Stop Start 99 91 Movement Zoom End Stop D99 91 Movement Zoom End Stop 97 91 I Gain Trk OFF MENU 1 A Fr1P Basic IS STD IS STD Press once and five times The display switches to the Zoom screen Press twice Movement is underlined Press The display switches to the Movement screen Press The display reverts to Screen A Press three times End is underlined The previous or default value is highlighted P...

Page 153: ...e settings apply For instructions see 4 1 3 Switching Users or 4 2 1 User Screen Settings Switching Users Press once and five times The display switches to the Zoom screen Press or Press left or right until you reach the desired function Press three times CurveMode is underlined Press Seesaw is underlined The previous or default value is highlighted Press The display switches to the CurveMode scree...

Page 154: ...de Zoom Demand Seesaw 5 7 Tracking OFF Movement Zoom CurveMode I Gain Trk OFF MENU 1 A Fr1P Basic IS STD IS STD Press once and five times The display switches to the Zoom screen Press three times CurveMode is underlined Press The display switches to the CurveMode screen Press The display reverts to Screen A Press twice Demand is underlined The previous or default value is highlighted Press or Press...

Page 155: ... Zoom Min Max D99 01 SpeedAdj Zoom Min Max 97 01 Tracking OFF Movement Zoom CurveMode I Gain Trk OFF MENU 1 A Fr1P Basic IS STD IS STD Press once and five times The display switches to the Zoom screen Press four times SpeedAdj is underlined Press The display switches to the SpeedAdj screen Press The display reverts to Screen A Press Max is underlined The previous or default value is highlighted Pre...

Page 156: ...peedAdj Control Sped Zoom SpeedAdj Zoom Min Max 99 D01 SpeedAdj Zoom Min Max 03 99 I Gain Trk OFF MENU 1 A Fr1P Basic IS STD IS STD Press once and five times The display switches to the Zoom screen Press four times SpeedAdj is underlined Press The display switches to the SpeedAdj screen Press The display reverts to Screen A Press twice Min is underlined The previous or default value is highlighted ...

Page 157: ...ed SpeedAdj Control VR Dem ON Zoom Posi I Gain Trk OFF MENU 1 A Fr1P Basic IS STD IS STD Press once and five times The display switches to the Zoom screen Press five times Control is underlined The previous or default function is highlighted Press or Press left or right to switch the function to Sped or Posi Initial Top Screen Zoom Screen Options D Sped Posi Description Speed servo Position servo D ...

Page 158: ...itching Users Tracking OFF Movement Zoom CurveMode Control VR Dem Zoom ON Sped Control VR Dem Zoom OFF Sped SpeedAdj SpeedAdj I Gain Trk OFF MENU 1 A Fr1P Basic IS STD IS STD Press once and five times The display switches to the Zoom screen Press six times VR Dem is underlined The previous or default function is highlighted Press or Press left or right to switch the function ON or OFF Initial Top S...

Page 159: ...E157 4 Operation in Full Mode 4 2 7 Focus Screen Settings The following setting items can be configured on the Focus screen Specifying Focus Demand Responsiveness ...

Page 160: ...rveMode is underlined Press The display switches to the CurveMode screen Press The display reverts to Screen A Press ADemand is underlined The previous or default value is highlighted Press or Press left or right until you reach the desired function Initial Top Screen Focus Screen Screen A CurveMode Screen Options 1 to 9 Description Large curve Small curve Default value 5 MENU 3 Focus or 1 2 3 4 5...

Page 161: ...configured on the Info screen Specifying the 3D Function For information on specifying the 3D function see the instruction manual of the BC 100 3D cable Specifying Encoder Output Serial Communication with Camera ON OFF Configuring Settings in System Mode Used by Canon Service Technicians Only ...

Page 162: ...o CamSeri CamSeri ON ON 3D OFF Encoder CamSeri ON Encoder 3D OFF IND ON IND OFF OFF I Gain Trk OFF MENU 1 A Fr1P Basic IS STD IS STD Press once and twice The display switches to the Info screen Press twice Encoder is underlined Press or Press left or right to switch the function ON or OFF Initial Top Screen Info Screen Options D OFF ON Description Output disabled Output enabled D Default value MEN...

Page 163: ...strict the interface to analog control set it to OFF I Gain Trk OFF Shtl VTR A 1 V MENU 1 A Fr1P Basic Info OFF Info CamSeri ON CamSeri Encoder OFF Info CamSeri ON Encoder OFF Encoder OFF 3D OFF 3D OFF 3D OFF Press once and twice The display switches to the Info screen Press three times CamSeri is underlined Press or Press left or right to switch the function ON or OFF Initial Top Screen Info Scre...

Page 164: ...E162 4 Operation in Full Mode 4 2 9 Fol Screen Settings The following setting items can be configured on the Fol screen Viewing Lens Follow Settings Iris Zoom Focus ...

Page 165: ... 1000 Fol Iris Zoom Focus 0000 1000 0000 1 I Gain Trk OFF Shtl VTR A 1 V MENU 1 A Fr1P Basic Press and then The display switches to the Fol screen showing relative follow iris zoom and focus values Initial Top Screen Fol Screen MENU Fol 1 1 Note As long as the Fol screen is shown the display will not turn off automatically after 2 minutes if left idle To turn off the display press the Display swit...

Page 166: ...tl IS NON I Gain To 2 on the next page A 1 Shtl VTR RET Fr1P Fr1F Fr2P Fr2F Sped Shtl IS NON V VTR VTR RET Fr1P Fr1F Fr2P Fr2F Sped Shtl IS A 2 Fr1P VTR RET Fr1P Fr1F Fr2P Fr2F Sped Shtl IS NON R RET VTR RET Fr1P Fr1F Fr2P Fr2F Sped IS Shtl I Tq H H L Z M To 3 on the next page AM Norm Norm Reve Auto Manu Zoom Zoom Iris Escape Operation Jump to user 0 setting status Hold down both the Display switc...

Page 167: ...tate OFF OFF STD SwSetting M A Alt Alt Mom N R Normal Normal Reverse Preset Frame1 Zoom Zoom Focus Z F 1 Frame2 Zoom Zoom Focus Z F 2 ZSpeed 800 1 800 ZMovement Start 99 00 99 Stop 91 00 99 Iris Go Top I Gain Auto 50 01 99 Remote 90 01 99 Torque High High Low Comp OFF OFF ON Close OFF OFF ON Zoom Tracking OFF OFF ON Movement Start 99 00 99 Stop 91 00 99 End 99 00 99 CurveMode Seesaw 5 1 9 Demand 5...

Page 168: ...Memo ...

Page 169: ...Operation in Analog Mode 5 INFORMATION DISPLAY ...

Page 170: ...ccess the Top screen press the Display switch A total of 3 items can be configured on the Top screen in Analog mode The first screen displayed is referred to as the Initial Top screen Status of some items can be checked simply by accessing this screen MENU IG 50 Basic Initial Top Screen in Analog Mode ...

Page 171: ...oom switch AUX and MEMO switches are disabled To set auto iris gain adjustment use either display or trimmer operations Shuttle shot frame preset speed preset and zoom tracking are not available Switching from Basic to Analog Mode Mode User Basic Access ResetAll B Unlock Mode User Basic Access ResetAll B Unlock User Access Mode A Unlock Analog Trk OFF Shtl A 1 A 2 MENU IG 50 A Fr1P Fr1P IS STD IS ...

Page 172: ...gure below 1 MENU Basic IG 50 1 3 2 1 4 2 7 6 8 9 10 3 5 MENU Menu screen See 5 2 Configuration from the Menu Screen 1 4 2 7 6 8 9 10 3 5 IG Auto iris gain Adjust the auto iris gain value as needed See 5 1 3 Specifying Auto Iris Gain 1 4 2 3 5 7 6 8 Basic Switching to Basic Mode Switch to Basic mode as needed See 5 1 4 Switching to Basic Mode Initial Top Screen 1 Inside Items that show the current...

Page 173: ...value but corresponds to the value determined with the iris gain adjustment trimmer MENU IG 50 or IG 50 IG 51 MENU IG 50 Basic IG 50 MENU Basic IG 51 MENU Basic Note Do the following when adjusting gain while checking iris operation Confirm that the drive unit A M switch is set to Auto mode Set the camera iris mode to Auto Note As you look at the lens iris ring set it to the position of maximum ga...

Page 174: ...ed Switching from Analog to Basic Mode MENU IG 50 Basic MENU Basic IG 50 Trk OFF Shtl A 1 A 2 MENU IG 50 A Fr1P Fr1P IS STD IS STD Initial Top Screen in Analog Mode Initial Top Screen in Basic Mode MENU Basic Press The mode switches and the Initial Top screen in Basic mode is displayed Press Basic is highlighted 1 2 ...

Page 175: ...m the Menu screen From the Menu screen in Analog mode you can access a User screen Select MENU on the Top screen and press the Set key to access the User screen See the following figure There is no single Menu screen Instead screens accessed by selecting MENU and pressing the Set key are collectively referred to as the Menu screen ...

Page 176: ...peration in Analog Mode 5 2 1 User Screen Settings The following setting items can be configured on the User Screen Switching Modes Locking Functions Mode User Analog Access A Unlock User Screen in Analog Mode ...

Page 177: ...alog Access A Unlock Mode User Analog Access A Unlock Mode User Basic Access A Unlock Initial Top Screen User Screen Press The display switches to the User screen Press Mode is underlined The previous mode is highlighted 1 2 3 Press or Press left or right until you reach the desired mode Options D Basic Full Analog Save Settings Basic Mode Full Mode Analog Mode D Default value MENU User A or ...

Page 178: ...nctions are locked they are locked for all users Two display operations are available in Analog mode auto iris gain adjustment and user switching However you cannot switch users when functions are locked because this function is also locked Unlocking functions requires the password used to lock them Press The display switches to the User screen Press twice The previous or default value is highligh...

Page 179: ...ious page Characters supported in passwords Options D A B C D E F G H I J K L M N O P Q R S T U V W X Y Z a b c d e f g h i j k l m n o p q r s t u v w x y z 0 1 2 3 4 5 6 7 8 9 Max Digits 8 D Default value _ Space Options D Unlock Lock D Default value 2 Password DISPLAY 4 5 Note Passwords No master password is used on this model The password you enter each time to lock settings is the password us...

Page 180: ... the User screen Press twice The previous or default value is highlighted Enter the password and press Entering Passwords Press up down to find characters and left right to move the cursor or make corrections Be careful not to press the Set key until you are finished entering the password Press Press and then The settings are now unlocked Options D Unlock Lock D Default value 2 Password DISPLAY In...

Page 181: ...og Mode 5 3 List of Settings Default Value Options Page Top MENU To 1 on the next page IG 50 01 99 Basic Basic Escape Operation Jump to user 0 setting status Hold down both the Display switch and Set key for at least 2 seconds ...

Page 182: ...80 5 Operation in Analog Mode Default Value Options Page MENU User 1 Mode Basic Basic Analog Full Access Unlock Unlock Lock Go Top Set key operation Right key operation Up key operation Left key operation ...

Page 183: ...7 AUX E32 E89 BASIC MODE E22 E23 CAMERA SERIAL E73 E161 ENCODER E64 E160 FOLLOW E75 E163 FRAME PRESET E56 E57 E135 E136 FULL MODE E22 E79 IRIS GAIN E60 E141 IS E49 E128 RET E95 E125 VTR E93 E124 ZOOM CURVE E36 E97 ZOOM TRACK E31 E86 ...

Page 184: ......

Page 185: ...89 号 金宝大厦15 层 邮编 100005 电话 86 0 10 8513 9999 传真 86 0 10 8513 9128 Korea 캐논코리아 컨슈머 이미징 주 제품마케팅팀 프로솔루션파트 서울특별시 강남구 테헤란로 607 삼성동 5층 06173 대표전화 82 2 2191 8500 팩스 82 2 2191 8576 South Southeast Asia Canon Singapore Pte Ltd REG ICP Sales Marketing Div 1 Fusionopolis Place 15 10 Galaxis Singapore 138522 65 6799 8888 日本 キヤノンマーケティ ングジャパン株式会社 イメージングソリューション技術部 108 8011 東京都港区港南2 16 6 03 3740 3305 03 3740 3307...

Page 186: ...お断りなく変更することがあります CANON INC 30 2 Shimomaruko 3 chome Ohta ku Tokyo 146 8501 Japan Subject to change without notice 进口商 佳能 中国 有限公司 地址 100005 北京市东城区金宝街 89 号 金宝大厦 15 层 因产品改进 规格或外观可能有所变更 敬请留意 初版 2016 8 1 原产地 日本 Pub No B IM 20246 0 1016S 2016 08 CANON INC ...

Reviews:

Related manuals for HJ40E